Machine Design
Yangtshel and I are on design duty and fabrication duty 😨
Final Poster and Video

Introduction
It’s machine design week!!! 😨 We started off by discussing potential ideas for a machine, and we agreed on creating a 3D scanner, since our lab doesn’t have one anymore. We had a group discussion and finally came up with this idea/sketch with the help of our local instructor. We also divided our roles.
Concept Mapping

The general idea is a rotating platform (to place your object), and an arm that holds your scanner, and can move the scanner up and down for better results.
My Contributions
For these 2 weeks, I was tasked with:
- Research
Doing research for online resources that could help us along the way, and finding new ideas to improve on our design.
- Design
My main job was to design the physical components of the machine, including the structure of the machine, and the components.
- System integration
Planning out how the machine was going to work, and then making according adjustments.
- Poster Design
Designing the poster for the machine, and collecting information and finding the best way to display it all.
Now, let’s get into everything !!!
Researching
References
Before the actual design process, I did some research on different 3D scanners that were made in the past, and I found quite a few interesting ones. However, one that really stuck out (and one that we referred to religiously) was by Mr. Quentin Bolsée 🙏
Pulley System
After some trial and error, we decided to use a pulley system to make it easier on our motor, and for general efficiency. Since I had to design the pulley head, I decided to do some research on the pulley and how to implement it in our design.
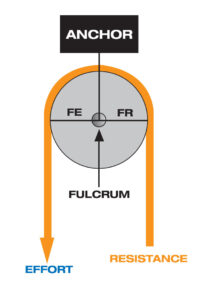
A pulley works by using a wheel and a rope or cable to change the direction of a force. This mechanism makes it easier to lift heavy objects by distributing the weight and reducing the effort needed. When you pull on one end of the rope, the wheel turns and redirects the force, allowing you to lift a heavy object with less effort due to the mechanical advantage created by the pulley system.
3D Scanners
The team decided to use a 3D scanning application that was already developed in the past, because we didn’t have the time to create our own. So, I decided to look into different softwares and see which one would be the safest choice.
1. Qlone

“Qlone offers an easy-to-use interface for 3D scanning objects. It uses your phone’s camera and allows for AR (augmented reality) integration to help guide the scanning process.” - Bing.com
Download
- iOS
-
- Open the App Store on your iPhone or iPad.
-
- Search for “Qlone 3D Scanner”.
-
- Tap the download button to install the app.
- Android
-
- Open the Google Play Store on your Android device.
-
- Search for “Qlone 3D Scanner”.
-
- Tap the install button to download the app.
2. Scandy Pro

Scandy Pro is available for iOS devices, particularly those with a TrueDepth camera (like newer iPhones and iPads). Scandy Pro provides high-quality 3D scans and offers options for exporting the scans in various 3D file formats. However, note that this app isn’t available on Android (as of this documentation date).
Download
- iOS
-
- Open the App Store on your iPhone or iPad (make sure your device supports TrueDepth cameras, like iPhone X and newer models).
-
- Search for “Scandy Pro 3D Scanner”.
-
- Tap the download button to install the app.
Polycam
Finally, we decided to stick to the application that we used in the 3D scanning week: Polycam.
Polycam is a popular 3D scanning app that utilizes LiDAR technology available on newer iPhone and iPad models, as well as standard camera-based photogrammetry for non-LiDAR devices. - ChatGPT
Key Features
LiDAR Scanning - For devices equipped with LiDAR (such as iPhone 12 Pro and newer), Polycam can create highly accurate 3D models by capturing depth information.
Photogrammetry - For devices without LiDAR, Polycam can still create 3D models by taking multiple photos of an object and using photogrammetry to stitch them together.
High-Resolution Textures - Polycam can capture detailed textures, resulting in realistic 3D models.
Export Options - The app supports exporting models in various formats such as OBJ, STL, and PLY, making it suitable for 3D printing, virtual reality, and other applications.
Editing Tools - Polycam includes tools for editing and refining scans directly within the app. AR View: View your 3D models in augmented reality to see how they would look in the real world.
Download
- iOS
-
- Open the App Store on your iPhone or iPad.
-
- Search for “Polycam - LiDAR & 3D Scanner”.
-
- Tap the download button to install the app.
-
Android
-
- Open the Google Play Store on your Android device.
-
- Search for “Polycam - 3D Scanner & LiDAR”.
-
- Tap the install button to download the app.
Pricing
Polycam offers both free and premium plans:
Free Version - Limited features and export options.
Premium Subscription - Provides access to advanced features, higher resolution scans, unlimited exports, and more. The pricing for the premium subscription can vary, so it’s best to check the app store for the most current rates.
At the end of the day, Polycam is a really good tool for anyone interested in 3D scanning, offering a lot of features whether or not your device has LiDAR technology or not, and I’d definitely recommend it to anyone that’s looking to scan anything in the future.
3D Design
This part of the documentation is about the 3D design aspects of the project !!!
Fusion360
Fusion360 is a comprehensive CAD/CAM/CAE software developed by Autodesk, suitable for mechanical design and engineering projects. This is the software I used for most of the 3D designing.
Getting Started If you don’t already have an account, you can sign up at this link:
(Once your account is set up, click on “Create” and then select the appropriate workspace for your project.)
If you are unable to download the software (like me at first), what I did was use the browser version.
(Just press LAUNCH and get started)
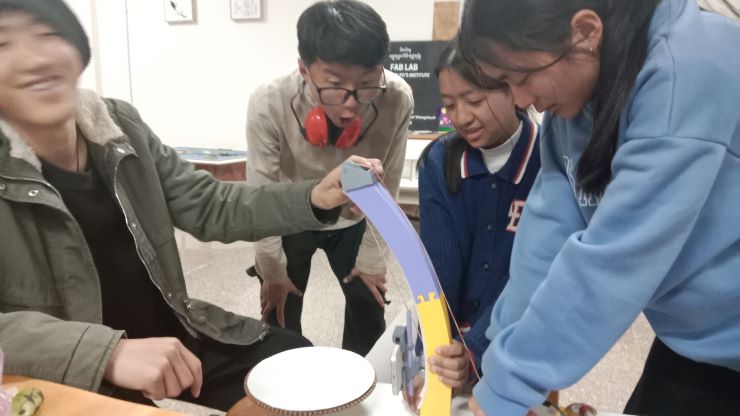
The Scan Arm
The team needed an arm to start off, so after some research, we found the best possible curve, and I was able to turn this into a 3D design with a slot in the middle for a cart.
Initially, I wanted it to be made using the CNC machine, so I sent the files to Yangtshel, and he got to work !!!
After assembly, we realized that it was a bit too heavy, and definitely not smooth enough to use for a cart, so we decided on 3D printing the same design.
The arm is one of the most fundamental parts of the machine, it holds the scanner and allows it to get multiple angles of the object. That’s why we fabricated it first.
Pulley Head
Like I menioned earlier, we decided to use a pulley system to move our scanner (thanks to the advice of our local instructor), so I started working on that using the dimensions of the arm, and a 16mm bearing as a reference.
After doing my research, I concluded that a pulley head would make the machine move much more efficiently, and relieve a bit of the stress on the motor.
Cart
While Yangtshel was busy 3D printing, I fabricated the cart that would move up and down the arm, and consequently move the scanner too.
The protrusions are for 16mm bearings, and an included slot to attach to the scanner. The four protrusions had bearings connected to them so that the cart could move up and down. This will attach to the holder that Yangtshel made.
System Integration
For our scanning machine, we are trying to control 2 motors. The first motor will be used to rotate the platform and the second second motor which will be placed to move the scanning platform of the object vertically.
For this part, all of us worked together, so I don’t have that much individual stuff to talk about.
### Poster Design
#### Canva
I decided to try out Canva this week !!!

Canva is a user-friendly graphic design platform that allows users to create a wide range of visuals, from social media graphics to presentations and more, using intuitive tools and templates.
Signing up
-
Go to the Canva website.
-
Click on the “Sign up” button located at the top right corner of the homepage.
-
You can sign up using your Google account, Facebook account, Apple ID (if using iOS), or by entering your email address and creating a password.
-
Follow the prompts to complete the registration process. If signing up with email, you’ll need to verify your email address.
-
Click on
Create a designin the top right, and start !!!
You can check out the poster I made at the top of the page. If you’re unfamiliar with Canva and how to use it, I found this tutorial very useful !!!
Reflection
The past 2 weeks have been incredibly hectic. We had our reviews on the first week, so none of us could make decent progress, however, we pulled through. A lot of collaboration and learning was done this week, and I’m proud of everyone on the team, and thankful to our instructor for all of his help. I didn’t even know the TinyG existed, but now I’m quite excited to programme it and see what other projects we can make with it in the future !!!
-wozer