Project Management
This is a good subject for me because I think I could be called the ultimate Yak Shaver (explained well in this Malcom in the Middle fragment ), so let's say there is some room for improvement. In general, the spiral development and parallel development appealed to me. However, I noticed these statements were not backed up with links and when I researched them myself, the Wikipedia page mentioned that this model is prone to be misused.
Anyway, last Thursday, Henk my instructor was already scared that I'm not going to make it and recommended spiral development and actually, there is no reason why I couldn't organize my tasks as such. In addition, Neil mentioned that it is often better to work on tasks in parallel, so let's do that as well.
Spiral development can be applied on a per week basis, but also for the whole of Fab Academy. Let's first define the tasks for this week.
Tasks
To complete this week, I need to complete the following tasks:
- Sign the student agreement
- Build a personal website
- Write the "About me" page
- Document your progress
- Make a sketch of the final project
- Work through a Git tutorial
In addition, I would like to work on the following things:
- Write a website generator for Scribble
- Document the bootcamp
In my mind, this is not too difficult to complete, but maybe the website generator causes problems, especially in combination with Gitlab's CI/CD. To explain the website generator: In my research we use the Domain-Specific Language (DSL) Scribble to specify an assembly manual. I want to use a highly similar system for Fab Academy. This should not be too difficult, since my personal website already uses that.
The idea for these tasks is to run them in parallel, complete tasks bit by bit without waiting for one task to complete.
Spiral Development
Let's define each of these tasks in various spiral iterations. Signing the student agreement is easy and can be done within one minute because of my knowledge of Git, so this has only one iteration.
Building a website can be done in many iterations. Firstly, in iteration 1 I could simply use the existing template and fill the pages with HTML content. Since I'm familiar with HTML, this is easy to do, but I prefer not to write directly in HTML, so this is not a sustainable choice.
A second iteration could be adding a custom CSS template to this HTML. A third iteration is using my personal website as a template to create a website with a similar structure and style. A fourth iteration is writing a custom website generator specifically for Scribble.
Writing about me can be done in various iterations. I could simply write a short summary or I could make it more extensive in each further iteration.
Documenting my progress is what I'm doing right now. Different iterations could also be how extensive the documentation is.
For making a sketch of the final project I have the following iterations in mind: first a simple sketch and in a subsequent iteration, sketch the motivation of it. A third iteration could be to optimize the scans of the hand-drawn sketches.
Working through a Git tutorial should be easy since I use Git on a daily basis. It is also not really required for me, but I agreeed with Henk that I work on my own Git tutorial that targets hardware developers. The various iterations are how extensive it can be: Iteration 1, solve some of the long-standing issues, iteration 2, add screenshots for the output commands, iteration 3, add a cheatsheet.
Reflections
So, although I had this set up in mind last Thursday and it is now Tuesday, so let's analyze what has happened and how I did. On Thursday, my focus was on the website style: I wanted to use a style similar to the assembly manuals that I generate with my research software. In a sense, I immediately skipped the first iteration on building a website, because I don't want to work in HTML. I completed the style of the website on Thursday.
The third iteration, using my personal website first is what I should have done but didn't do: I wanted to do things slightly differently (but better of course), and that required a custom website generator. So, most of my attention has been directed to developing this software. Today on Tuesday, it is almost done but not quite in a state where I can actually use it. Although I write this text in Scribble, I most likely have to create the HTML manually and insert it into the style template that I already completed. For one time, it is not so bad, it also allows me to understand the requirements of the website better.
In the meantime I made a sketch of the final project, but I haven't written about it yet. I also completed the Git tutorial, resolving various issues, and most importantly adding screenshots of the expected output. This was a longstanding issue and makes the tutorial much better. I haven't added a cheatsheet which would have been the final iteration.
Documenting the process depends on what you do, so it is logical that I do this last. The documentation up until now is quite extensive.
Building the website
Theming
The first focus was on theming: I wanted to have a theme that somehow matches the assembly manuals that I generate and is responsive. I'm familiar with Bootstrap , so it is logical to use that. I know that I want to have a simple theme with a white background for incorporating images easily (if you use a flash with a white background, then the image is captured naturally within the page).
I adapted the main theme by making use of the examples:
I then focused on creating pages that matched the documentation required for Fab Academy, for example for a week, for the About Me page and for the Final Project page.
I wanted to further style the template with my own font using D-DIN-PRO (an
open font) which is often used in Germany and is similar to DIN-PRO (a more
closed font) that Daniele's manuals use. An interesting CSS quirk that I
wasn't aware of: The property
font-weight
has different meanings in
different contexts. In an
@font-face
body, it has the meaning of
declaring
of what weight this specific font-face is, while in the
body of an HTML tag or CSS class such as
body
or
.text-muted
,
the property has the meaning of
selecting
the font weight of the
current font.
@font-face {
  font-family: DIN;
  src: url(../fonts/D-DIN-PRO-400-Regular.ttf);
  font-weight: 400;
}

@font-face {
  font-family: DIN;
  src: url(../fonts/D-DIN-PRO-500-Medium.ttf);
  font-weight: 500;
}

body {
  font-family: DIN, Roboto, sans-serif;
  font-weight: 500;
}

.text-muted {
  font-weight: 400;
}
Licensing
I wanted to release my template for use by others (find it here ), but it was difficult to figure out what license the template was. I wanted to follow the REUSE specification, but this requires you to be very explicit about the license of each file.
It turned out that the CSS and Javascript are MIT licensed, but the examples that I used are part of the documentation and are therefore CC-BY-3.0 licensed. This allows me to relicense the template to CC-BY-SA-4.0.
Website Generator
The website generator is not finished but almost working. It is difficult to estimate how much longer it will take because there are all kinds of corner cases that pop up. Now that I have this text in Scribble and will transform it manually to HTML will give me many different cases to understand how to deal with corner cases.
Now that I see how much text this is, it may be worth the effort to fix the website generator after all...
In my
personal
repository
in the directory
src
you find the Scribble files that at
some point will be the source of the HTML in
public
. The website
makes use of our
Scribble
parser
that I modified slightly to reduce ambiguity in the Abstract Syntax
Tree. There is a
separate library
that transforms the AST into something that can be further processed to
generate HTML or a PDF. The program that transforms Scribble into HTML is
located
here
and makes use of the above two libraries.
As soon as the website generator is ready, the idea is to create a custom Docker image for Gitlab's CI/CD such that the HTML is generated automatically on each push.
Reflections
I mentioned this before, but it would have been much easier to adapt the existing website that I already have, than starting from scratch with a slightly different set up. I think I took the current approach because I assumed that the code would be almost exactly the same. However, I changed to a better internal representation of the Scribble text and this changed many corner cases.
Working through a Git tutorial
The INTERFACER Project in which I'm employed is all about digital infrastructure for Open Source Hardware. A critical component of that is Git, but typically hardware designers are not familiar with Git. I decided to write my own primer on Git for that audience trying to incorporate some basic Computer Science knowledge to make this audience aware of what a binary and a text file are, for example.
The primer lists various command line commands that users have to execute. However, the primer did not show any of the expected output, so the users typically wouldn't know if they had executed the command right. So, a major thing that I wanted to improve is adding the output of the terminal. Concretely, I improved the following things:
- added screenshots of the output of the commands,
- used gender-neutral names,
-
added clarifications on
$,#, and~ - updated the text on collaboration
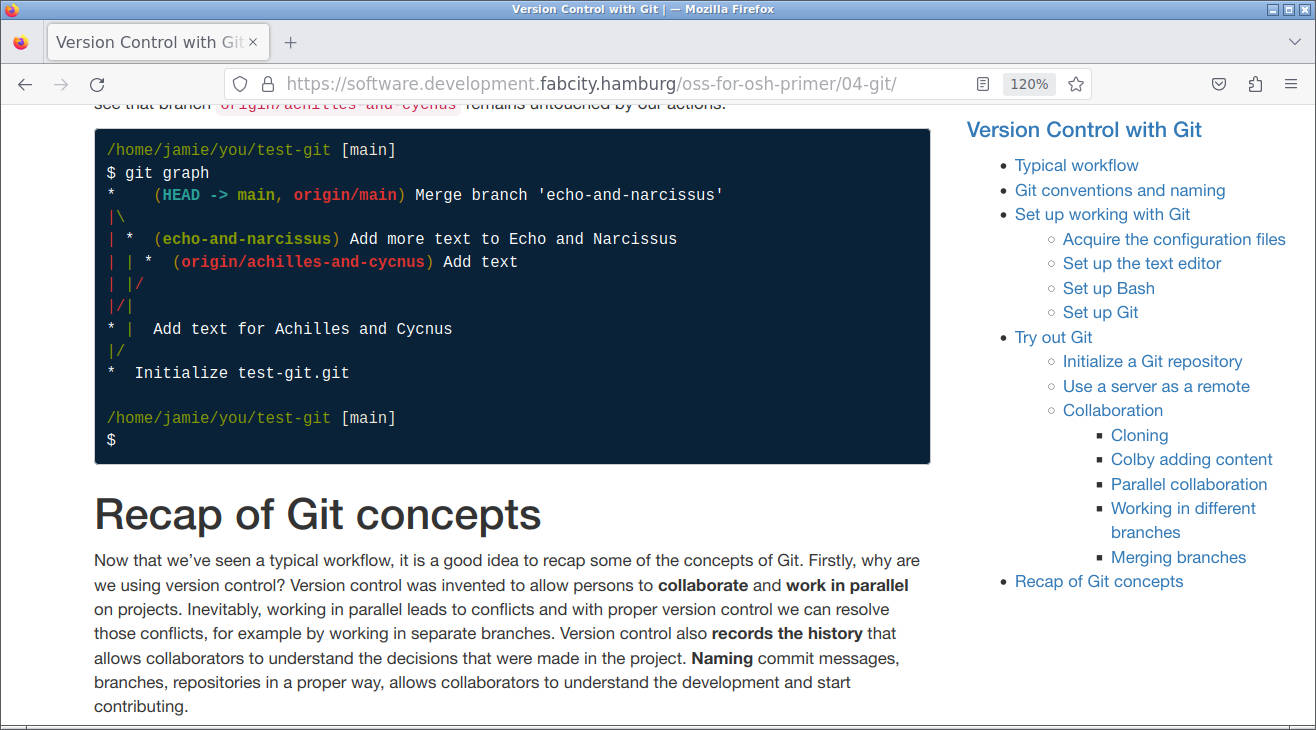
A screenshot of the primer where you can see the handy
git graph
command that I can recommend to anyone and is part of and explained in the
primer:
Signing the student agreement
This has been done, you can find it here . At a later stage, I will most likely incorporate into Scribble and generate a page that reflects the content.
Sketch of the Final Project
Introduction
I have many, many ideas for a Final Project, but last Wednesday we discussed it with Henk and my fellow students and then it became clear what the most promising one was. Let's first list my ideas: Chip lithography (undoable), a device along your spine that gives you discomfort when having a bad posture, a small robot mouse for my cat that does collision avoidance but is nonetheless fast, and I most likely have already forgotten a couple of other ones.
The project that is most promising is most likely a device to warm up your eye lids. This has to do with a condition that I have. In some periods of the year, especially when I have a cold, I get sticky eyelids (they stick together after a night's sleep for example) and my eyes are prone to tearing.
Current Situation and Motivation
The advice from the ophthalmologist is to use warm compresses which can improve the situation. After having tried that to no avail, I read a paper that explained to me why warm compresses should work and more specifically under which conditions it should work.
An eyelid has so-called meibomiam glands that produce an oily substance which prevents your eye tear film to evaporate. I have meibomiam gland dysfunction which means that the oily substance has a more solid form. This results in my eye tear film being not oily enough causing evaporation that my eyes compensate with tearing.
The cause of meibomiam gland dysfunction is that the melting point of the oily substance is higher than normal, causing it to be more solid. Applying heat makes it flow again. The reasons for why the melting point is higher for some people are not well known but age is a factor.
Unfortunately, I can't trace back the paper that I read years ago, but the conditions for improvement were very clear. Firstly, the applied heat should be very high, so high that you can barely take it. Secondly, they tested the method on subjects, and twice a day 5 minutes improves the situation. Twice a day 10 minutes is better, twice a day 15 minutes is even better, and twice a day 20 minutes has no measurable effect. So, the conclusion is that applying heat twice a day for 15 minutes is ideal.
The advice that I received, applying a warm compress is in principle a good suggestion, but the details matter much: What is warm and how long does a warm compress stay warm?
I resolved my issue by adopting a technique, sketched below. I apply this technique twice a day for 15 minutes over the course of two weeks and most of the time, my tearing eyes have resolved itself. I typically need to do this after I've had a cold.
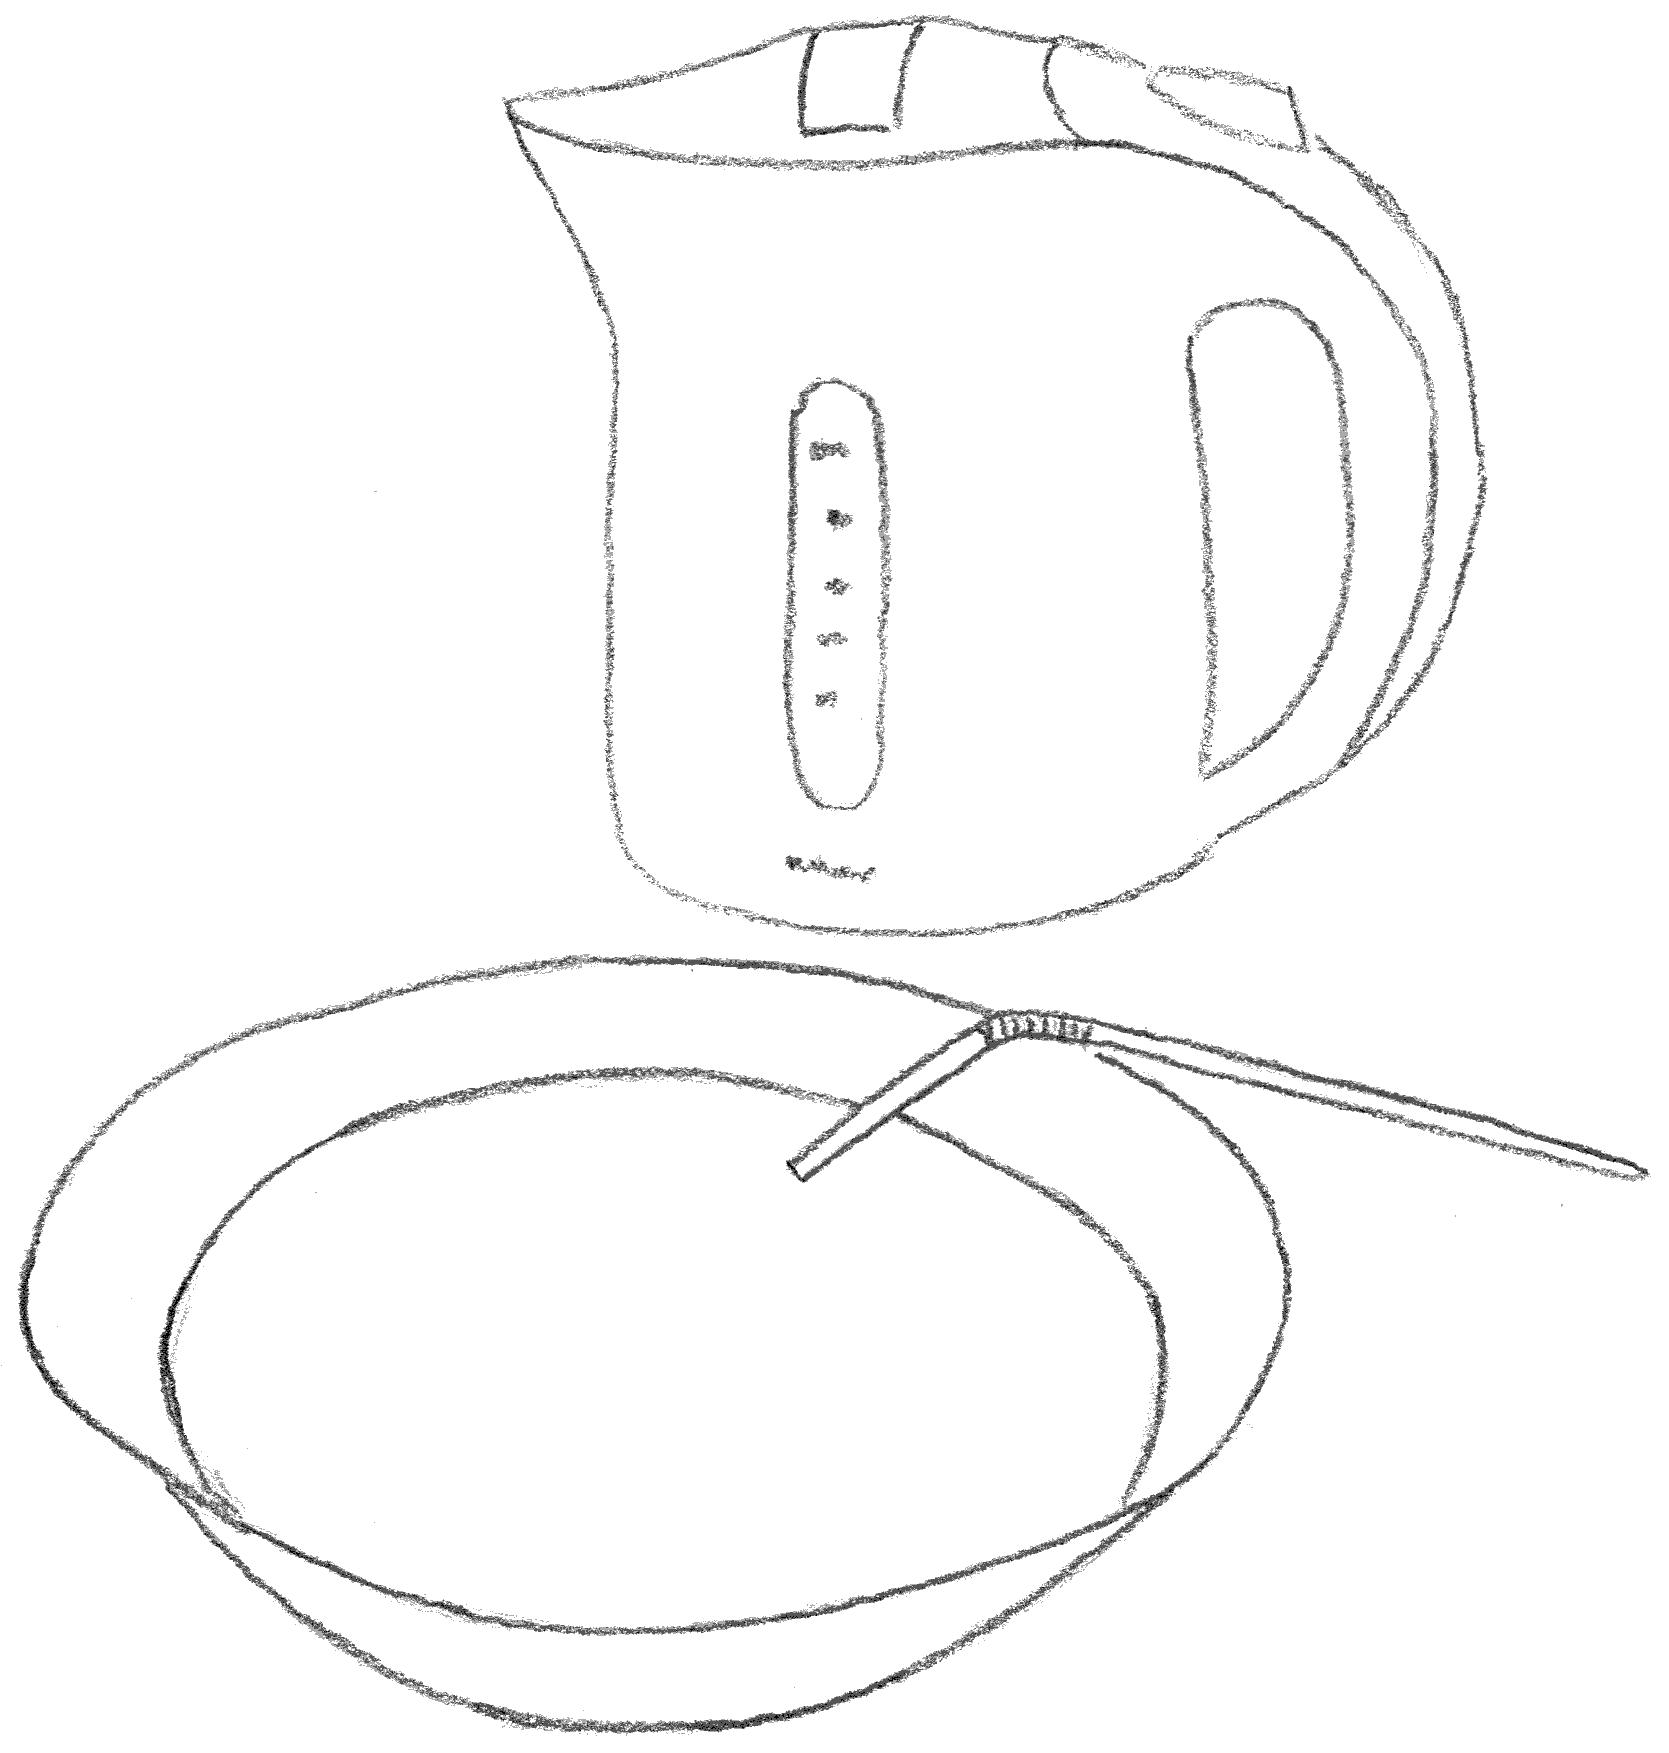
So, the technique works, but it annoying, boring and borderline dangerous: In a water boiler, I bring water to a boil. In the meantime I prepare a bowl with water so hot that I can barely resist it. I set a timer to 15 minutes and start a podcast on my computer. I submerge my face in the water in the bowl and use a straw to breathe. I use my fingers to stir the water gently because if I don't, I get used to the temperature very soon. Apparently, the water around my eye lids cools; in any case, stirring makes it feel warmer for longer. Every once in a while, I pour some new of the boiled water to bring the temperature up to level. This is a very imprecise action and sometimes, I have to pour some new or wait a bit until the water reached a level that I can bare. Needless to say, there is lots of room to improve on this.
Project Idea
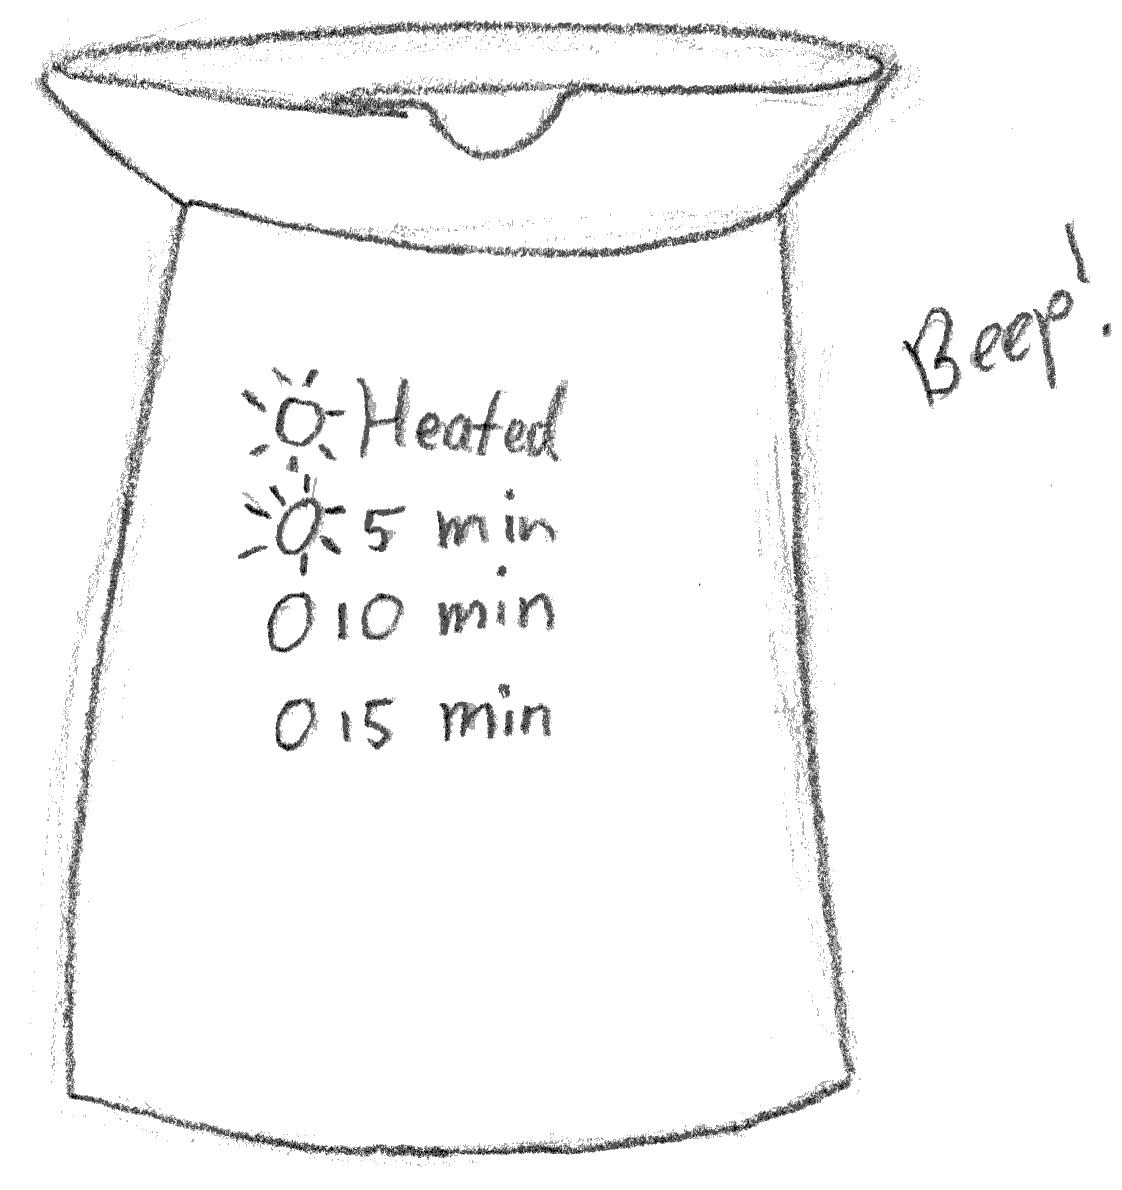
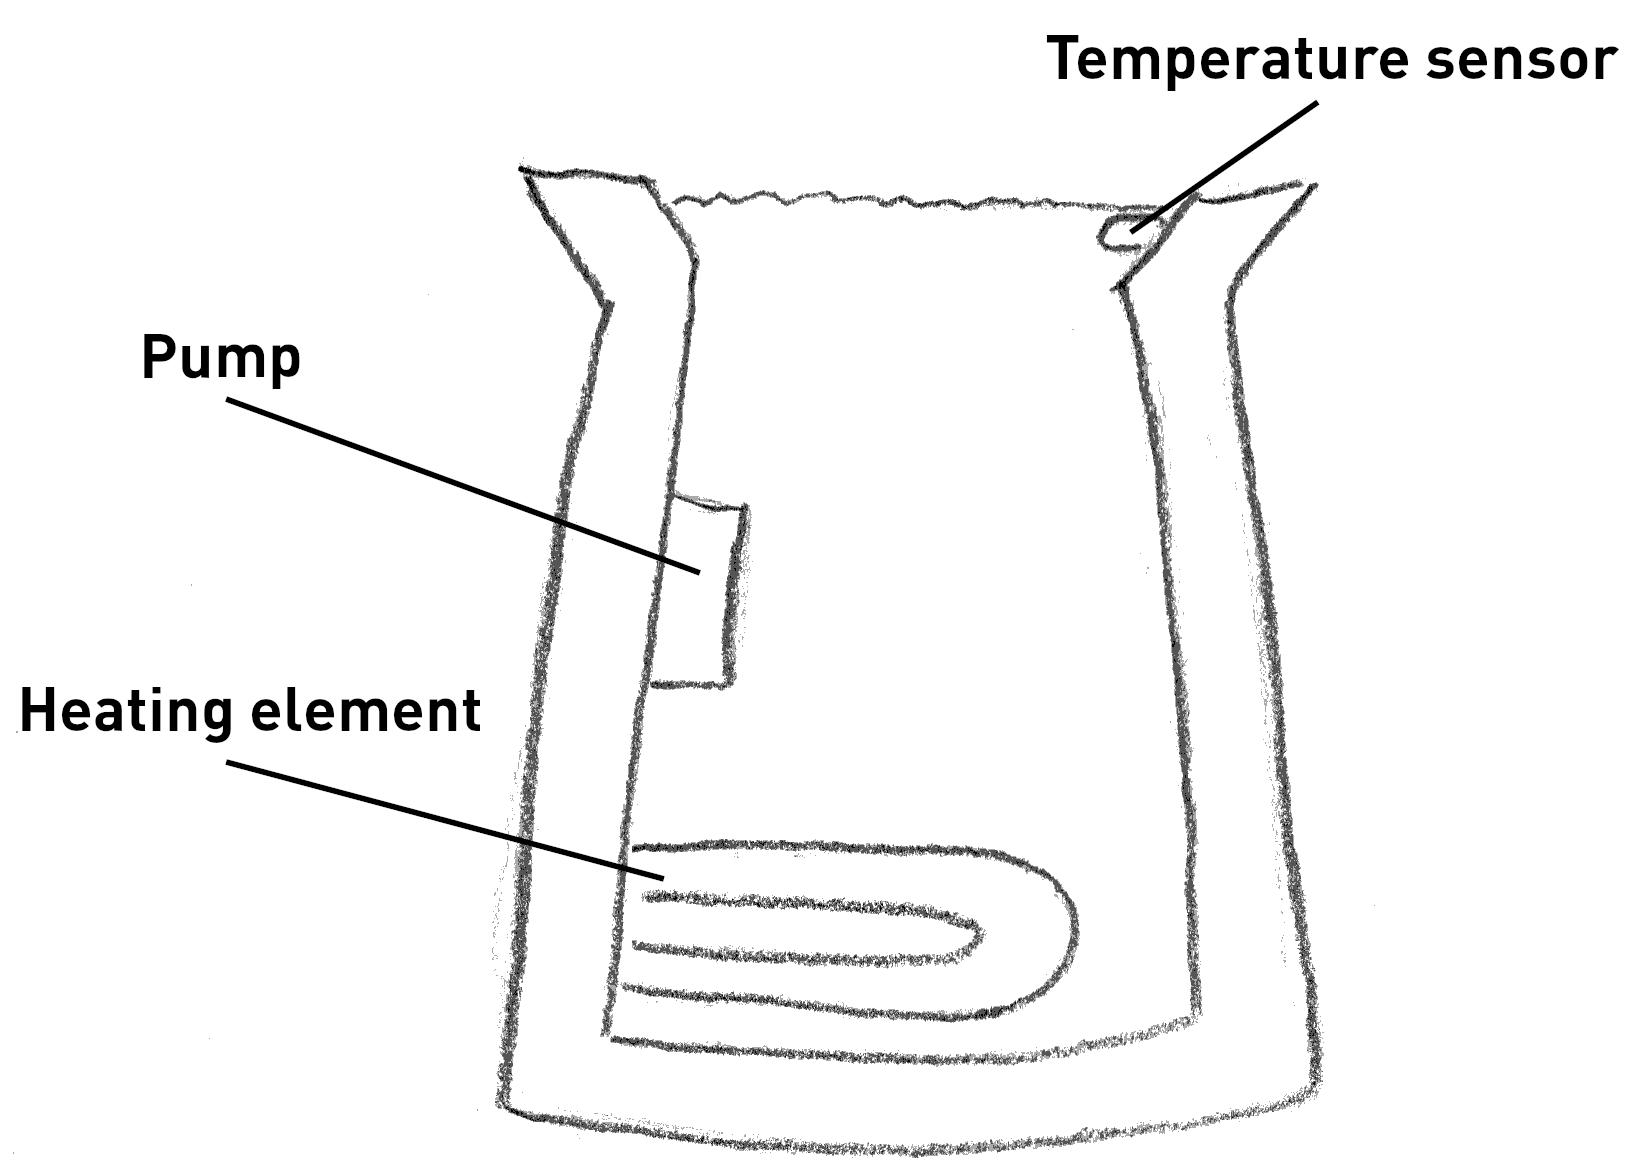
My project idea is something that looks like a water boiler but on top there is a cut-out in which my face fits. It has indicators for reaching the right temperature and notifies the user with a beep when the water has reached the right temperature or when 5, 10, and 15 minutes have passed:
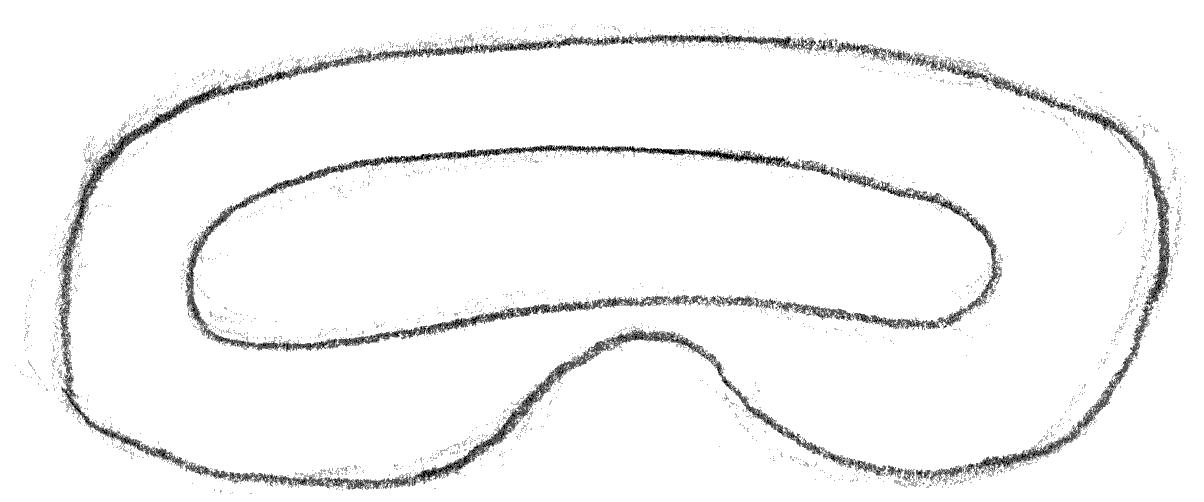
The top view shows an impression of a cut-out that should perfectly fit my face but leaves my nose free to breathe:
There is a temperature sensor that drives a heating element and there is a small pump that arranges for a constant flow of water as can be seen in this cross section:
On turning on the device, it heats the water and makes it known that the water has reached the right temperature. The device has two buttons to increase or decrease the temperature:
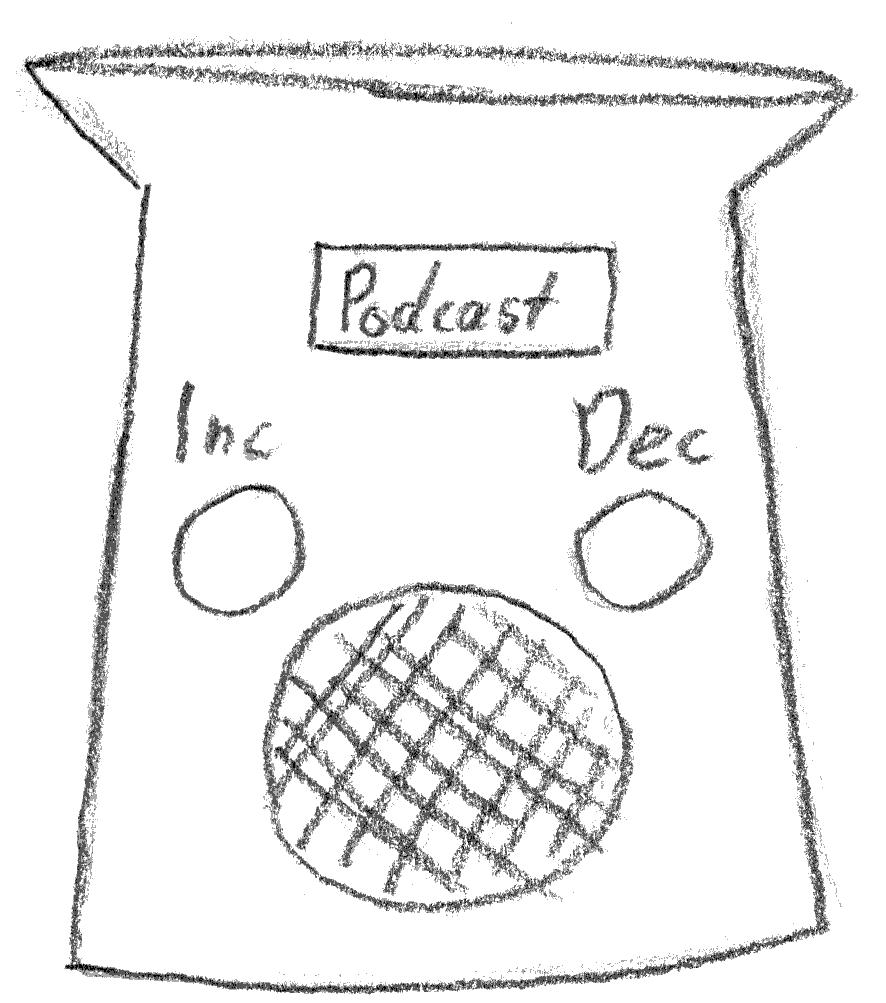
Additionally, it is able to play my favorite podcasts or it may produce relaxing or meditative music in order to make what is now a chore into a nice relaxing moment of the day.
Relation to the Fab Academy Program
I believe that this project is able to use many of the techniques in the Fab Academy program, making it also applicable to spiral development. Potential applicable techniques are:
- CAD, for the design of the various components
- Cutting, for the housing
- Embedded Programming, for the podcasts, and controlling the temperature and flow
- 3D Scanning and Printing, scanning my face perhaps, printing parts for the housing?
- Machining, for the housing perhaps?
- Electronics Production, for the boards
- Molding and Casting, for making something that fits my face well
- Output Devices, heating element on a different circuit with higher voltage
- Input Devices, measuring the flow of water, temperature, user input
- Networking and Communication, several boards that interact, the podcast client
- Interface and Application Programming, the podcast client
Potential Issues
The most likely issue has probably to do with interacting with water because electronics and water don't match very well. It will be necessary to seal off all the electronics from the water. However, there need to sensors and actuators in the water as well, so this may be quite a challenge.
Another issue is the heating element that needs much more power than 5V can deliver , so there needs to be another circuit that is switched on somehow by the electronics that regulate the temperature.
Writing a podcast client may also turn out to be quite challenging. There needs to be a speaker and a headphones connection would be nice as well.
Project Management
I believe this project suits itself very well to spiral development. We could start from my current situation and try to improve on that step by step. For example, making a bowl where I can turn on a heating element with a switch now and then would already be an improvement. In a next iteration, we could add a pump, and afterwards, we could add a temperature sensor for the water. We could then add a dedicated housing and finally a piece that fits my face perfectly so I don't need straws to breathe.
Update: Building the Website
To satisfy all the Fab Academy requirements, I would have to add a couple of more things. Firstly, I made a checklist for the Fab Academy tasks and my personal tasks for this week. You can find it in the final section on this page. I still have to describe a bit better how I set up the Git repository and are adding files to it. Finally, now that my software is more mature, I can explain better how I create this website.
Using the Git repository for Fab Academy
As I said above, I use Git daily, so this is not a difficult task for me. Since I gave a brief presentation in last year's recitation , I already had an account on the Fab Academy Git server and apparently, I had already set up my SSH keys at that time. I don't remember I did, but this is standard practice for me, so I'm sure it was one of the first things I did when I got access.
I write the pages of the website in Scribble which are in the directory
src
. I then run my software to create the HTML locally and this
will put the HTML files in
public
. I typically work on branches,
for example a branch for
week-01
and then I will merge the branch
(without forwarding) to branch
main
. I then simply push the files.
Both the source directory and
public
directory will have copies of
the images. However, this is not a problem in Git because the blobs for
each image will be stored only once.
From Scribble to HTML
Now that we are a couple of weeks into Fab Academy and my software is more mature, I can describe how I generate a web page from Scribble. Since each week requires documentation, let me describe the process for a week. During the explanations from Henk, I will take many pictures with two cameras, one for natural light and one for off-camera flashes or strobes. See the Strobist Blog to get an idea how I use flashes. I take many more pictures than will end up on the website.
For documenting my work, I basically have two options: 1) Use the images as a basis for my documentation and add text to it or 2) write text as a documentation and add images to that. I prefer the latter approach and I set up my software to support this. Below I will show a piece of Scribble file from this very page and then you can see how it gets rendered.
I will create a file "scribble.scrbl" with a selection of the Scribble I'm writing right now. I will include that into the page and then you can see how it gets rendered in HTML. Let's also assume that I want to add a picture later, for example to explain the concept of how to use pictures in my software. Suppose I want the image "explain-concept-images.jpg" to show in HTML but I don't have that image yet because I still have to take it. The website will show then a placeholder until I put the image "explaining-concept-images.jpg" in a dedicated folder that my software will scan for images.
So, let's get to it: I will include the Scribble code for this part here:
  @subsection["From Scribble to HTML"]{
    Now that we are a couple of weeks into Fab Academy and my software is more
    mature, I can describe how I generate a web page from Scribble.  Since each
    week requires documentation, let me describe the process for a week.
    During the explanations from Henk, I will take many pictures with two
    cameras, one for natural light and one for off-camera flashes or strobes.
    See the @link["https://strobist.blogspot.com/"]{Strobist Blog} to get an
    idea how I use flashes.  I take many more pictures than will end up on the
    website.

    For documenting my work, I basically have two options: 1) Use the images as
    a basis for my documentation and add text to it or 2) write text as a
    documentation and add images to that.  I prefer the latter approach and I
    set up my software to support this.  Below I will show a piece of Scribble
    file from this very page and then you can see how it gets rendered.

    I will create a file "scribble.scrbl" with a selection of the Scribble I'm
    writing right now.  I will include that into the page and then you can see
    how it gets rendered in HTML.  Let's also assume that I want to add a
    picture later, for example to explain the concept of how to use pictures in
    my software.  Suppose I want the image "explain-concept-images.jpg" to
    show in HTML but I don't have that image yet because I still have to take
    it.  The website will show then a placeholder until I put the image
    "explaining-concept-images.jpg" in a dedicated folder that my software will
    scan for images.

    So, let's get to it: I will include the Scribble code for this part here:

    @codefile{scribble}

    I will then add the image to explain the concept of images.  Since I won't
    have the image in my designated image directory, it is not included, but a
    placeholder is shown that tells me that my software is waiting for this
    image:

    @img{explain-concept-images} @; this will only be a placeholder
  }
I will then add the image to explain the concept of images. Since I won't have the image in my designated image directory, it is not included, but a placeholder is shown that tells me that my software is waiting for this image:
(This part is not part of the Scribble part above.) Notice that the
extension is not important, my software will figure out whether it is a
jpg
or
scrbl
file. The software will also automatically copy
the image from the designated image directory to the
src/img
directory in the repository and to the
public/img
directory. When
an image is updated in the designated image directory, the updates will
automatically be incorporated in the two repository directories.
Processing Images
I have a designated directory
fabacademy-images
that is outside of
version control. This directory can contain large files. It has
directories
nikon
and
canon
where I upload the images from my
two cameras per week.
I do the selection already on the camera and in my notebook I sometimes
make a note which image belongs to which explanation. I upload the images
that I selected to a directory "week-01" for example. I then open all
these images in GIMP with command
gimp *.JPG
and there I will do a
quick edit of each image. I typically correct the lighting with Curves
(Colors
➜
Curves), reduce the saturation if the image is underexposed
(Colors
➜
Saturation) and I typically crop the image. I store the images
as
.xcf
file, GIMP's native file format that leads to large files.
From there I export the GIMP images to JPGs (with a lower-case extension
".jpg"
with the following script
convert-gimp *.xcf
:
#!/bin/bash

gimp -n -i -b - <<EOF
(let* ( (file's (cadr (file-glob "*.xcf" 1))) (filename "") (image 0) (layer 0) )
  (while (pair? file's)
    (set! image (car (gimp-file-load RUN-NONINTERACTIVE (car file's) (car file's))))
    (set! layer (car (gimp-image-merge-visible-layers image CLIP-TO-IMAGE)))
    (set! filename (string-append (substring (car file's) 0 (- (string-length (car file's)) 4)) ".jpg"))
    (file-jpeg-save RUN-NONINTERACTIVE image layer filename filename 0.75 0.0 1 1 "" 3 1 0 0)
    (gimp-image-delete image)
    (set! file's (cdr file's))
    )
  (gimp-quit 0)
  )
EOF
I also run the following script to resize them (
compress *.jpg
):
#!/bin/bash

mogrify -geometry "1024>" -quality 70 $*
I then copy all the files to
fabacademy-images/week-01
where my
software will find the images to incorporate them into the website.
The files from the camera are typically named "DSCF7034.JPG" and in my
Scribble file I only have to add
@img{7034}
for example and my
software will find the image automatically.
Tasks
Fab Academy
- Plan and sketch a potential final project.
- Describe the final project.
- Describe who will use it.
- Work through a Git tutorial.
- Build a personal website.
- Describe how you build the website.
- Describe yourself on the website.
- Describe the final project.
- Document steps for setting up Git repository and adding files to it.
- Signed and uploaded the Student Agreement.
Personal
- Improve website generation.
- Add syntax highlighting for code.
- Generate the website in CI.
- Improve the final project page.