3D Scanning & Printing
Week 5 Assignement summary
This week I have learned 3D scanning along with 3D printing. I have also learned how to use 3D Printers and scanners also.here I am documenting all my learning this week.
Conventional Manufacturing Process.
1) Subtractive Manufacturing: - In this process final object will be produced by subtracting material from the initial object. Example Lathe Machine, CNC Machine, Laser cutter, etc.
2) Formative Manufacturing: - In this process final object will be produced by changing the shape of an initial object. Example Sheet Metal Working, Bending, drawing, etc.
3D Printing/ Additive Manufacturing/ Rapid Prototyping
• 3D Printing is the process of making solid objects from a digital file.
• The object is created by depositing material in a layer-by-layer manner.
• A machine named a 3D Printer is used to make this happen.
• Materials like Polymer, resin, wood, metals, and ceramic are generally used.
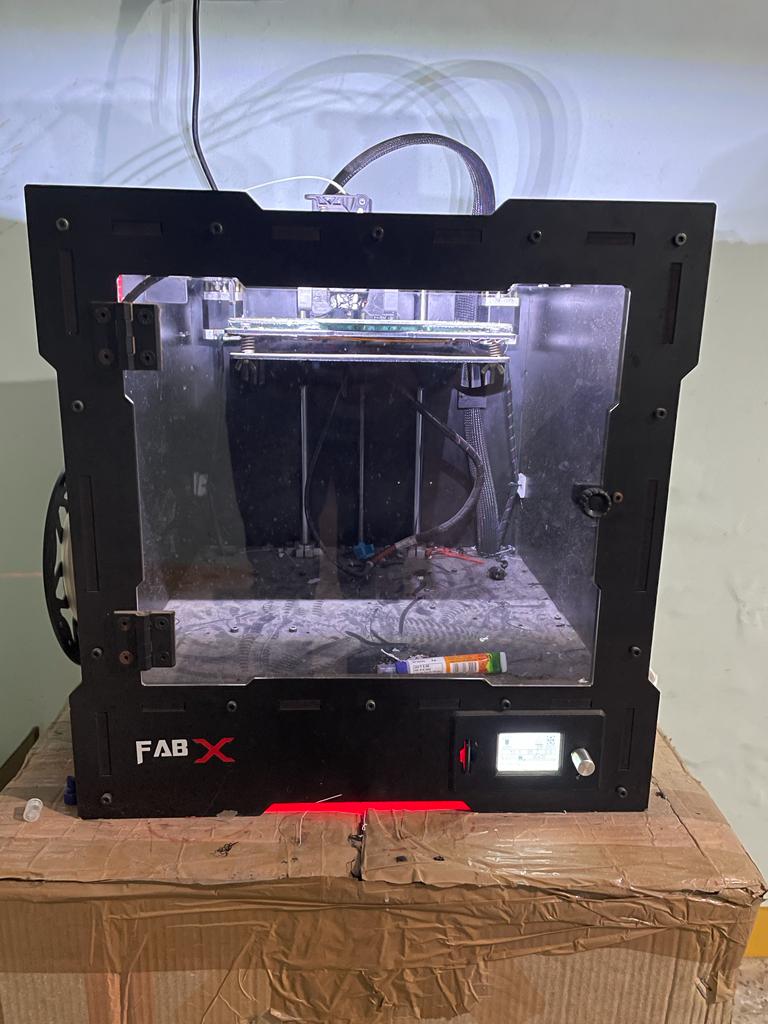
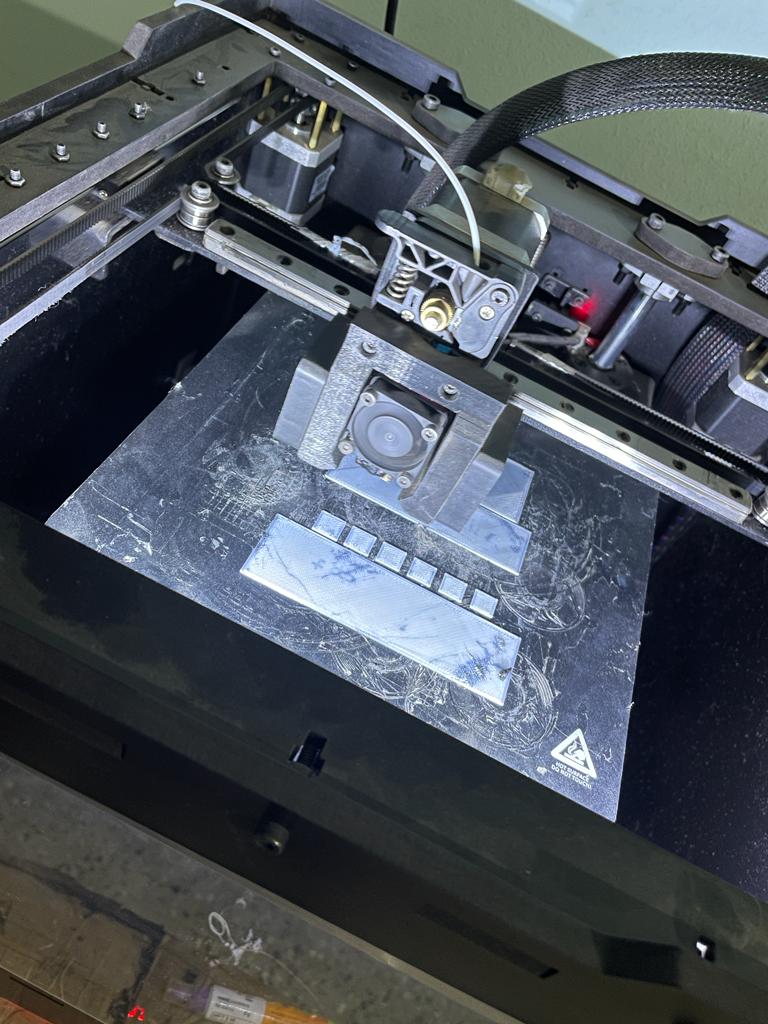
3D Printer @Fablab Vigyan Ashram
We used Fabx series 3D printer by 3ding, a made in india 3D printing company.
It has build volume of 180*180*180 mm with direct drive xtruder mechanism, it also supports assisted bed levelling and many other features with 0.4 mm nozzle size.
Disadvantages of Conventional M.P
1) More Cost
2) More material wastes
3) More tooling
4) Prototyping is difficult
5) More leading time
6) Complex geometries are difficult to produce
7) Customization is difficult
Advantages of Additive M.P over Conventional M.P
1) Rapid Prototype- Print on demand
2) Sustainability- Low Material Waste
3) Complex job requires a same cost as a simple job
4) 3D printings can form interlocked parts- no assembly required.
5) Zero lead time-It can print on demand
6) Compact, portable manufacturing
7) Infinite shades of material
Industrial Applications of 3D Printing.
1) Low-volume production
2) Weight reduction
3) Material efficiency
4) Part consolidation
5) Maintenance & repair
6) Faster product development
7) Greater design flexibility
8) Customisation
9) Create complex geometries
10) Enhanced medical devices
11) Personalised healthcare
12) Mass customization
13) Shorter lead times
14) On-demand production
3D Printing Technologies
A) Fused Deposition Modelling.
Advantages: - A most cost-effective way to produce custom thermoplastic parts and prototyping. Suitable for both prototyping and some non-commercial functional applications.
Disadvantages: - FDM has the lowest dimensional accuracy and resolution compared to other 3D printing technologies, so it is not suitable for parts with intricate details.
B) Stereolithography.
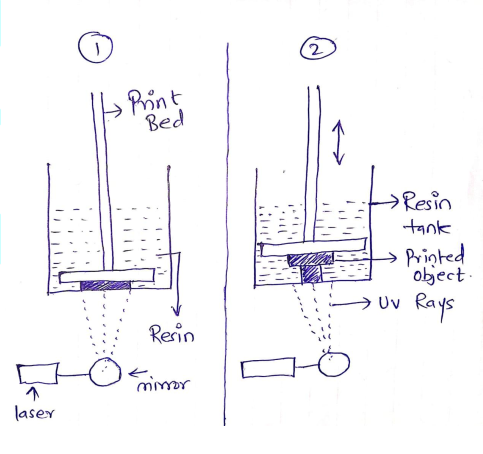
Advantages: - SLA has the highest dimensional accuracy and resolution compared to other 3D Printing Technology. Highly recommended for the parts that require smooth surface finish.
Disadvantages: - Working/Manufacturing cost is high compared to FDM technology.
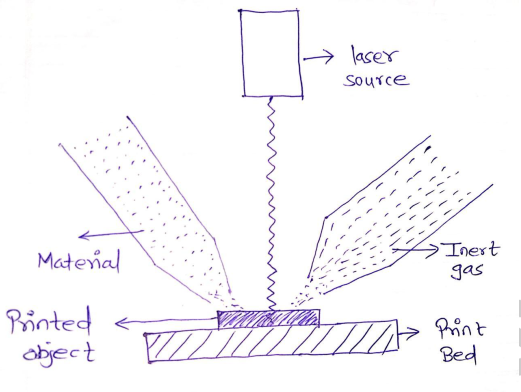
C) Selective Laser Sintering.
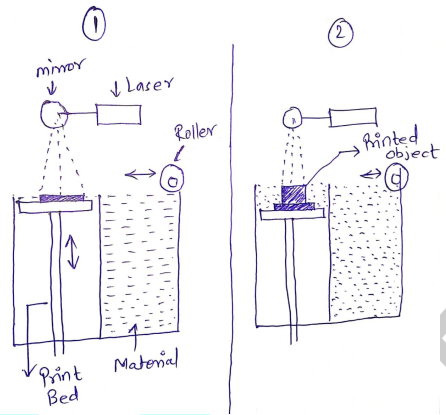
Advantages: - Perfectly Suitable for complex structures and thin walls. Mass Production is possible and does not require a support structure.
Disadvantages: - Post Processing is Difficult, only 70% of the remaining powder gets recovered.
D) Direct Energy Deposition.
Advantages: - High build rates, Dense and strong parts, ideally suited for application requiring metal addition to existing parts hence lends itself to repairing applications.
Disadvantages: - High capital cost, Parts produced using DED technology are lower in resolution with a poor surface finish, Due to the nature of how the DED technology builds parts, support structures cannot be used during the build process, hence features like overhangs will not be possible
F) Sheet Lamination AM Process.
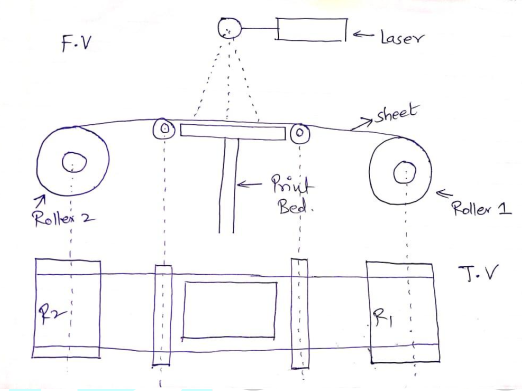
Advantages: - One and only paper-based Additive manufacturing process.
Disadvantages: - Sheet laminated objects cannot be used as replacement parts,only used for prototyping, not for manufacturing.
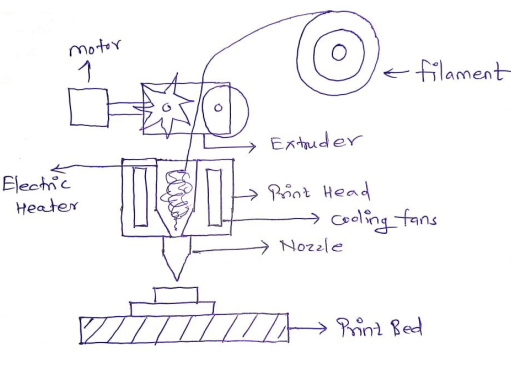
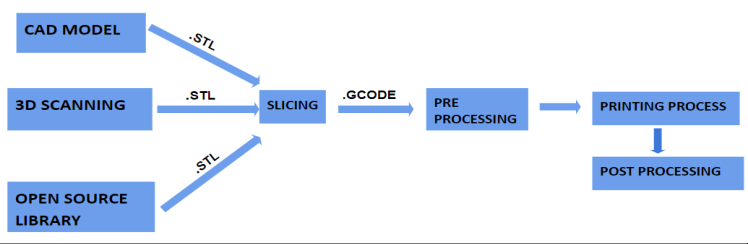
3D Printing Methodology
I have made a standard block Diagram inorder to print a object from scrach.
Group Assignment
Design Considerations for 3D Printing: -
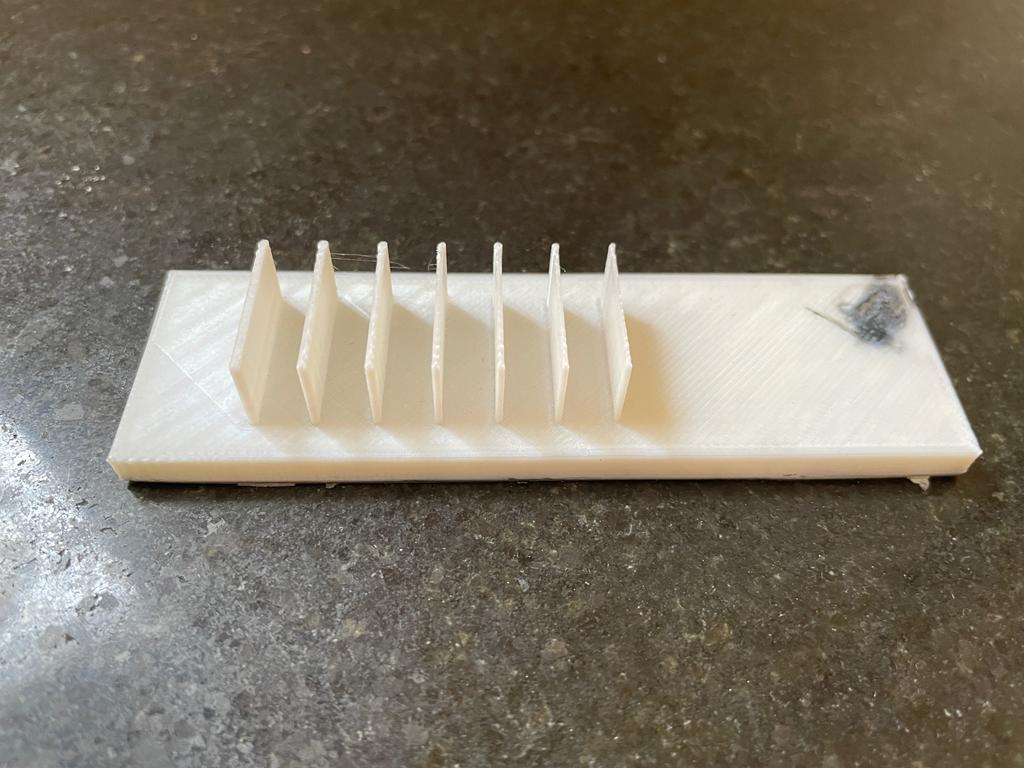
Overhang: -
Objects having overhangs needs to be supported. Without support, the structure might fail. The efficiency to print overhangs depends on the printer and its specification.
The 3D Printer in our lab can print objects with a 60-degree overhang angle. Angle more than this needs to be supported.
Bridging: -

Some objects have horizontal overhang across two points, if the distance between two points is less than we need not use a support structure; again, efficiency depends on a 3D printer.
The 3D Printer in our lab successfully prints overhangs with less than 30 mm bringing distance, for more distance we might have to use a support structure.
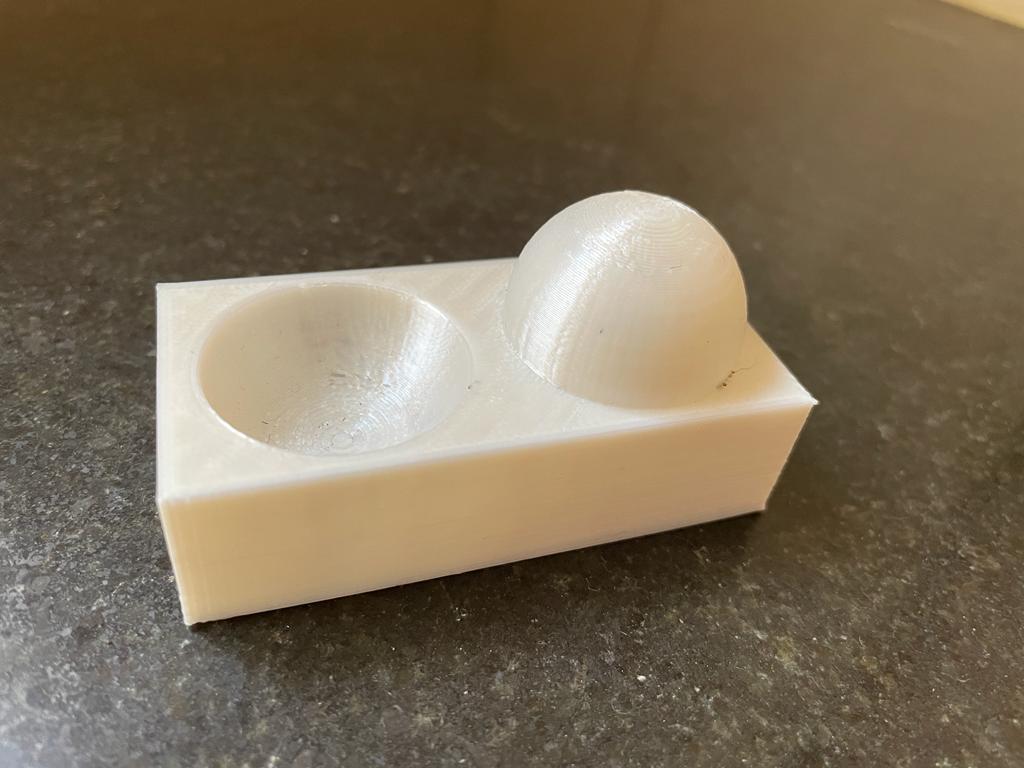
Tolerance: -
FDM prints have a rough surface finish so while creating interlock parts tolerance must be considered.
Different parameters of a 3D Printer can vary the tolerance value of a 3D printer. Objects with a tolerance value of 0.3mm give us a tight tolerance value.
Orientation: -
Support structures are very difficult to remove but by changing the orientation of objects we can minimize support structures.
Wall thickness: -
Generally, this value depends on the size of the nozzle and the value of wall thickness. We used a 0.4 mm nozzle hence wall thickness with a value less than 0.4 mm is not printed.
Surface steps: -
This value depends on the value of resolution or layer height and accuracy of the 3D Printer, for this we have used 0.2mm layer height.
Individual Assignemnt
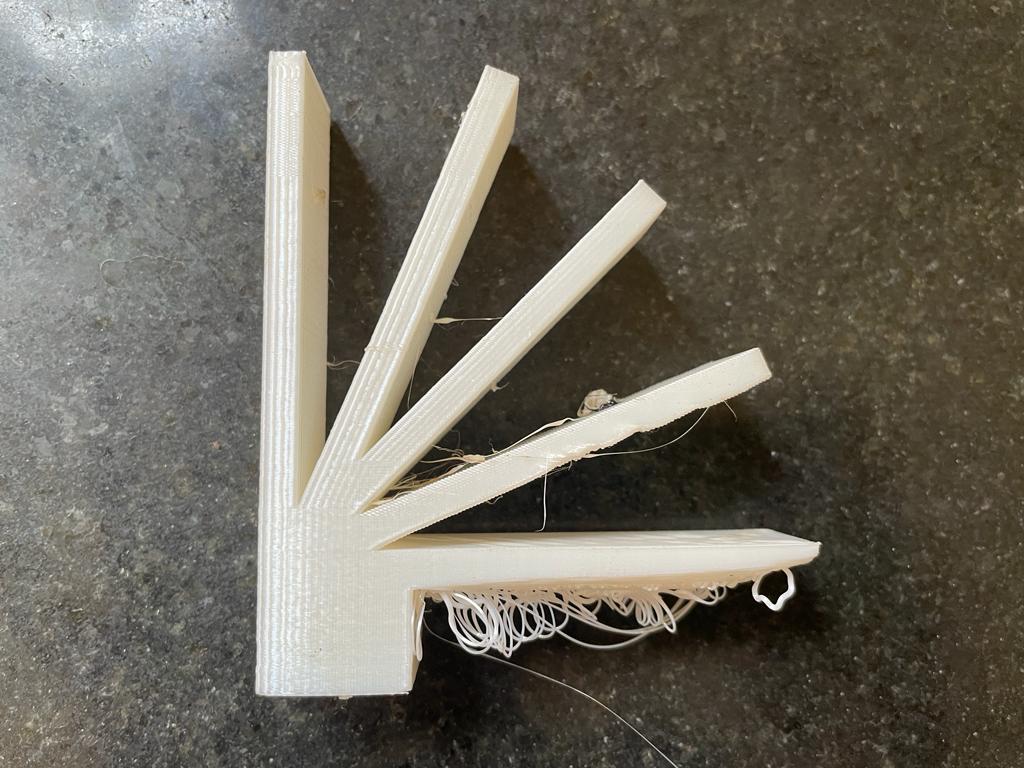
Design & print an object that cannot be made up by subtractive manufacturing.
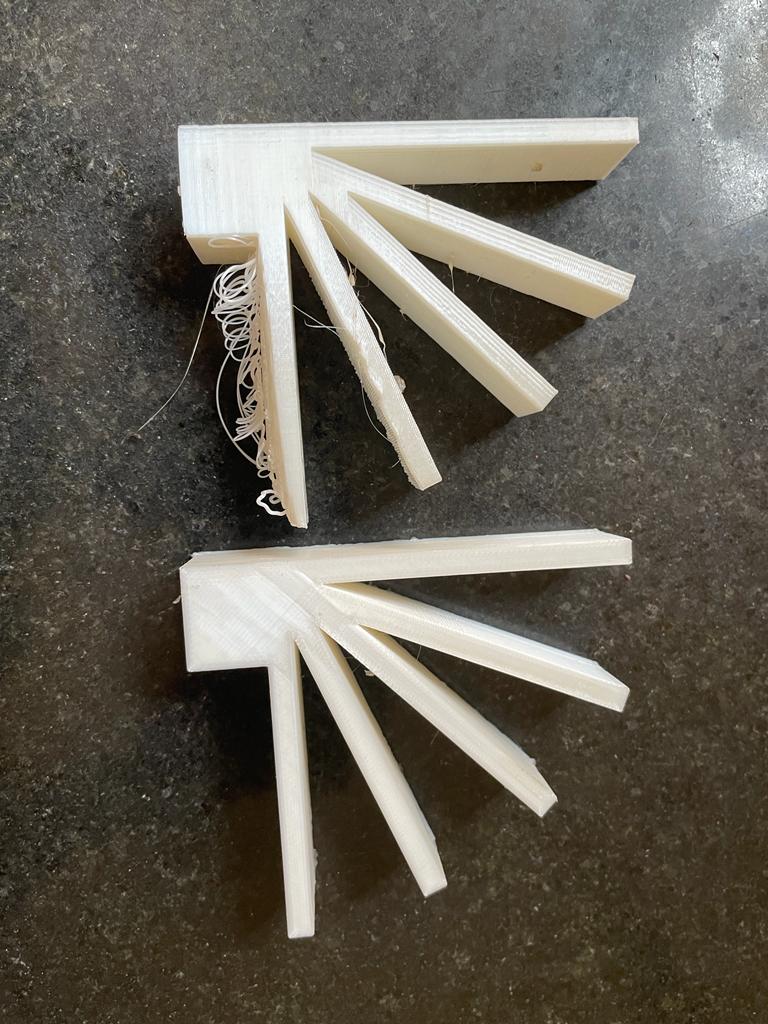
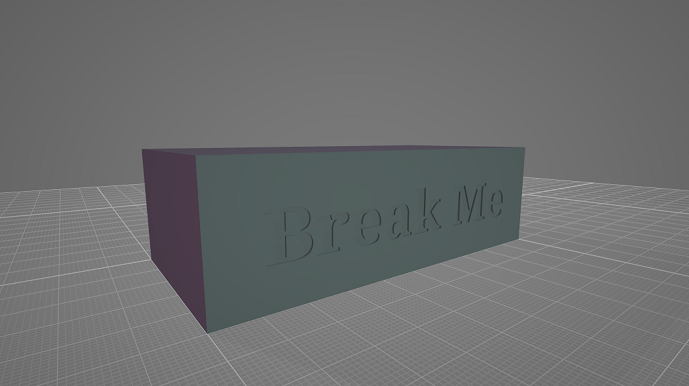
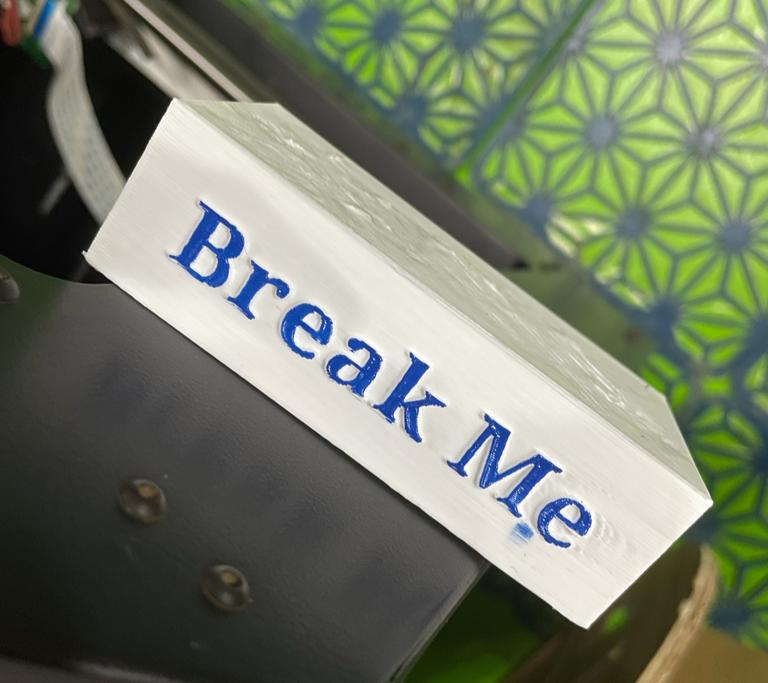
For this particular assignment I have tried to make a “break me” box for children.
If we want to put anything inside an object without cutting, drilling or any other machining process then it is impossible to do this using conventional manufacturing process like subtractive and formative manufacturing process.
For this assignment, initially I have designed a rectangular hollow box with “break me” named engraved at one of side of an object.
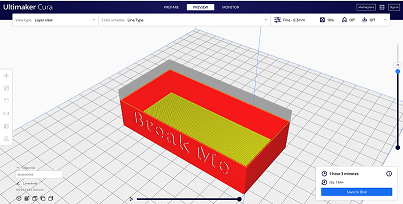
i have used ultimaker cura slicing software to slice this design
Parameters i have used
Material = PLA
Resolution = 0.3mm
Wall thickness = 0.8
Infill density = 10%
Print Speed = 55mm/s
Printing temp. = 200 60-degree
Support Structure = N/A
Build Plate Adhesion = No
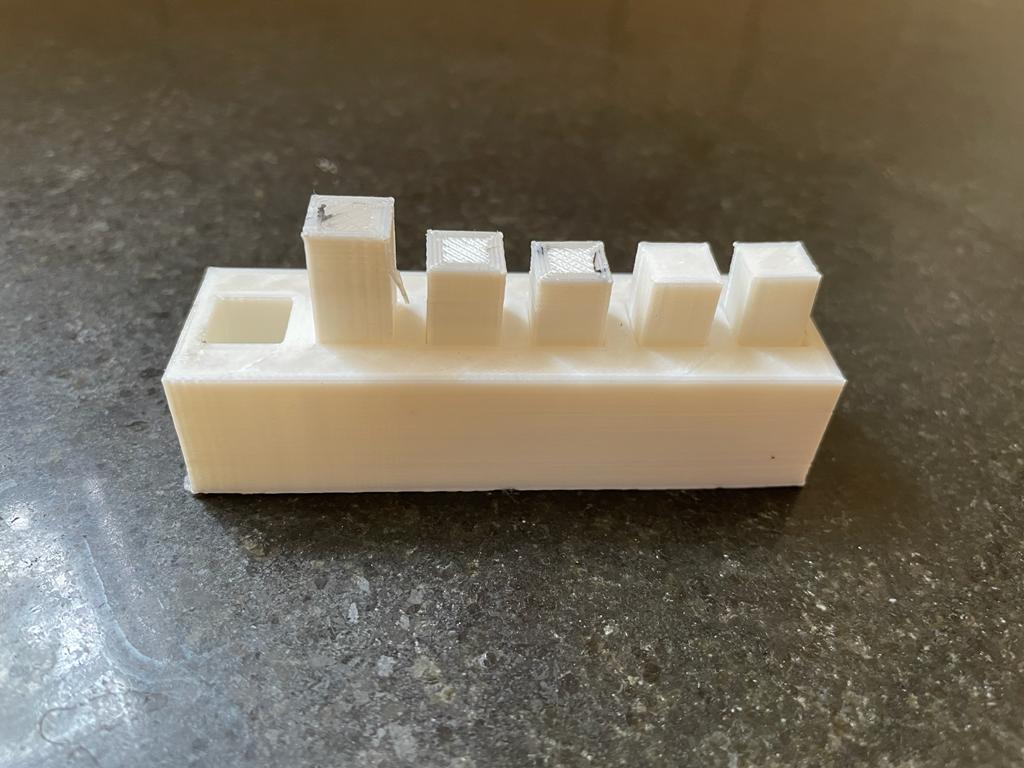
While printing, when 50% job gets done I have paused the printer and inserted few chocolates inside the box and start printing again.
After printing process, if we want to collect that chocolate gain then there is only one way that we have cut break that box.
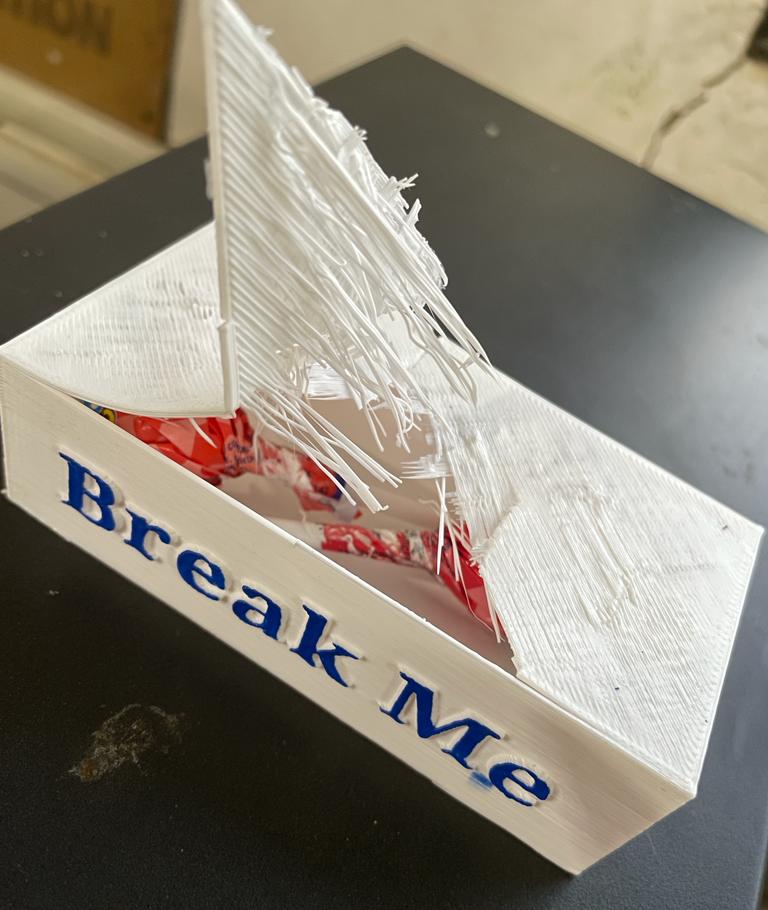
This type of packaging can be used for packaging of surprise and presents, than can surely make wow kind of feeling on their face.
3D Scanning or Reverse Engineering
3D scanning is an amazing way to easily obtain files for 3D Printing.
A 3D scanner takes multiple snapshots of an object. The shots are fused into a 3D model and will provide a 3-Dimensional copy of the object.
Qlone
Qlone is a Mobile 3D scanning application available on android and iOS.
Steps to work with qlone
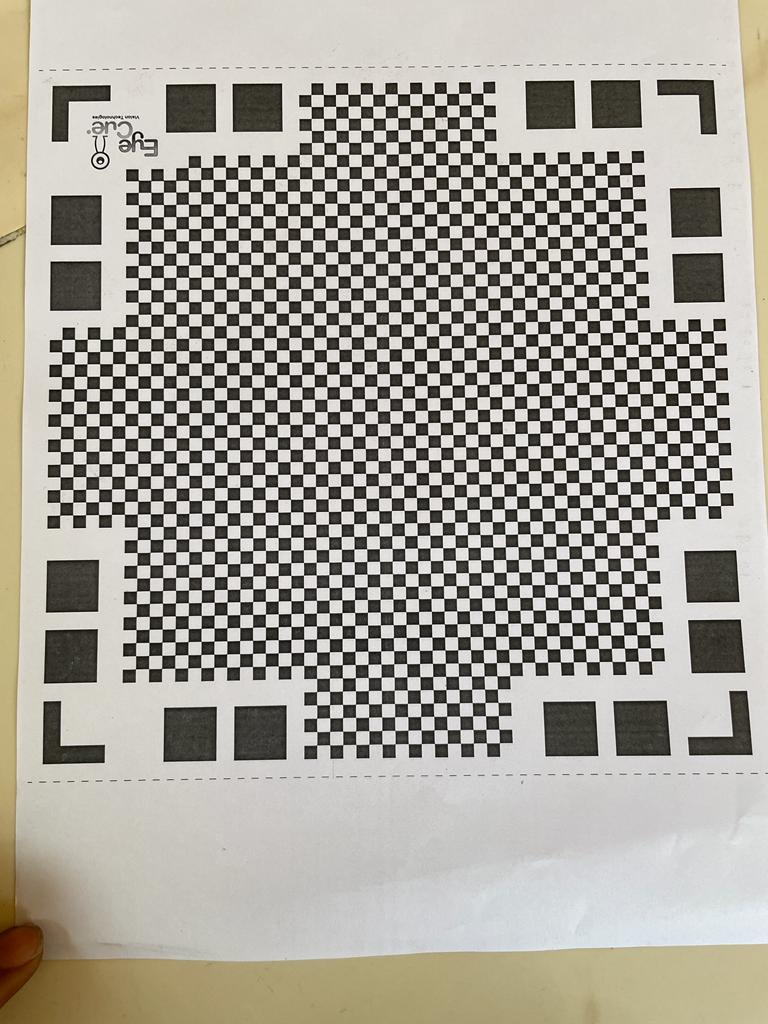
Setup of mat for 3D scanning
I have downloaded and printed a mat for 3D scanning and successfully stuck it to the rotating table.
Object Selection
I have selected one rectangular object for scanning operation and placed that object on the mat for 3D scanning.
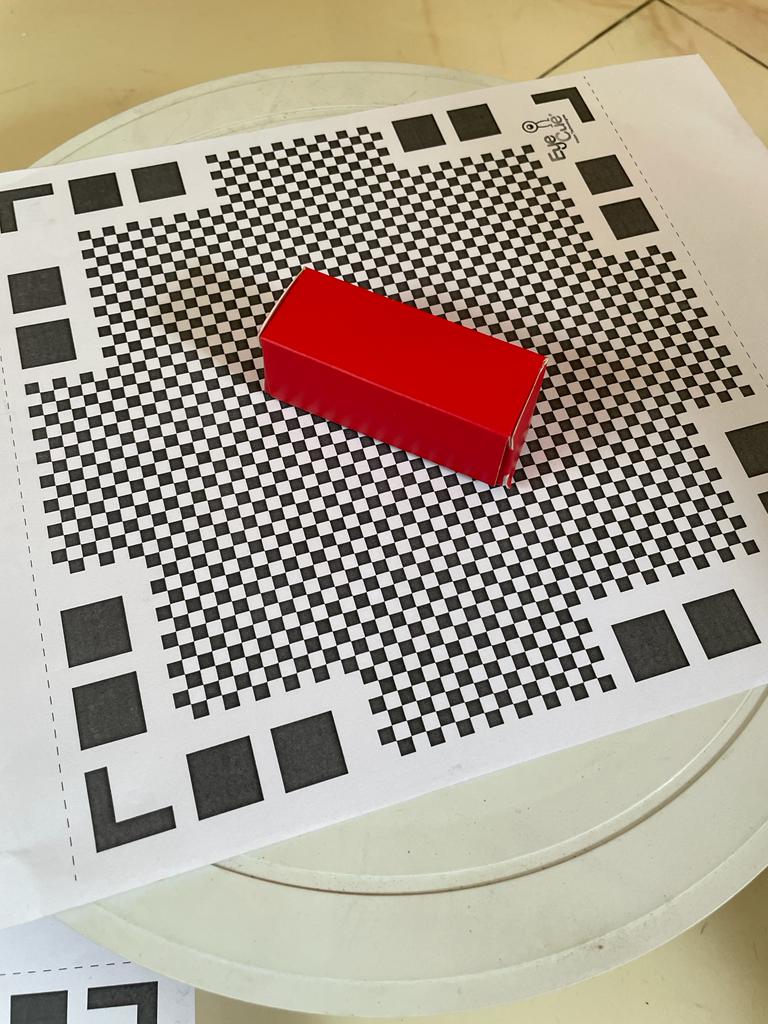
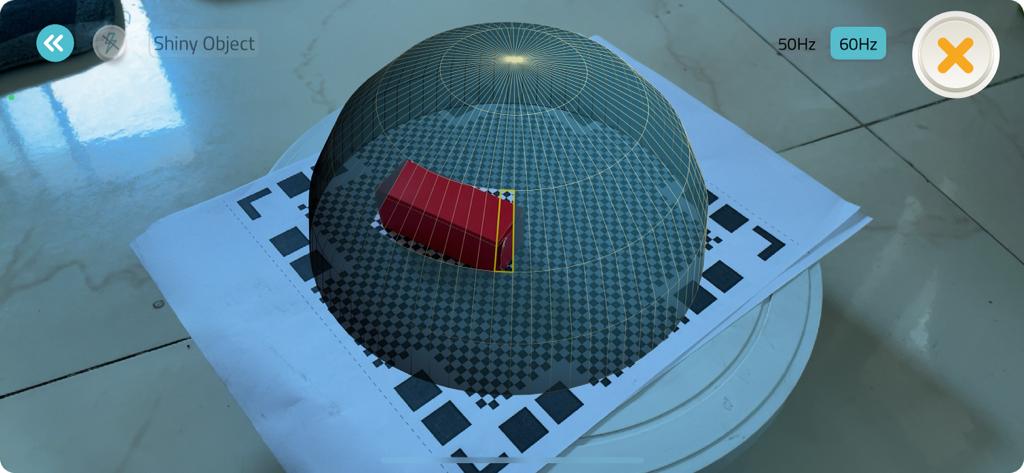
Scanning Process
This mat creates a virtual path that can help us to scan that object from all directions, helps to capture all the details.
Repeat
This application allows us to scan an object by changing its position and merging all the scans in order to get perfect output.
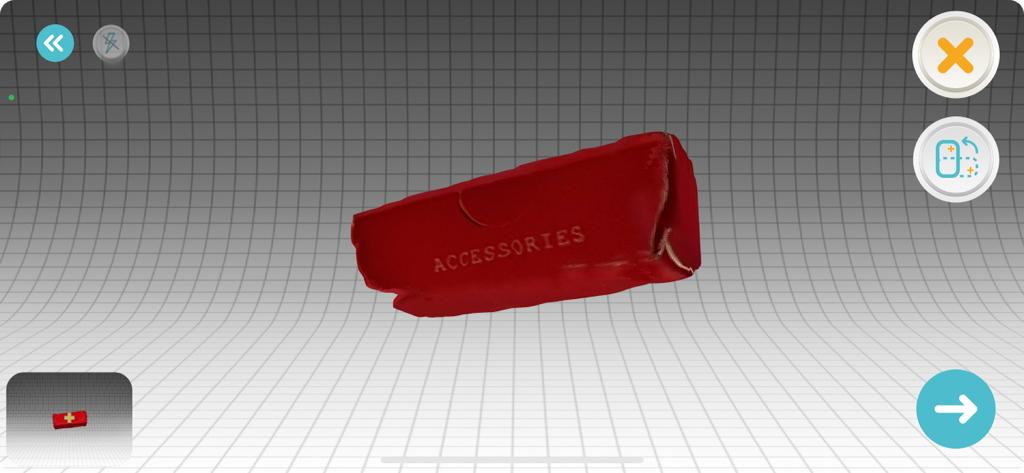
Auto merging and 3D output
After merging all the scans we can download a 3D file generated in the form of. stl & .obj which can actually help us to print the scanned object.
AR Function
AR function is also available to project scanned objects to real-life scenarios.
Learning of the week
What went Well
Able to calibrate printer's Printability, that can helped me understand my 3D Printing.
Understood different Design cosideration while desinging for 3D Printing
Explore and used Mobile scanning applications
What went Wrong
Rotatating mobile phone manually while scanning caused uneven surfaced product, use of mobile stand and rotating table can help to reduced it.