Probe an input device(s)’s analog and digital signals.
Document the work (in a group or individually).
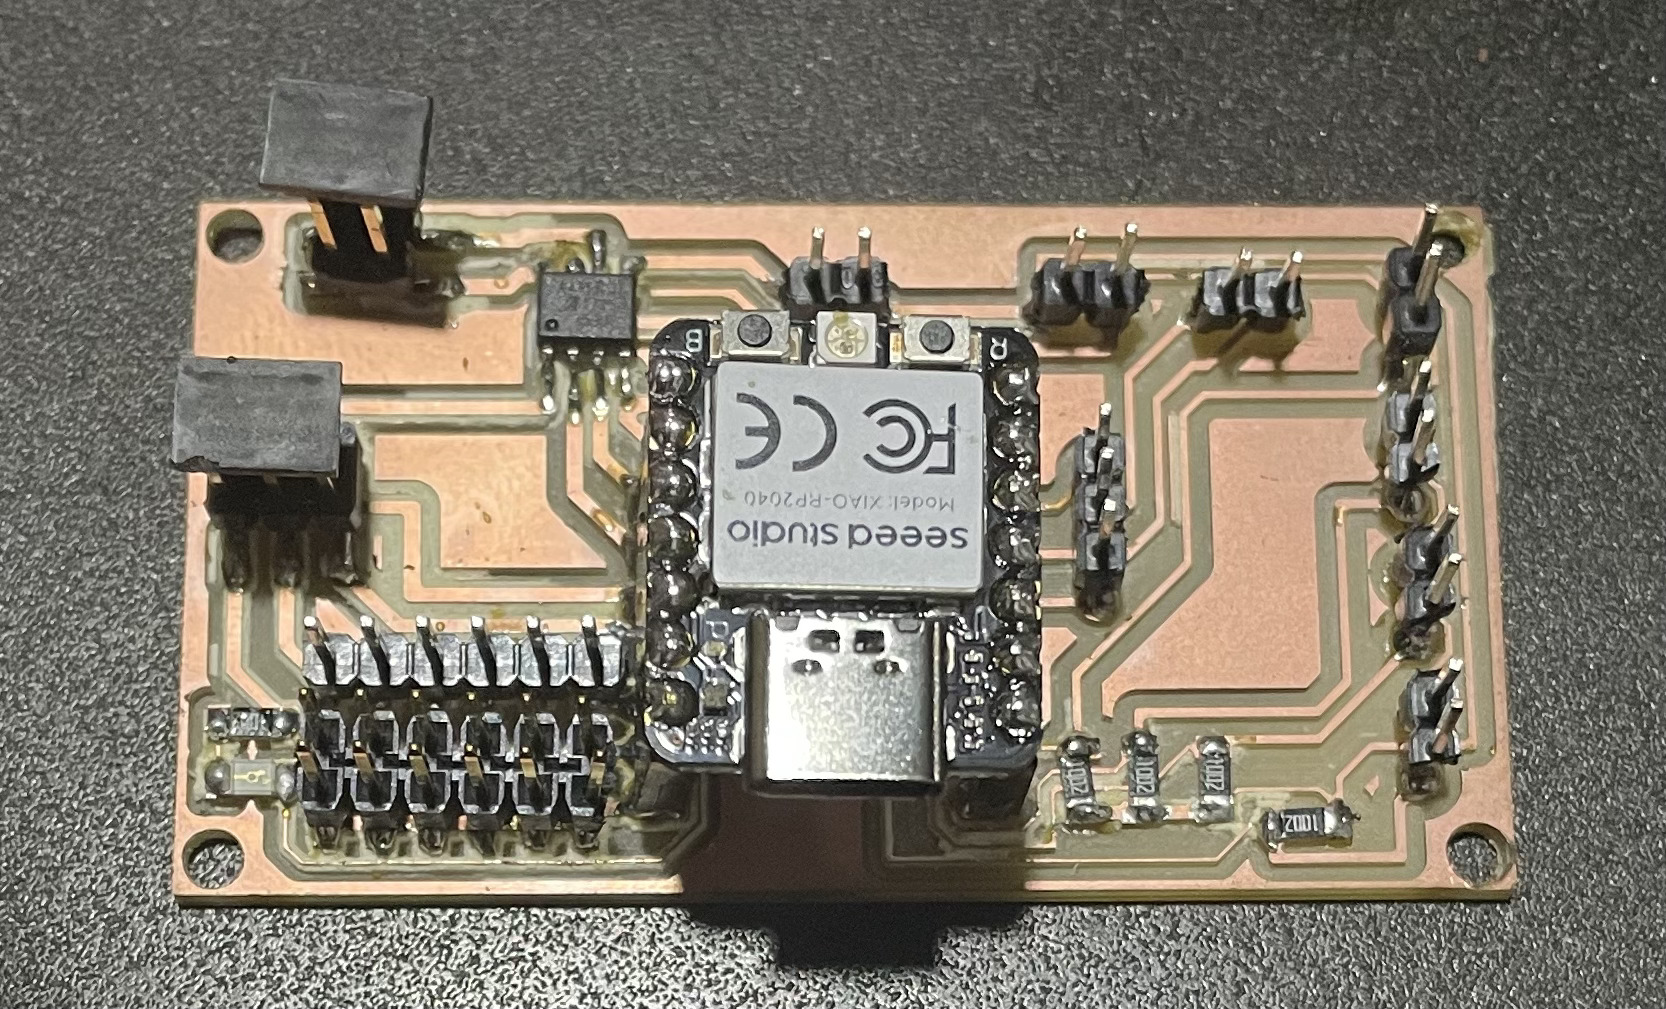
For this week I will use LDR (photoresistor) as an input sensor, I Measure is using Multimeter and I test it using bread board with RP2040 and finaly,I used it in my final project in my "Smart solar panel" with a microcontroller board that I have designed before.
// Define the analog pin connected to the photoresistor
const int photoresistorPin = A0;

// Define the digital pin connected to the LED
const int ledPin = 27;

// Setup function, runs once when the program starts
void setup() {
  // Set the LED pin as an output
  pinMode(ledPin, OUTPUT);

  // Start serial communication at a baud rate of 9600
  Serial.begin(9600);
}

// Loop function, runs repeatedly as long as the Arduino is powered on
void loop() {
  // Read the analog value from the photoresistor
  int lightLevel = analogRead(photoresistorPin);

// Print the current light level to the Serial Monitor for monitoring and analysis
Serial.print("Light level: ");

// Display the numerical value of the light level
Serial.println(lightLevel);


  // Check if the light level is below a certain threshold (50 in this case)
  if (lightLevel < 50) {
    // If the light level is low, turn on the LED
    digitalWrite(ledPin, HIGH);
  } else {
    // If the light level is not low, turn off the LED
    digitalWrite(ledPin, LOW);
  }

  // Introduce a delay of 1000 milliseconds (1 second) to avoid rapid readings
  delay(1000);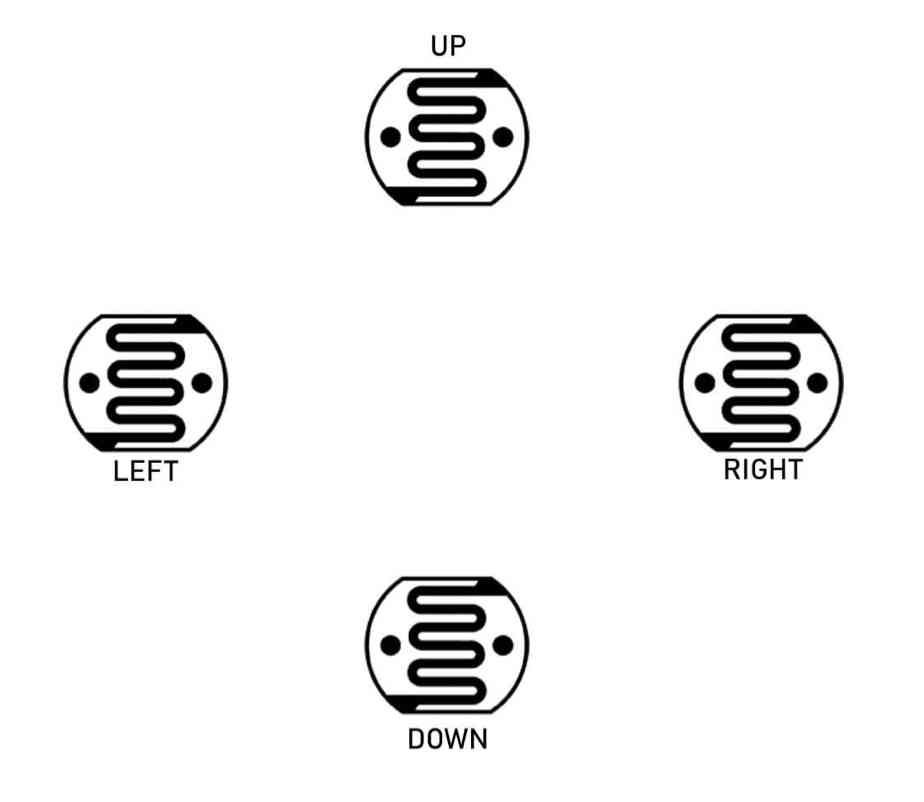
} Finaly I used 4 Photoresistor in my final project to track the sun light and you can see bellow the working principle for the LDR in my final project.
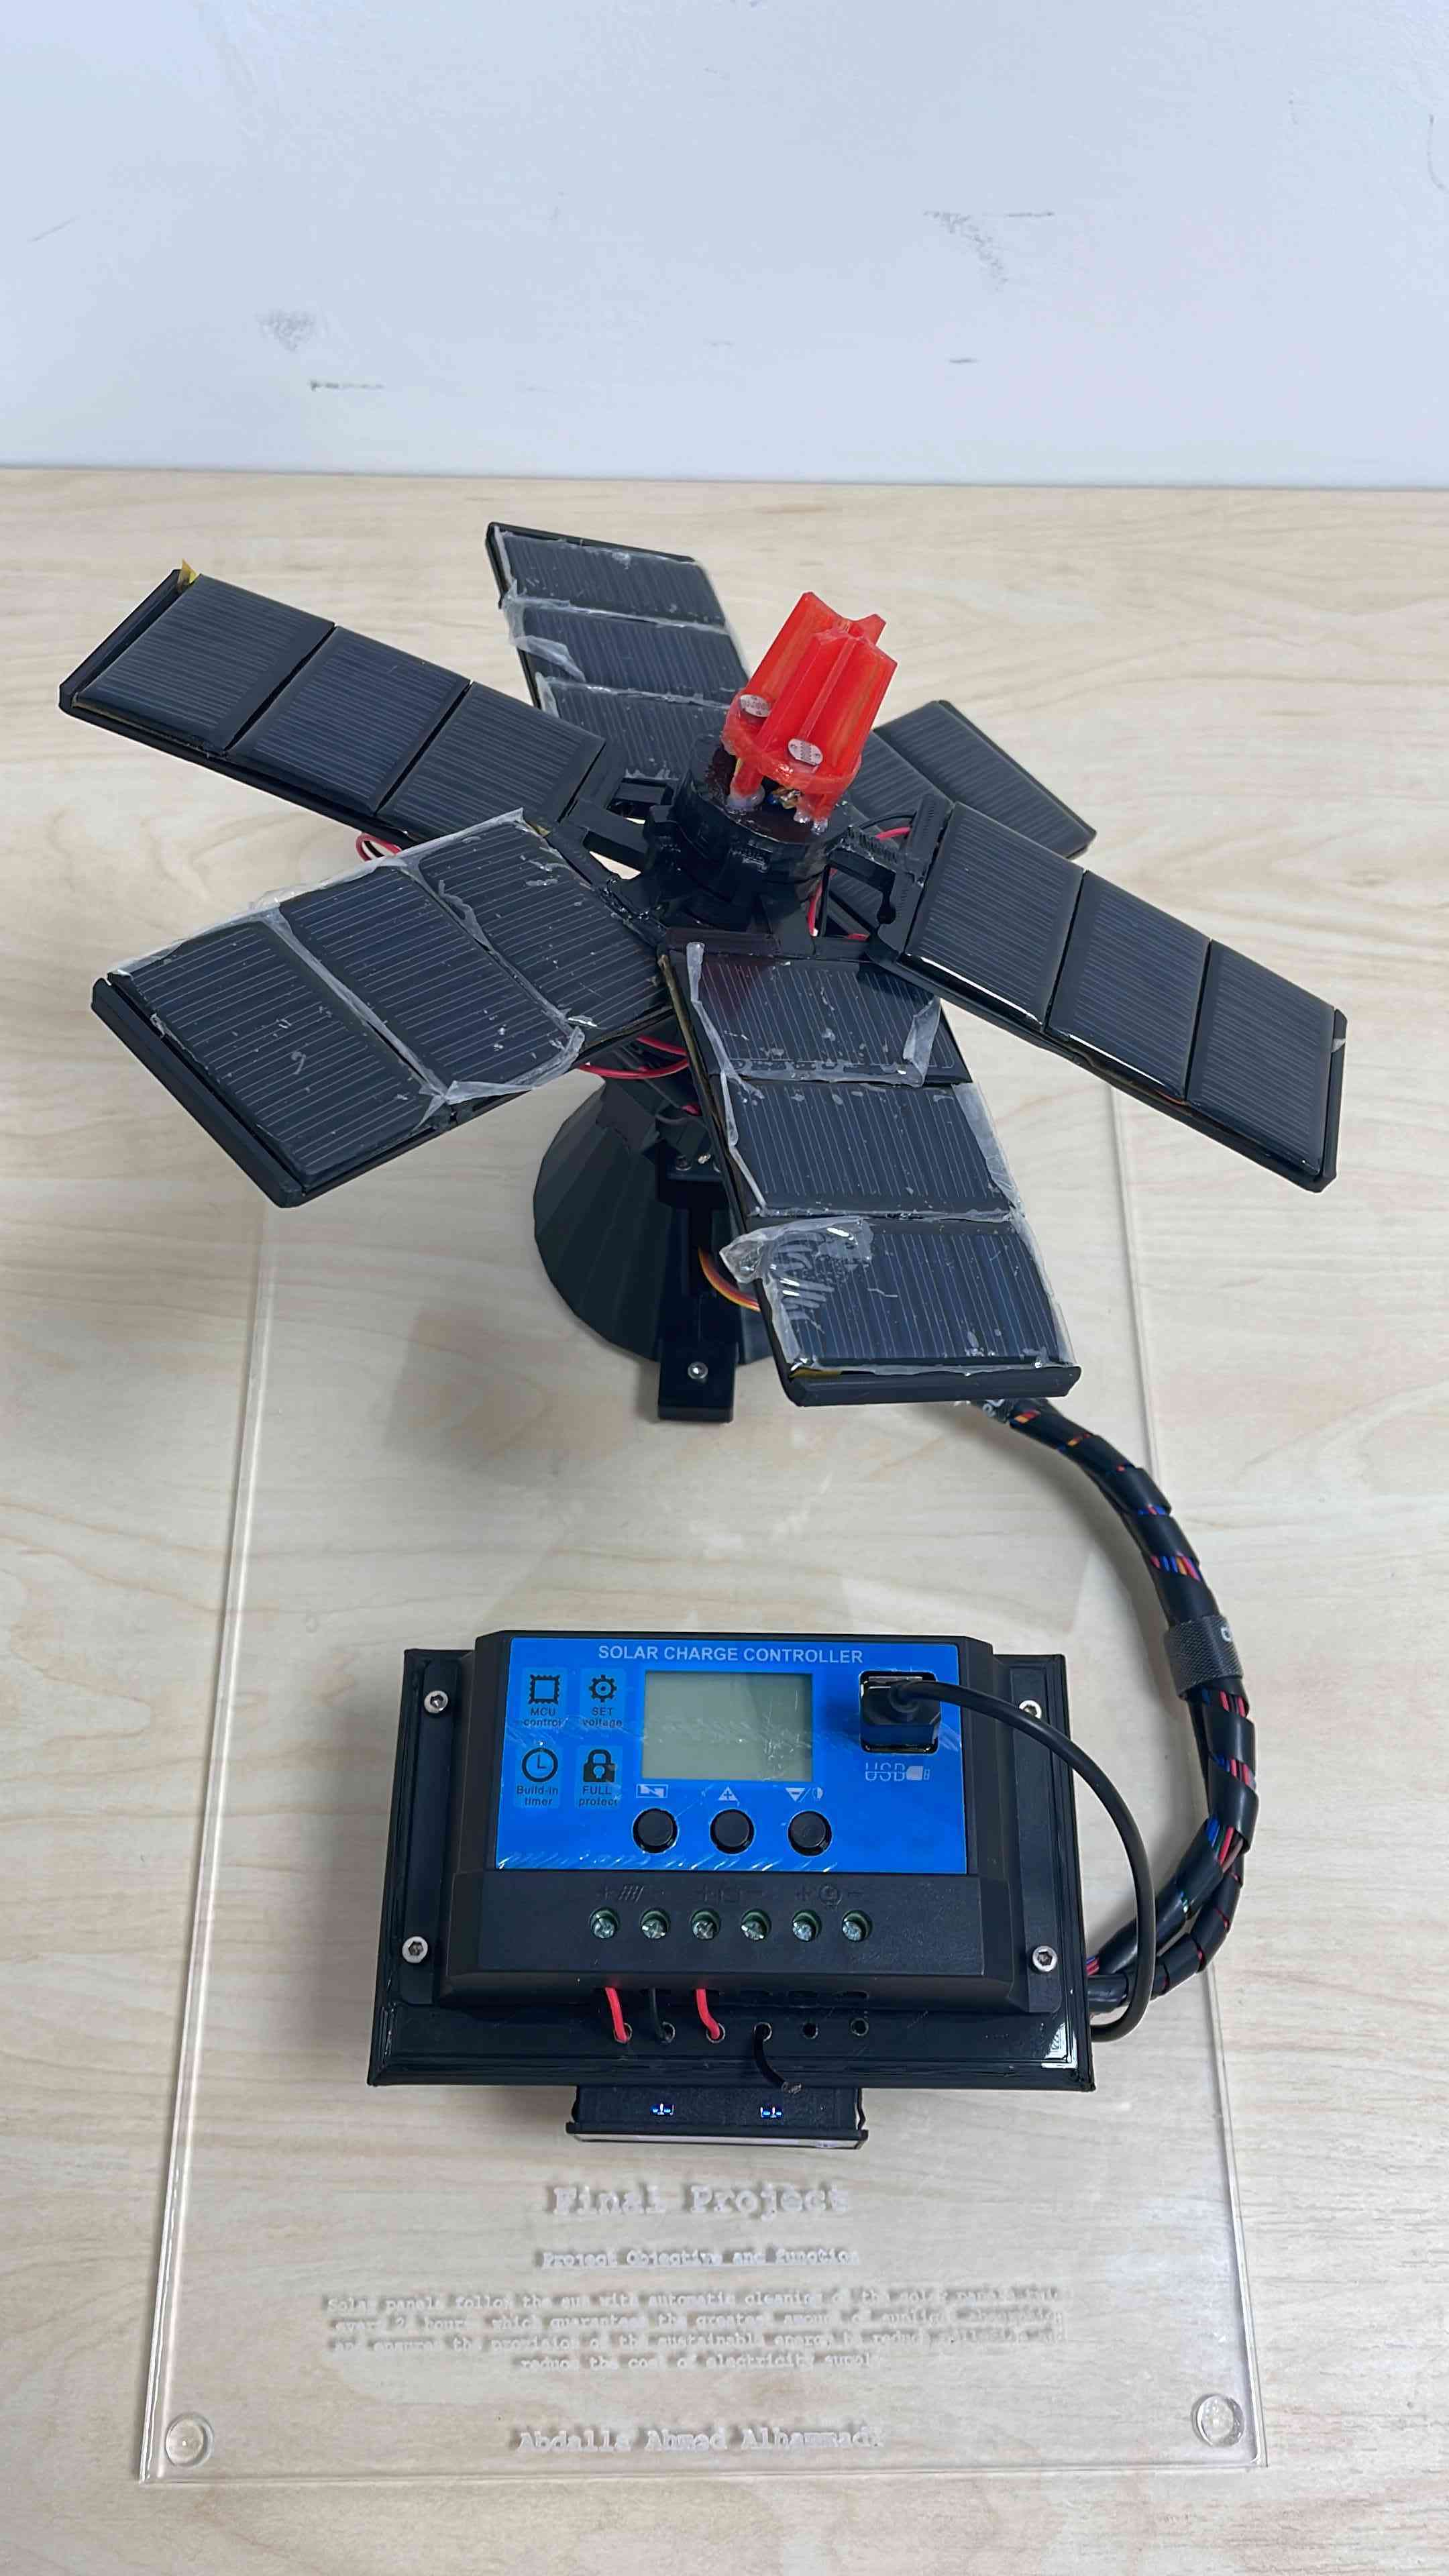
You can see the FOUR resistor is placed on the middle position of the solar top, when the light is minimum, the micro controller seeed RP2040 read the resistance value and the the threshold value is sated in the coding section, when the light is available and the threshold level breaks, the Arduino rotate the n20 gear motor anticlockwise through the L293D Driver till the limit switch level high, when anticlockwise limit switch pressed the panel stop rotating and panel is fully opened position when the button is pressed, now the main work is going to progress, according the sun rotation other 4 LDRs sense the light and send data to the seeed RP2040, and seeed RP2040 process the data then rotate the servo motors according the sun rotation, the rotation position of the servo is max 170 degrees,when the sun goes down the 4th LDR sense data again and this time the process is reverse condition, the LDR data goes down blow the threshold level and seeed RP2040 Rotate the N20 motor clockwise till the 2nd limit switch press and run the servo in home position, when light is available in next day the same process goes on again.
I used solar panel and limit switch in my final project solar panel was uesd to get energy from the sun and the limit switch used to change the direction for the "DC motor" form 'CW' to 'CCW'.

Code: To control all the input in the Final project.
#include

Servo horizontal; // horizontal servo
int servoh = 180;
int servohLimitHigh = 175;
int servohLimitLow = 5;

Servo vertical; // vertical servo
int servov = 0;
int servovLimitHigh = 60;
int servovLimitLow = 0;

// LDR pin connections
// name = analogpin;
int ldrlt = A3;
int ldrrt = A0;
int ldrld = A2;
int ldrrd = A1;

const int button1 = 7;
const int button2 = 6;
const int motorA = D8;
const int motorB = D7;
int buttonStateA;
int buttonStateB;

int pos = 0;
int pos2 = 0;
int oldvalue;
int oldvalue2;

void setup() {
  horizontal.attach(3);
  vertical.attach(4);
  horizontal.write(180);
  vertical.write(0);
  pinMode(motorA, OUTPUT);
  pinMode(motorB, OUTPUT);
  pinMode(button1, INPUT);
  pinMode(button2, INPUT);
  delay(2500);
}

void loop() {
  int ldrStatus = analogRead(ldrlt);
  if (ldrStatus > 30) {
    buttonStateA = digitalRead(button1);
    if (buttonStateA == LOW) {
      digitalWrite(motorA, 255); // Counter-clockwise
      digitalWrite(motorB, LOW);
    } else {
      digitalWrite(motorA, LOW);
      digitalWrite(motorB, LOW);
    }

    int lt = analogRead(ldrlt);
    int rt = analogRead(ldrrt);
    int ld = analogRead(ldrld);
    int rd = analogRead(ldrrd);
    int dtime = 10;
    int tol = 90; // dtime = difference time, tol = tolerance
    int avt = (lt + rt) / 2; // average value top
    int avd = (ld + rd) / 2; // average value down
    int avl = (lt + ld) / 2; // average value left
    int avr = (rt + rd) / 2; // average value right
    int dvert = avt - avd; // check the difference of up and down
    int dhoriz = avl - avr; // check the difference of left and right

    if (-tol > dvert || dvert > tol) {
      if (avt > avd) {
        servov++;
        if (servov > servovLimitHigh) {
          servov = servovLimitHigh;
        }
      } else if (avt < avd) {
        servov--;
        if (servov < servovLimitLow) {
          servov = servovLimitLow;
        }
      }
      vertical.write(servov);
    }

    if (-tol > dhoriz || dhoriz > tol) {
      if (avl > avr) {
        servoh--;
        if (servoh < servohLimitLow) {
          servoh = servohLimitLow;
        }
      } else if (avl < avr) {
        servoh++;
        if (servoh > servohLimitHigh) {
          servoh = servohLimitHigh;
        }
      } else if (avl == avr) {
        delay(10);
      }
      horizontal.write(servoh);
    }
    delay(dtime);
  } else {
    oldvalue = horizontal.read();
    oldvalue2 = vertical.read();
    for (pos = oldvalue; pos <= 180; pos += 1) {
      horizontal.write(pos);
      delay(15);
    }
    for (pos2 = oldvalue2; pos2 <= 0; pos2 += 1) {
      vertical.write(pos2);
      delay(15);
    }
    buttonStateB = digitalRead(button2);
    if (buttonStateB == LOW) {
      digitalWrite(motorA, LOW); // Clockwise
      digitalWrite(motorB, 255);
    } else {
      digitalWrite(motorA, LOW);
      digitalWrite(motorB, LOW);
    }
  }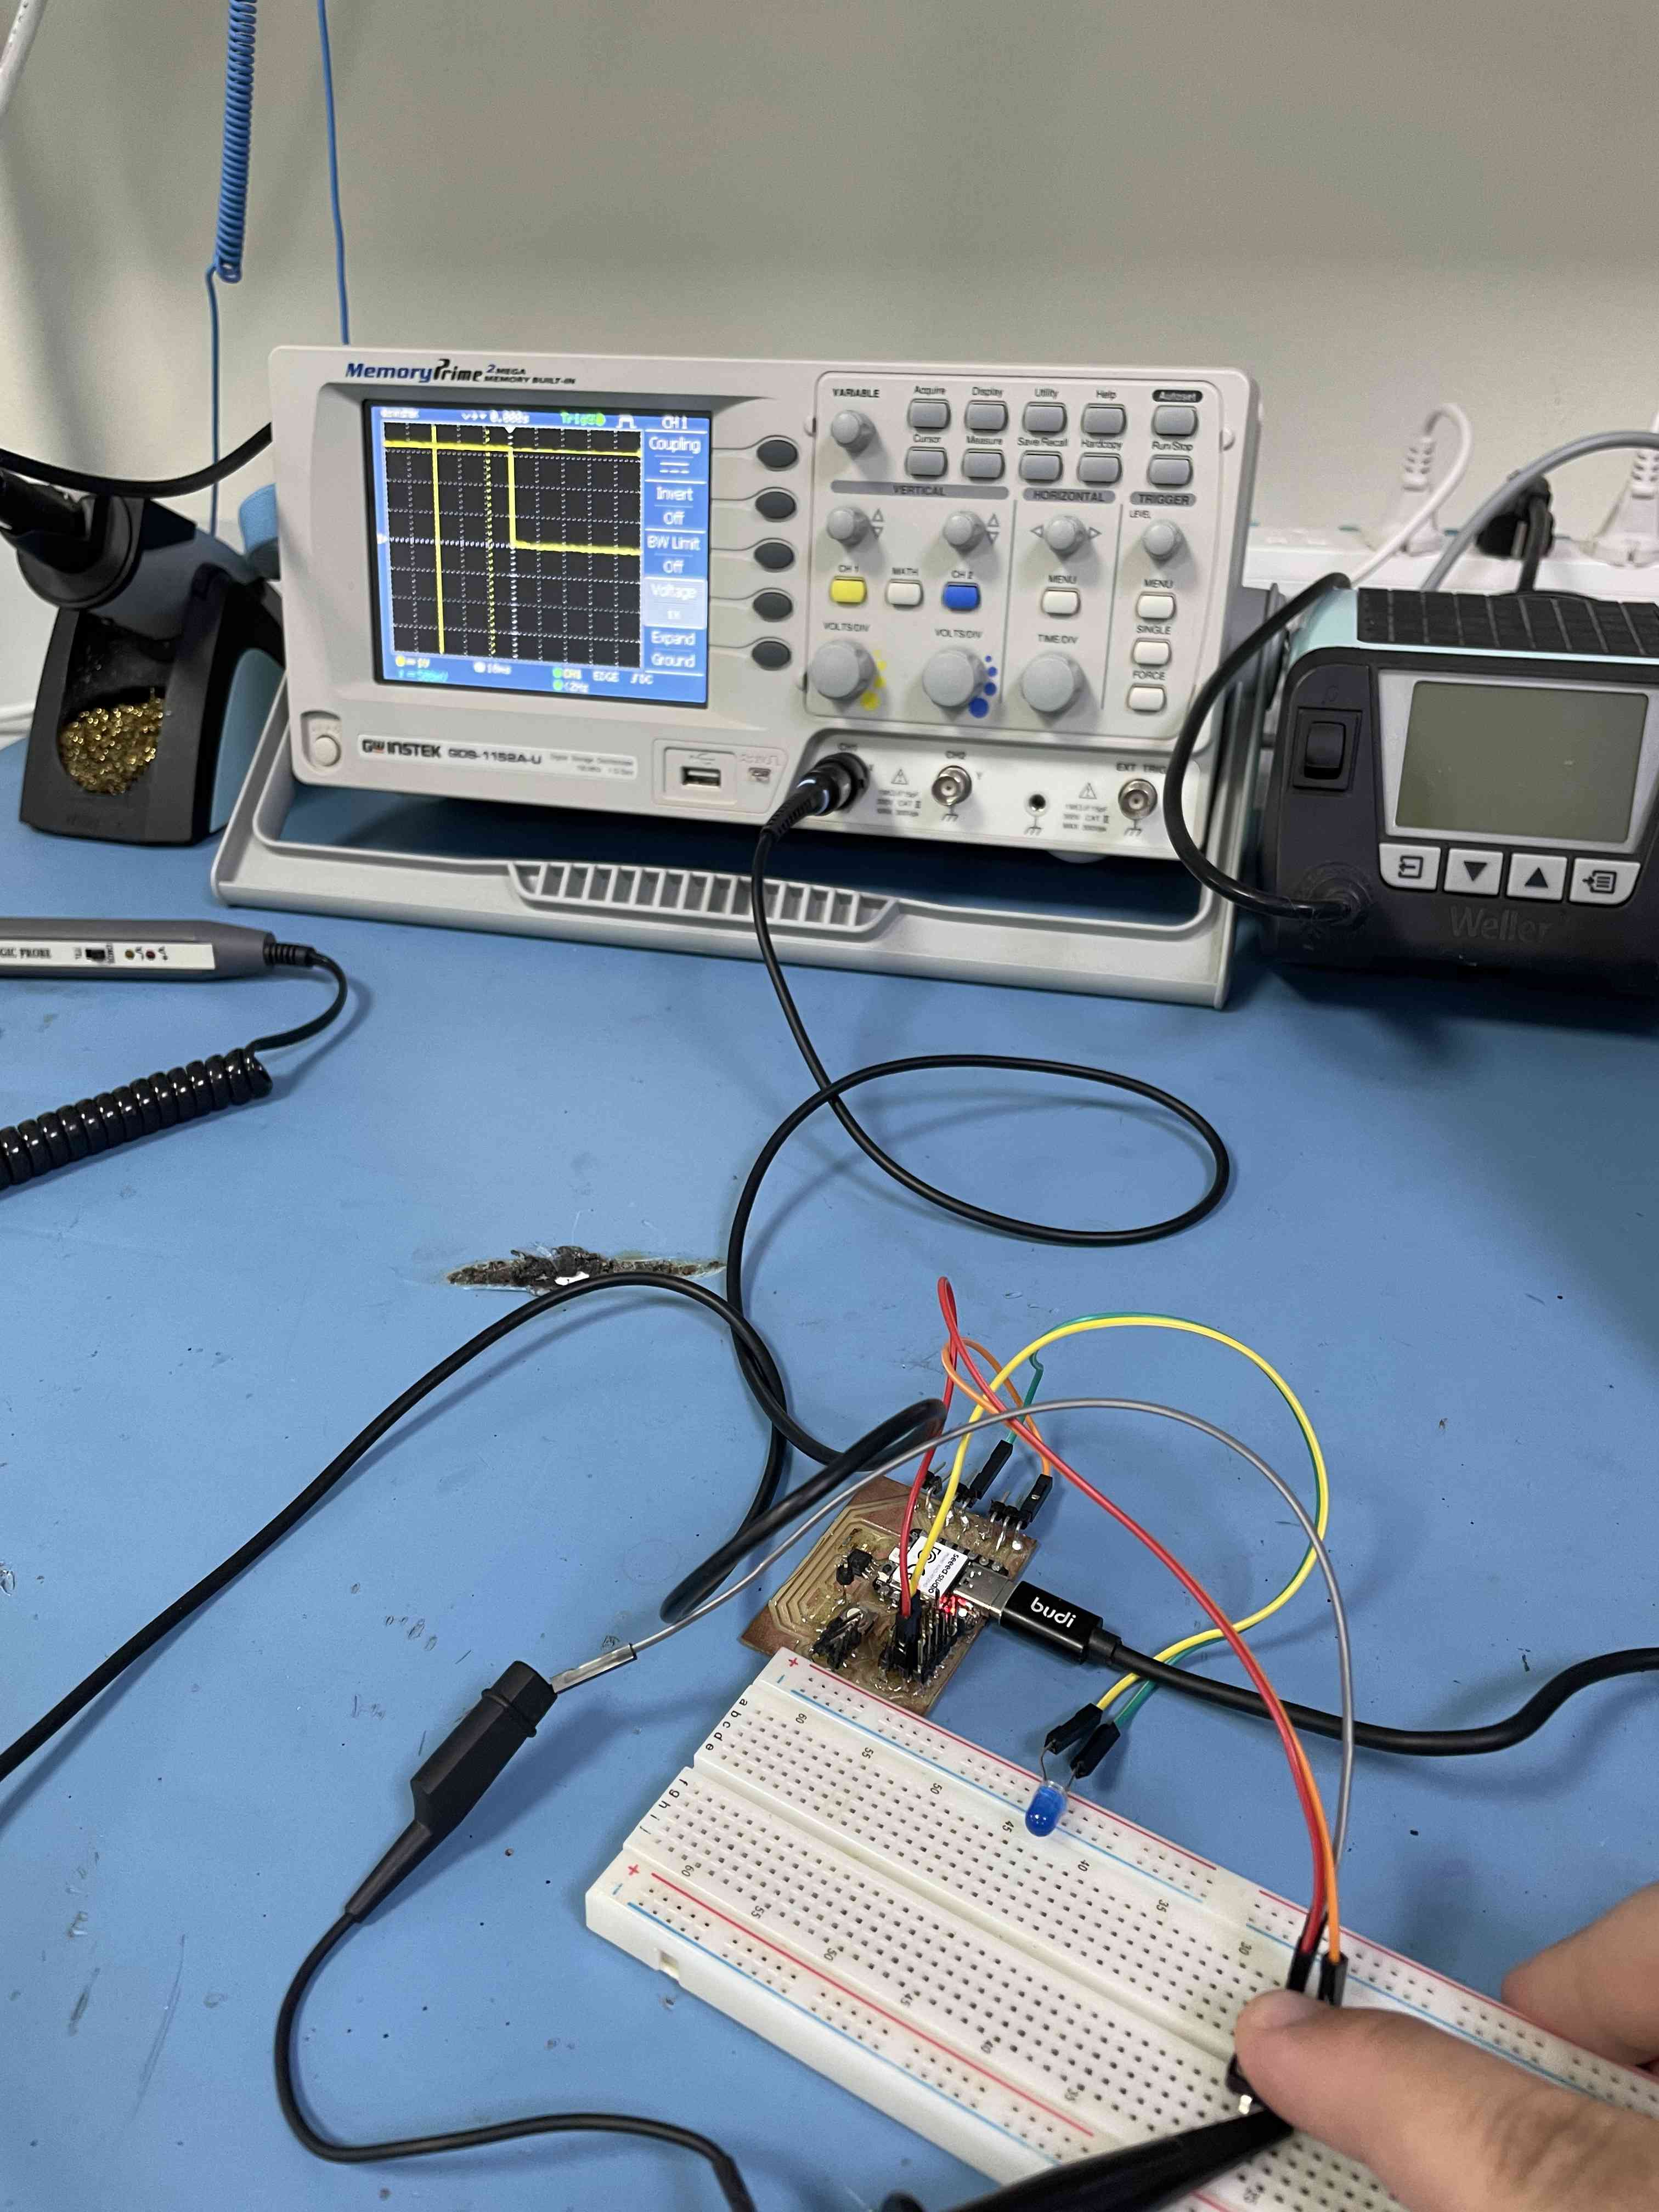
}I used two methods: Multimeter, oscilloscope to read the voltage. and to get the signal graph.
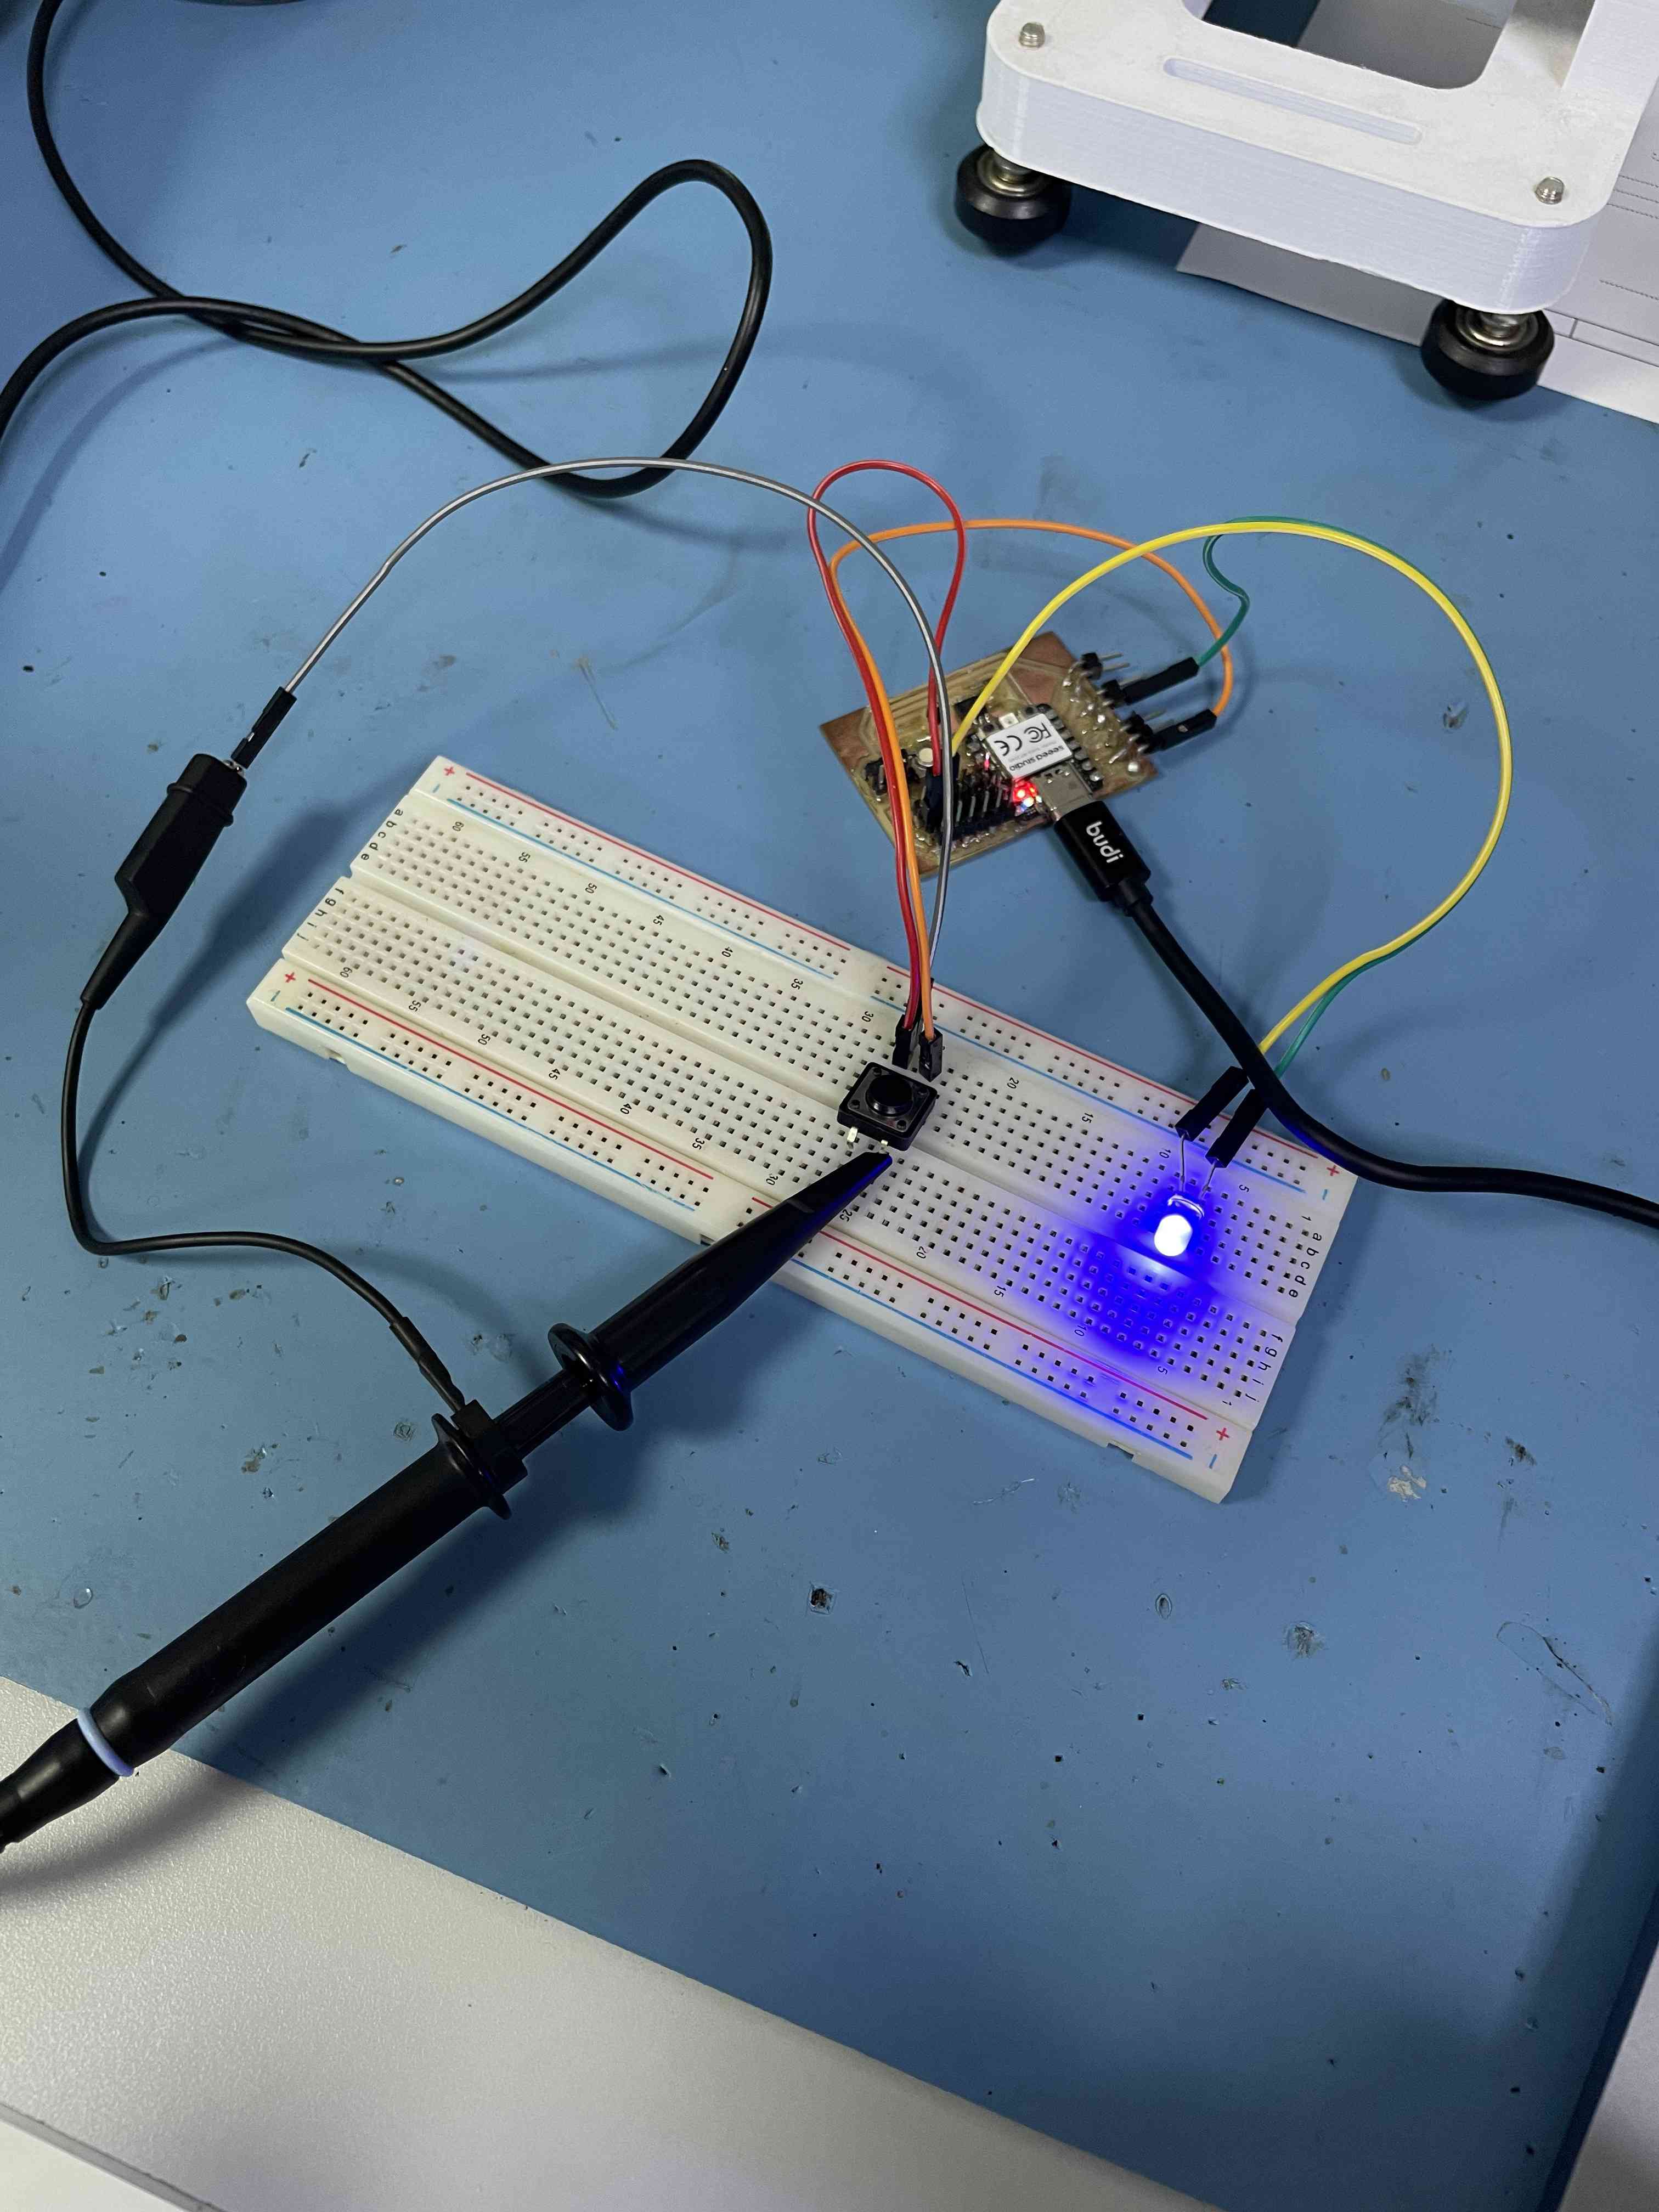
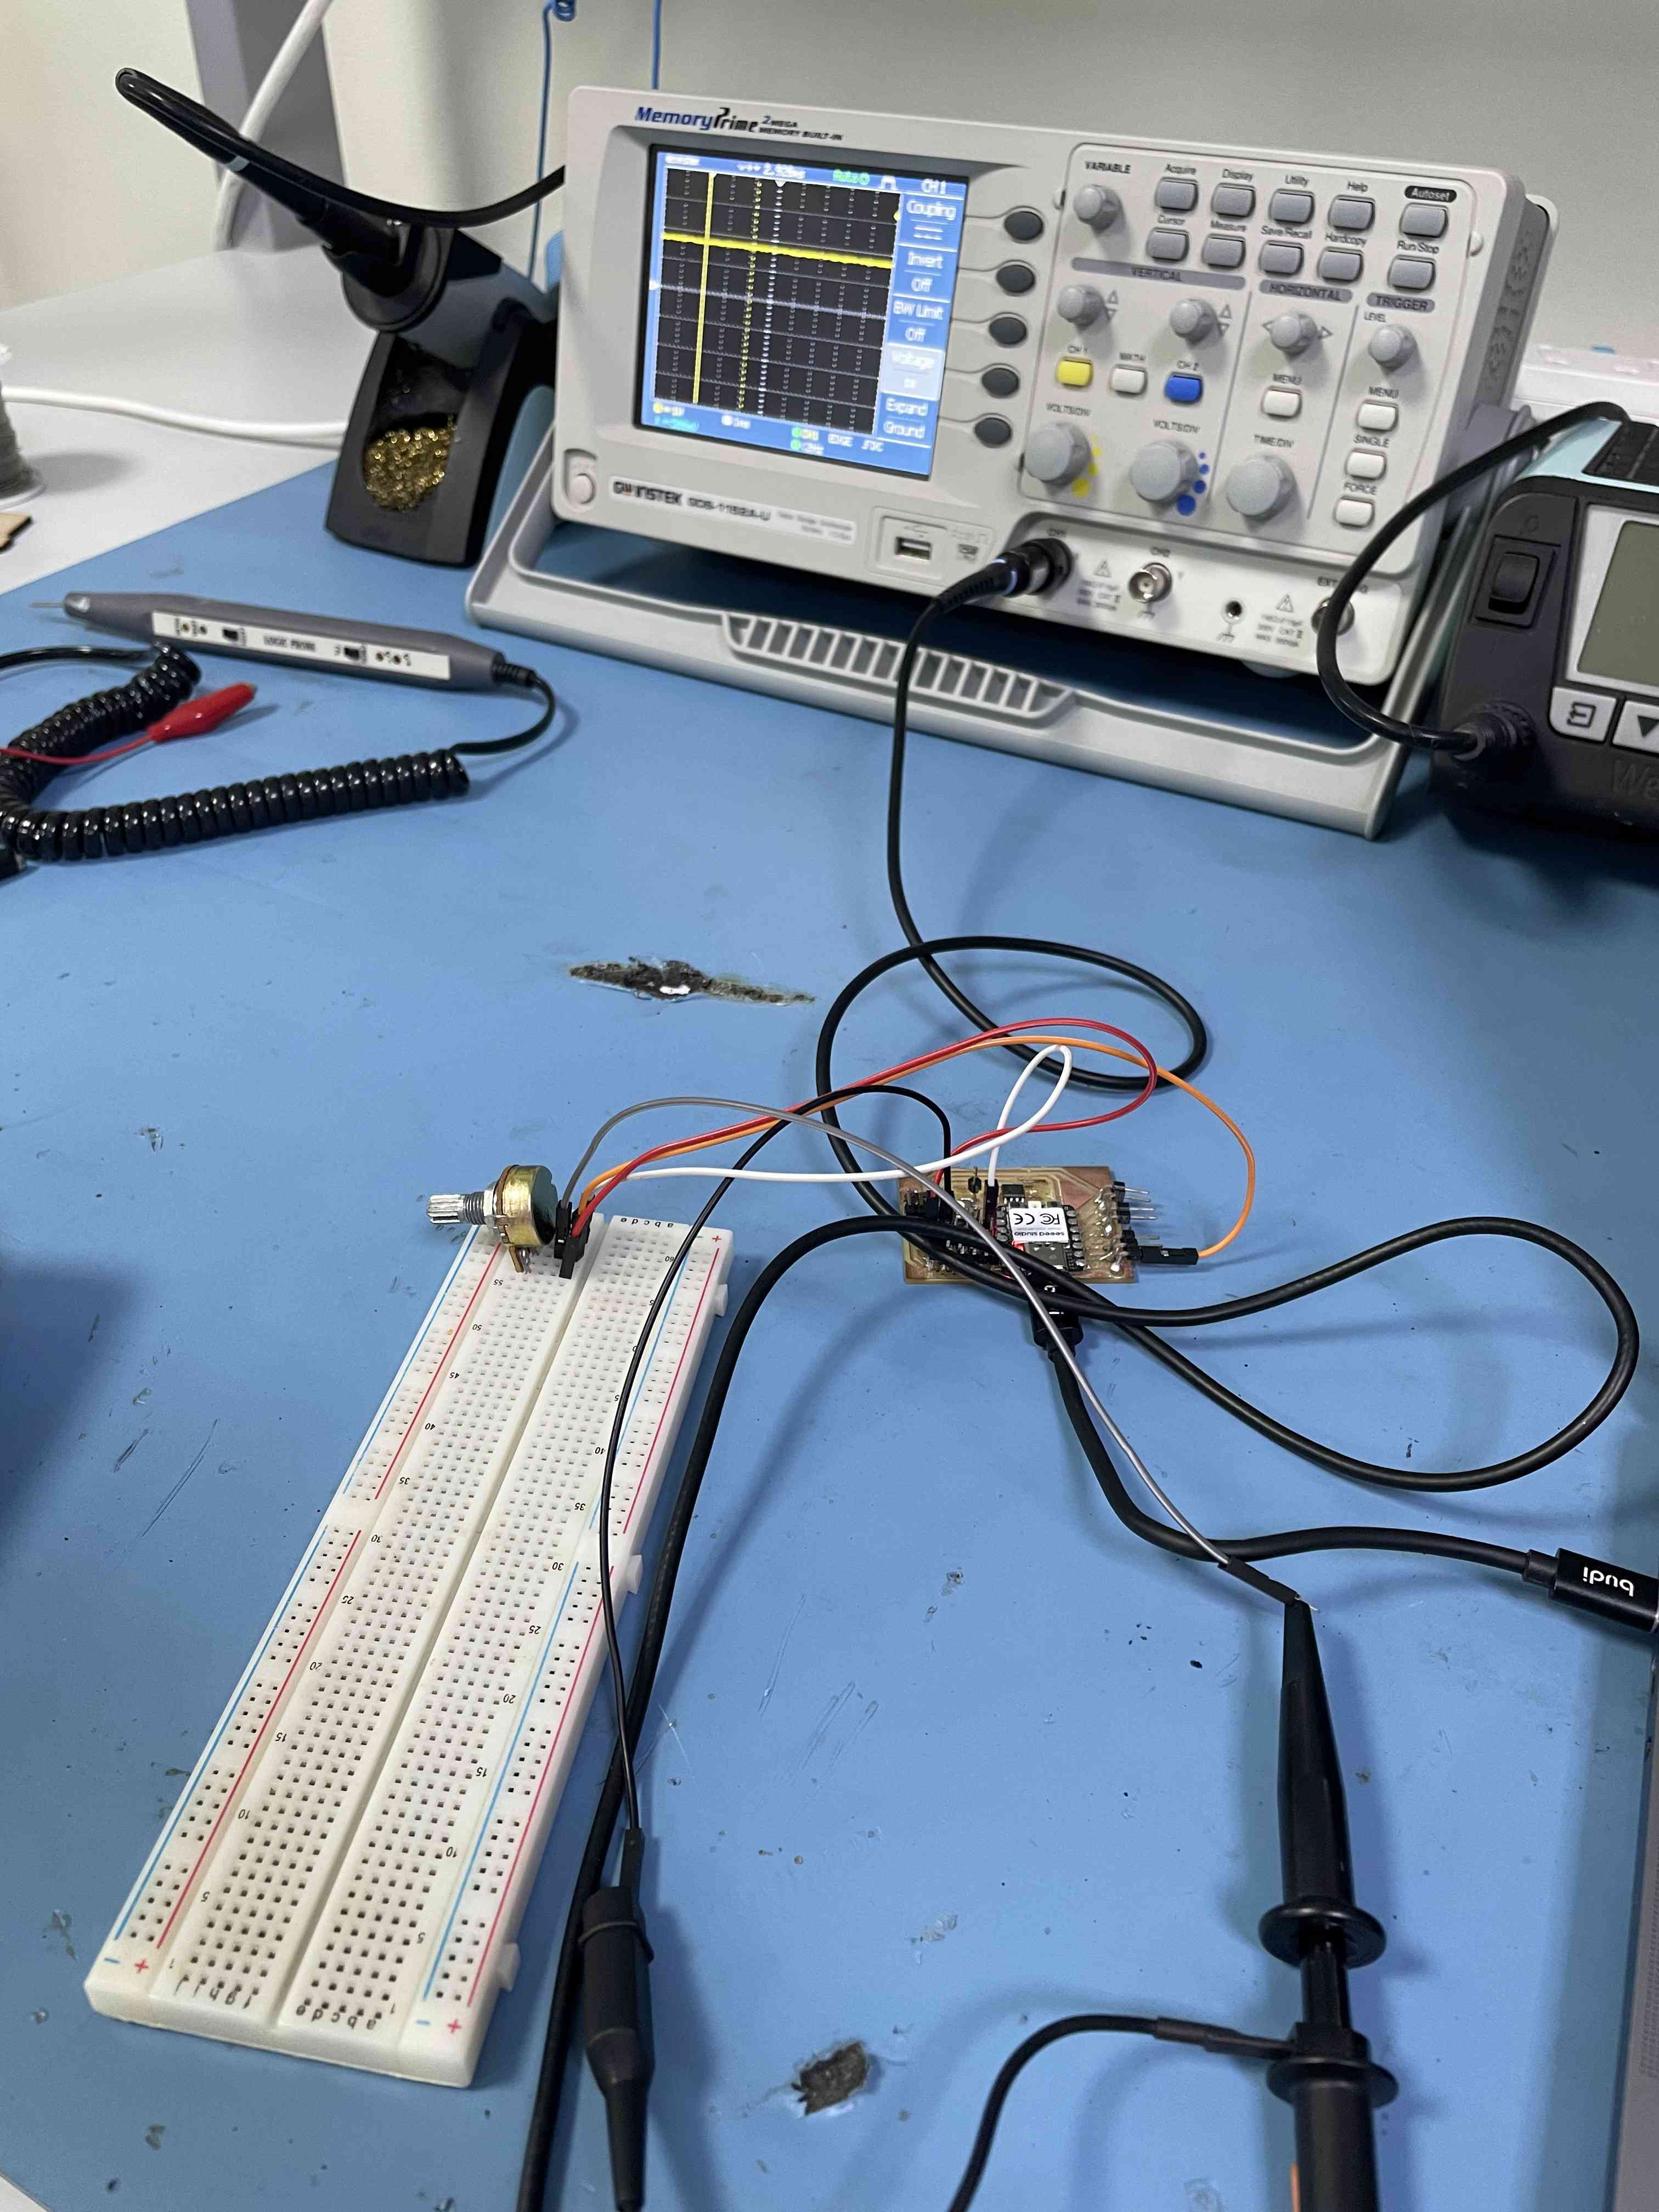
I use buttom for digital and potentionmeter for analog signl.
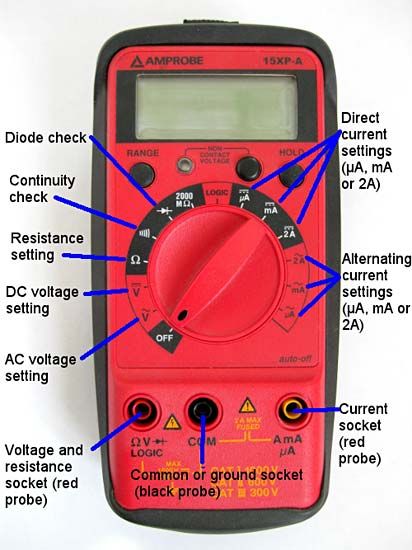
Before staring testing and getting the values let know more about "Multimeter" and "oscilloscope".
- Multimeter
A multimeter is a device used to measure multiple parameters of an electric circuit like voltage, current, and resistance. The device is made up of a digital or analog meter, batteries, resistors, and other circuitry, which ensure the measurement of several electrical quantities with very high accuracy and speed.
- Oscilloscope
An oscilloscope, formerly known as an oscillograph (informally scope, oscope, or o-scope), is an instrument that graphically displays electrical signals and shows how those signals change over time.
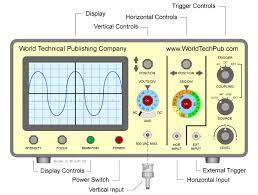
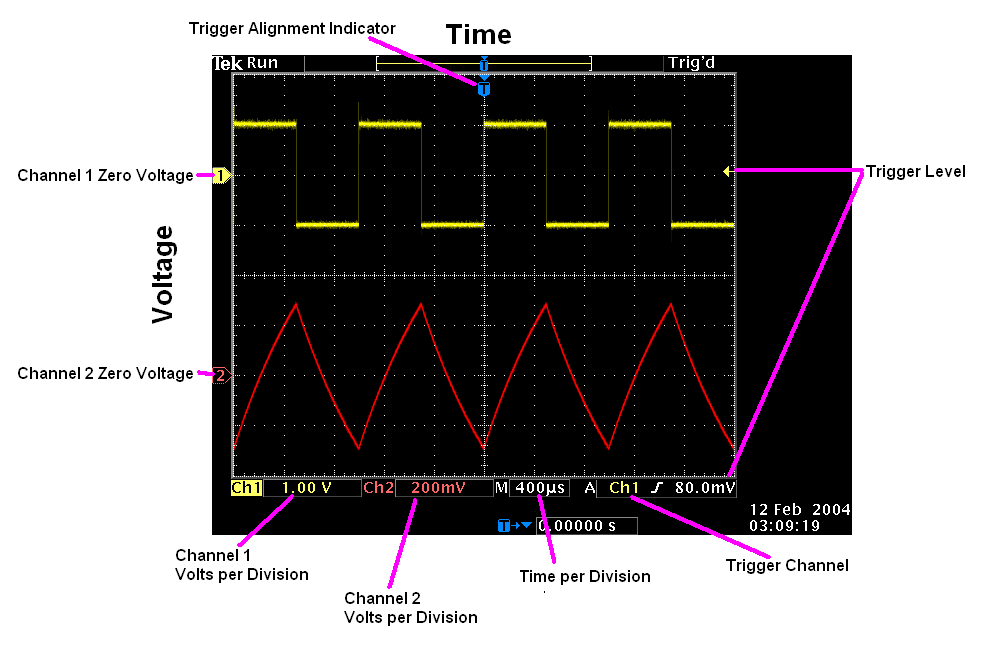
and let know about the screen and how to read it
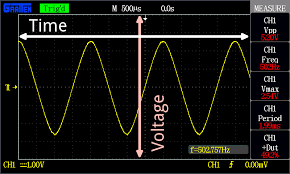
Falling Edge
Rising Edge
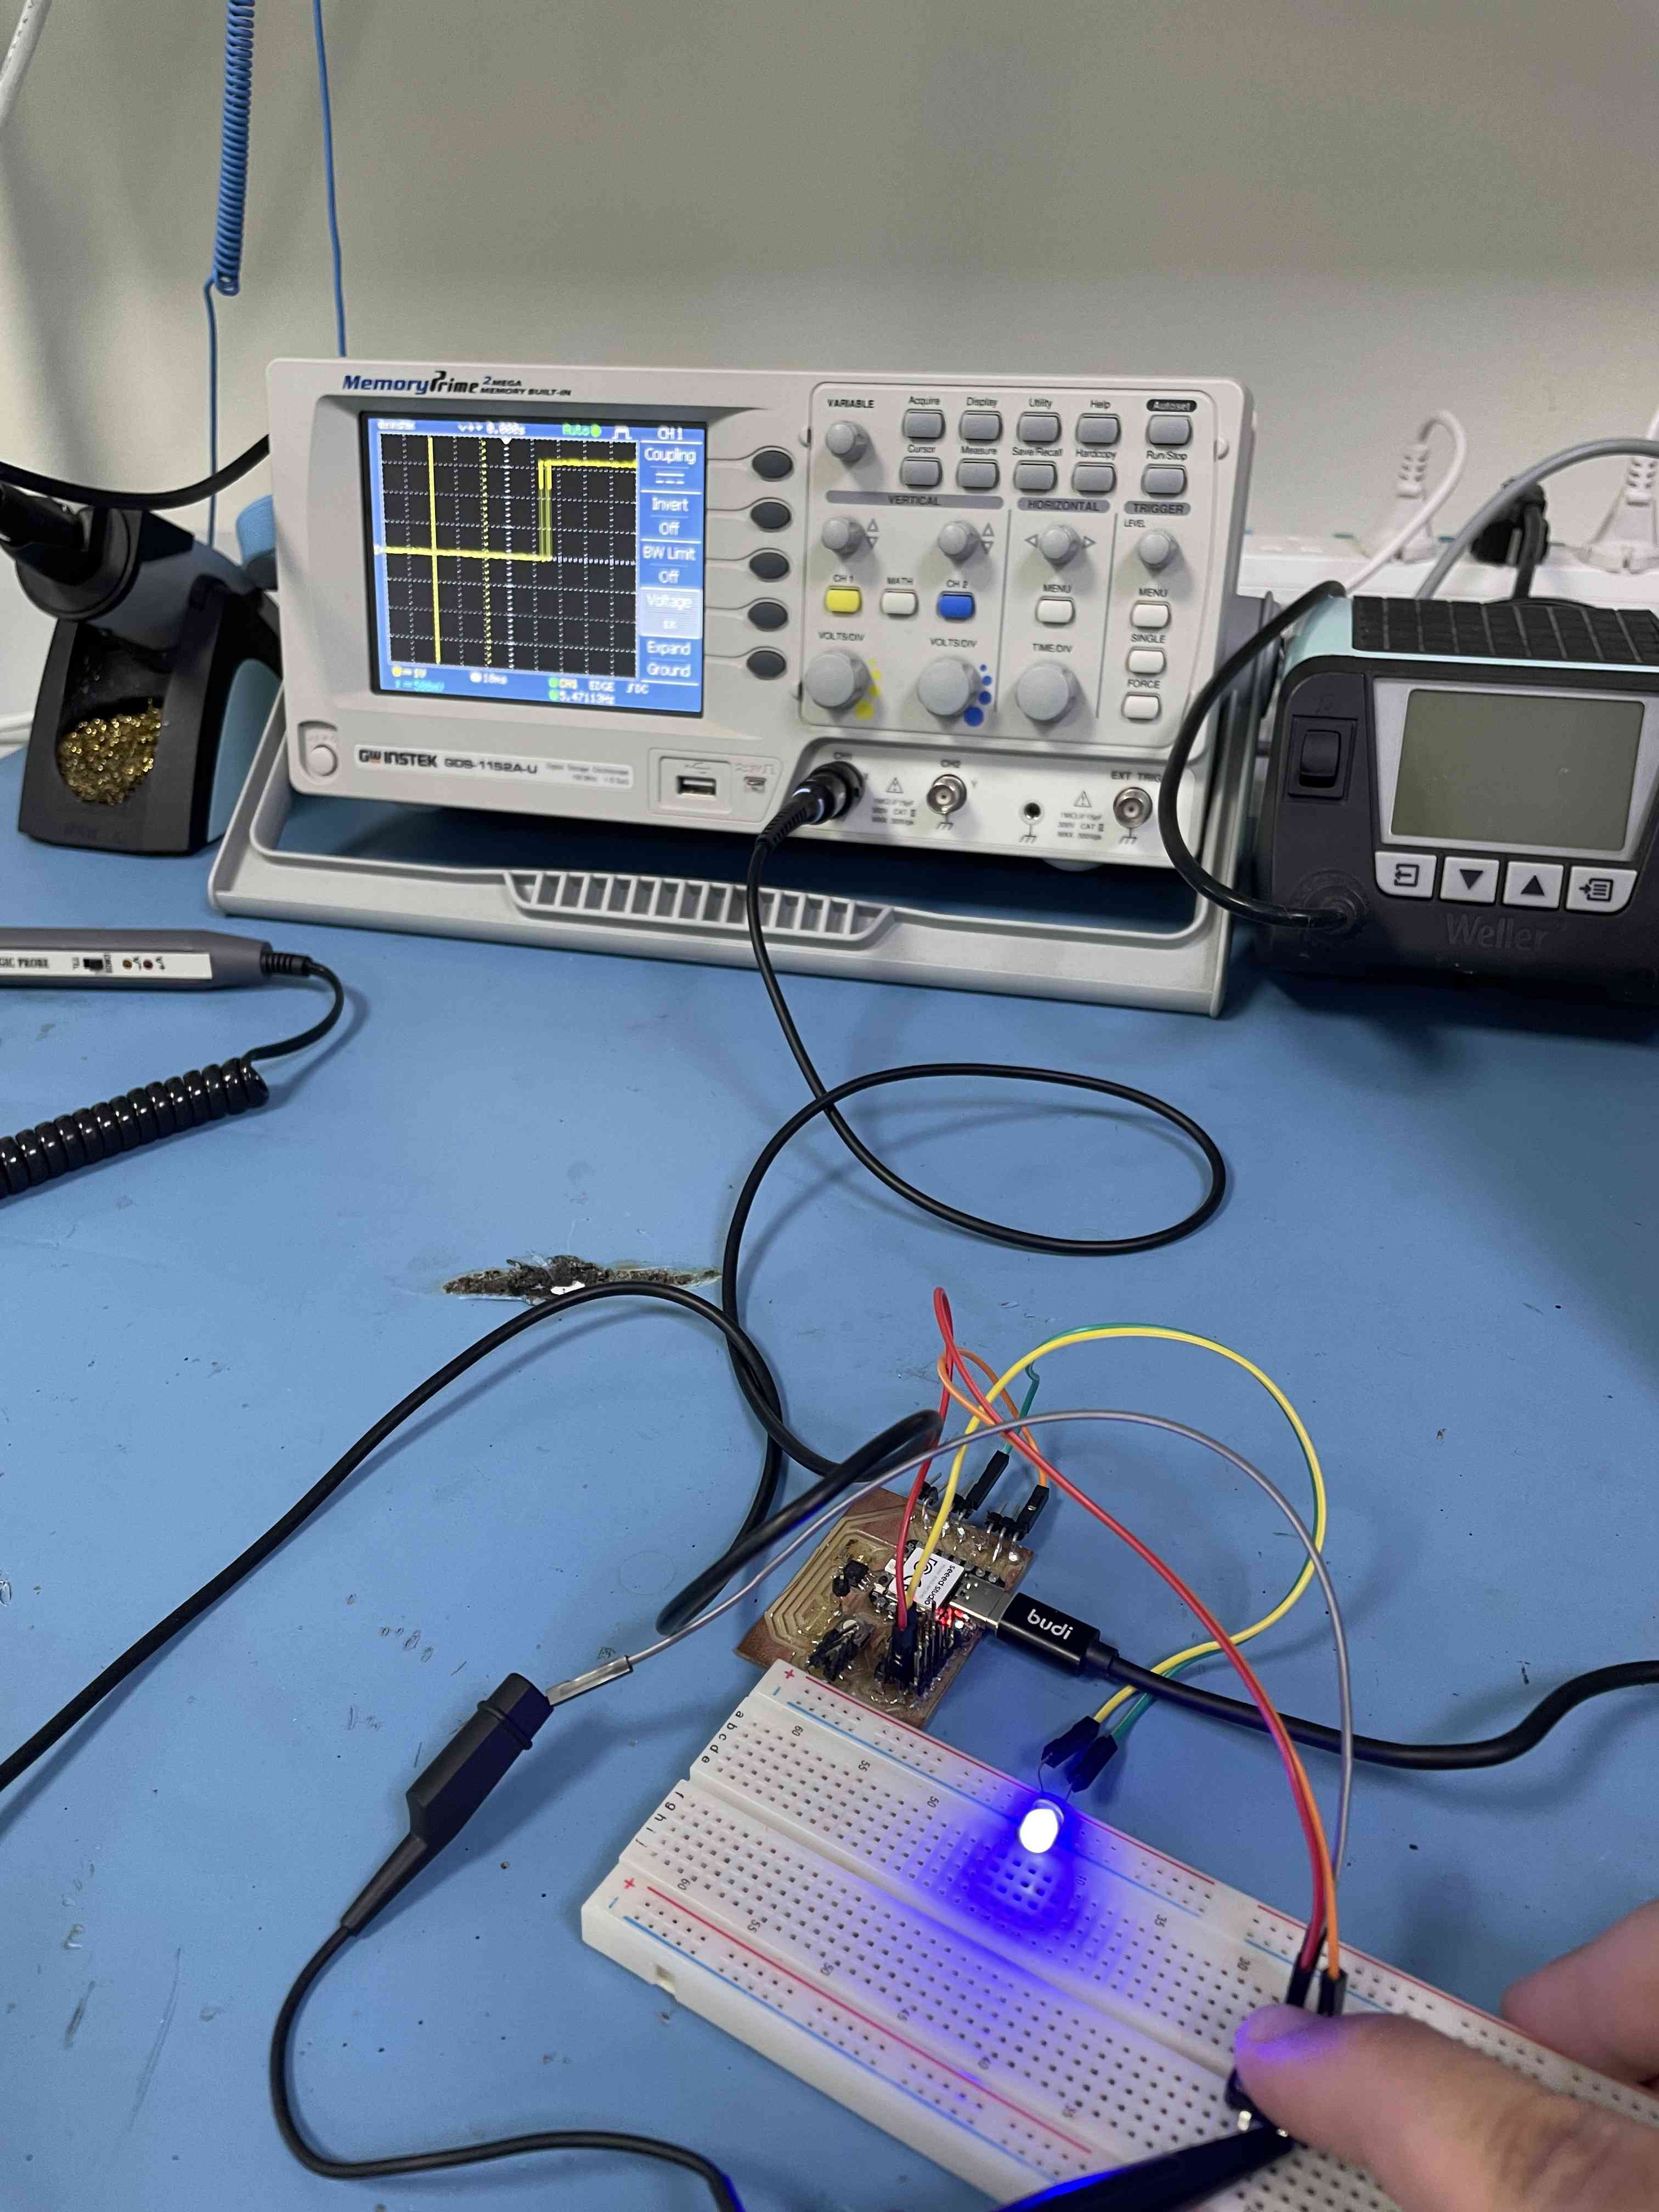
Digital: Buttom - Code:
// constants won't change. They're used here to set pin numbers:
const int buttonPin = 2;  // the number of the pushbutton pin
const int ledPin = D10;    // the number of the LED pin

// variables will change:
int buttonState = 0;  // variable for reading the pushbutton status

void setup() {
  // initialize the LED pin as an output:
  pinMode(ledPin, OUTPUT);
  // initialize the pushbutton pin as an input:
  pinMode(buttonPin, INPUT);
}

void loop() {
  // read the state of the pushbutton value:
  buttonState = digitalRead(buttonPin);

  // check if the pushbutton is pressed. If it is, the buttonState is HIGH:
  if (buttonState == HIGH) {
    // turn LED on:
    digitalWrite(ledPin, HIGH);
  } else {
    // turn LED off:
    digitalWrite(ledPin, LOW);
  }
}
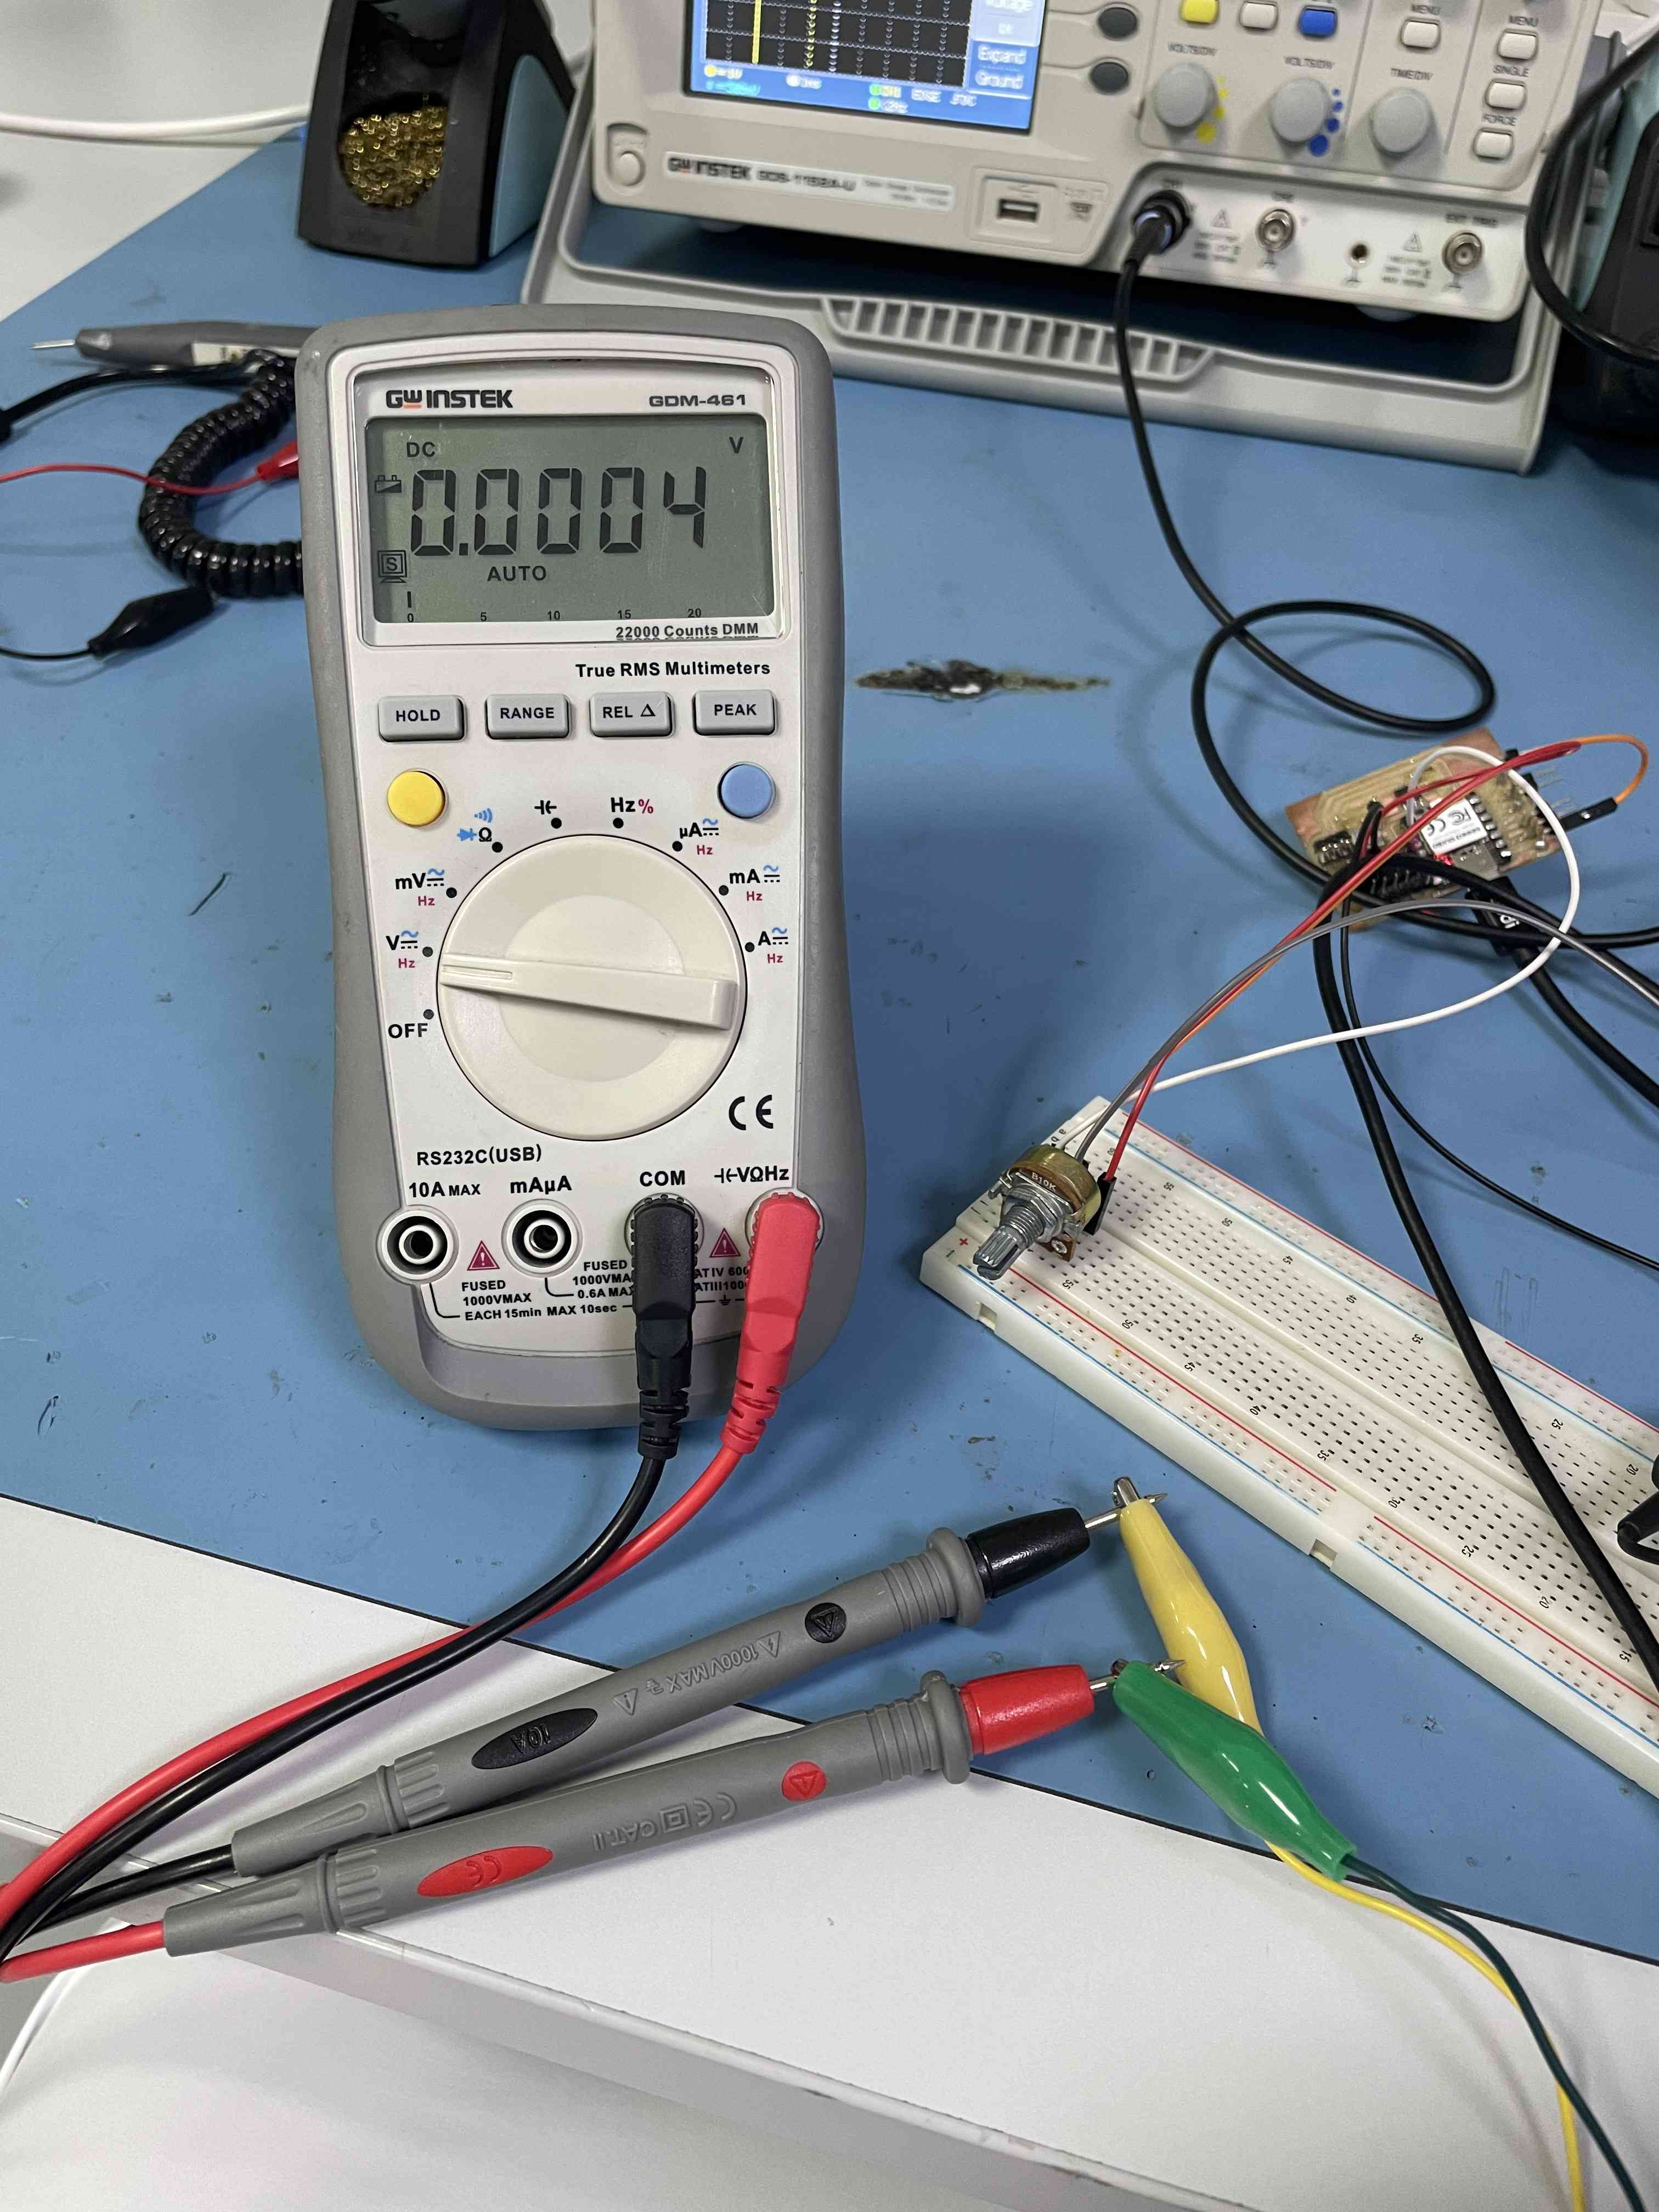
Multimeter Lowest reading
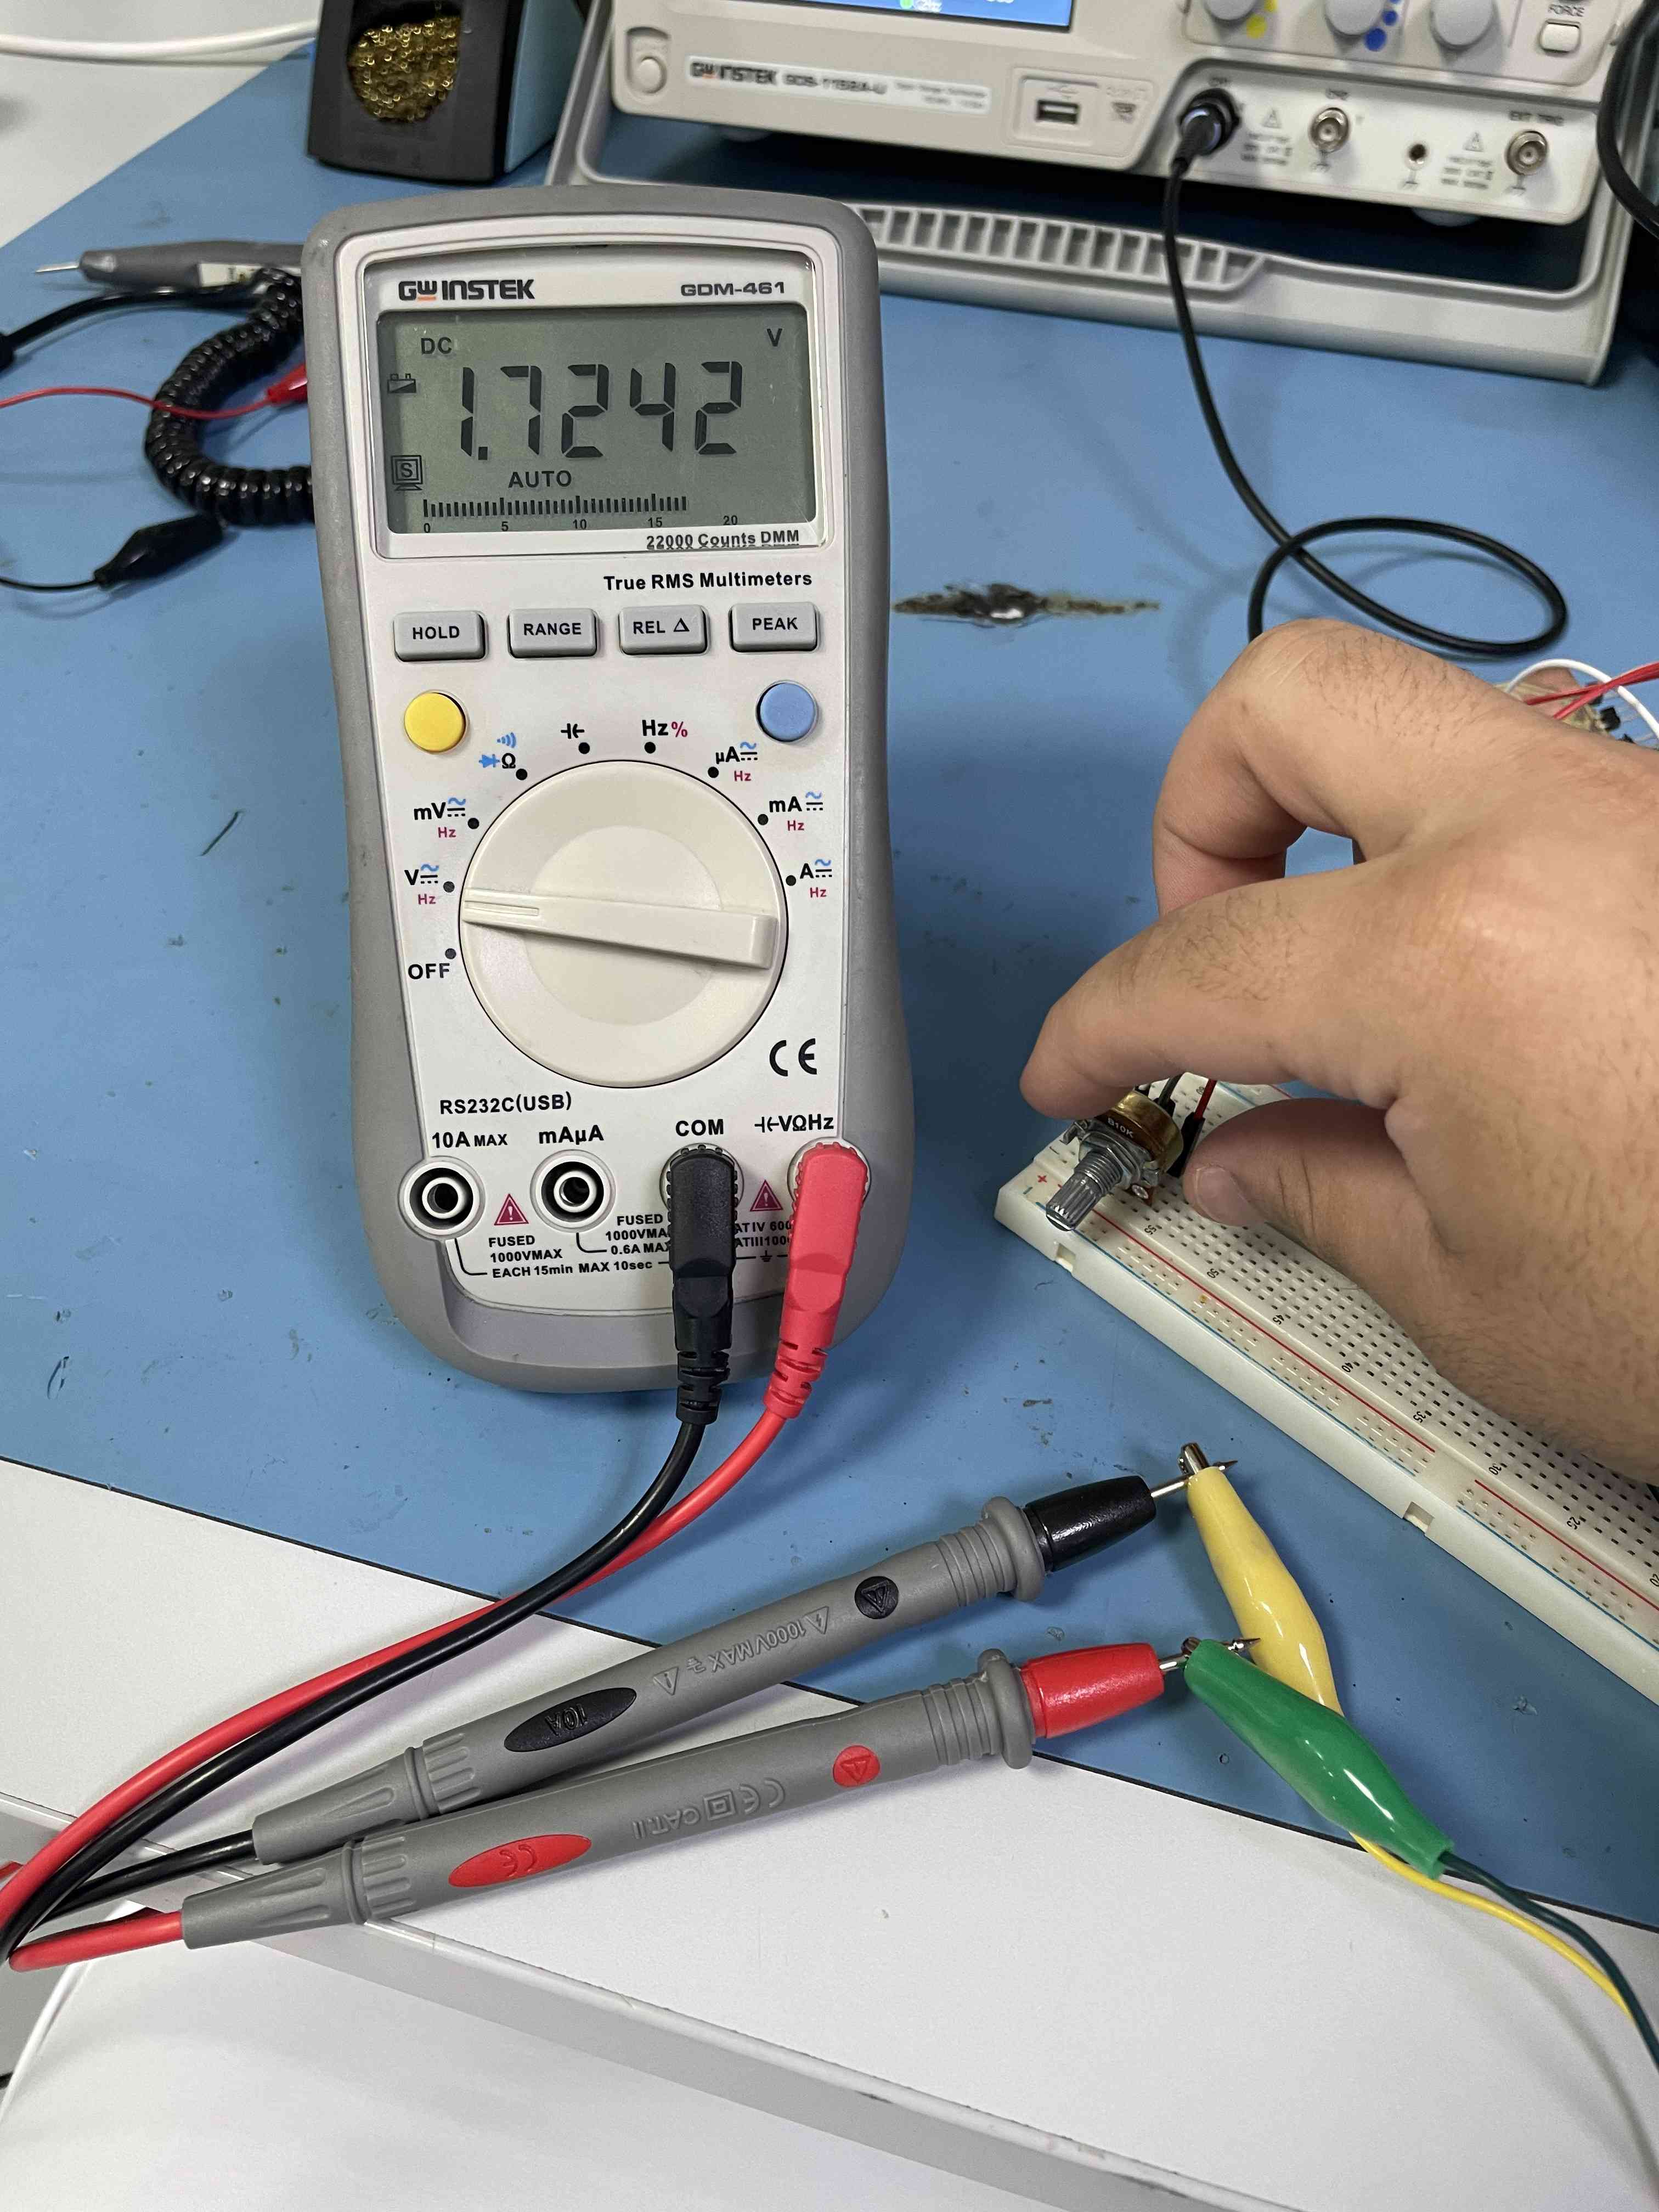
Multimeter Mid reading
Multimeter Highest reading
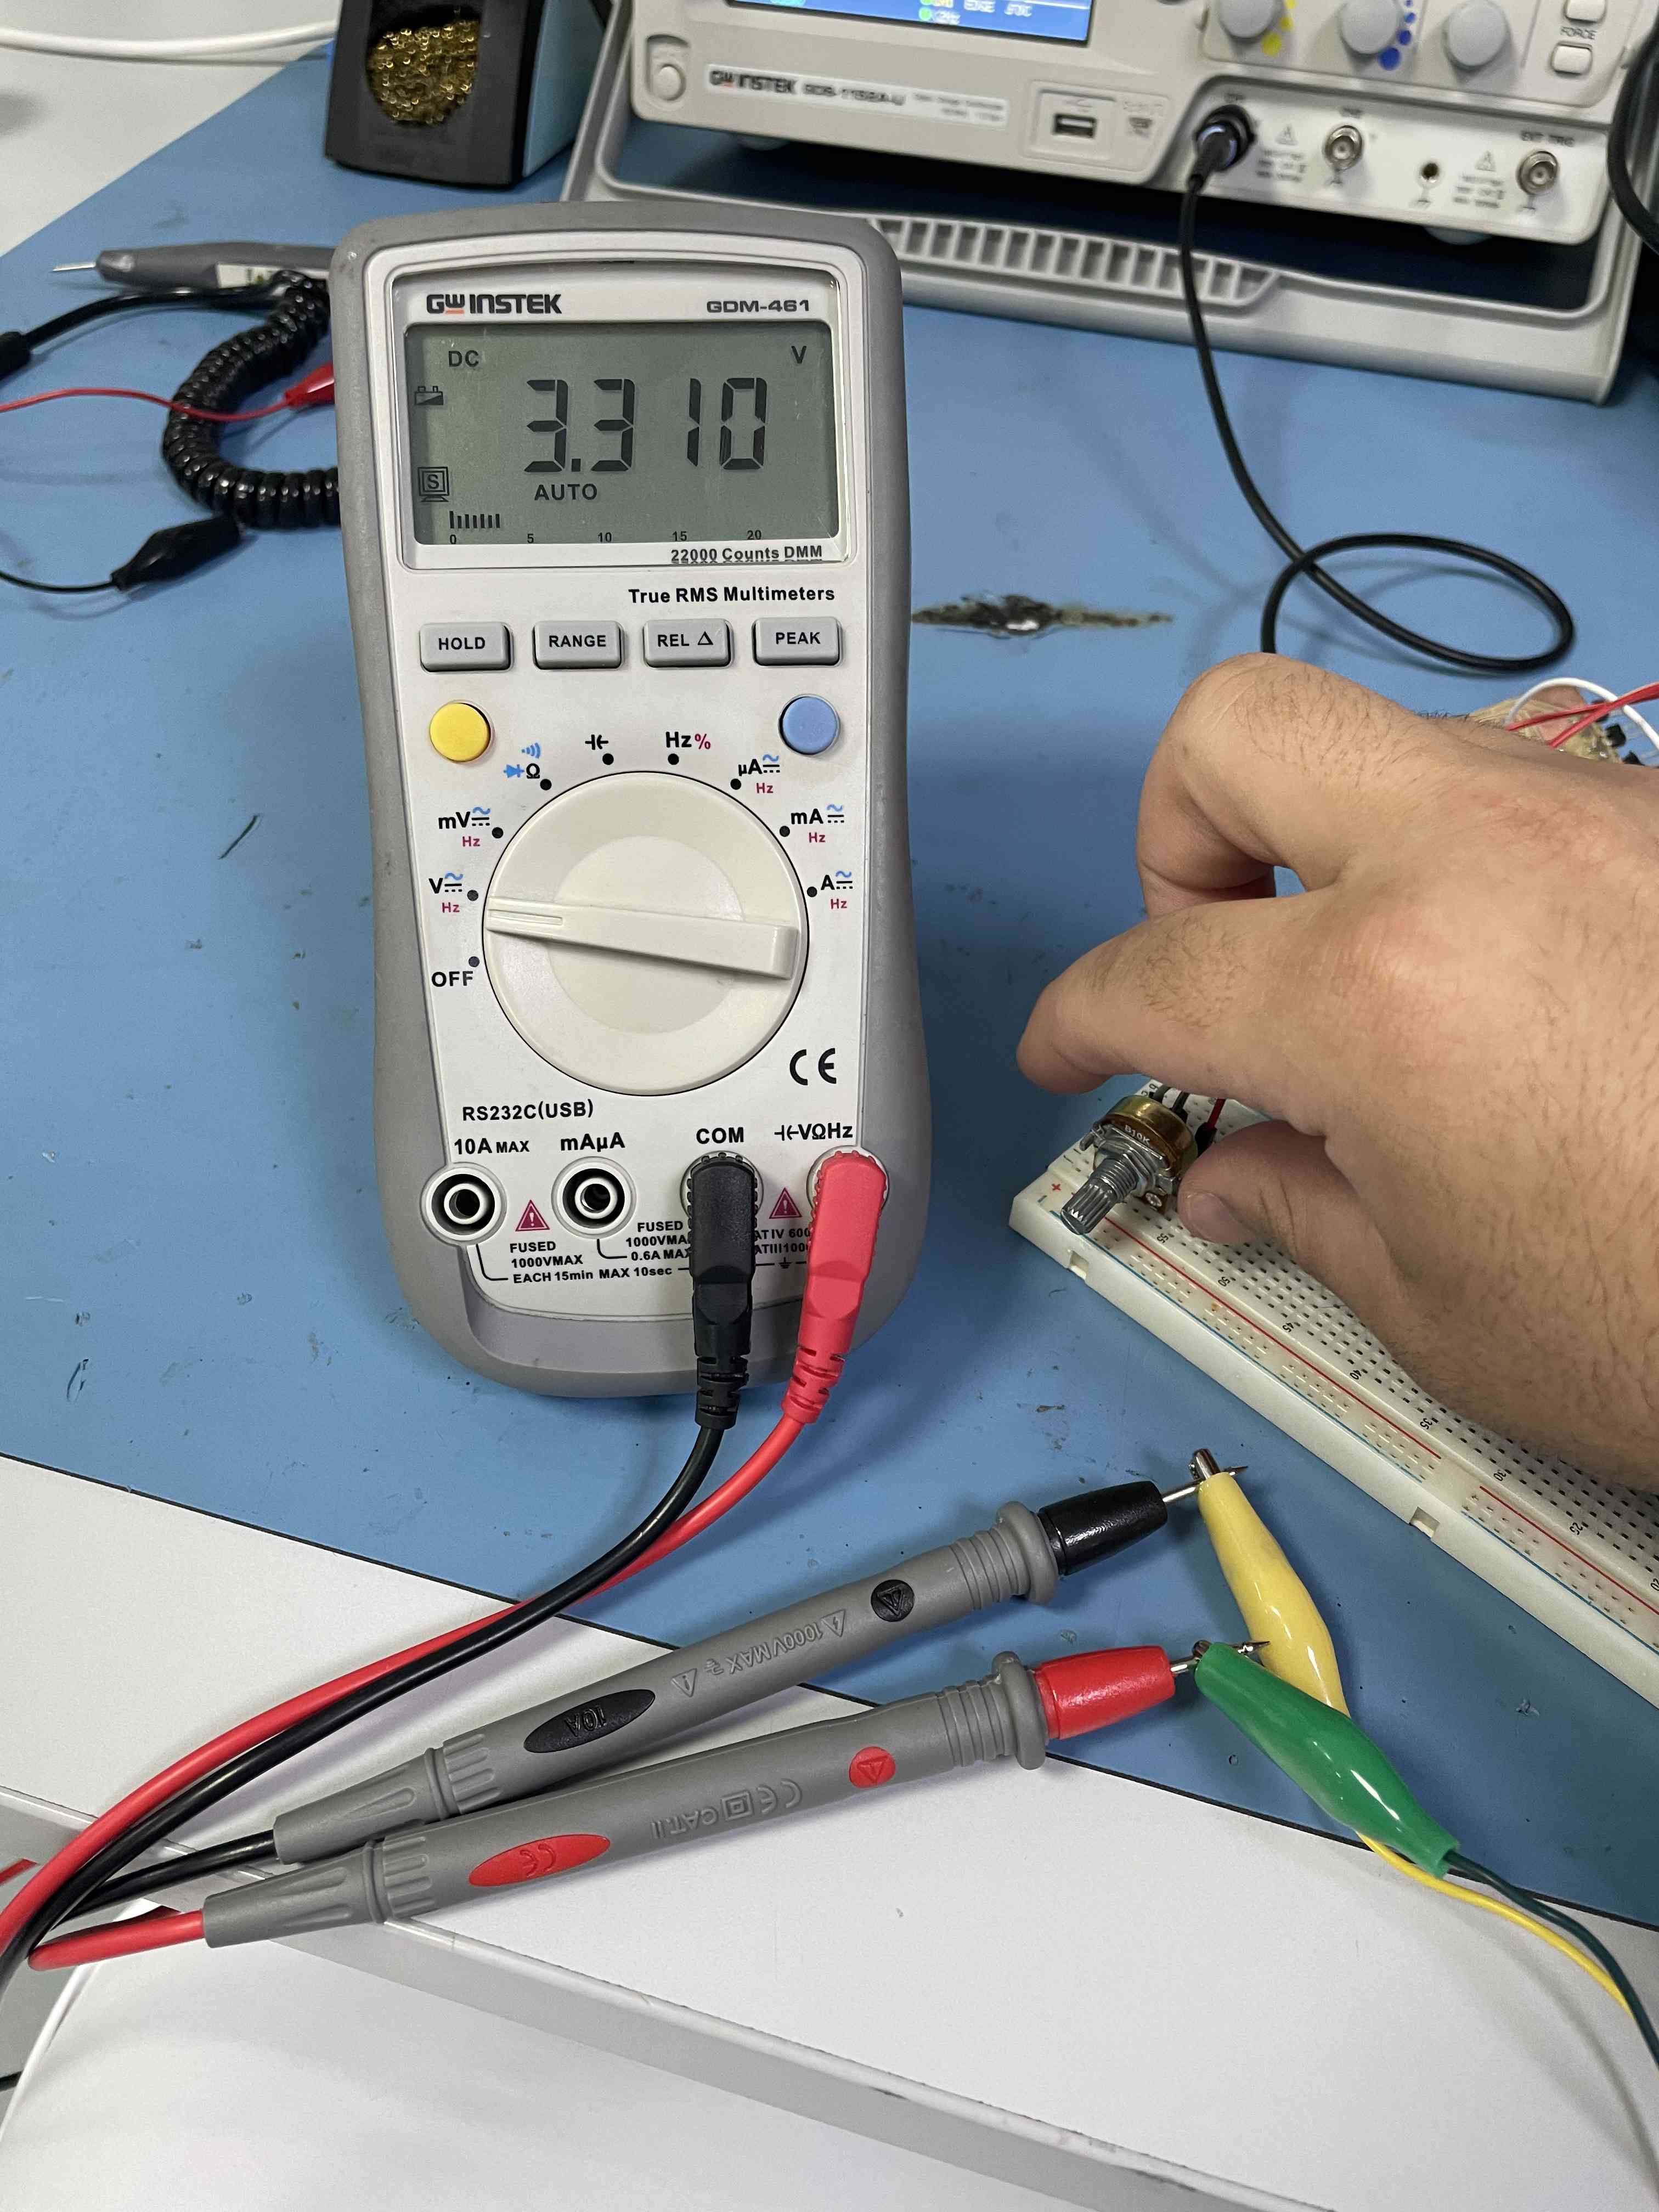
Multimeter reading
Oscilloscope signals
Multimeter & Oscilloscope
Analog: Potentionmeter - Code:
int sensorPin = A0;   // select the input pin for the potentiometer
int ledPin = 13;      // select the pin for the LED
int sensorValue = 0;  // variable to store the value coming from the sensor

void setup() {
  // declare the ledPin as an OUTPUT:
  pinMode(ledPin, OUTPUT);
}

void loop() {
  // read the value from the sensor:
  sensorValue = analogRead(sensorPin);
  // turn the ledPin on
  digitalWrite(ledPin, HIGH);
  // stop the program for  milliseconds:
  delay(sensorValue);
  // turn the ledPin off:
  digitalWrite(ledPin, LOW);
  // stop the program for for  milliseconds:
  delay(sensorValue);
}