Networking and communications
WEEK - 13
Objective
- Group assignment: (Page Link Here)
- Send a message between two projects.
- Individual assignment:
- Design, build, and connect wired or wireless node(s) with network or bus addresses.
CONTENTS
Networking and communication
Networking and communication means that electronic devices can talk to each other and share information, like sending messages to each other. They can do this using wires or without wires, and can share different kinds of information like sounds, images, and computer data.
Idea
- My idea is to create a network using a custom board with esp wroom- 02 D
So for this assignment i am going to use Client-Server Wi-Fi Communication
with HTTP protocol
A client-server Wi-Fi communication is a type of protocol that enables communication between a client device (like my esp32) and a server device (such as a web server or database server) over a Wi-Fi network.
In this type of protocol, the client device will request data from the server device, which then responds to the request and sends the requested information back to the client.
here usually the communication is initiated by the client device, which sends a request to the server device using a specific protocol that both devices understand.
here im using HTTP protocol:
The Hypertext Transfer Protocol (HTTP) is a client-server protocol that is used for transmitting data
- HTTP messages consist of a request message from the client to the server, and a response message from the server to the client.
- The request message includes a method (such as GET or POST) that specifies the action to be performed, as well as a URL that identifies the resource to be accessed.
- The response message includes a status code that indicates the success or failure of the request, as well as any data or resources that are returned by the server.
Designing the board
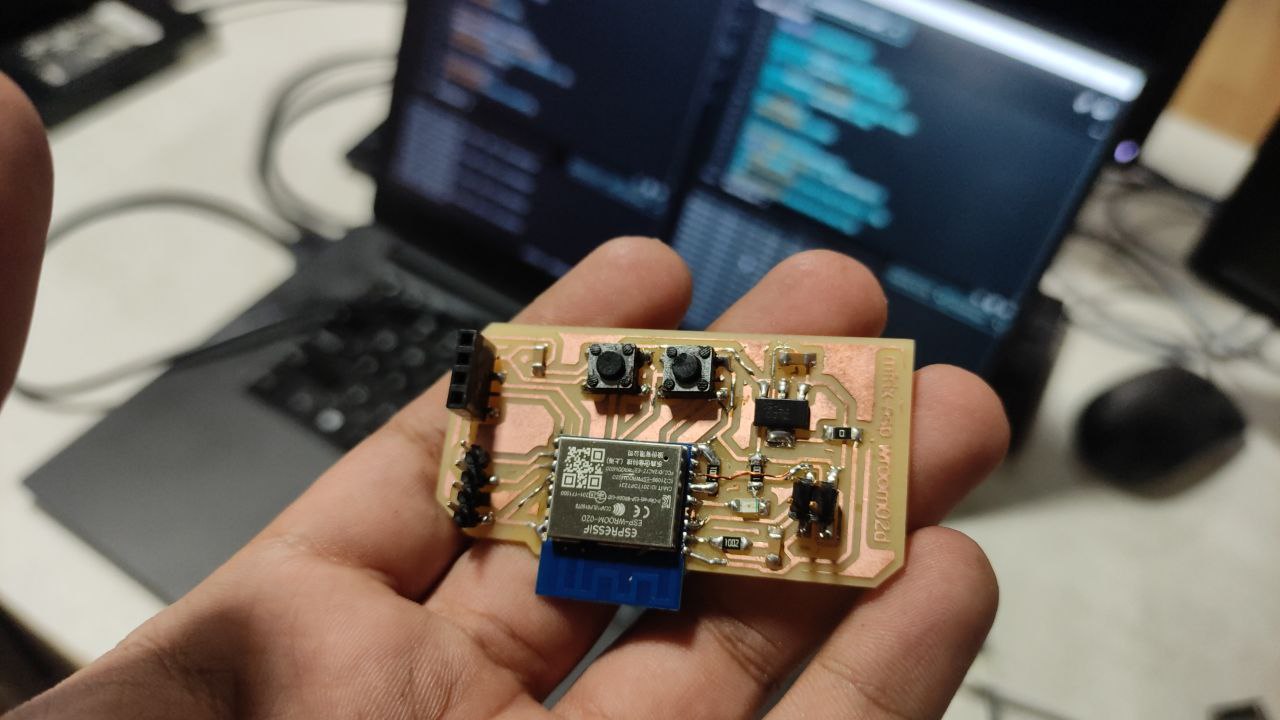
This week I’m using an ESP-WROOM-02 to build my custom board

- This is the PIN mapping of ESP-WROOM-02
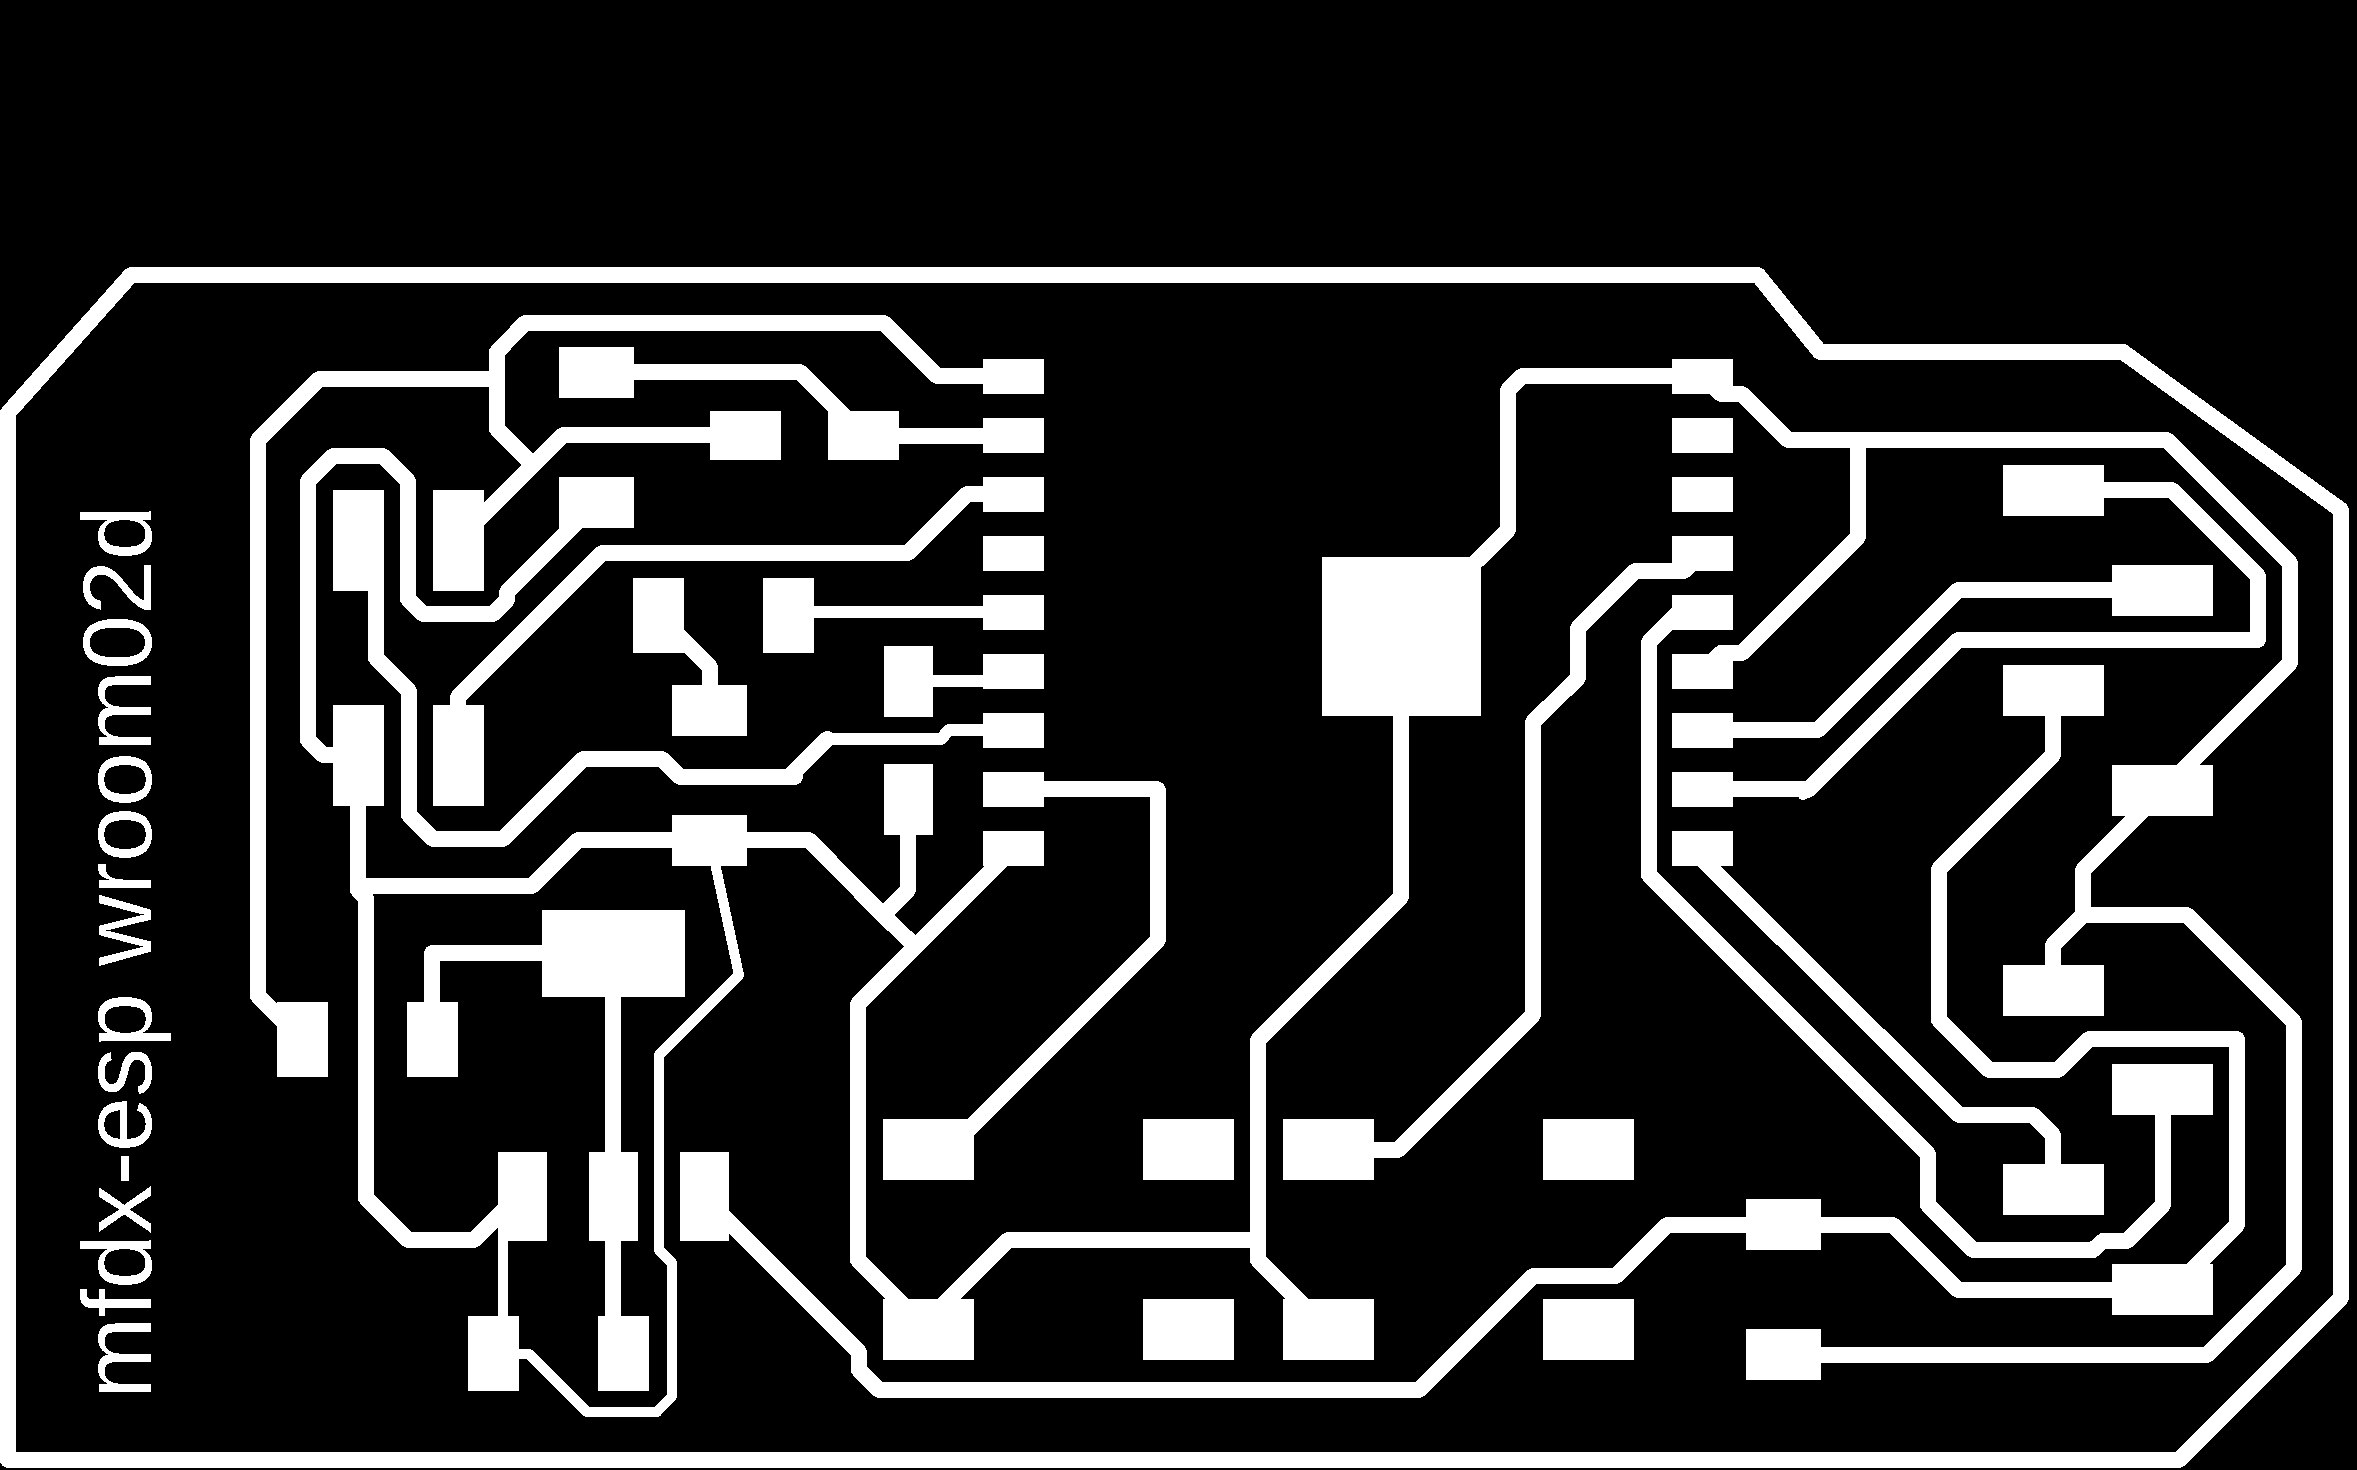
The Circuit Design

- use this to mill the board
Soldering the PCB

Programming the board
https://learn.edwinrobotics.com/getting-started-with-esp-wroom-02/ “ refer this website for the library
library : http://arduino.esp8266.com/stable/package_esp8266com_index.json

installing library
Connecting the board i made to the WIFI
So for the first step i am creating a web server in with my esp826 board
- In Arduino IDE open File>Examples>Esp8266WebServer>HelloServer

- use this code to connect to wifi
#include <ESP8266WiFi.h>
#include <WiFiClient.h>
#include <ESP8266WebServer.h>
#include <ESP8266mDNS.h>

#ifndef STASSID
#define STASSID "your-ssid"
#define STAPSK "your-password"
#endif

const char* ssid = STASSID;
const char* password = STAPSK;

ESP8266WebServer server(80);

const int led = 13;

void handleRoot() {
  digitalWrite(led, 1);
  server.send(200, "text/plain", "hello from esp8266!\r\n");
  digitalWrite(led, 0);
}

void handleNotFound() {
  digitalWrite(led, 1);
  String message = "File Not Found\n\n";
  message += "URI: ";
  message += server.uri();
  message += "\nMethod: ";
  message += (server.method() == HTTP_GET) ? "GET" : "POST";
  message += "\nArguments: ";
  message += server.args();
  message += "\n";
  for (uint8_t i = 0; i < server.args(); i++) { message += " " + server.argName(i) + ": " + server.arg(i) + "\n"; }
  server.send(404, "text/plain", message);
  digitalWrite(led, 0);
}

void setup(void) {
  pinMode(led, OUTPUT);
  digitalWrite(led, 0);
  Serial.begin(115200);
  WiFi.mode(WIFI_STA);
  WiFi.begin(ssid, password);
  Serial.println("");

  // Wait for connection
  while (WiFi.status() != WL_CONNECTED) {
    delay(500);
    Serial.print(".");
  }
  Serial.println("");
  Serial.print("Connected to ");
  Serial.println(ssid);
  Serial.print("IP address: ");
  Serial.println(WiFi.localIP());

  if (MDNS.begin("esp8266")) { Serial.println("MDNS responder started"); }

  server.on("/", handleRoot);

  server.on("/inline", []() {
    server.send(200, "text/plain", "this works as well");
  });

  server.on("/gif", []() {
    static const uint8_t gif[] PROGMEM = {
      0x47, 0x49, 0x46, 0x38, 0x37, 0x61, 0x10, 0x00, 0x10, 0x00, 0x80, 0x01,
      0x00, 0x00, 0x00, 0x00, 0xff, 0xff, 0xff, 0x2c, 0x00, 0x00, 0x00, 0x00,
      0x10, 0x00, 0x10, 0x00, 0x00, 0x02, 0x19, 0x8c, 0x8f, 0xa9, 0xcb, 0x9d,
      0x00, 0x5f, 0x74, 0xb4, 0x56, 0xb0, 0xb0, 0xd2, 0xf2, 0x35, 0x1e, 0x4c,
      0x0c, 0x24, 0x5a, 0xe6, 0x89, 0xa6, 0x4d, 0x01, 0x00, 0x3b
    };
    char gif_colored[sizeof(gif)];
    memcpy_P(gif_colored, gif, sizeof(gif));
    // Set the background to a random set of colors
    gif_colored[16] = millis() % 256;
    gif_colored[17] = millis() % 256;
    gif_colored[18] = millis() % 256;
    server.send(200, "image/gif", gif_colored, sizeof(gif_colored));
  });

  server.onNotFound(handleNotFound);

  /////////////////////////////////////////////////////////
  // Hook examples

  server.addHook([](const String& method, const String& url, WiFiClient* client, ESP8266WebServer::ContentTypeFunction contentType) {
    (void)method;       // GET, PUT, ...
    (void)url;          // example: /root/myfile.html
    (void)client;       // the webserver tcp client connection
    (void)contentType;  // contentType(".html") => "text/html"
    Serial.printf("A useless web hook has passed\n");
    Serial.printf("(this hook is in 0x%08x area (401x=IRAM 402x=FLASH))\n", esp_get_program_counter());
    return ESP8266WebServer::CLIENT_REQUEST_CAN_CONTINUE;
  });

  server.addHook([](const String&, const String& url, WiFiClient*, ESP8266WebServer::ContentTypeFunction) {
    if (url.startsWith("/fail")) {
      Serial.printf("An always failing web hook has been triggered\n");
      return ESP8266WebServer::CLIENT_MUST_STOP;
    }
    return ESP8266WebServer::CLIENT_REQUEST_CAN_CONTINUE;
  });

  server.addHook([](const String&, const String& url, WiFiClient* client, ESP8266WebServer::ContentTypeFunction) {
    if (url.startsWith("/dump")) {
      Serial.printf("The dumper web hook is on the run\n");

      // Here the request is not interpreted, so we cannot for sure
      // swallow the exact amount matching the full request+content,
      // hence the tcp connection cannot be handled anymore by the
      // webserver.
#ifdef STREAMSEND_API
      // we are lucky
      client->sendAll(Serial, 500);
#else
      auto last = millis();
      while ((millis() - last) < 500) {
        char buf[32];
        size_t len = client->read((uint8_t*)buf, sizeof(buf));
        if (len > 0) {
          Serial.printf("(<%d> chars)", (int)len);
          Serial.write(buf, len);
          last = millis();
        }
      }
#endif
      // Two choices: return MUST STOP and webserver will close it
      //                       (we already have the example with '/fail' hook)
      // or                  IS GIVEN and webserver will forget it
      // trying with IS GIVEN and storing it on a dumb WiFiClient.
      // check the client connection: it should not immediately be closed
      // (make another '/dump' one to close the first)
      Serial.printf("\nTelling server to forget this connection\n");
      static WiFiClient forgetme = *client;  // stop previous one if present and transfer client refcounter
      return ESP8266WebServer::CLIENT_IS_GIVEN;
    }
    return ESP8266WebServer::CLIENT_REQUEST_CAN_CONTINUE;
  });

  // Hook examples
  /////////////////////////////////////////////////////////

  server.begin();
  Serial.println("HTTP server started");
}

void loop(void) {
  server.handleClient();
  MDNS.update();
}
Change “ssid and password” in this code
Taking a step further, turning on/off the LED with web-server
now with the server i have created i am going to turn on the led
- now I want to turn the onboard LED using the web-server
- I got this code from https://circuits4you.com/2018/02/05/esp8266-arduino-wifi-web-server-led-on-off-control/ and edited a bit changed the LED PIN - 13
/*
 * ESP8266 NodeMCU LED Control over WiFi Demo
 */
#include <ESP8266WiFi.h>
#include <WiFiClient.h>

//ESP Web Server Library to host a web page
#include <ESP8266WebServer.h>

//---------------------------------------------------------------
//Our HTML webpage contents in program memory
const char MAIN_page[] PROGMEM = R"=====(
<!DOCTYPE html>
<html>
<body>
<center>
<h1>WiFi LED on-off demo: 1
<h1> ------------------------------------------</a><br>
<h2> Ciclk to turn <a href="ledOn">LED ON</a><br>
<h1> ------------------------------------------</a><br>
<h2>Ciclk to turn <a href="ledOff">LED OFF</a><br>
<h1> ------------------------------------------</a><br>
<h1> Don't get too excited!! more work pending</a><br>
</body>
</html>
)=====";
//---------------------------------------------------------------
//On board LED Connected to GPIO13
#define LED 13

//SSID and Password of your WiFi router
const char* ssid = "your ssid";
const char* password = "your password";

//Declare a global object variable from the ESP8266WebServer class.
ESP8266WebServer server(80); //Server on port 80

//===============================================================
// This routine is executed when you open its IP in browser
//===============================================================
void handleRoot() {
 Serial.println("You called root page");
 String s = MAIN_page; //Read HTML contents
 server.send(200, "text/html", s); //Send web page
}

void handleLEDon() {
 Serial.println("LED on page");
 digitalWrite(LED,HIGH); //LED is connected in reverse
 server.send(200, "text/html", "LED is ON"); //Send ADC value only to client ajax request
}

void handleLEDoff() {
 Serial.println("LED off page");
 digitalWrite(LED,LOW); //LED off
 server.send(200, "text/html", "LED is OFF"); //Send ADC value only to client ajax request
}
//==============================================================
//                  SETUP
//==============================================================
void setup(void){
  Serial.begin(115200);

  WiFi.begin(ssid, password);     //Connect to your WiFi router
  Serial.println("");

  //Onboard LED port Direction output
  pinMode(LED,OUTPUT);
  //Power on LED state off
  digitalWrite(LED,HIGH);

  // Wait for connection
  while (WiFi.status() != WL_CONNECTED) {
    delay(500);
    Serial.print(".");
  }

  //If connection successful show IP address in serial monitor
  Serial.println("");
  Serial.print("Connected to ");
  Serial.println(ssid);
  Serial.print("IP address: ");
  Serial.println(WiFi.localIP());  //IP address assigned to your ESP

  server.on("/", handleRoot);      //Which routine to handle at root location. This is display page
  server.on("/ledOn", handleLEDon); //as Per  <a href="ledOn">, Subroutine to be called
  server.on("/ledOff", handleLEDoff);

  server.begin();                  //Start server
  Serial.println("HTTP server started");
}
//==============================================================
//                     LOOP
//==============================================================
void loop(void){
  server.handleClient();          //Handle client requests
}- After opening the serial monitor, i got this message

- Copied this IP and opened it in a browser
Networking
Connecting the Esp32 and the Esp wroom-02d
Their are two methods through which we can send data between 2 esp modules or through which the esp8266 WiFi modules can talk with each other. In both cases one esp8266 module is in client mode and the other one in server mode.
- Send a HTTP request from client to server and the server upon receiving the particular request will perform the desired action, manipulate its Inputs Outputs etc. Consider this method as you are sending an HTTP request
- Send a HTTP request from client to server. Up on receiving the request the server replies client with some useful information.
PROGRAMMING
Code for creating the server
//code for creating hot spot server
#include <ESP8266WiFi.h>

const char* ssid = "MyHotspot";
const char* password = "MyPassword";

const uint16_t serverPort = 80;

WiFiServer server(serverPort);

void setup() {
  Serial.begin(115200);

  // Create an access point
  WiFi.softAP(ssid, password);
  IPAddress apIP = WiFi.softAPIP();
  Serial.print("Access point IP address: ");
  Serial.println(apIP);

  // Start the server
  server.begin();
  Serial.println("Server started");
}

void loop() {
  // Check for client connection
  WiFiClient client = server.available();
  if (client) {
    Serial.println("New client connected");

    // Wait for client to send data
    unsigned long timeout = millis();
    while (client.connected() && !client.available()) {
      if (millis() - timeout > 5000) {
        Serial.println("Timeout waiting for client data");
        client.stop();
        return;
      }
      delay(100);
    }

    // Read client data
    String request = client.readStringUntil('\r');
    Serial.print("Received message from client: ");
    Serial.println(request);

    // Send response to client
    client.println("Hello from ESP8266");

    // Disconnect client
    client.stop();
    Serial.println("Client disconnected");
  }
}
Code for the client
//code for client
#include <ESP8266WiFi.h>

const char* ssid = "MyHotspot";
const char* password = "MyPassword";

const IPAddress serverIP(192, 168, 4, 1);
const uint16_t serverPort = 80;

void setup() {
  Serial.begin(115200);

  // Connect to WiFi
  WiFi.begin(ssid, password);
  while (WiFi.status() != WL_CONNECTED) {
    delay(1000);
    Serial.println("Connecting to WiFi...");
  }
  Serial.println("Connected to WiFi");
}

void loop() {
  // Connect to server
  WiFiClient client;
  if (!client.connect(serverIP, serverPort)) {
    Serial.println("Failed to connect to server");
    return;
  }

  // Send message to server
  client.println("Hello from ESP8266");

  // Wait for response from server
  unsigned long timeout = millis();
  while (client.connected() && !client.available()) {
    if (millis() - timeout > 5000) {
      Serial.println("Timeout waiting for server response");
      client.stop();
      return;
    }
    delay(100);
  }

  // Read response from server
  String response = client.readStringUntil('\r');
  Serial.print("Received response from server: ");
  Serial.println(response);

  // Disconnect from server
  client.stop();

  delay(5000);
}
- in the first code In the loop function, the code checks for a client connection using the server.available() method.
- If a client is connected, the code waits for the client to send data using a timeout of 5 seconds. If no data is received within the timeout period, the client is disconnected and
shows Timeout waiting for client data
then the loop function starts over.
- If data is received from the client, the message is read using the client.readStringUntil() and printed to the serial monitor.
- A response message ("Hello from ESP8266") is sent back to the client using the client.println() method.
- in the second code for the client
In that loop function, the code creates a WiFiClient object called "client", and attempts to connect to the server using the client.connect() method, passing in the "serverIP" and "serverPort" constants defined earlier. If the connection is not successful, the code prints an error message
“Failed to connect to server” to the serial monitor and returns.
If the connection is successful, the code sends a message to the server using the client.println() method. and shows the message “Hello from ESP8266”
- here is a video of the communication happening


