Week 1: Principles and Practice / Project Management
Tasks For This Week
- Work through a git tutorial.
- Build a personal website describing you and your final project.
- Sketch a final project idea
- Complete the student agreement
GitLab Tutorial
GitLab is used for Fab Academy to store and share students' work. Before this I knew about GitHub and had accessed it, but had never uploaded anything. I found GitLab similar to navigate and once I got the hang of pushing my files it was easy to use.
GitLab allows you to see commits overtime of your work for Fab Academy, giving you version control, which is useful if you need to go back in time and see what you did. When you are collaborating you can also branch off and make another version, which in the future you can merge back into the original if you want to.
GitLab also enables the public sharing of the personal website, which I think is great as I like that a key part of Fab Academy is you share what you have made and learnt so others can do the same and build on your work.
Step 1 Install Git for Windows
- Go to https://gitforwindows.org/ to get Git Bash
- As part of setup I needed to choose a default editor, you can choose from many including Vim which is the the default for Windows when you are running the installation.
- I have used Vim in the past, but saw that there is an option for using Visual Studio Code, which is my preferred code editor. So I decided to set my default as Visual Studio Code.
- I left the rest of the settings in the installation to what they were set to as default.
Step 2 Setup Credentials
Open Git Bash at C:/users/"your name"
Set you credentials
git config --global user.name "your_username"
git config --global user.email "your_email_address@example.com"
Check credentials have been set
git config --global --list
http://fabacademy.org/2019/docs/FabAcademy-Tutorials/week01_principles_practices_project_management/git_simple.html
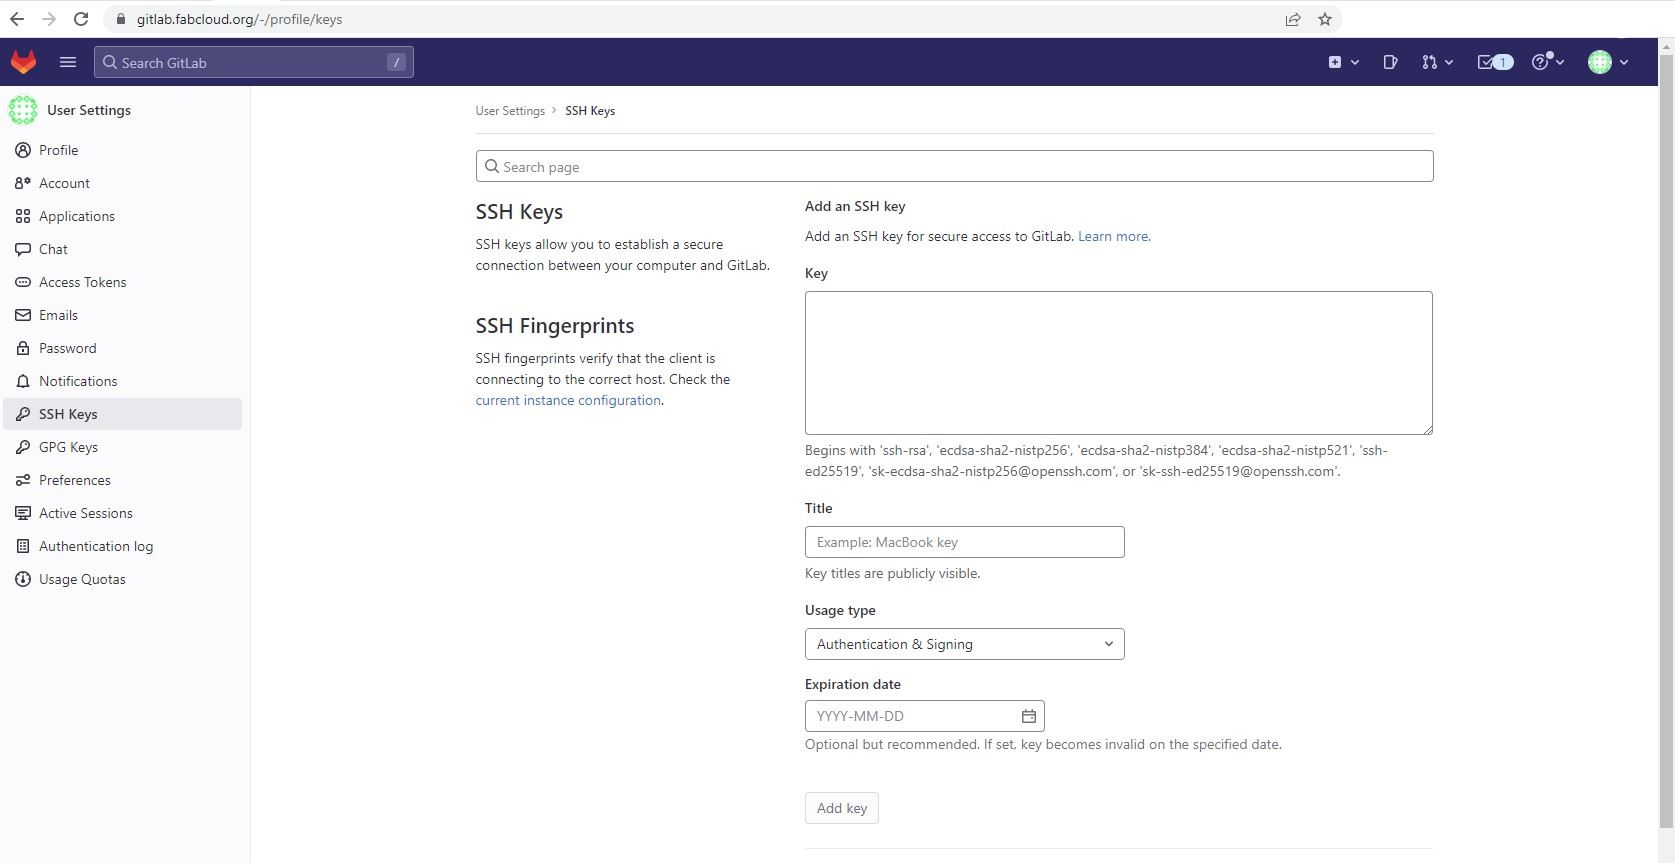
Step 3 Generate SSH Key to Connect to Git Lab
In Git Bash enter the following to generate your Key
ssh-keygen -t rsa -C "$your_email"
See your key
cat ~/.ssh/id_rsa.pub
Copy your Key
clip < ~/.ssh/id_rsa.pub
Open Git Lab and go to User Settings > SSH Keys
Under Add an SSH Key, paste the key you have copied into the Key textbox and give it a Title and set an Expiration Date
Step 4 Clone Repository
In Git Bash type
git clone "name of repository"
Go to your file folders to see the Cloned Repository
Open Git Bash in your Repository
You can now use the following commands to update, add and commit changes to your Git Repository
git pull
git status
git commit -m "change description"
git push
Create a Website
Step 1 Create a Website using MkDocs
In the past I have used website builders such as Sqaurespace, Wordpress and Dreamweaver. It was suggested by the team at Kamakura that I try out making a website using MkDocs and Markdown language.
I have not used MkDocs or Markdown before, I had a look at the documentation available at https://www.mkdocs.org/user-guide/ and I also asked ChatGPT by OpenAi to write me a guide on how to make a website with mkdocs:
- Install MkDocs: To use MkDocs, you will first need to have Python installed on your computer. Once Python is installed, you can install MkDocs using pip by running the command "pip install mkdocs" in your command line.
- Create a new project: Once MkDocs is installed, navigate to the directory where you want to create your new project, and run the command "mkdocs new projectname" to create a new project. This will create a new directory with the specified name, containing the basic file structure for your new project.
- Add content: Navigate to the new directory and add your Markdown files to the "docs" folder. These files will be used to create the pages of your website. You can also add images, videos, and other files to the "docs" folder, and they will be included in the website.
- Edit the configuration file: The "mkdocs.yml" file in the root directory of your project contains the configuration for your website. You can edit this file to change the title, theme, and other settings for your website.
- Preview your website: Run the command "mkdocs serve" in the root directory of your project to preview your website. This will start a local web server, and you can view your website by opening a web browser and navigating to "http://localhost:8000".
- Build and Deploy: Once you are satisfied with the result, you can build your website using the command "mkdocs build" and then deploy the website to a web server.
- Customize: You can customize the look and feel of your website by changing the theme, or by creating a custom theme. You can also add extra functionality to your website by using plugins.
Note:
• Make sure you have the latest version of mkdocs installed
• Once deployed, the website will be a static one, so it will not support any dynamic operations.
This guide is a basic overview on how to create a website with MkDocs and Markdown, there are a lot more things you can do with it.
Source: ChatGPT Jan 9 Version
Key Words Used: write a guide on how to make a website with mkdocs and markdown
I was able to use the guide generated by ChatGPT to create my base mkdocs website. ChatGPT does not always get things 100% correct, however it is a useful tool. One of the downsides is you are unable to get the source that the information it has generated has come from, so you are unable to include acknowledgements in your documentation.
Mkdocs new site creation

Running mkdocs serve to see what site looks like
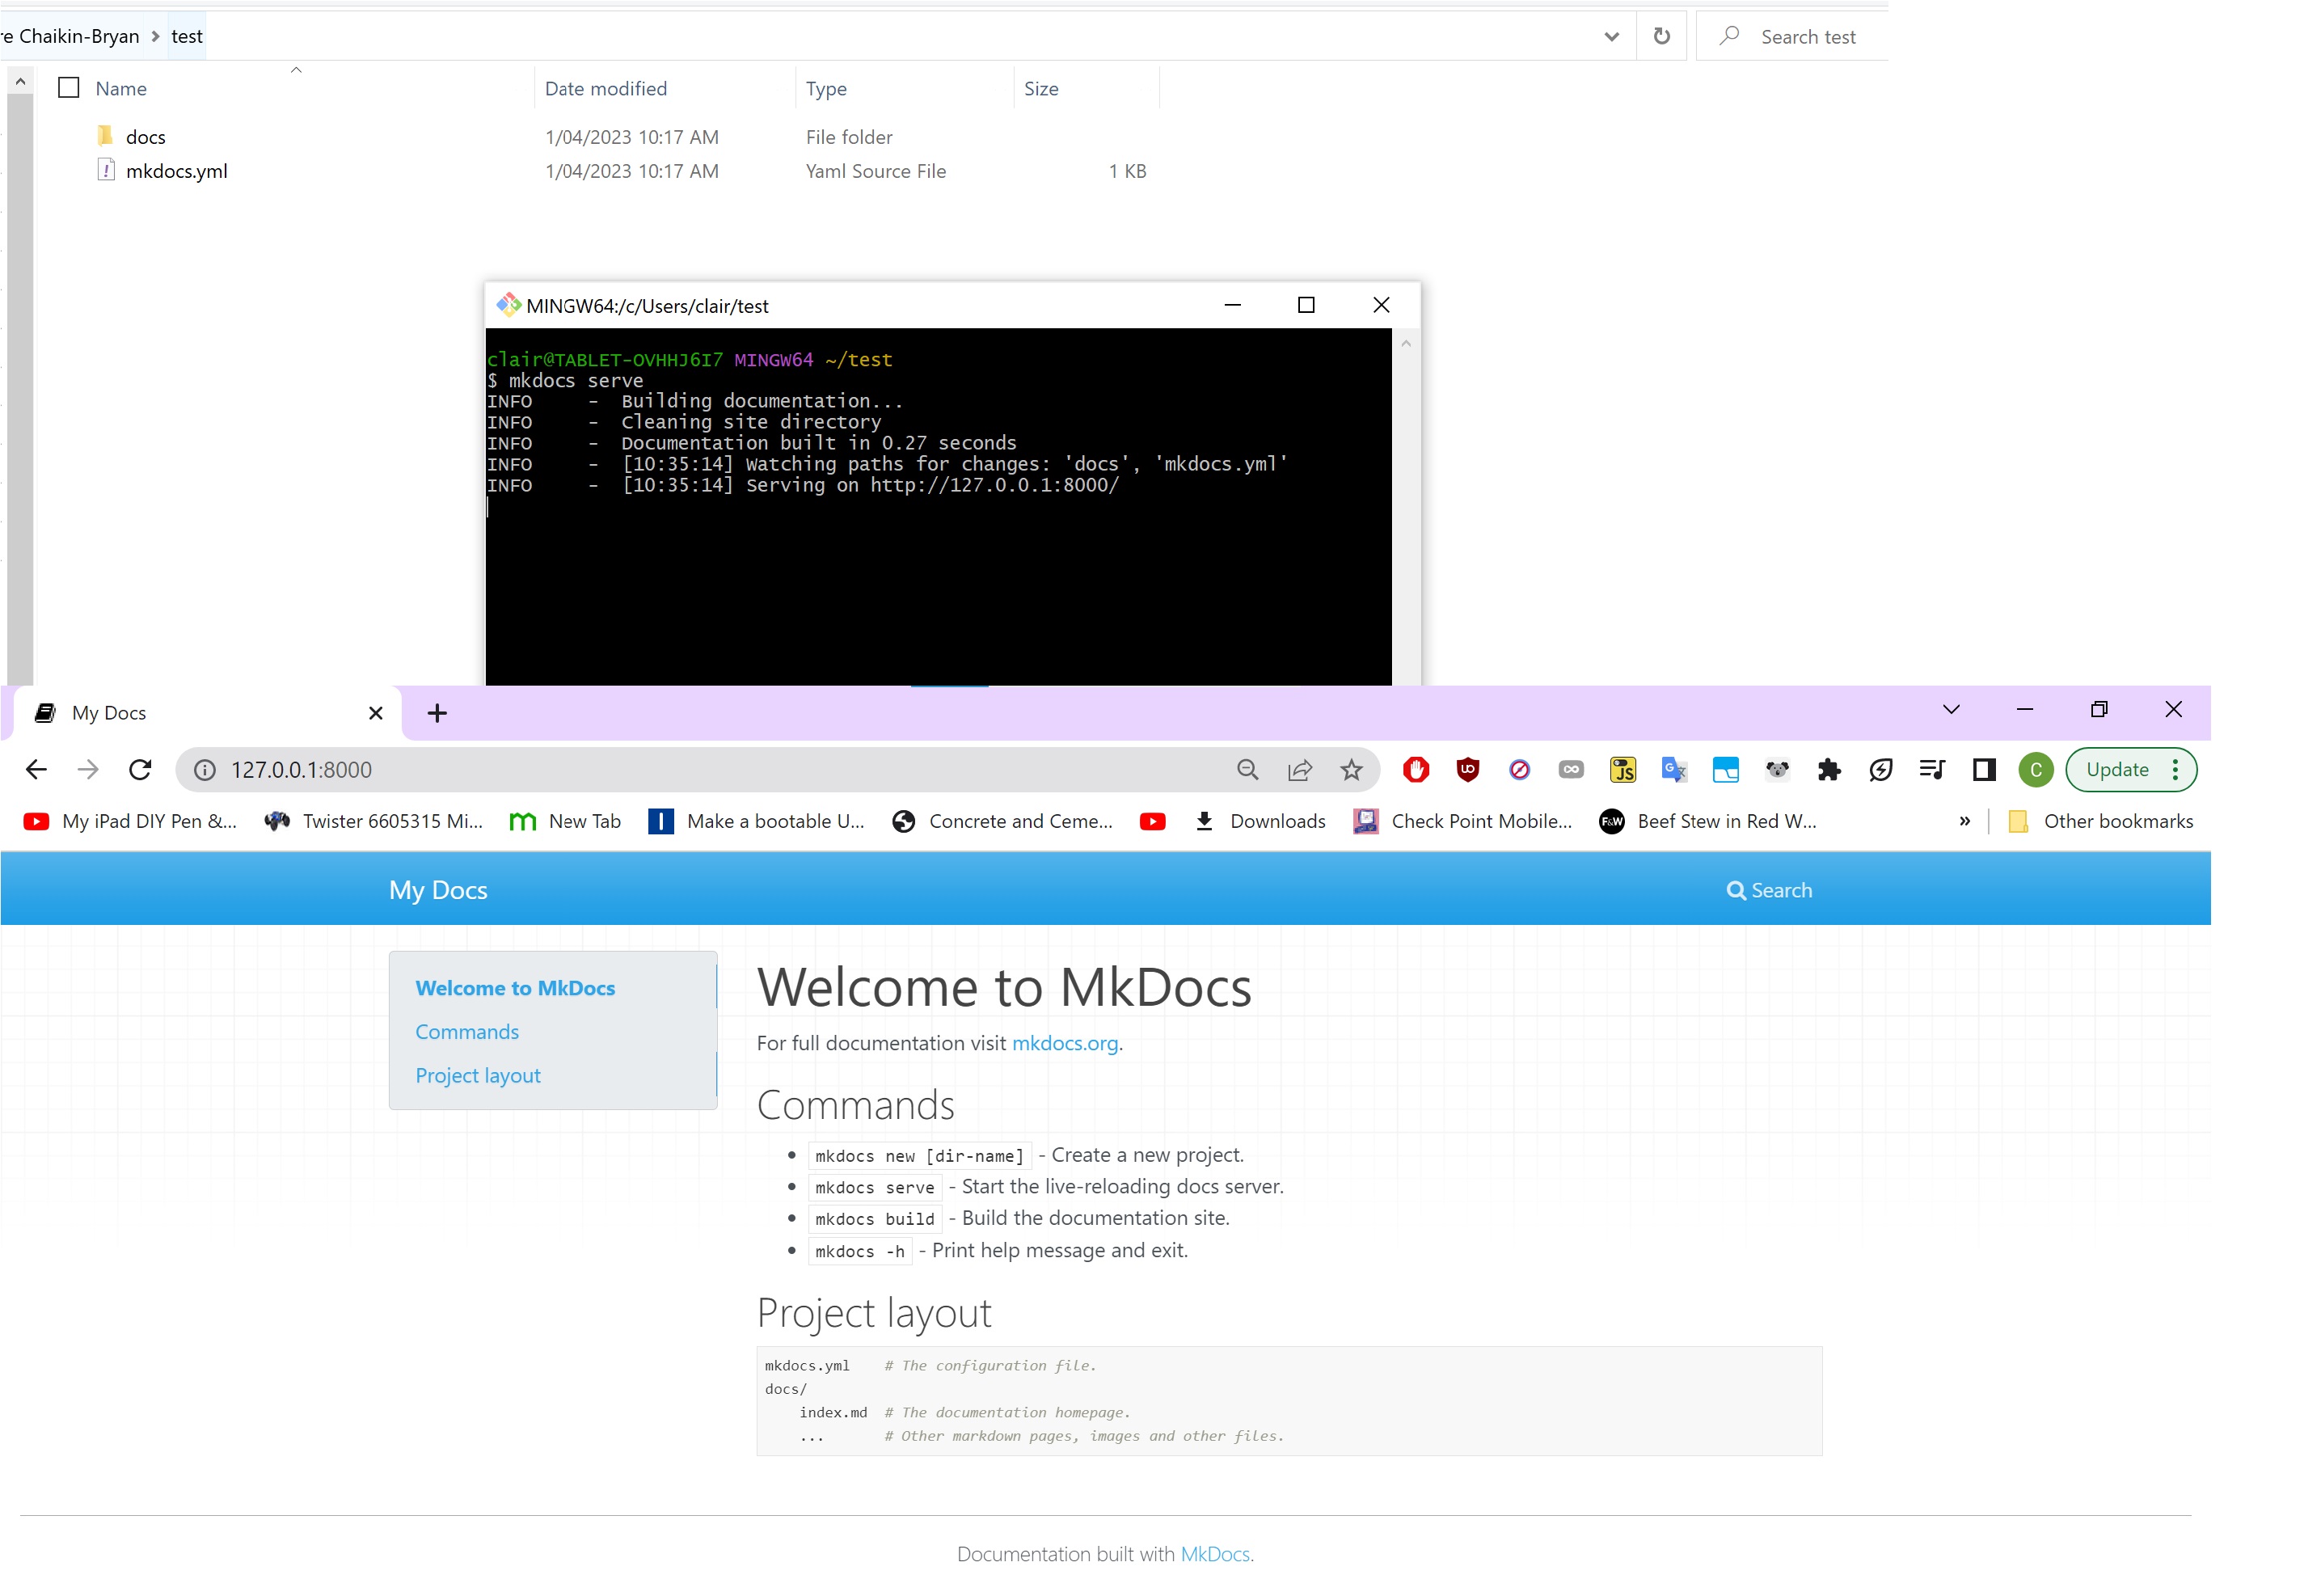
Note: To exit mkdocs serve type Control+C in the command line (in the above case I used Git Bash to serve the mkdocs site)
I also asked ChatGPT to explain to me the difference between Markdown and html as I have not used Markdown before:
Markdown and HTML are both languages used to create and format content for the web, but they have some key differences.
- Markdown is a simpler and more lightweight markup language compared to HTML. It uses a more readable and easy-to-write syntax, which makes it a popular choice for creating content for the web, such as blog posts, documentation, and README files.
- In contrast, HTML is a more powerful and versatile markup language, with a larger set of tags and attributes that can be used to create a wide range of elements and styles. HTML is used to create more complex and interactive web pages, such as online stores, social media platforms, and news websites.
- Markdown uses simple, easy-to-remember symbols to format text, such as # for headings, * for bullet points, and > for blockquotes. In contrast, HTML uses tags, such as h1, ul, and blockquote to format text.
- Markdown is designed to be easy to read and write, even when not rendered, whereas HTML is designed to be rendered by a browser and may not be as easy to read when viewed as raw code.
- Markdown is a limited set of syntax compared to HTML but it's also more human-readable, and it can be converted to HTML with the help of libraries. HTML can also be transformed to markdown but it's less common and less straightforward.
In summary, Markdown is a simpler, more user-friendly markup language, that's best suited for creating content for the web, while HTML is a more powerful and versatile language, that's best suited for creating complex and interactive web pages.
Source: ChatGPT Jan 9 Version
Key Words Used: how is markdown syntax different to html
Note: If you are creating a list or a table make sure to put an empty line in your Markdown code before the list of table otherwise it will not render properly
Step 2 Setup Website Theme
There are a number of third party theme templates available for MkDocs to get you started https://github.com/mkdocs/mkdocs/wiki/MkDocs-Themes
I first tried out the Cinder theme.
I was able to customise this theme by downloading the theme to my computer, unzipping the file and adding the folder to the top level of my repository. I was then able to manipulate the CSS code to change the colour palette of the site. To make the custom theme run on your site you need to add the following to your mkdocs.yml:
theme:
  name: null
  custom_dir: 'custom theme name'
There is an extensive guide for customising the Material theme available https://squidfunk.github.io/mkdocs-material/
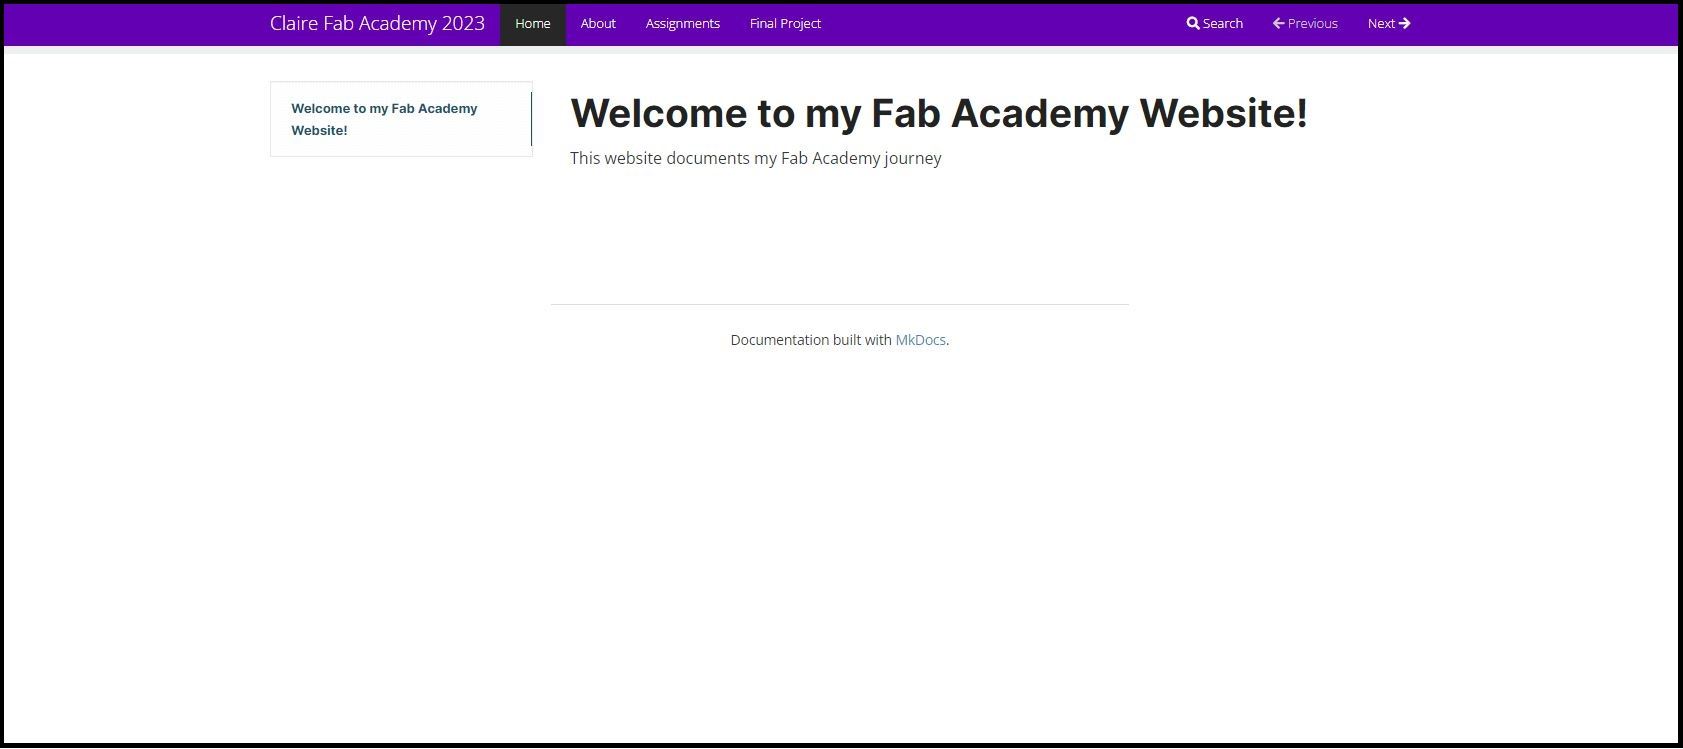
 I customised the theme by adding parameters into my mkdoc.yml file.
Set theme to material
theme:
  name: material
  features:
    - navigation.tabs
    - navigation.tabs.sticky
    - navigation.top
  palette:
    primary: deep purple
    accent: deep purple
  logo: media/logo.png
  favicon: media/favicon.png
  font:
    text: Fira Sans
    code: Fira Code
markdown_extensions:
  - tables
  - attr_list
  - def_list
  - pymdownx.tasklist:
      custom_checkbox: true
  - pymdownx.emoji:
      emoji_index: !!python/name:materialx.emoji.twemoji
      emoji_generator: !!python/name:materialx.emoji.to_svg
  - admonition
  - pymdownx.details
  - pymdownx.superfences
---
hide:
  - navigation
---
Other useful syntax:
Insert an image

External link
[Text for link](link)
To make text bold add ** at the start and finish of the text.
To make text italics add * at the start and finish of the text.
To make a list use - or * with a space after it before the text. Note: before a list make sure there is a blank line in the code otherwise it may not render properly.
To put something in a box (admonition) you can use
!!! note ""
      text
To make a button add
[text on button](page or link){ .md-button }
Step 3 Add a page
I used ChatGPT to write a guide for adding another page to the website:
Creating a new page in MkDocs is a simple process.
Start by creating a new Markdown file in your project's docs directory. The file name should end in .md and should be named according to the title of the page you want to create.
In the file, add a heading using the # symbol, followed by the title of the page.
Below the heading, you can add the content of the page using Markdown syntax.
To add the page to the navigation menu, open the mkdocs.yml file in the root of your project.
Under the nav section, add the title of the page and the file name to the list of pages. example:
nav:
- Home: index.md
- About: about.md
- New Page: newpage.md
Note:
Make sure the indentation is correct in mkdocs.yml file, otherwise it will give error. If you are adding a subpage, you can use nested list in mkdocs.yml file. If you want to add some images or other media, you can put them in the docs/media directory.
Source: ChatGPT Jan 9 Version
Key Words Used: write a guide on creating a new page in mkdocs
Step 4 Loading an MkDocs site onto Git Lab
Fab Academy using Git Lab to host websites.
In your Git Lab repository change the .gitlab-ci.yml file to
image: python:3.8-buster

before_script:
  - pip install -r requirements.txt

pages:
  script:
  - mkdocs build
  - mv _site public
  artifacts:
    paths:
    - public
  only:
  - main
Create a new requirements.txt file with the following in it
# Documentation static site generator & deployment tool
mkdocs>=1.1.2

# Add your custom theme if not inside a theme_dir
# (https://github.com/mkdocs/mkdocs/wiki/MkDocs-Themes)
mkdocs-material>=5.4.0
Create a new .gitignore file to ignore Git Lab public folder, it should just say
public
To your mkdocs.yml add
site_dir: _site
Copy your mkdocs files and folders to your repository, mkdocs.yml should be in the top-level of the repository where the .gitlab-ci.yml file is.
Step 5 Check Image Size
I noticed that although not large individually, the overall storage space required for my images was already over 1MB.
I decided to use Mass Image Compressor 3.1, a free Windows desktop software, to help me compress the images.
It allowed me to batch process compressing my images. I found it fast and easy to use.
Initial Final Project Idea
The Problem
Approximately 30% of Australians rent.
Most are not allowed to have pets or have difficulty getting approval from landlords to have a pet.
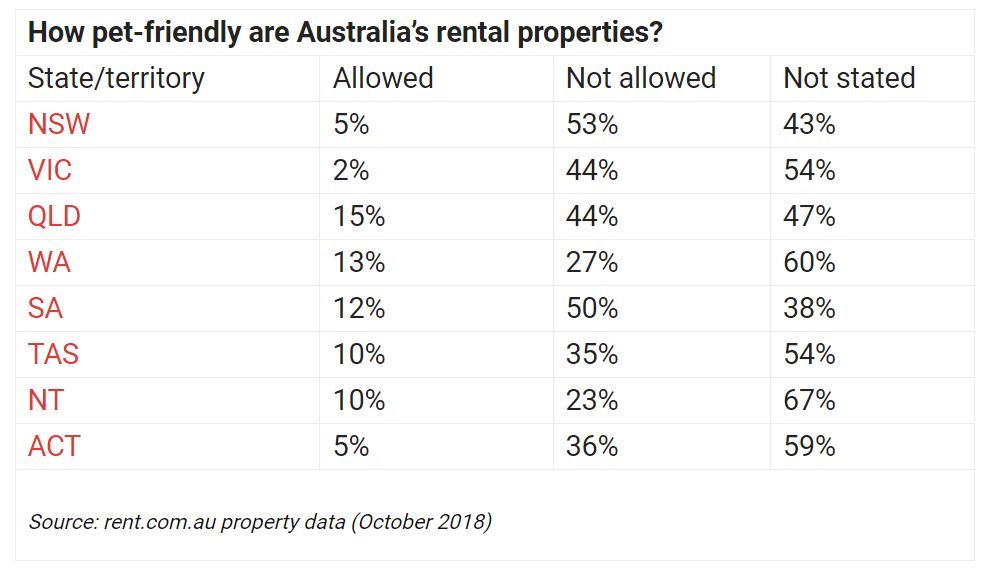
This means many renters miss out on the mental and physical health benefits of owning and caring for a pet.
Final Project Idea
To create an artificial pet that can provide comfort and motivation to its owner.
The pet will need to be able to:
- Provide opportunities for its owner to care for it
- Encourage its owner to exercise
- Know when it is being pat
- Be huggable
Sketch
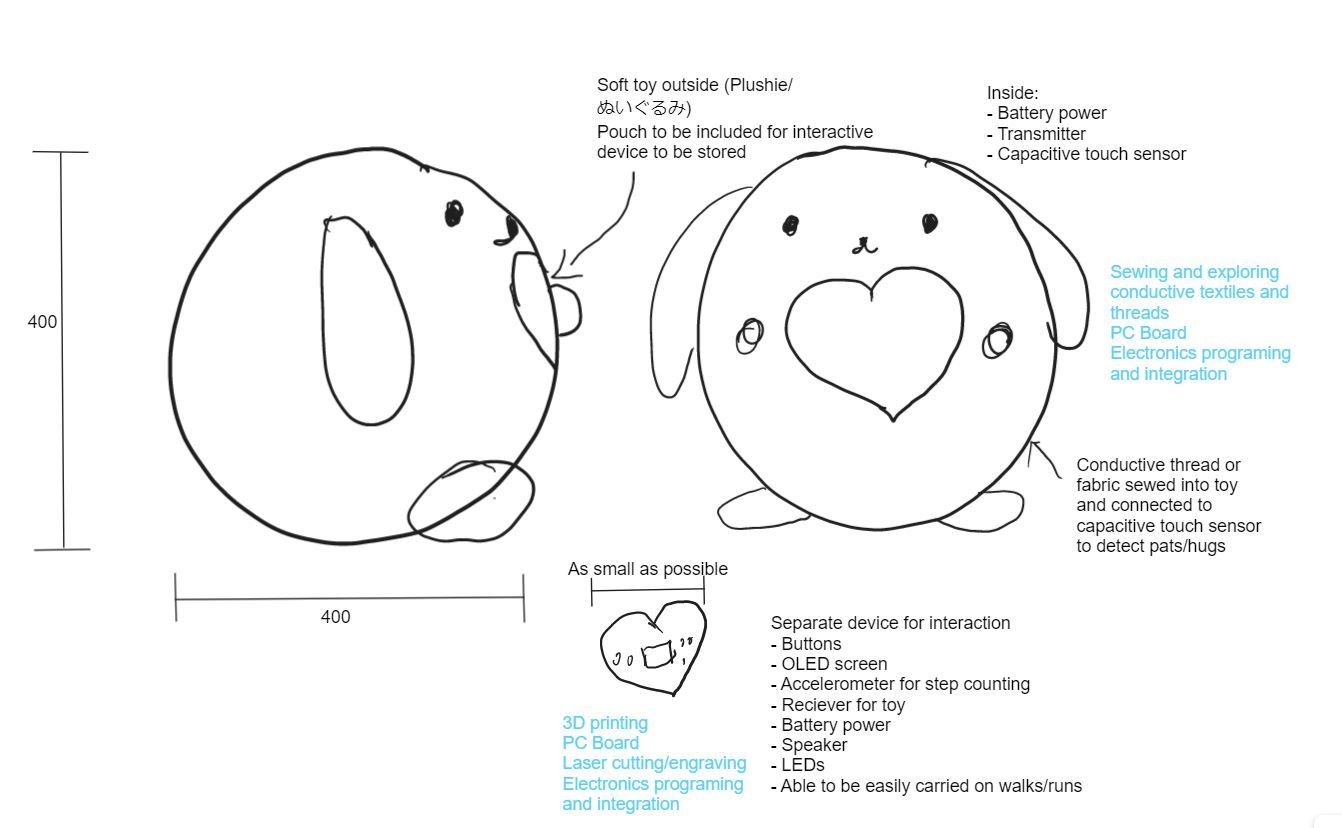
Owner will be able to take the separate device on walks/runs if they do not want to take the whole pet with them
Pet will provide an alert when it:
- Needs charging
- Has been neglected for too long (hugs/pats required)
- When the owner has not taken it for a walk for too long
Extra ideas
- Being able to play games with the pet
- Adding an RFID reader into the pet and making different food and toys which when touched to the pet will result in different sounds and screen outputs
- Adding LED lights to the pet
Who is this for?
This will appeal to people who cannot own a pet themselves. It will be appropriate for both children and adults, although with its cuteness factor it will appeal to the young and young at heart.
Idea Name: Kokoro Friend
![]()
The Japanese Concept of Kokoro
Kokoro is a Japanese word that is often translated as “heart” or “spirit.” However, the concept of kokoro encompasses what a person thinks, feels, and would like to express. It is made of a person’s thoughts and will that drive them forward, the knowledge and experience they have acquired through time, and all their feelings.
Yet, kokoro is more than the sum of all these elements: it is all these elements at the same time. Each person’s features give their kokoro its own “color” and “shape,” making every human a distinct individual with a unique inner richness.
A person’s kokoro cannot be seen or touched:it resides in the area of the heart. Hidden in this invisible kokoro, lies a complex patchwork of ideas, concepts, and feelings that cannot be fully accessed from the outside.
One’s kokoro lives in everything he or she creates. The creation can be a material or conceptual.
Source: https://kokoro-jp.com/what-is-kokoro/
Project Inspiration
Fluf Bot by a Shinobu Ishimura Fab Academy Student https://fabacademy.org/2021/labs/kannai/students/shinobu-ishimura/projects/final-project/
Qoobo - commercial product out now https://qoobo.info/index-en/
Paro Therapeutic Robot - commercial product out now http://www.parorobots.com/
Furby - Inspiration from my childhood https://en.wikipedia.org/wiki/Furby
Tamagotchi - Inspiration from my childhood https://en.wikipedia.org/wiki/Tamagotchi
Student Agreement
Link to Student Agreement