Embedded Programming
Assignment
- Group Assignment:
- Compare the performance and development workflows for other architectures.
- Document your work to the group work page and reflect on your individual page what you learned.
- Individual Assignment:
- Browse through the datasheet for your microcontroller.
- Program a microcontroller development board to interact and communicate.
Evaluation Standards
- Linked to the group assignment page.
- Documented what you learned from browsing through a microcontroller datasheet.
- Programmed your board to interact and communicate.
- Described the programming process(es) you used.
- Included your source code.
- Included hero shot(s).
Output Preview
Group Assignment
This week we used 3 different boards with 3 different microcontrollers and we compared the performance of them.
| Board | Arduino UNO | Node MCU V3 | Seeed XIAO |
|---|---|---|---|
| Microcontroller | ATMega328 | ESP8266 | RP2040 |
| CPU Core | 8-bit AVR | 32-bit Xtensa LX106 | 32-bit Cortex M0+ |
| CPU Max Frequency | up to 20 MHz | up to 160 MHz | up to 133 MHz |
| Board Clock Frequency | 16 MHz | 80 MHz | 133 MHz |
| Flash | 32 KB | 4 MB | 2 MB |
| SRAM | 2KB | 64 KB | 264 KB |
| GPIOs | 20 | 16 | 11 |
| ADC Resolution | 10-bit | 10-bit | 12-bit |
Also we try different workflows to programme these boards.
Check our
group assignment page to see more of our assignment.
I would reflect on the difference between programming using Arduino C and MicroPython from my personal perspective.
- Arduino C have more community, more references and more librarys then MicroPython.
- MicroPython is passed of Python which is more flexable and easy to tinker with.
- MicroPython need more practice.
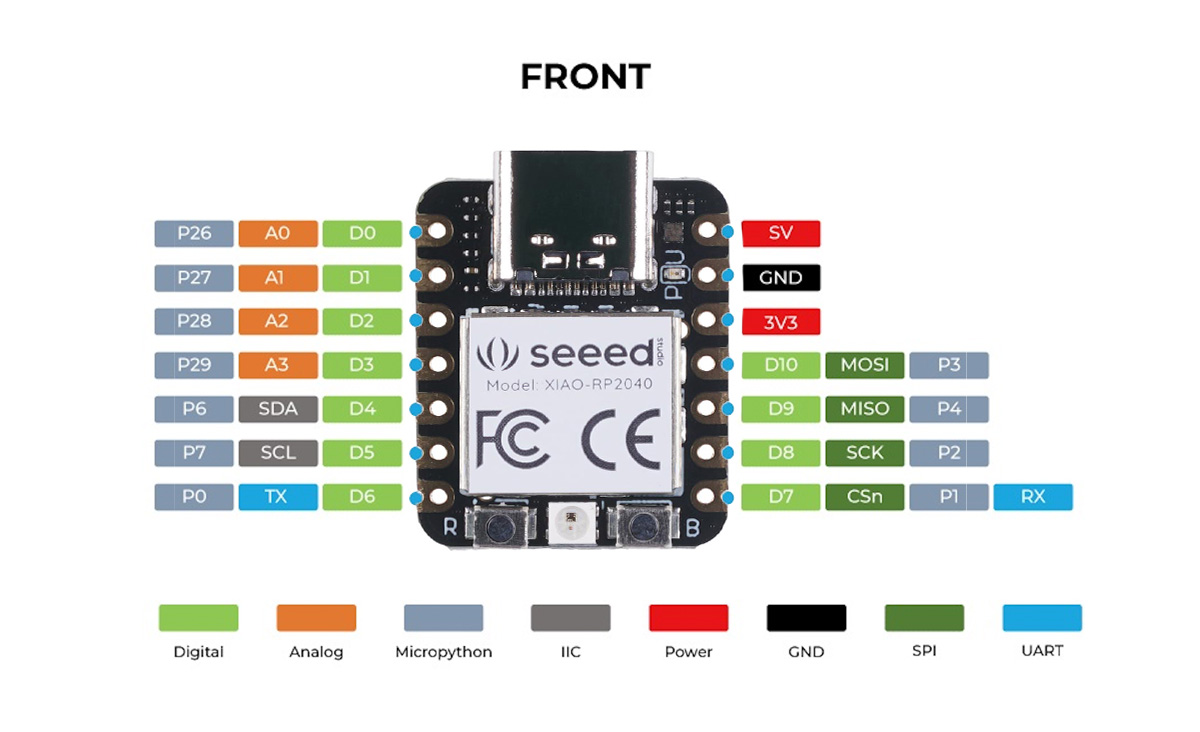
Understanding RP2040
I start looking into RP2040 datasheet but it was pretty long and complex. but I found this mini documentation about RP2040 MCU
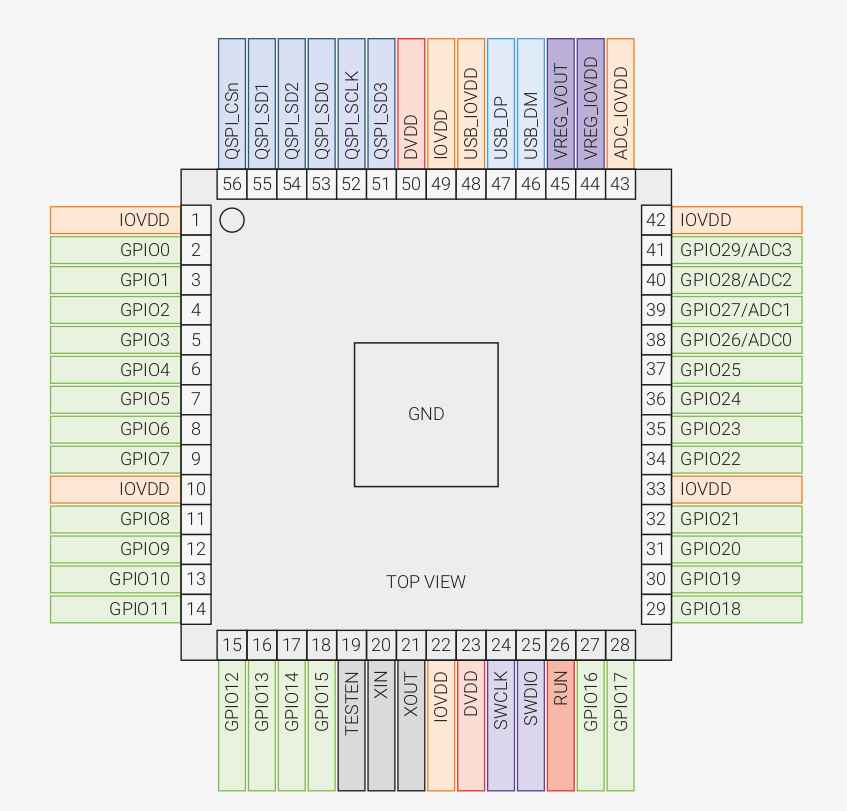
Here is RP2040 features
| CPU Core | Dual ARM Cortex-M0+ |
|---|---|
| CPU Max Frequency | up to 133 MHz |
| Board Clock Frequency | 133 MHz |
| Flash | Support for up to 16MB of off-chip Flash memory via dedicated QSPI bus |
| SRAM | 264 KB |
| GPIOs | 30 |
Tinker with Xiao
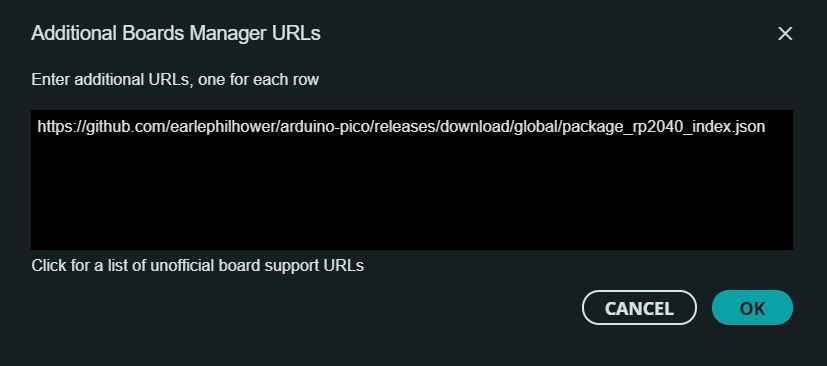
I start by adding RP2040 core into Arduino IDE by adding the following URL into the
preferences panel.
https://github.com/earlephilhower/arduino-pico/releases/download/global/package_rp2040_index.json
 And from Boards Manager, I searched for RP2040 and I installed the driver for it
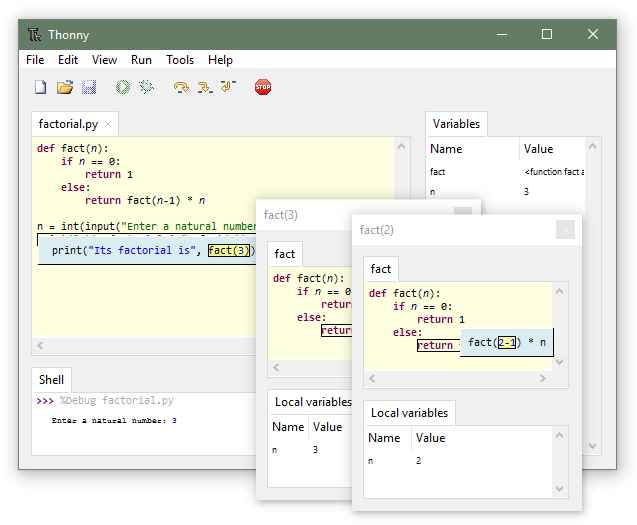
 Also I Installed Thonny to use
MicroPython.
Also I Installed Thonny to use
MicroPython.
 Now It's time to Tinker with Xiao RP2040
I start by uploading blink-echo.ino
on Xiao RP2040.
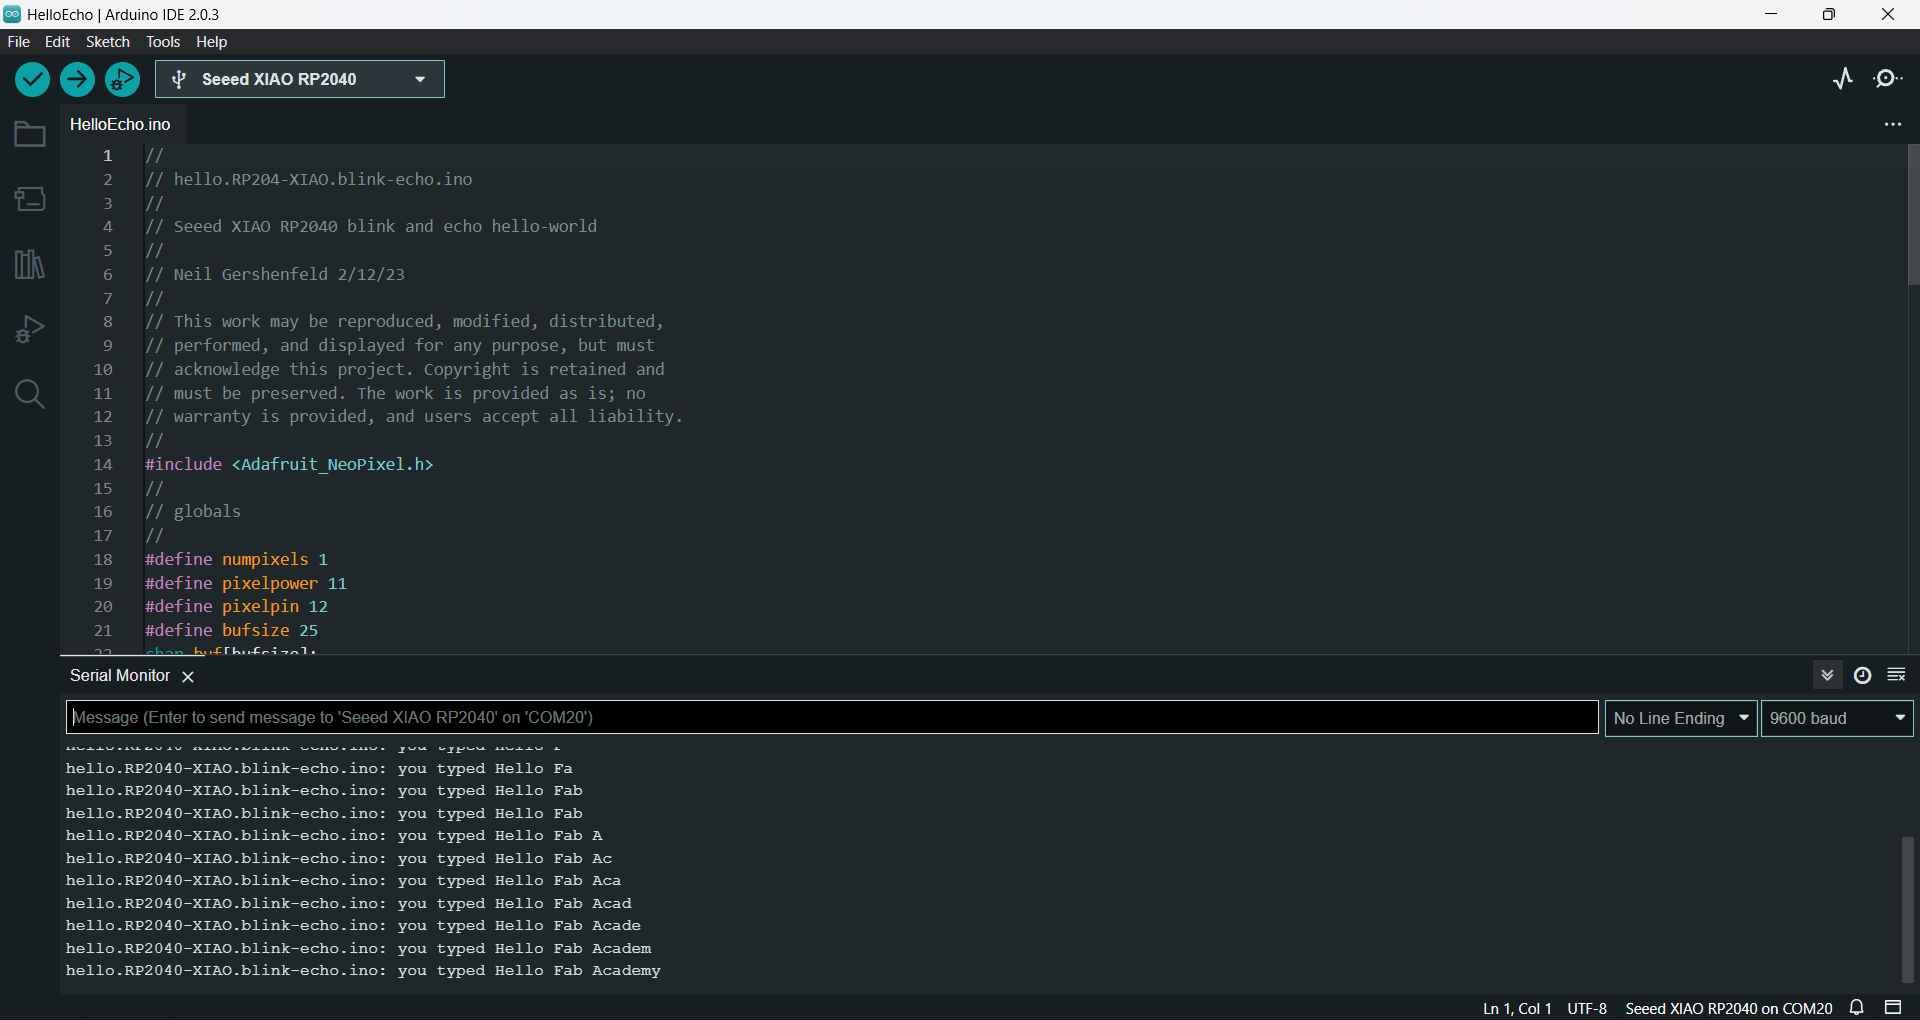
Then I start to write a sample blink code to blik the internal LED in both workflows (Arduino C & MicroPython).

Arduino C
#define led 26

void setup() {
    pinMode(led, OUTPUT);
  }

  void loop() {
    digitalWrite(led, HIGH);
    delay(1000);
    digitalWrite(led, LOW);
    delay(1000);
  }
MicroPython
from machine import Pin
import utime

led = Pin(26, Pin.OUT)

while True:
      led.value(1)
      utime.sleep(1)
      led.value(0)
      utime.sleep(1)
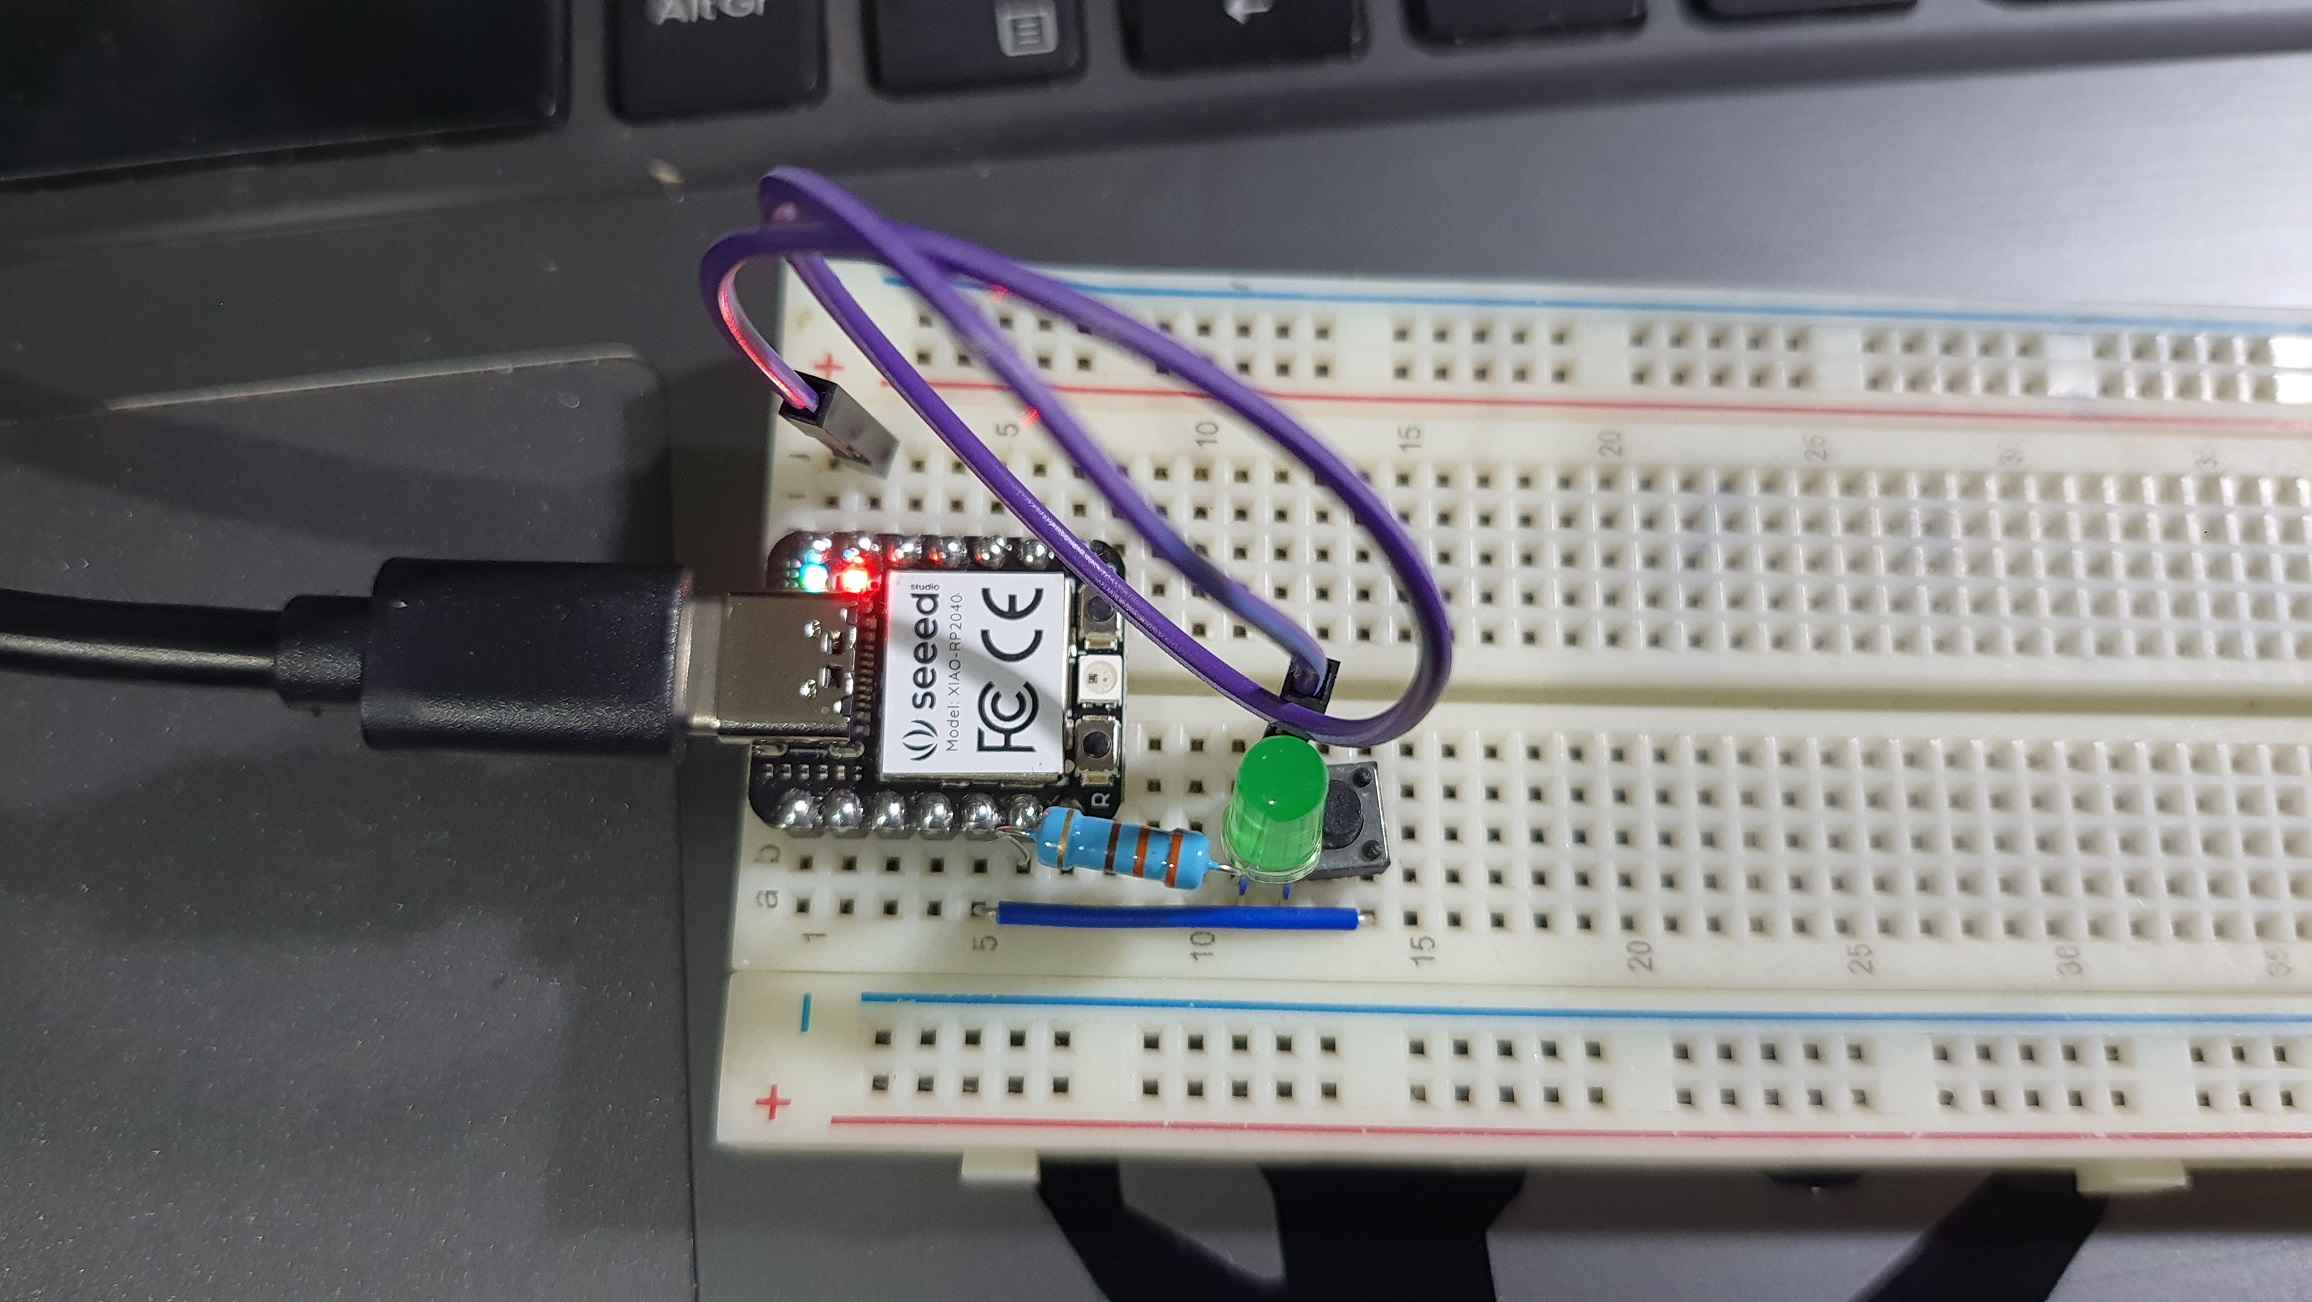
Then I write a sample code to blink external LED when I press a button in both workflows (Arduino C & MicroPython).


Arduino C
#define btn 6
#define led 7

void setup() {
  pinMode(btn, INPUT_PULLUP);
  pinMode(led, OUTPUT);
}

void loop() {
  if (!digitalRead(btn)) {
    for (int i = 0; i < 3; i++) {
      digitalWrite(led, HIGH);
      delay(500);
      digitalWrite(led, LOW);
      delay(500);
    }
  } else {
    digitalWrite(led, LOW);
  }
}
MicroPython
from machine import Pin
import utime

btn = Pin(6, Pin.IN, Pin.PULL_UP)
led = Pin(7, Pin.OUT)

while True:
  if btn.value() == False:
      for x in range(3):
          led.value(1)
          utime.sleep(0.5)
          led.value(0)
          utime.sleep(0.5)
  else:
      led.value(0)
Then I followed this example from Seed Studio to use the internal NeoPixel.
Arduino C
#include <Adafruit_NeoPixel.h>

    int Power = 11;
    int PIN  = 12;
    #define NUMPIXELS 1

    Adafruit_NeoPixel pixels(NUMPIXELS, PIN, NEO_GRB + NEO_KHZ800);

    void setup() {
      pixels.begin();
      pinMode(Power,OUTPUT);
      digitalWrite(Power, HIGH);

    }

    void loop() {
      pixels.clear();
      pixels.setPixelColor(0, pixels.Color(15, 25, 205));
      delay(400);
      pixels.show();
      pixels.clear();
      pixels.setPixelColor(0, pixels.Color(103, 25, 205));
      delay(400);
      pixels.show();
      pixels.clear();
      pixels.setPixelColor(0, pixels.Color(233, 242, 205));
      delay(400);
      pixels.show();
      pixels.clear();
      pixels.setPixelColor(0, pixels.Color(233, 23, 23));
      delay(400);
      pixels.show();
      pixels.clear();
      pixels.setPixelColor(0, pixels.Color(12, 66, 101));
      delay(400);
      pixels.show();
      delay(500);

    }
Finally I wanted to try multithreading as RP2040 is dual core so write this code to make 2 external LEDs blink with different delays.

Arduino C
#define led1 2
#define led2 7

void setup() {
  pinMode(led1, OUTPUT);
}
void setup1() {
  pinMode(led2, OUTPUT);
}

void loop() {
  digitalWrite(led1, HIGH);
  delay(200);
  digitalWrite(led1, LOW);
  delay(200);
}
void loop1() {
  digitalWrite(led2, HIGH);
  delay(2000);
  digitalWrite(led2, LOW);
  delay(1000);
}