Group assignment:
    Compare as many tool options as possible.
    Document your work on the group work page and reflect on your individual page what you learned.

Individual assignment
    Write an application that interfaces a user with input and/or output device(s) on a board that you made.
Learning outcomes
Implement a Graphical User Interface (GUI) using programming and explore protocols to communicate with an MCU board.
Have you answered these questions?
Linked to the group assignment page.
Documented your process.
Explained the GUI that you made and how you did it.
Explained how your application communicates with your MCU board.
Explained any problems you encountered and how you fixed them.
Included original source code (or a screenshot of the app code if that's not possible).
Included a ‘hero shot’ of your application running & communicating with your board.
Processing to Arduino
I will make a demonstration sketch to demonstate communication beetween a Processing user interface and a rgb led strip connected to an arduino.
Communication will be made thank to serial communication.
Read data from serial port on arduino side
Arduino will wait for serial message on the form “r,g,b”
Those values are then used to set the color of an rgb strip using Adafruit Neopixel library. The complete code is below.
#include<Adafruit_NeoPixel.h>#define DATA_PIN 3
#define NUM_LEDS 5
Adafruit_NeoPixelled_strip(NUM_LEDS,DATA_PIN,NEO_GRB+NEO_KHZ800);voidsetup(){// put your setup code here, to run once:
Serial.begin(9600);Serial.println("Please send RGB values separated by comas, then ENTER");led_strip.begin();for(inti=0;i<NUM_LEDS;i++){led_strip.setPixelColor(i,led_strip.Color(0,0,0));led_strip.show();}}voidloop(){if(Serial.available()){//int r = Serial.getChar();
intr=Serial.parseInt();intg=Serial.parseInt();intb=Serial.parseInt();// look for end of line
if(Serial.read()=='\n'){Serial.print("received values:");Serial.print(r);Serial.print(",");Serial.print(g);Serial.print(",");Serial.println(b);for(inti=0;i<NUM_LEDS;i++){led_strip.setPixelColor(i,led_strip.Color(r,g,b));}led_strip.show();}}}
Send data to serial port from processing
Processing open serial communication with arduino with
1
2
try{myPort=newSerial(this,Serial.list()[0],9600);}catch(RuntimeExceptione){println("Can't open Serial Port");}
where Serial.list()[0] return the name of the first available com port but we can explicitly give the name of the port instead.
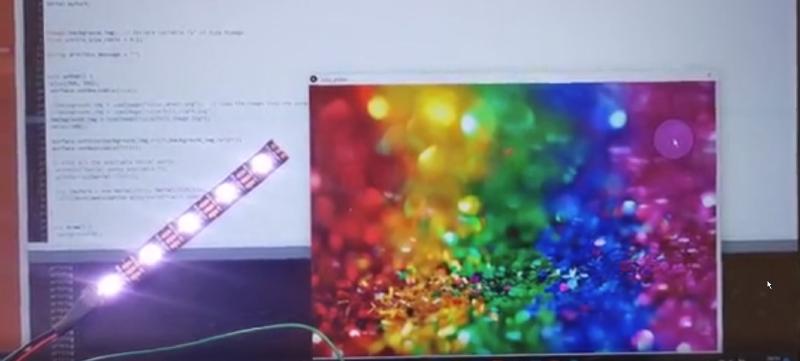
We load an image and retrieve the rgb value of the pixel under the mouse cursor with “mouseX” and “mouseY”. This value is send to arduino to be displayed by the led strip.
importprocessing.serial.*;SerialmyPort;PImagebackground_img;// Declare variable "a" of type PImagefloatcircle_size_ratio=0.1;Stringprevious_message="";voidsetup(){size(300,300);surface.setResizable(true);//background_img = loadImage("color_wheel.png"); // Load the image into the program background_img=loadImage("colorfull_night.jpg");//background_img = loadImage("colorfull_image.jpg");delay(100);surface.setSize(background_img.width,background_img.height);surface.setResizable(false);// List all the available serial ports:println("Serial ports available:");printArray(Serial.list());try{myPort=newSerial(this,Serial.list()[0],9600);}catch(RuntimeExceptione){println("Can't open Serial Port");}}voiddraw(){background(0);//====================================================// Loading image and get pixel color at mouse position//====================================================image(background_img,0,0,width,height);colorc=background_img.get(mouseX,mouseY);intr=int(red(c));intg=int(green(c));intb=int(blue(c));//println("RGB color:",r,g,b);//====================================================// Magnifier effect//====================================================intcircle_size=int(circle_size_ratio*background_img.width);fill(c,200);//second parameters is transprencyellipse(1.*mouseX,1.*mouseY,circle_size,circle_size);//====================================================// Send formated message//====================================================Stringmessage=r+","+g+","+b+"\n";println(message);if(message!=previous_message){try{myPort.write(message);}catch(RuntimeExceptione){println("Can't send data");}}previous_message=message;delay(20);}
Here is the video of the application running
Arduino to Processing
Now we will use data from a sensor connected to arduino to make react an processing app. Once again, communication will be made thank to serial communication.
The processing app will display a sun or a moon depending of a potentiometer position or the intensity of light on a photoresistor.
It simply load a tall image containing both sun and moon separated by a blue to black color gradient.
Testing processing app
First we test the app mapping mouseX position to sun-moon position.
 1
 2
 3
 4
 5
 6
 7
 8
 9
10
11
12
13
14
15
16
17
PImagebackground_img;// Declare variable "a" of type PImageintimage_height=1800;voidsetup(){size(640,480);background_img=loadImage("sunrise.png");// Load the image into the program }voiddraw(){background(0.0);floatr1=map(mouseX,0,width,0,image_height-480);println(r1);image(background_img,0,-int(r1));}
importprocessing.serial.*;SerialmyPort;// Objet Serial pour communiquer avec ArduinoStringsensorValue;PImagebackground_img;// Declare variable "a" of type PImageintimage_height=1800;voidsetup(){size(640,480);background_img=loadImage("sunrise.png");// Load the image into the program try{myPort=newSerial(this,Serial.list()[0],9600);}catch(RuntimeExceptione){println("Can't open Serial Port");}}voiddraw(){background(0.0);if(myPort.available()>0){sensorValue=myPort.readStringUntil('\n');// Read until reciving end of line symbolif(sensorValue!=null){intsensorValue_parsed=int(sensorValue.trim());//convert string message to intprintln("Sensor value: "+sensorValue_parsed);}}//float r1 = map(mouseX, 0, width, 0, image_height-480);floatr1=map(sensorValue_parsed,0,1023,0,image_height-480);println(r1);image(background_img,0,-int(r1));}
Sending data from Arduino
 1
 2
 3
 4
 5
 6
 7
 8
 9
10
11
12
13
14
15
16
17
18
19
intsensor_value=0;//from 0 to 1023
intprev_sensor_value=0;intthreshold=5;// avoid resending data in case of small fluctuation
voidsetup(){Serial.begin(9600);// Initialise la communication série à 9600 bauds
}voidloop(){intsensor_value=analogRead(A0);//send value only if different from previous one to avoid flooding communication
if(abs(prev_sensor_value-sensor_value)>threshold){Serial.println(sensor_value);// Send value
}prev_sensor_value=sensor_value;delay(200);//
}