Networking and communication.
Group assignment.
For this week we were divided into two groups girls and boys, we were to send a message between two projects. for girls we worked on Wired Communication. and for boys they did on wireless communication.This week for group assignment we worked on wired communication between two boards using Arduino uno and arduino mega.The Link to boys's group assignment here.
Components used for the assignment.
Arduino uno Arduino Mega jumper wires and ledConnections.
5v of Uno to 5v of Mega GND of Uno to GND of Mega Pin 8 of Uno to Pin 11 of Mega Pin 9 of Uno to Pin 10 of Mega LED to Pin 13 of MegaTFor more information you can visit the Link to our assignment here.
individual assignment:
design, build, and connect wired or wireless node(s) with network or bus addressesSerial communication:
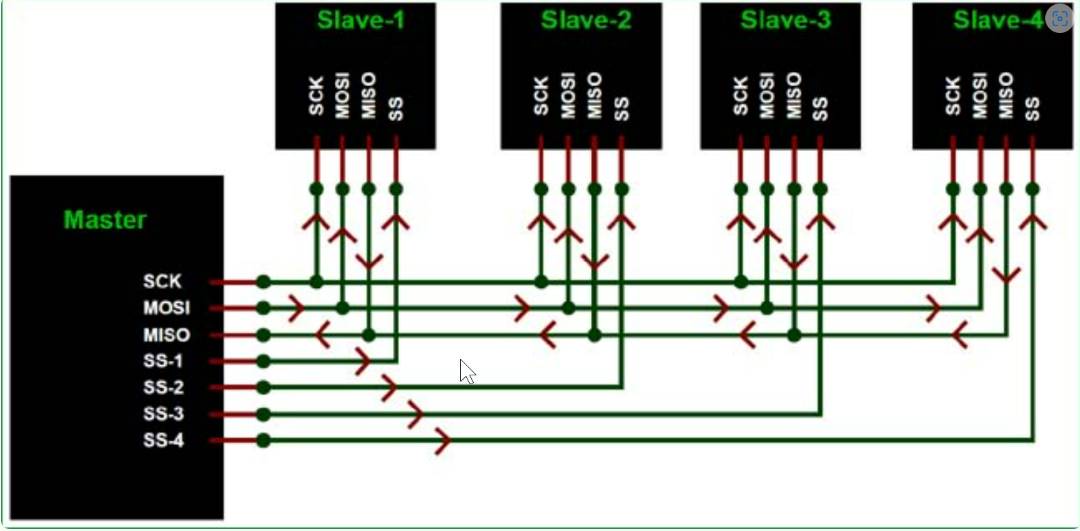
So this week we were to create a network between various processors. There are different types of networking procedures that could be used for communicating between different MCU for widening the capability of a certain system. Out of the various networking methods; serial communication is one of them. Here the main communication happens using the serial connection between mcu. 12C which mainly using SDA and SCL pins . The data is transmitted bit by bit through a common channel, since there is only one channel. In serial communication the data cannot be send in a bulk or in more byte. Eventually it is relatively slow.
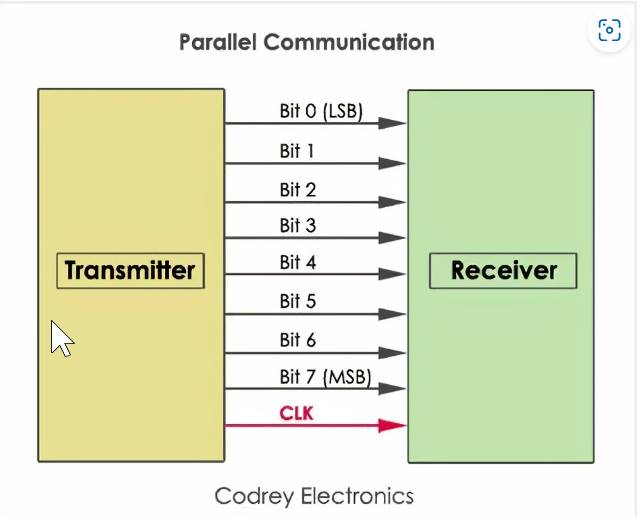
Parallel communication
According to Wikipedia in data transmission, parallel communication is a method of conveying multiple binary digits (bits) simultaneously. Parallel interfaces transfer multiple bits at the same time. They usually require buses of data - transmitting across eight, sixteen, or more wires. Data is transferred in huge, crashing waves of 1’s and 0’s. It transmit multiple bits of data at same time.they require buses of data to transmitting across eight, sixteen, or more wires.
 • Board designing on esp32 so for Networking and communication I planned on using esp32 and communicate with the bluetooth through a terminal app which is a wireless serial communication. So i designed a esp 32 board since last few weeks i have been trying on attiny 1614 so this week i wanted to try on a different board. If this board works out i would also want to try this board for my final project. so i designed a Esp32 board on eagle and below here is the rough design on eagle.
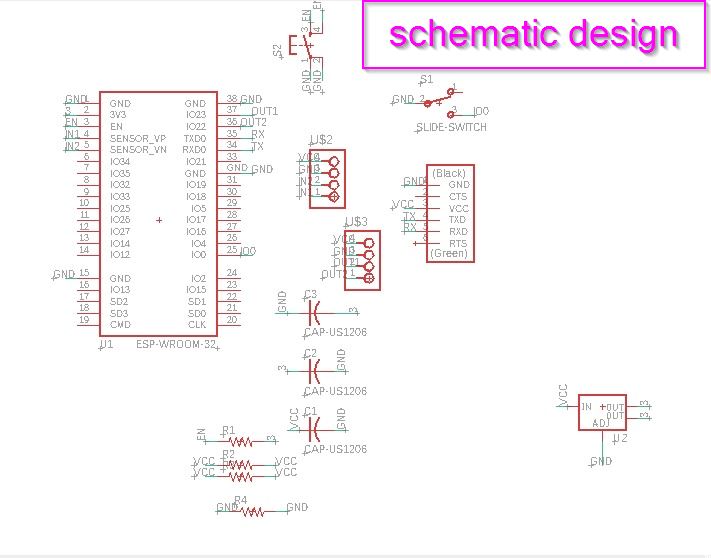
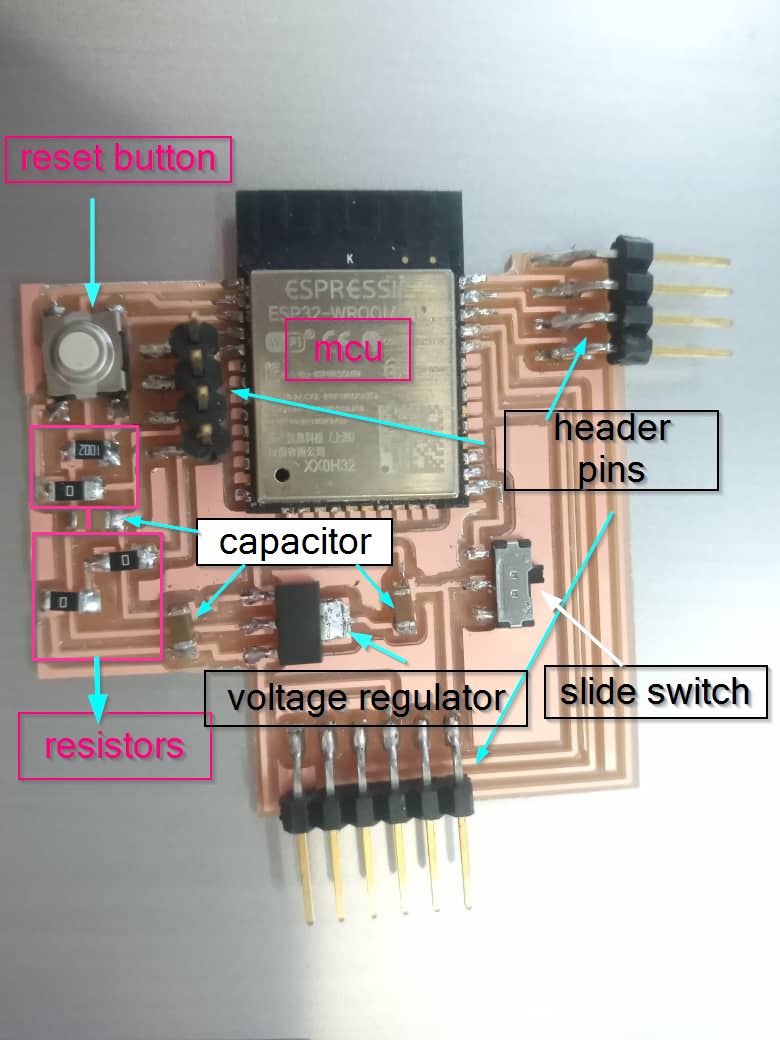
 • Here is the name of the components used in my esp32 board.
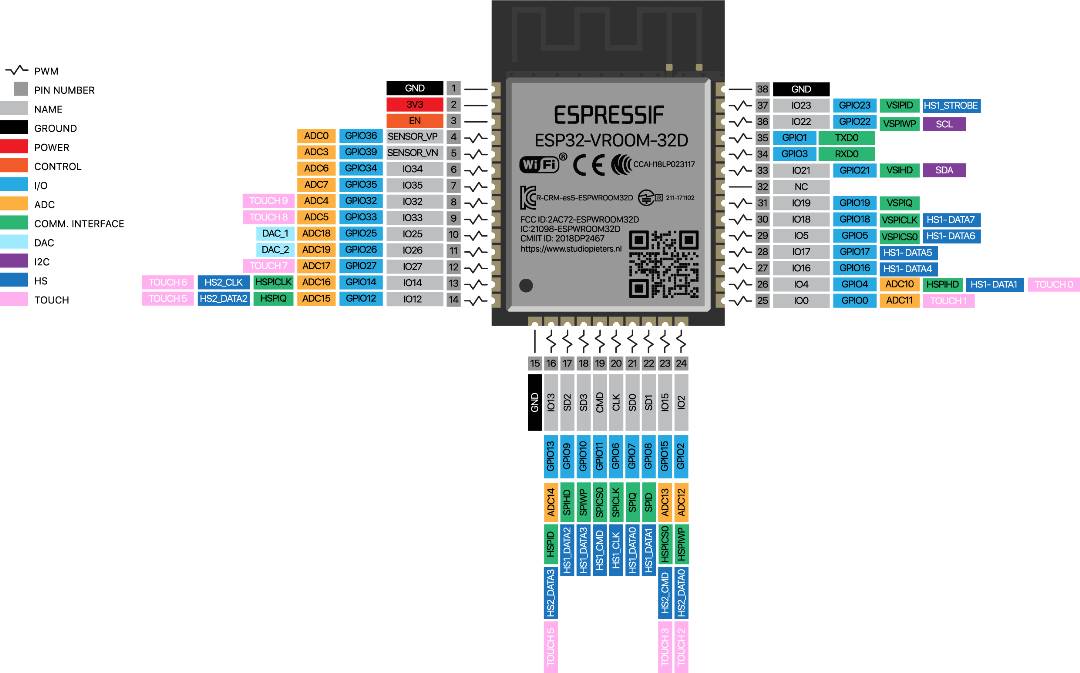
 • Pinout for esp32 .
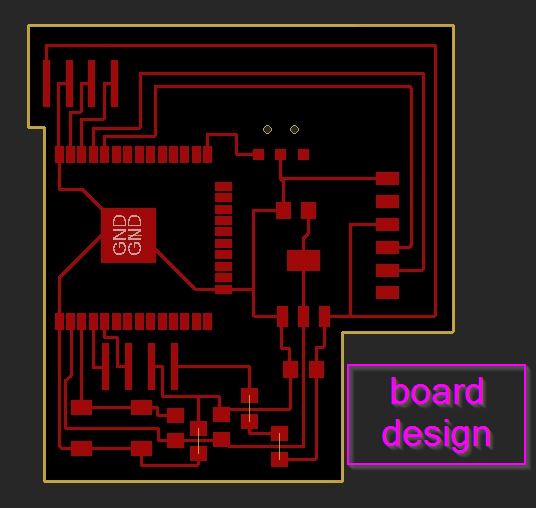
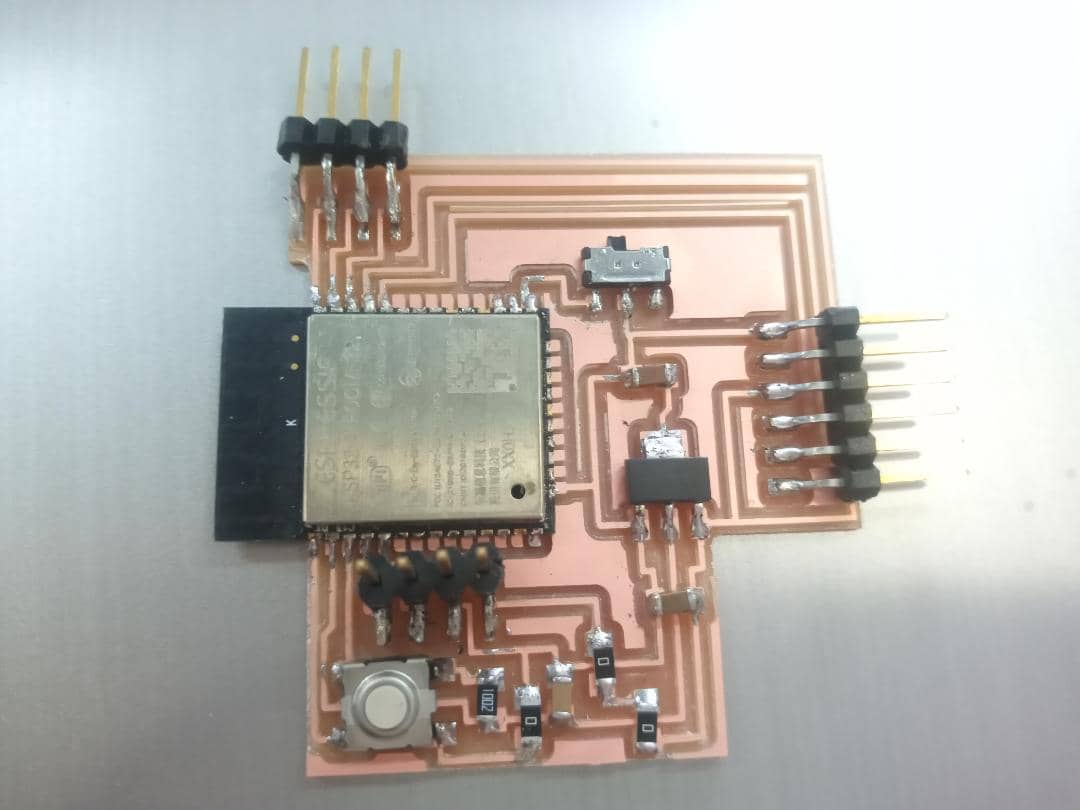
• This is the hero shot of my board after soldering.
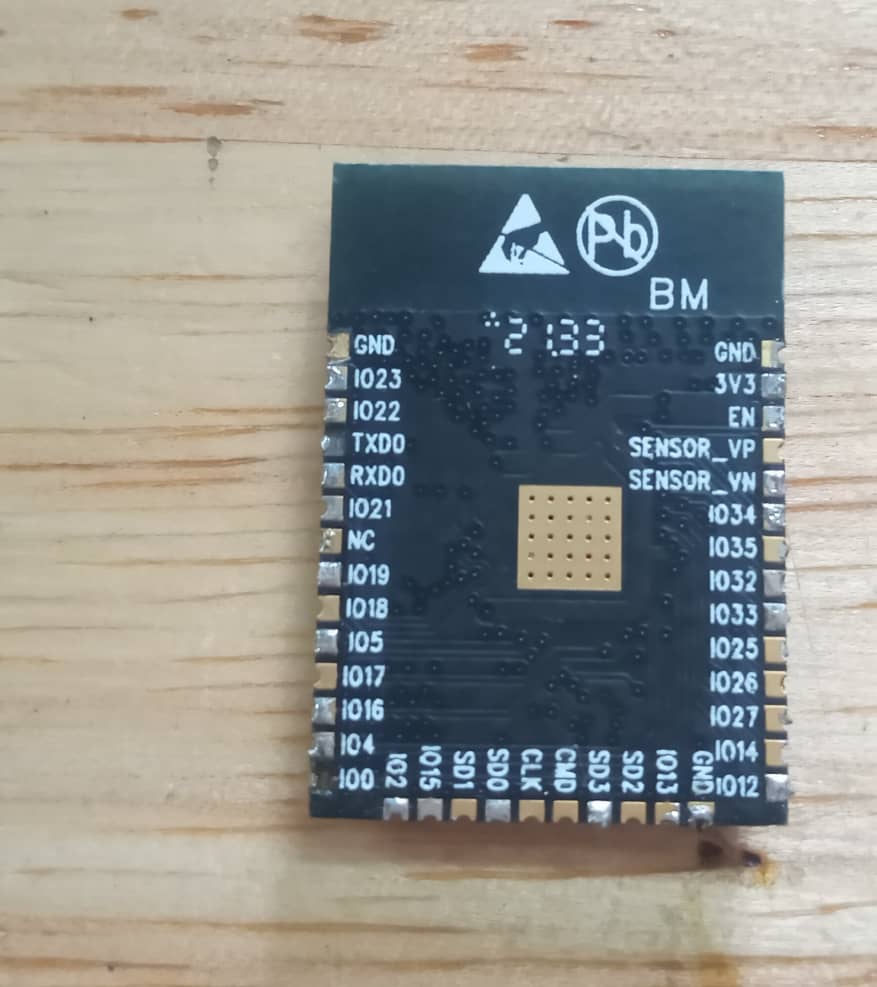
This is the Esp32 i used for my board, since we did not have enough esp32 so i had to de- solder and used it again
Steps for programming.
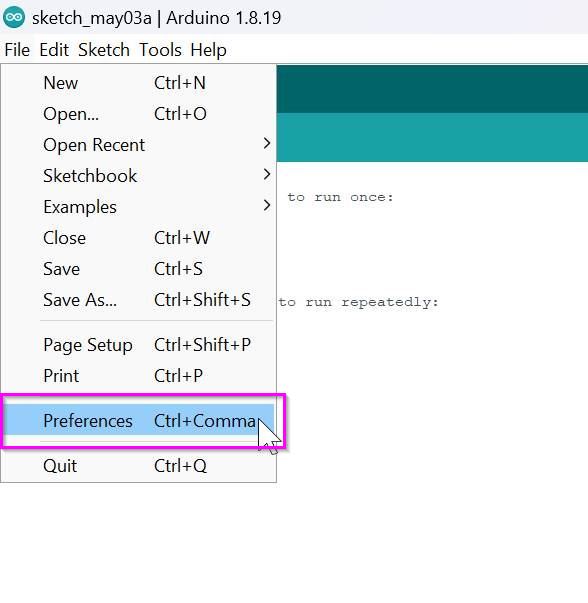
• Open the arduino ide on your desktop and then go to preferences as shown below.
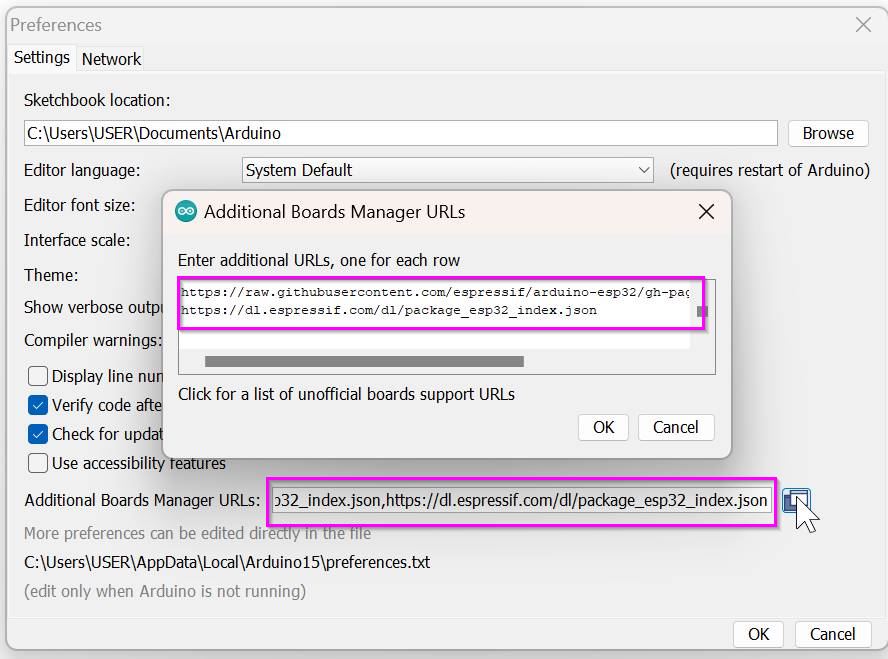
• Then just copy this link and put in the box below "https://raw.githubusercontent.com/espressif/arduino-esp32/gh-pages/package_esp32_index.json https://dl.espressif.com/dl/package_esp32_index.json"
The link to the preference is here
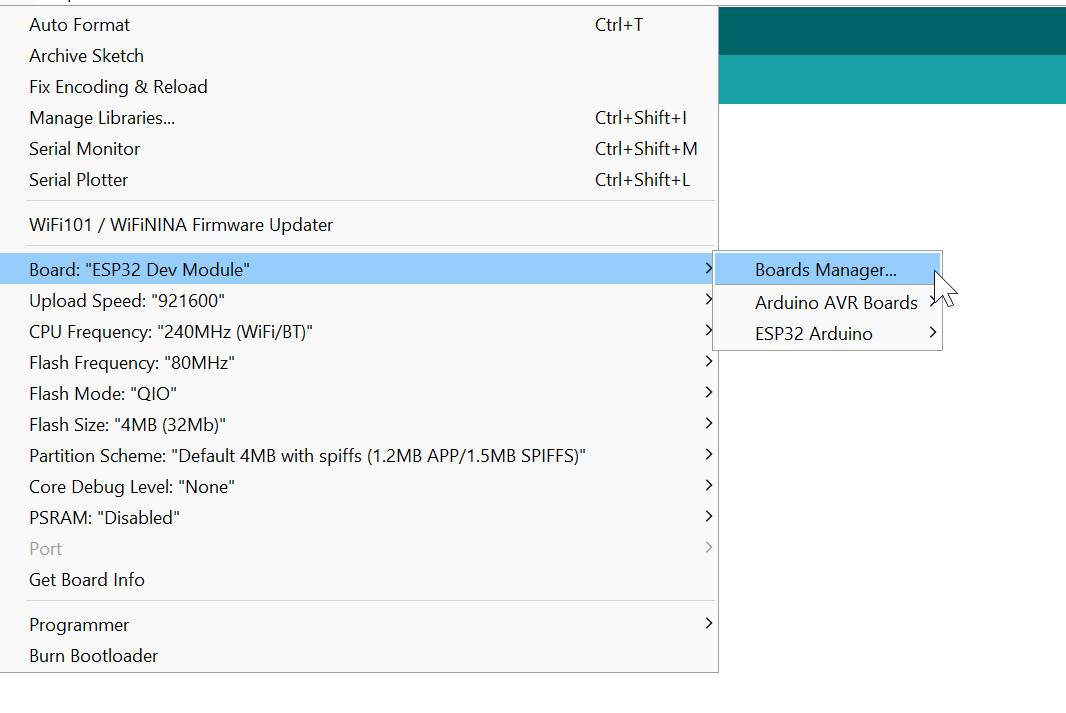
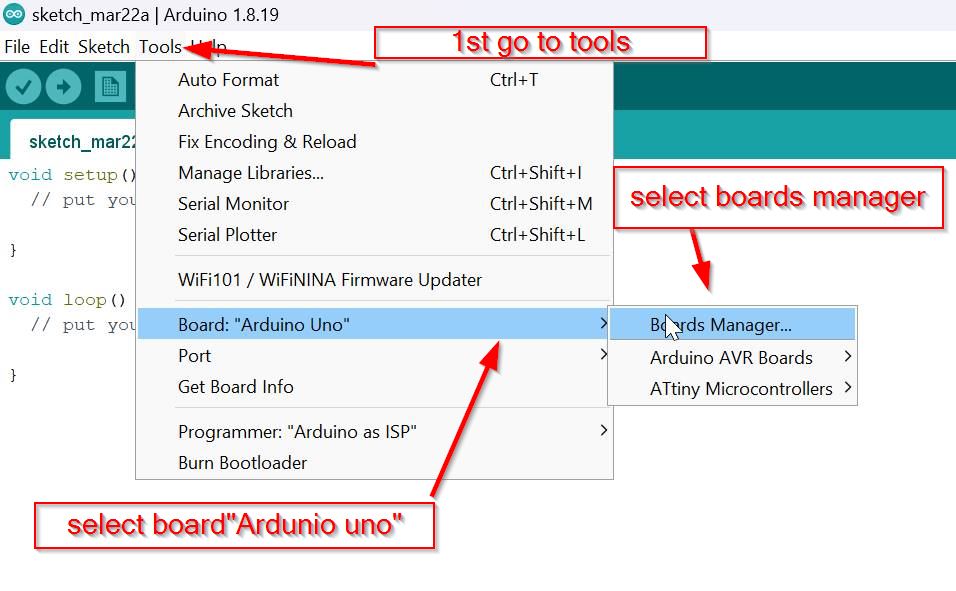
• Go to tools and select the board option then hit the board manager option.
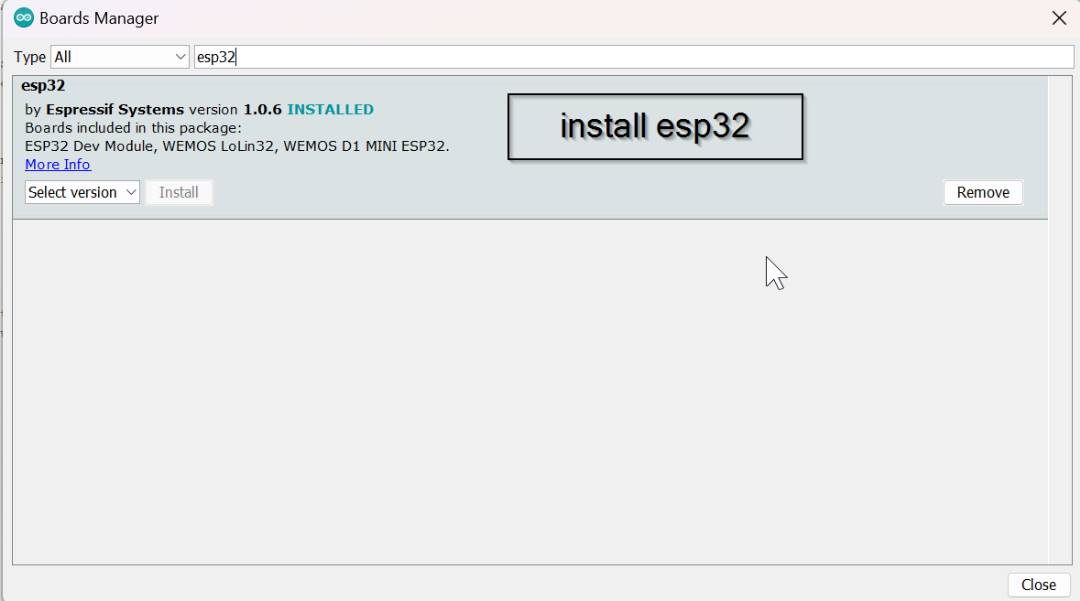
• Then you have to add the esp32 library as shown below. For me I have the library installed already.
• Now go to Examples then bluetooth serial then the third option. and you will get a code from there.
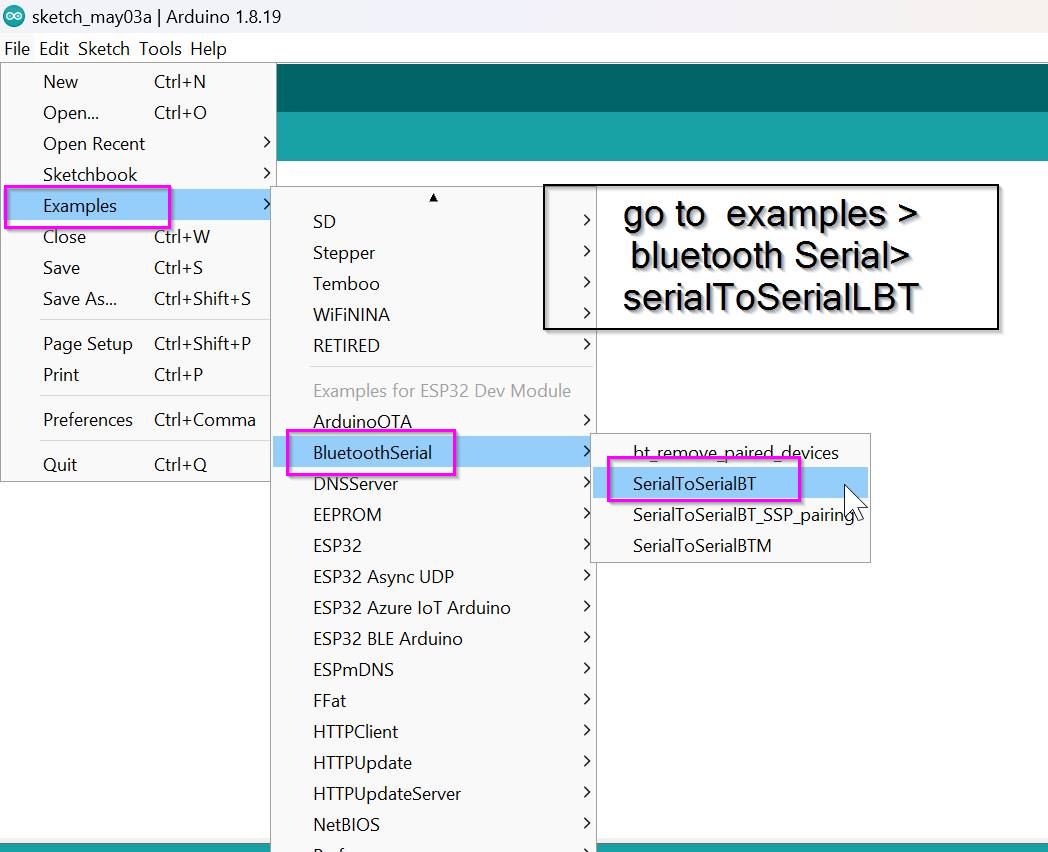
Below here is the code
        //This example code is in the Public Domain (or CC0 licensed, at your option.)
        //By Evandro Copercini - 2018
        //
        //This example creates a bridge between Serial and Classical Bluetooth (SPP)
        //and also demonstrate that SerialBT have the same functionalities of a normal Serial

        #include "BluetoothSerial.h"

        #if !defined(CONFIG_BT_ENABLED) || !defined(CONFIG_BLUEDROID_ENABLED)
        #error Bluetooth is not enabled! Please run `make menuconfig` to and enable it
        #endif

        BluetoothSerial SerialBT;

        void setup() {
          Serial.begin(115200);
          SerialBT.begin("ESP32test"); //Bluetooth device name
          Serial.println("The device started, now you can pair it with bluetooth!");
        }

        void loop() {
          if (Serial.available()) {
            SerialBT.write(Serial.read());
          }
          if (SerialBT.available()) {
            Serial.write(SerialBT.read());
          }
          delay(20);
        }
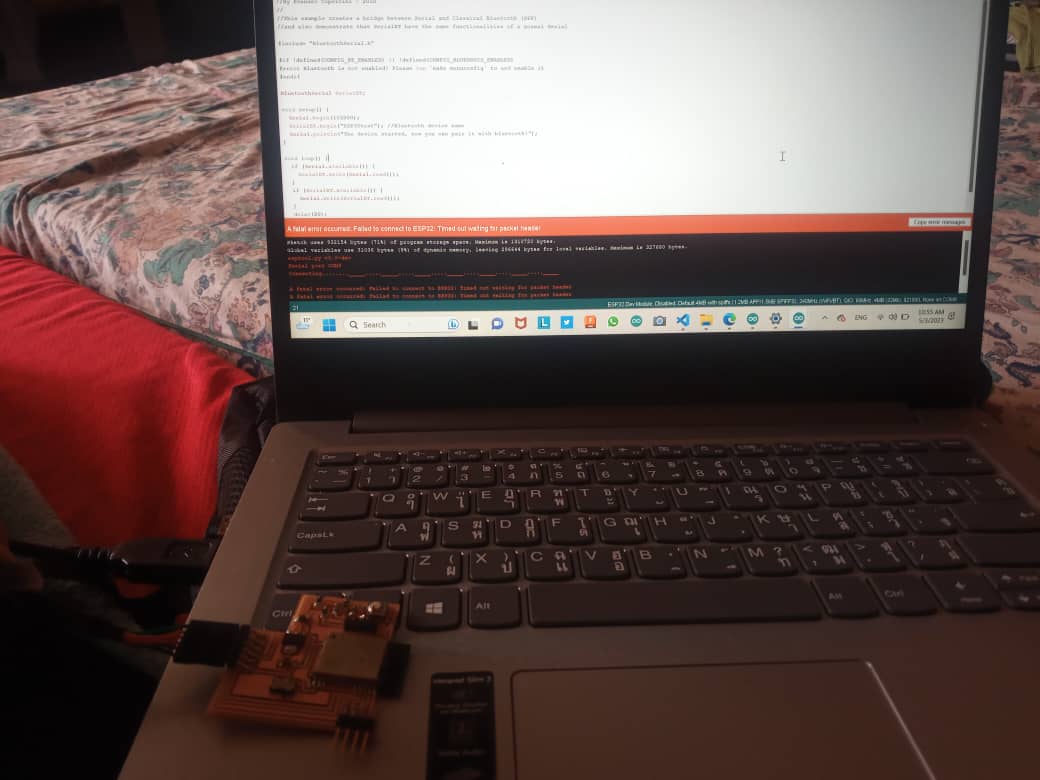
•Unfortunately my esp32 board didn't work and I am yet to figure it out. and shows" Failed to connect to esp32 Timed out waiting for packet header "

So after trying again and again on my esp32 board I was running out of time so I had to change my board, I used Attiny 1614 and bluetooth module which I got from my lab
DSD TECH HM-11 BLUETOOTH MODULE
According to wikipedia The DSD TECH HM-11 Bluetooth module is a small electronic component that enables wireless communication between devices using Bluetooth technology. It operates on low power consumption and has a range of up to 100 meters. It supports multiple communication modes and can be easily integrated into various electronic projects.

Bluetooth module Data sheet
This bluetooth module has GND,VCC,TX and RX connections.
- Now let us set up on arduino ide for the programming.
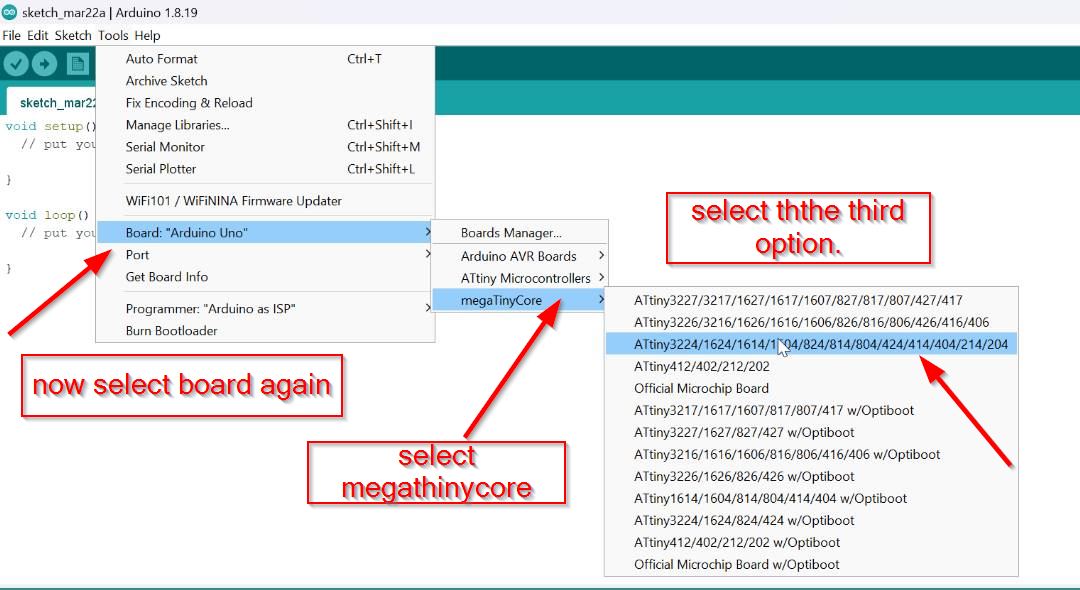
- Then Go to tools and select the board manager there.
- after that go to the library and search megaTiny core.
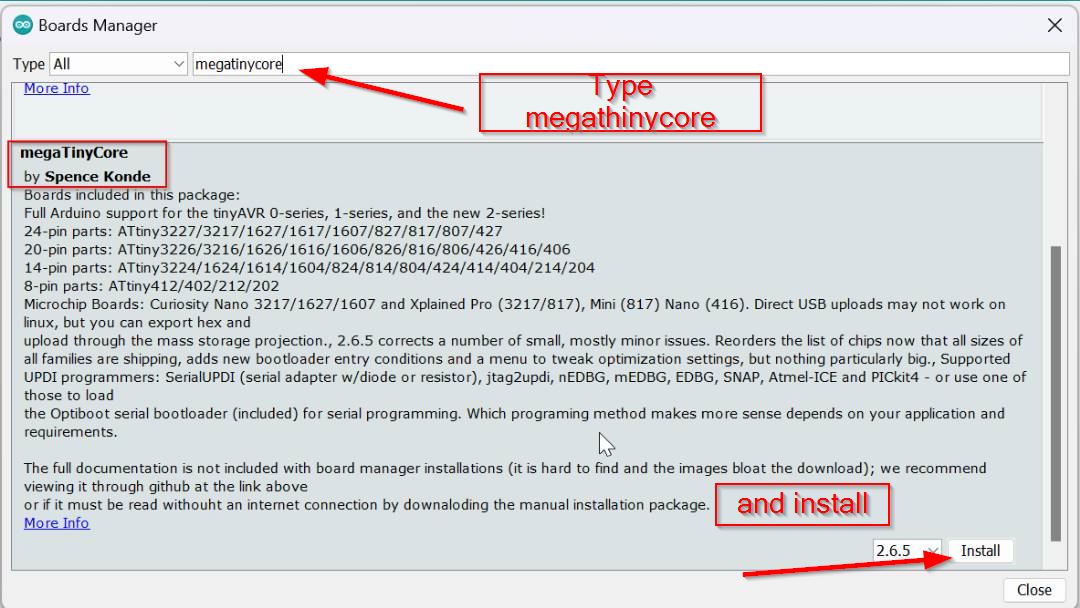
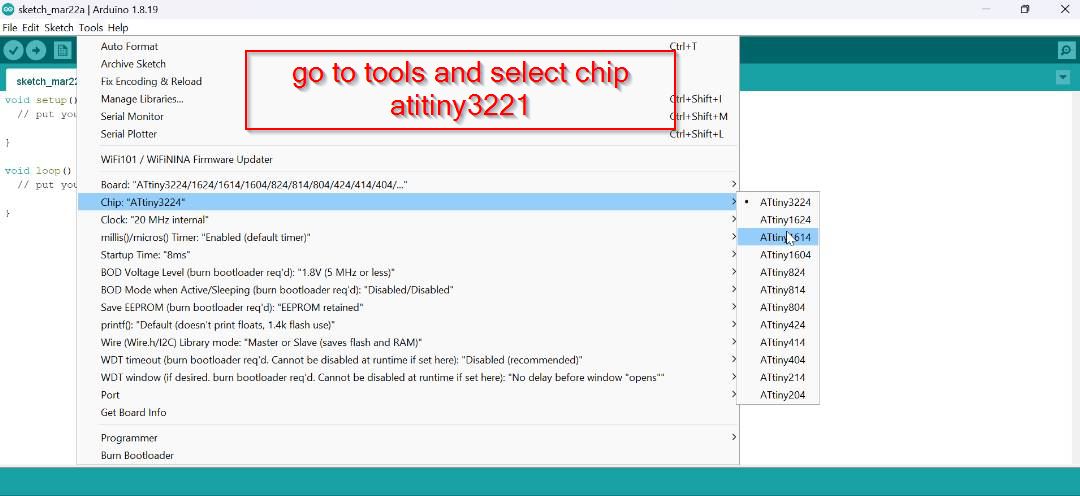
After that select the board to Attiny 1614.
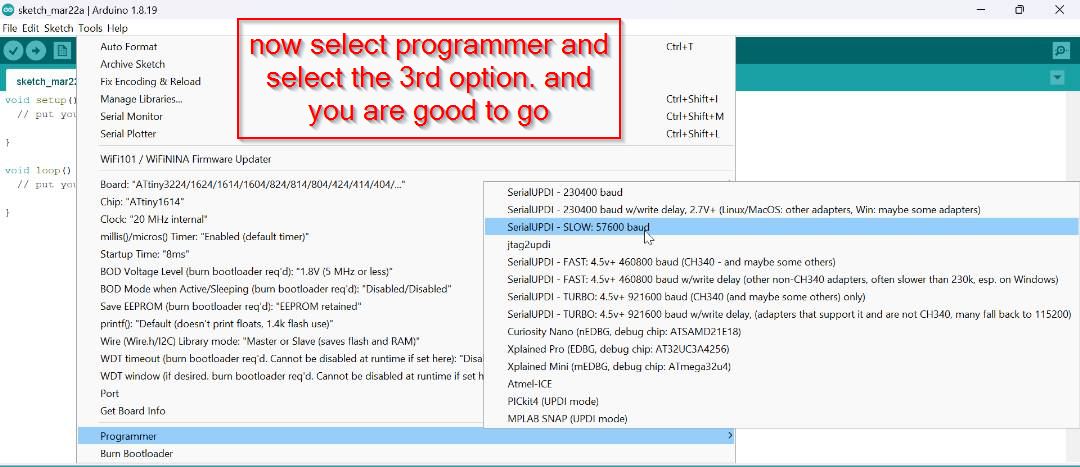
Then select the programmer as shown below and don't forget to select the port .
Programming
Now let us put the code and then run before that let us see the connection
GND of the bluetooth module to the GND of the board
VCC of the bluetooth module to the VCC of the board
TX of the bluetooth module to the RX of the board and RX of the module to the TX of the Board
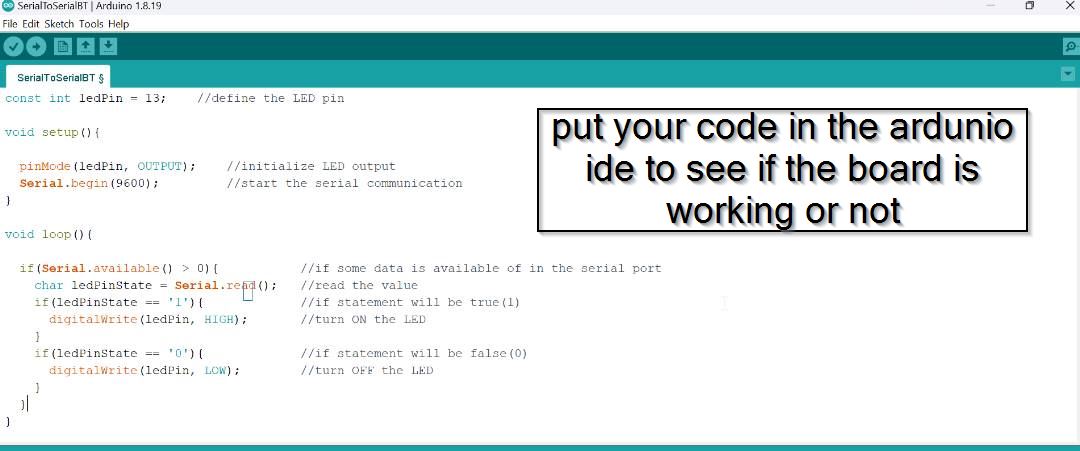
LED pin 2 on the board, Below here is the code i got from google.
  #include <SoftwareSerial.h>

  SoftwareSerial HM10(2, 3); // RX = 2, TX = 3

  char appData;

  String inData = "";

  void setup()

  {

    Serial.begin(9600);

    Serial.println("HM10 serial started at 9600");

    HM10.begin(9600); // set HM10 serial at 9600 baud rate

    pinMode(13, OUTPUT); // onboard LED

    digitalWrite(13, LOW); // switch OFF LED


  }


  void loop()

  {

    HM10.listen();  // listen the HM10 port

    while (HM10.available() > 0) {   // if HM10 sends something then read

      appData = HM10.read();

      inData = String(appData);  // save the data in string format

      Serial.write(appData);

    }


    if (Serial.available()) {           // Read user input if available.

      delay(10);

      HM10.write(Serial.read());

    }

    if ( inData == "F") {

      Serial.println("LED OFF");

      digitalWrite(13, LOW); // switch OFF LED

      delay(500);

    }

    if ( inData == "N") {

      Serial.println("LED ON");

      digitalWrite(13, HIGH); // switch OFF LED

      delay(500);

      digitalWrite(13, LOW); // switch OFF LED

      delay(500);

    }

  }
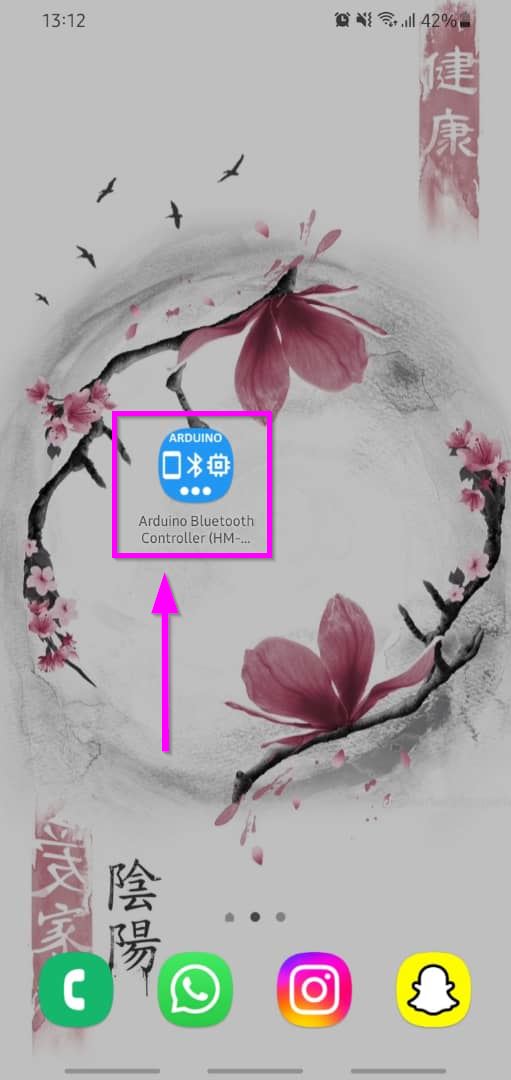
I downloaded an app to connect to the bluetooth module
Here is a youtube tutorial that helped me a lot to use this module, in the tutorial video it is connected to the arduino so it was easier for me to do on my board. link to tutorial video.
Firstly i downloaded an app from the play-store and installed in my phone.
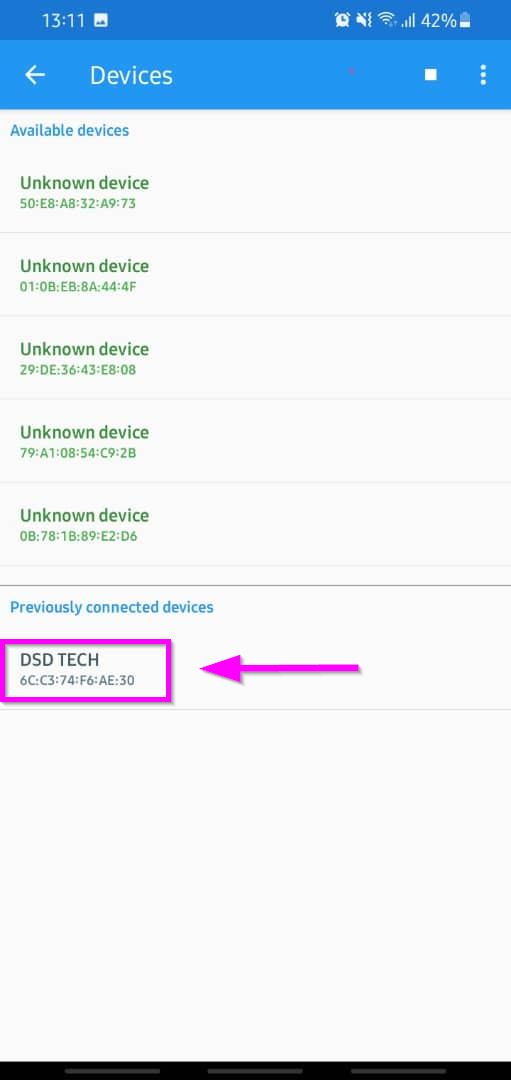
Then i just connected my phone bluetooth by the app to the module like shown below.
Her you can customize on your own, like what number or digit you want to press for ON and OFF.

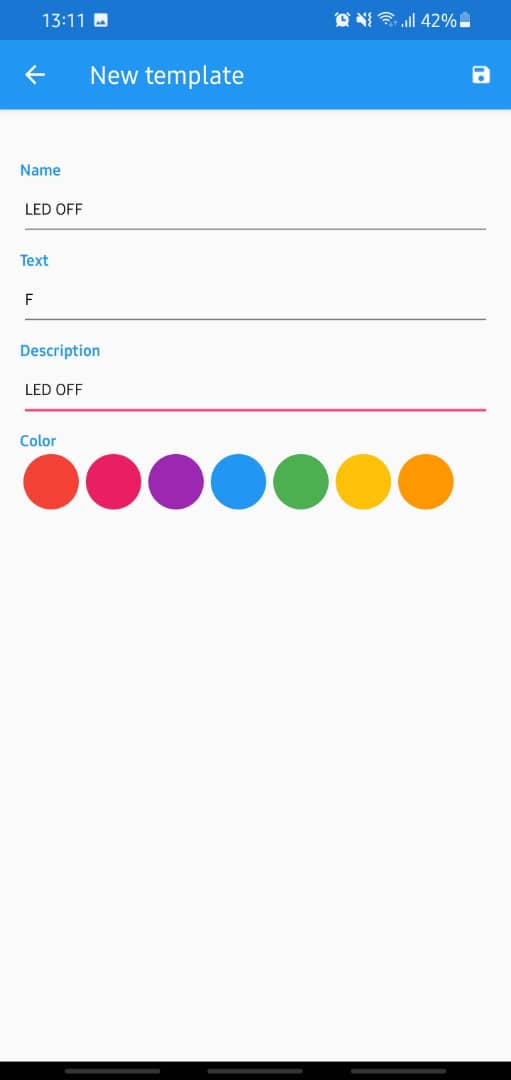
Here you can just add the command for ON I kept FN and for OFF i kept
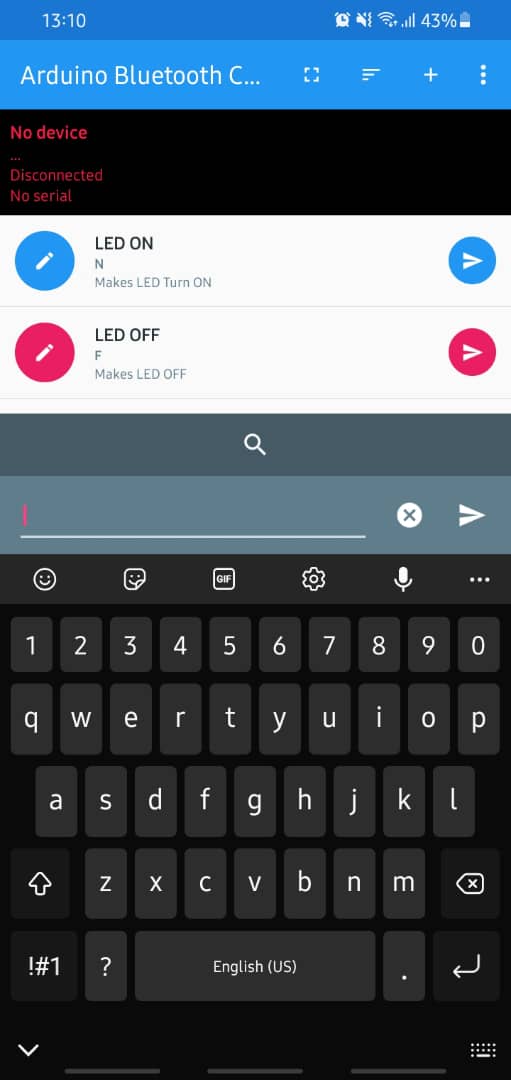 Below here is the working video of bluetooth module on my board.