Project Management
Personal Website Development
STEP 1:
Nicepage is
used to create my website. Upon entering I import a project.
Download link:
Nicepage
STEP 2:
We select
the file with zip extension.
STEP 3:
To enter
text on our page we use the block button and select text.
STEP 4:
To insert
my photo on the ABOUT ME page, I click on the UPLOAD button.
STEP 5:
To insert
the icons of social networks we use in BLOCK the type of SOCIAL NETWORKS.
STEP 6:
To insert
the icons of social networks we use in BLOCK the type of SOCIAL NETWORKS.
STEP 7:
We changed
the address or link for both Facebook, Instagram, Twitter and LinkedIn.
STEP 8:
We edit the footer.
STEP 9
We added a
block where we publish the student agreement.
STEP 10
We use
bullet points for two paragraphs and put a white background on the text blocks.
STEP 11
We open a
blank page for the ASSIGMENTS and choose the GRID REPEATER option in BLOCK.
STEP 12
We are
saving images to change on our ASSIGNMENTS page.
STEP 13
In
NICEPAGE, after having clicked on the icon in the center of the image, the
following window opens where we click on UPLOAD to load the image.
STEP 14
On the
PROJECT FINAL page we add text and a video.
STEP 15
En
cuanto al ASSIGMENT 2 he utilizado un bloque de texto y luego dentro de él he
colocado una cuadricula.
This
section will explain the synchronization of the fabcloud account in Gitlab for
the cloning of our website through Visual Studio Code for version control.
Cloning Fabcloud Account from Gitlab
STEP 1:
Download and install gitlab.
Download link:
Gitlab
STEP 4:
Log in to gitlab.
STEP 6:
I go to
visual and click on CLONE GIT REPOSITORY.
I indicate
the folder where I am going to clone.
STEP 7:
And on the left side of Visual Studio Code you see my name which means it's already cloned. All my gitlab information is on my PC.
STEP 1:
Enter the
clone folder and delete the contents of the DOCS folder.
STEP 2:
Go to nicepage and export the project in HTML
STEP 3:
save the HTML project with the name DOCS and in the path where the clone is located
STEP 4:
We synchronize my PC with visual studio code. let's go visual
STEP 5:
We visualize the icon of source control and then we click on the check (commit),
STEP 6:
Click SYNC CHANGES and Ok,
STEP 7:
Request credentials. Click in Accept.
STEP 8:
To see the changes I update (f5) in my web page repository.
STEP 9:
Displaying the docs we can see the html of the index and there we can see the head and the body of the page
Download link:
Visual Studio Code
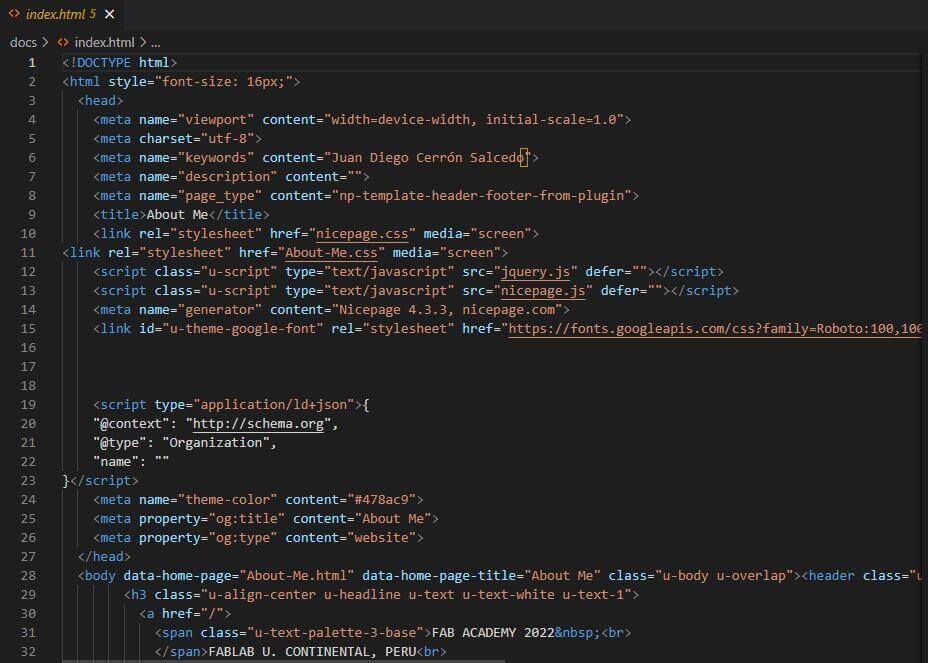
EXPLANATION OF THE HTML USED
Every HTML document has the following basic structure:
- Each
page starts with: < HTML >
- Next
comes the header, delimited by < HEAD > and < /HEAD >
- Then,
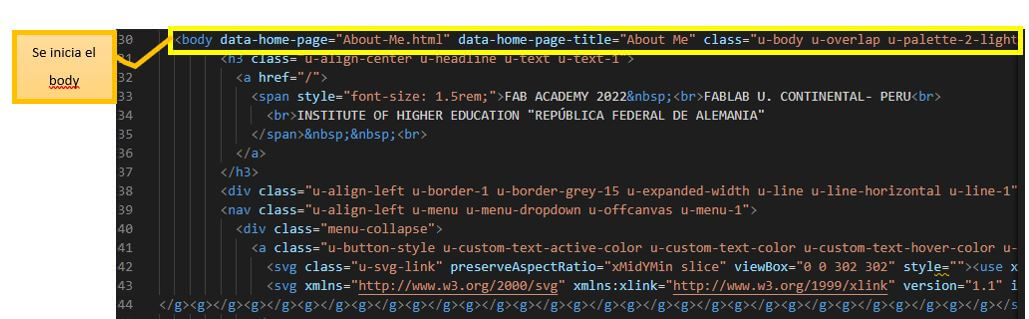
the command < BODY >, which indicates the beginning of the body of the
page. The HTML instructions will be written below, ending with <
/BODY >
- The
page will end with < /HTML >

In the HEAD we have some META TAGS that accurately describe
the content of a website.

In the case of BODY we have tags like h3 is a title tag that we use within a web page to highlight the theme and sub-themes of the content. We also use tags like <li> that allow you to list elements in an ordered or unordered manner using bullets.
Within
the BODY we can find hyperlinks. For this, the HREF tag is used, which contains
the URL of the page to be opened, but it is accompanied by the word target,
which indicates that it is going to open on another page.

