Individual Work
Work Design of Fab isp for mission 4.
In this week of electronic production I realized my Fab ISP programmer.
After reading tutorials I finally understood how the fab isp works.
I launched in pursuit of designing a personally. The purpose of this tutorial is to design an isp programmer. Indeed before I used arduino uno as a programmer. Now I have the knowledge to make one.
How is it done?
NB: First it should be noted that the procedure taken here is only for windows.
The first phase is to design the circuit and welded.I took the diagram on the site of fab academytutoriel week-4 fab TinyISP-francais
I made the electronic circuit with the Eagle software.
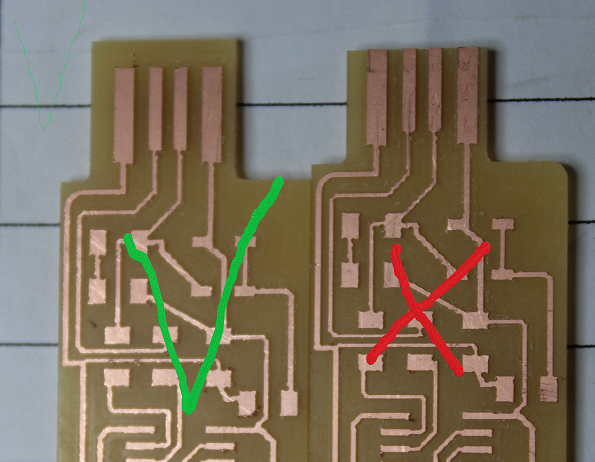
Then I milled my circuit three times due to errors:
The first mistake is the size of the USB port head having to connect with the pc, it was small and its floating. 'measured an external adapter of a charging cable that. The length is 12.02mm and the width 12mm. I milled a second time..

The second mistake. When I finished milling the second one? I welded the components do not try, I checked the short circuits but there was continuity everywhere. I did not understand anything. After verification it was due to the placement of the zoner diodes. I put it back well and it's cool. When I connected my circuit to my pc I saw a smoked. Cause: The USB port I chose on the eagle software was not the right one. The bollards were reversed. I redid the circuit by changing the type of USB port.
Now I have corrected all the errors. Mill a third circuit and welded. When I plug in it, it turns on. I checked the supply voltage and connection polarites of my attiny45 microcontrollers, it was well powered too.
The second phase is to download the drivers to turn the designed board into a programmer.
I installed the atmel avr toolchain for windows by doing this:
Install git bash
-
Download on micro chip; I have ATmel avr toolchain for windows to click on avr-GCC development toolchain avr_8bit toolchain v3.62 – windows.
Then I extracted this in c/ program files
-
I downloaded the Gnu make and install by its default location
-
I downloaded avrdude extracted and save in the c /programs files.
Then I updated my path of the files I just ran. I open the control panel and then go to System. I typed "Advanced System Settings" to quickly find it. Click, Under the Advanced tab, click on the "Environment Variables" button. Under User Variables, select "Path" and click the Edit button. If you don't already have a variable called "Path", click the New button to create it, enter "Path" without the name and fill in the value as described below. I clicked path and edit. I need to save the paths of the install files; I added them all in path by clicking on new.
C:\Program Files (x86)\GnuWin32\bin
-
C:\Program Files\avrdude
C:\Program Files\avr8-gnu-toolchain-win32_x86\bin

I closed everything the settings.
-
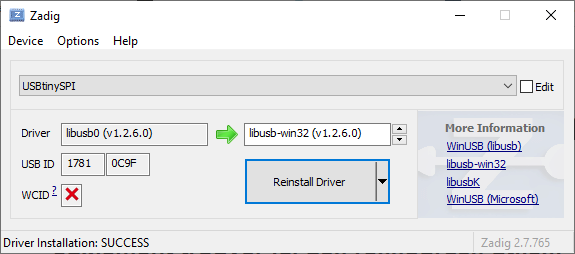
I downloaded the Zadig software. Make it easier to choose the programmer on Windows 10. This software allowed me to download the driver for my avrisp2 Blue programmer. After installation I plugged in the programmer avrisp mkl. At the level of the green arrow I chose libusb-win 32 and at the bottom I clicked on Install driver. At the driver level, the driver is to install automatically.
-
I will check my work. I open git bash. I check with the following commands.
-
Make; I fill in the path on the command. commands do not give. We are mistaken. I checked the installation of make and then reinstall. I checked the path too and corrected.
-
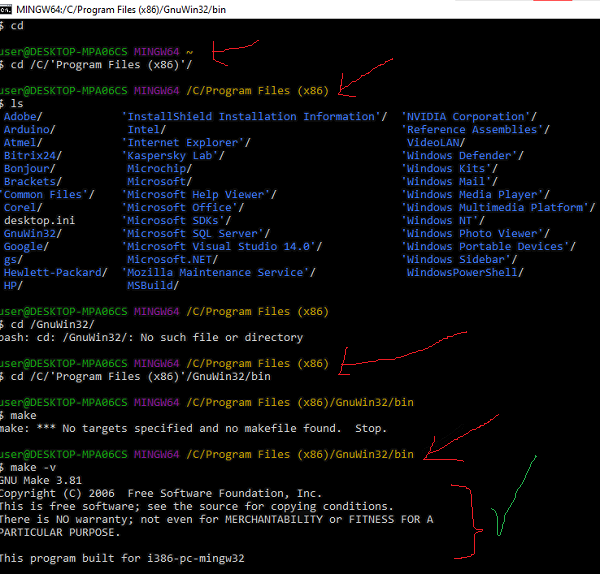
The fatal error that made me unable to access my file. When I type cd /C / Program Files, the git does not take into account the two syntax Program and Files which it does not run; The solution I had to put in quotation marks the two words like 'Program Files'. And now I have access to it. Ho sa is 4 hours, I typed the commands without having access. But the ls command saved me (to view the folders).
-
I've done the test path everything is fine now.
Third phase
I downloaded the fts file and unzip. In the git bash with the cd command I entered the fts_firmware_bdm_v1 folder. I typed make and then entered. And the file fts_firmware.elf to create another file fts_firmware.hex.
Fourth phase
Verification of the installation of the tool chain atmel avr on windows.
In this part we will type commands in the different folders to see if everything is perfect. If not, you need to review your different installations.
The first command to type is ‘make -v’. To type this command I open git bash and I go into the cd /C/'Program Files'/GnuWin32 folder and then I type the command.
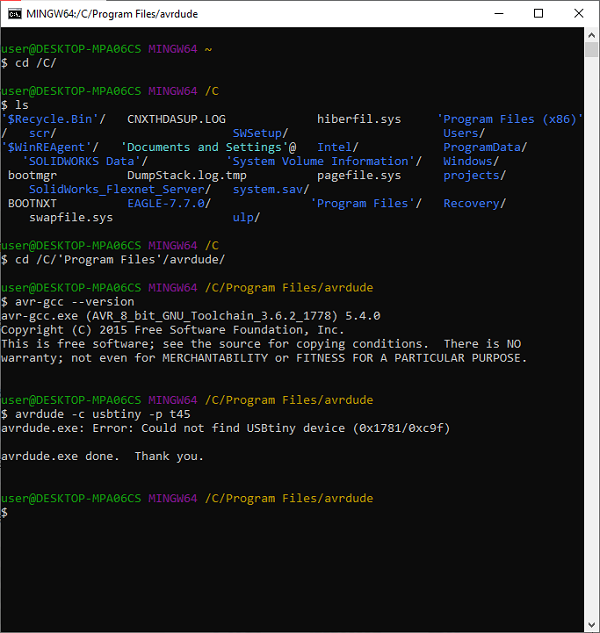
The second is in the avrdude folder. In the git to return to a folder it is cd …; but if it's to go back car2ment it's simply cd ; of which I type cd to go back and I go into the folder 'C:\Program Files\avrdude ' and I type the command 'avr-gcc ---version ' and entered.
The third is in the same folder and I type the command ‘avrdude -c usbtiny -p t45’.
Fith phase
Using the avrisp programmer to program my fab isp.
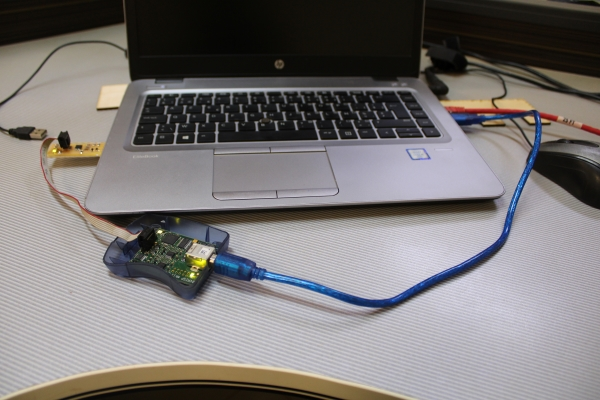
After step 2 I connected the programmer to my pc then I spotted the miso number 1 on the programmer then I connected the cable to 6 pins the red corresponds to the 1, there is an arrow mark that also indicates on the Conn 2X3. I then connected my fab isp to the isp header of my programmer. The red led programmer avrisp is on but the led of the fab isp is still off.
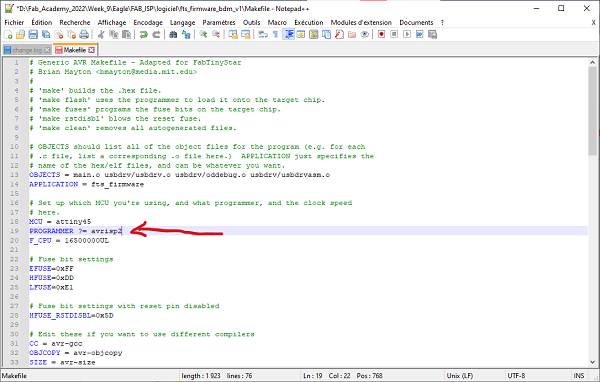
In the folder that I unzipped from the fts_firmware_bdm_v1 file, I will edit the Makefile file with a text editor. I used notepad++. I edited the type of programmer I will use to program my fab isp. It is the avrisp2 in blue color, the name of its programmer is the avrisp2, so you should change the name by the name of your programmer.
I open git in the fts folder I run the make flash command to reprogram the fab isp flash memory with the fts file of .hex

After that we will reprogram the configuration fuses.
-
The Clock system is set with PLL and is not divisible by 8.
-
I ran the make fuses command. This will set up all fuses except the one that disables the reset pin.

Sixth phase
Checks of the functionality of our fab isp card.
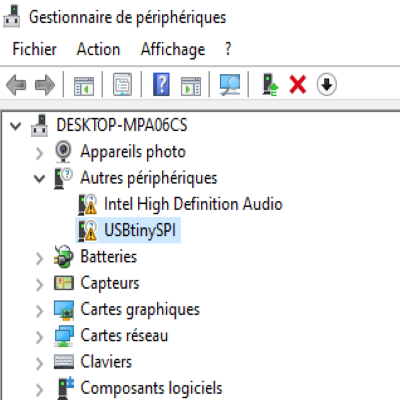
I checked if the fab isp is displayed on the device manager but yes. It is displayed. To check this, one must type in the search bar windows device manager, in other devices will be written USBtinySPI.
We need to change the bit that will turn the reset pin of the ATtiny45 into a GPIO pin. Again, this will disable our ability to reprogram this ATtiny45 in the future, which is why we wanted to make sure everything worked before we did. Let's connect our ISP programmer to our Fab ISP board once again and run the make rstdisbl command. This does the same as the make fuses command, but this time it will also include the reset disable bit. This will make it possible to never program the fab isp again.
Everything is well done.
I will use Zadig to install the driver for my Fab Isp on my pc. So I connect my Fab Isp to my pc and I open the software. I click on install drivers and it's done.
Install Fab ISP Driver by Zadig
Finally I will blow up the jumper's bridge. This will make the card safe and non-reprogrammable. I used my soldering iron to remove the bridge.
The Fab ISP board is ready to be used as a programmer.
Final FAB ISP

FAB ISP Connection
