 Home
Home
Principles, Practicals, and Project ManagementEven from the first week the academy has challanges us with new different world. As an lecturer in electronics and stuffs, website design is totally new for me. I know little bit about HTML, but Markdown? Gitlab? No Idea!. I once designed static website in localhost. I have never pushed my website online. But now, Neil and friends in fablab academy encourage me to step up! Okay! List of tasks Here the list that I can remember for first week:
Rules to Remember In our first week, we are asked to read and understand thoroughly the Student Agreement provided by the academy. Also I add MIT license. Here they are: Final Project
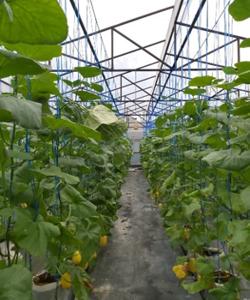
As the institution where I am working plans to establish a fabrication lab aims to support three selected Research Group (RG), so that I am obligated to support one of them which is Smart Agriculture RG. One of the product that this RG working on is to producing high quality melon as shown below.
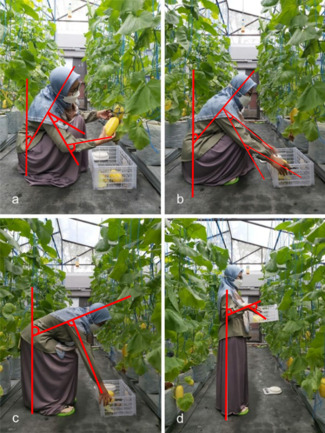
According to their experience, 3 days prior to harvesting (subject to regular schedule), melon should be regulary monitored as such a high quality melon can be produced. Usually, a farmer walks through the aisles and check the melon one by one. The farmer will see whether observed melon is ripe and ready to harvest or not. This activity includes monitoring to the plant conditions. When a farmer do the monitoring, as can be seen from Figure below, the position of melon is far below. Hence, the farmer should position their body to reach melon’s position as shown below.
Even if this is a body position when harvesting, the thing is, they are similar when they conduct monitoring process. Imagine if there are hundreds of plant they should check. It will hurt them. Hence, I propose a solution to use Automatic Guided Robots that can check the plants one by one with the help of various components such as sensors, screen, motors, and magnetic tape as its guided trajectory.
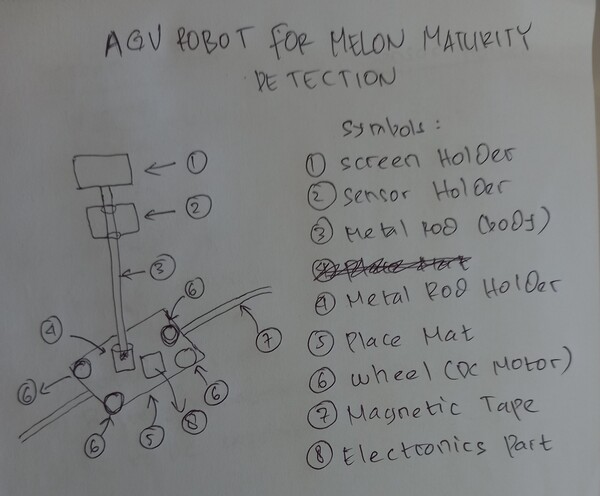
The design is a result of intensive discussion with friend from Smart Agriculture Research Group, we made sketch of what the product will be. The sketch can be seen below.
This is just simple robot with height around 30 cm, because the position of melon is not too far from the ground. The robot will have 4 wheels (DC motor) controlled by microcontroller and drivers. The robot read data from RGB camera and color sensors. The data will be processed using simple Machine Learning algorithm. This robot will walk by following magnetic tapes on the floor. The reason why I choose this because it will be easier to control it than ordinary line follower. Magnetic tape can survive from water drops, stains, and small disturbance that ordinary line follower can’t tackle. The criterias of melon are ready for harvesting based on papers and person from Smart Agriculture RG are:
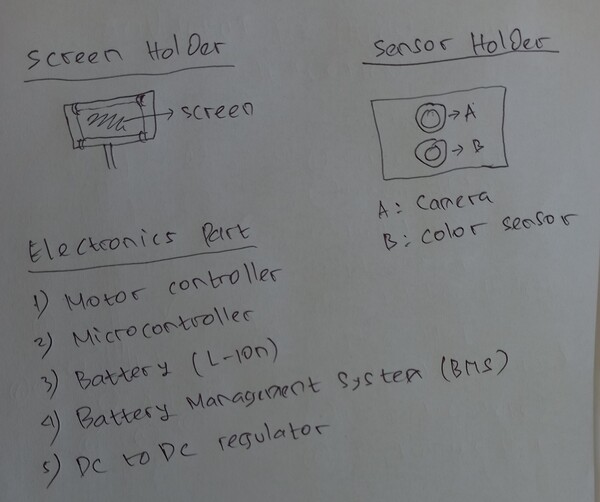
In this case, we select indicators number (1), (2), and (4) to decide whether the melon ready to harvest. The “kinda” detail electronics part is shown on below image.
This robot comprises of 3 parts which are sensors, a screen, and motors. Table below shows components will be used in the future. The detection results alongwith other data will be displayed in free IoT platform like thingSpeak. This will help users or farmers to monitor the melon maturity detection.
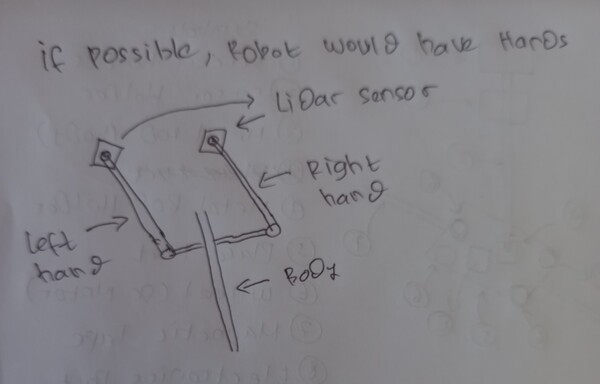
I am planning also to add hands with lidar sensor attached on both hands to get exact boundaries of melon. It can be used for many purpose for example helping camera to measure dimensionality of the melon. One of Smart Agriculture RG member said that this data can also be used further to map weight of melon with their dimensionality. They are linear and possible to formularize.
Project ManagementThere are several project management explained by Neil and Our Instructor in Kamakura fablab. They are easy to understand. What I captured from their explanation is I should choose one best match to my condition and characteristic. After taking some time, I decide that I can walk along with
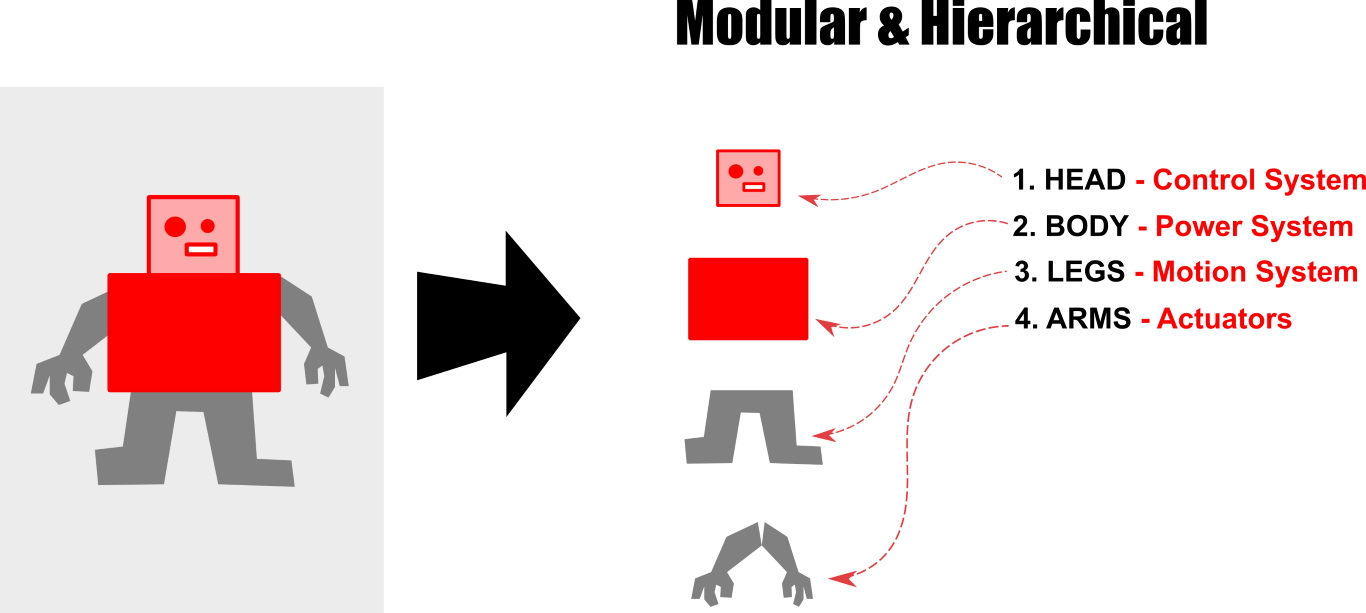
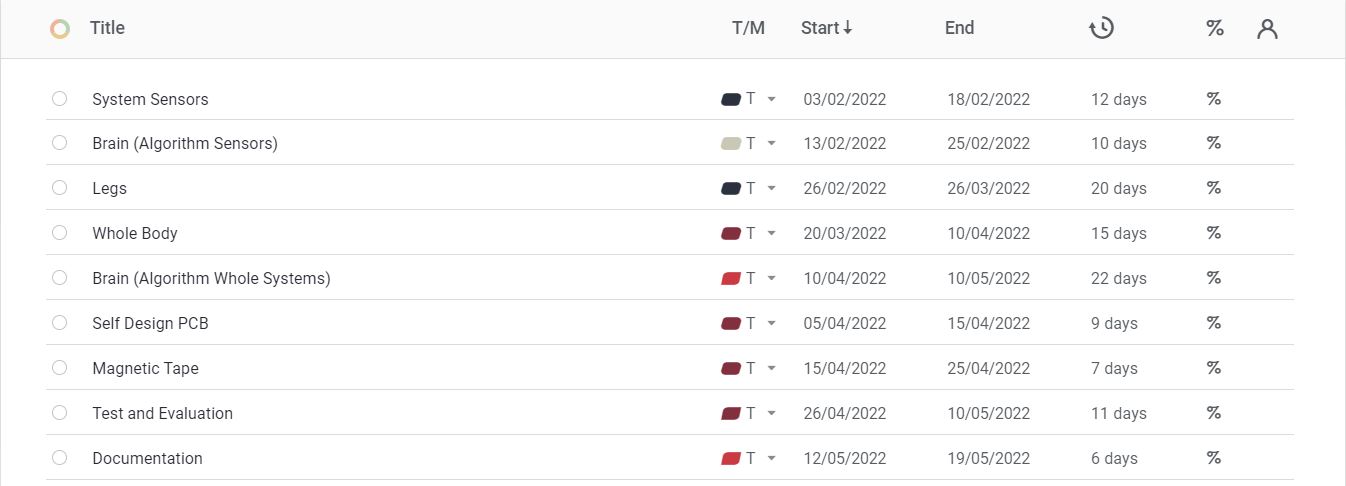
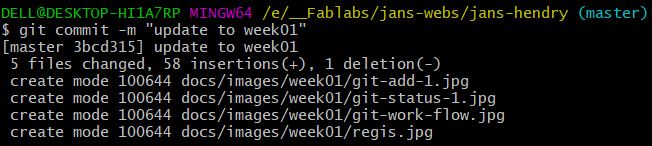
I complete this week task by establishing priorities. First of all, I make sure that I understand about Gitlab platform then continue to learn the editing in local repository. The editing happened in local repository along with the image and video captured for documentation. For my final project, I will make guided robot for smart agriculture. They can be separated into several parts like Brain, Legs, Sensors Systems, and can be further added with hands (additional feature if time is enough). For that to succeed, I plan to work on below plan designed using online gantt chart.
Develop Knowledge Regarding Git
According to wikipedia, Git was created by Linus Torvalds in 2005 for development of the Linux kernel, with other kernel developers contributing to its initial development. Git is a software for tracking changes in any set of files, usually used for coordinating work among programmers collaboratively developing source code during software development. Its goals include speed, data integrity, and support for distributed, non-linear workflows (thousands of parallel branches running on different systems).
Gitlab is a version control software which aims to keep the historical record of all changes made to files and documents. By this definition, we can revert back to an earlier version whenever needed.
Quoting Atlassian, Git Bash is an application for Microsoft Windows environments which provides an emulation layer for a Git command line experience. Bash is a popular default shell on Linux and macOS. Git Bash is a package that installs Bash, some common bash utilities, and Git on a Windows operating system. The installation of Git bash is pretty easy. All you need is solely following the instruction given in each steps. Normally Git bash comprises of two application, which are GUI and Command Line Interface (CLI). For novice, it is quite difficult to understand what can be done with CLI, but one should try because it is more convenient to do all activities in this application. Gitbash can be downloaded from this link.
Tips When you accidentaly found that what written on the window’s header is MINGW instead of GIT BASH, do not freak out. You already in the right place.
Git installation is quite stressfull especially when you are not familiar with Unix instructions. The installation of Git on local computer is easy. The installation is fully based on command line, and we can find a lot of help available on the internet. Weapons that you already have in hand:
One should pay attention to the existance of Python in the system. It is better to have Python 3 installed on your computer instead of Python 2. Markdown is developed based on Python, hence you should install it first where you can download it form here. Let’s start the How To steps:
The installation process runs automatically. So that, once you push [ENTER], you should let it working itself. Tips It took me quite long figuring out the mistake when installing the requirement needed by gitlab theme. For I did not put their version in installation statements. Differ to aforemention steps, I just realized, the one-by-one installation I did above can be simply replaced with this one-line instruction:
Warning Leave no space between text and equal sign to avoid installation failures as shown below
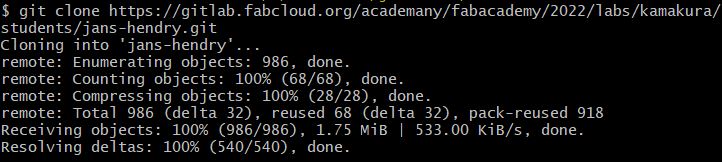
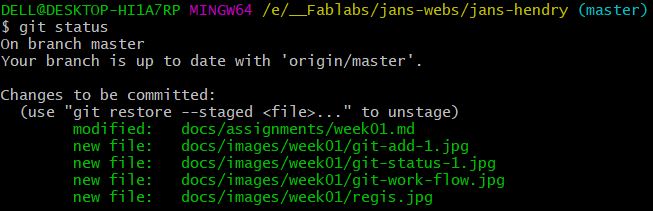
Working directly on gitlab repository is exhausting. So that, I encourage myself to work on local repository. Luckily, this can be done easily using Git bash. First of all, we should download whole repository using below command
When succeeded, it will display some lines that indicate 100%. Remember where you store all the files locally. When you try to clone in the same directory, it will alert a message: Destination path already exists and is not an empty directory. Tips
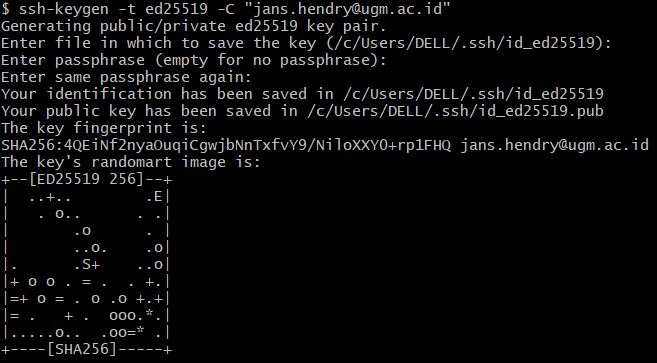
SSH-Key plays important role. It will be the identity that online and local repository should have. It is needed when the first time connection is made. Here are the steps to generate SSH-Key on your local machine prior to storing them to Git lab.
There are a lot of script editor available to use. One should choose what convenient to them. You can choose VIM, Sublime, Visual Studio Code, Atom, Bracket, so on. As I used to use Visual Studio Code (VS Code) for Single Board Computer based on Python programming, I decided to use it.
The benefits of using VS Code are it can open full folder of local repository complete with the tree. It also generates HTML version of your website automatically. The most interesting from this software is it is linked to windows store where we can install an application to review the result of MKdocs editing. By having this review application program, we can directly see the effects of editing locally without using browser. Tips We can use MKdocs server to enable preview in localhost if you don’t feel VS code review convenient. In your Git bash, type Finally you can connect to local repository by copying URL written on the Git bash.
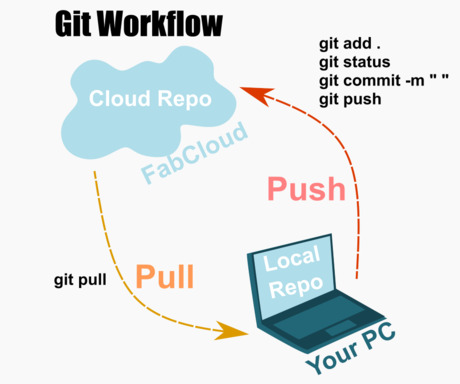
There is a cycle, which is simple, that we can remember easily when developing website from local repository using Gitlab. Here is an image from our instructors in Kamakura fablab.
Here are the complete steps of how to publish your designed website from local repository to the cloud:
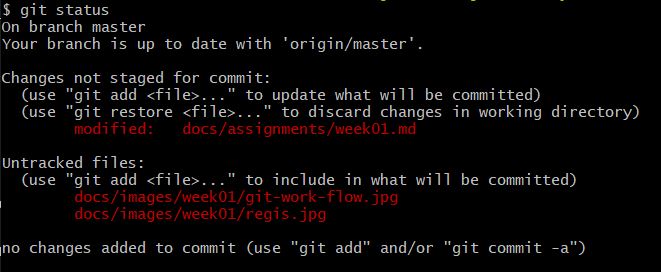
Tips Prior to editing, please always PULL the cloud contents by using it will guarantee that you would work based on updated cloud contents. Attention! Editing online repository from gitlab directly is NOT RECOMMENDED. It happened when I tried to push to gitlab, it alerted an [ERROR] as shown below
It was a sign that you made change(s) directly in online repository. Hence, you should close the activity by commiting it or close it. When commit is in progress, let them. Once it is complete, pull them to local repository prior editing or just merge. Markdown or HTML, what do you choose?HTML is developed for the first time by Tim Berners-Lee in 1990. HTML which is abbreviated from Hypertext Markup Language is normally used to create documents that are published in WWW (world wide web). Usage of HTML is pretty easy. Website created solely on HTML is said to be static website. Markdown, abbreviated with MD, in a nutshell is a simple form of HTML. With this, we are no longer need to write HTML commands when building our static website. In many case, we can replace their commands with symbols. Basically, HTML code is shown below An example of how Markdown can simpify the usage of HTML in developing static website is shown in table below.
Tips
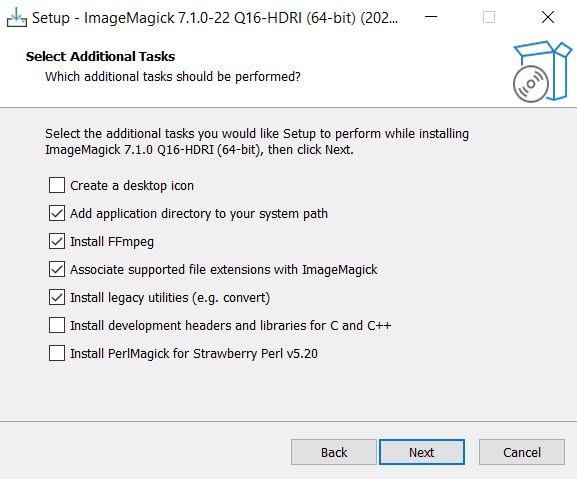
Future Plan Designing personal website with the help of tool like Hugo has taken my attention. I am planning to use this tool or maybe other tool to create my personal website in academy. It is just I have not got a chance as I took time to learn this platform. In paralel, I promise to myself to master it. Image Insertion and ManipulationThere are a lot of options for free image manipulation software, either based on GUI or CLI. In this task, I use frequently CLI software to help me creating images to display in this website whatsocalled ImageMagick. The developer provides software for Linux, MacOs, and Windows Operating System. As I am a Windows user, I chose binary (executable) file that can be installed with GUI in my computer. This software can be downloaded from here. This software comes with many features that we can get from professional photo editing software, even if it does not as complex as others. The benefits that we can get from this software are
In this weekly task, I utilize this software mostly for image resizing and quality reducing (for now).
Generally, the steps for image resizing are
For example: As I want to put 4 images in one raw without using certain formatting, then I just make their dimensional proportional to browser width. I did not change its extension and quality. Then I did:
The differences between before and after action are shown below
It is clear that image after conversion is down-resized into 70% of original dimensional.
The aim of this feature is to reduce quality of source image without changing its dimensional. In order to do this, you can simply type In my machine it is
Then, the results are
As can be seen, even if their dimensionality is exactly the same, the image after action has smaller size in Byte. Tips We can also use free GUI-based software like XnConverter that can convert image in batch processing mode and easy to use. Video Insertion and ManipulationFor video manipulation, I prefer to use CLI
This video is a 12 seconds video with high definition with the resolution is 1920x1080. The video was recorded using OBS Studio which can be downloaded here. You can ask for properties that a video has using command below According to FFMpeg, size of the video is 11.62 seconds with bitrate 1381 kb/s as depicted by image below.
The example of instructions set to reduce the dimensional of a video is After compression, the video becomes The comparison of original video and compressed version is
It can be seen that original video with size 1.959 KB has been reduced to 990 KB, the compression rate is 50.54%. By using FFMpeg, you also can record your screen by below statement. It will record screen with high definition (1920x1080) starting from top-left corner (0, 0). There are many actions we can do with ffmpeg as well as ImageMagick. |
Table of Contents
|