Week fifteenth assignment is the Wildcard Week.In this week we have to design and produce something with a digital fabrication process not covered in another assignment, documenting the requirements that the assignment meets, and including everything necessary to reproduce it.
Plasm Cutting Hero shot
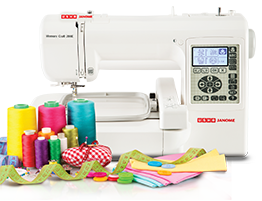
Digital Embroidery Hero Shot
Assignment-15
Wildcard Week.
OBJECTIVES
Individual assignments
- Design and produce something with a digital fabrication process (incorporating computer-aided design and manufacturing) not covered in another assignment.
Learning outcomes
- Demonstrate workflows used in the chosen process.
- Select and apply suitable materials and processes to do your assignment.
Individual assignment on Wildcard Week.
In this assignment we have task to design and produce something with a digital fabrication process incorporating CAD and CAM that should not be covered in previous assignments.So, for this I have decide to use the "Plasma cutter" in vigyan ashram workshop,also used the "digital sewing machine" in sewing lab of vigyan ashram but due to covid all the labs in ashram remains close for a week.We are rescheduling the assignment for next week,but till i have worked and tried to design for wild card week.The work flow of the assignment is given below.
- About Plasma Cutter
- How the Plasma cutting works?
- About Fast CAM software.
- Design the Key holder in Rhino.
- Tool path generation using Fast CAM.
- Cutting the material.
- About USHA Janome Memory Craft Sewing Machine
- 2D design in Rhion
- About Digitizer Junior Version 5
- Use Digitizer J5 for G-code
About Plasma Cutter.
Plasma cutting is a process that cuts through electrically conductive materials by means of an accelerated jet of hot plasma. Typical materials cut with a plasma torch include steel, stainless steel, aluminum, brass and copper, although other conductive metals may be cut as well. Plasma cutting is often used in fabrication shops, automotive repair and restoration, industrial construction, and salvage and scrapping operations. Due to the high speed and precision cuts combined with low cost, plasma cutting sees widespread use from large-scale industrial CNC applications down to small hobbyist shops.(Wikipedia)
Plasma arc cutting torch work.
How the Plasma cutting works?
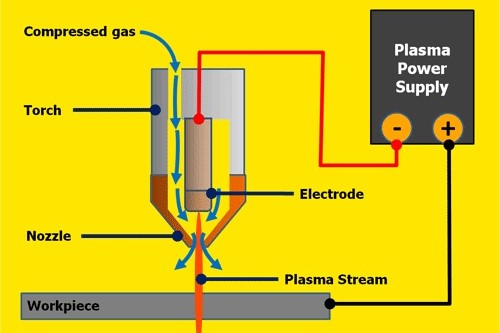
Plasma cutting is a process in which electrically conductive materials are cut through by means of an accelerated jet of hot plasma. Typical materials that can be cut with a plasma torch are steel, stainless steel, aluminium, brass, copper and other conductive metals. Plasma cutting is widely used in manufacturing, automotive repair and restoration, industrial construction, salvage and scrapping. Due to the high speed and precision of the cuts at low cost, plasma cutting is widely used from large industrial CNC applications to small hobby companies where the materials are subsequently used for welding. Plasma cutting - Conductive gas with a temperature of up to 30,000°C makes plasma cutting so special.
The basic process in plasma cutting and welding is to create an electrical channel of superheated, electrically ionised gas – i.e. plasma - from the plasma cutter itself through the workpiece to be cut, thus forming a finished circuit back to the plasma cutter via an earth terminal. This is achieved by a compressed gas (oxygen, air, inert gas and others depending on the material to be cut) which is blown to the workpiece at high speed through a focused nozzle. Within the gas, an arc forms between an electrode near the gas nozzle and the workpiece itself. This electric arc ionises part of the gas and creates an electrically conductive plasma channel. As the current from the cutting torch of the plasma cutter flows through this plasma, it gives off enough heat to melt through the workpiece. At the same time, much of the high-speed plasma and compressed gas blows the hot molten metal away, separating the workpiece.
Plasma cutting is an effective way to cut thin and thick materials. Hand torches can usually cut up to 38 mm thick steel sheet, stronger computer controlled torches can cut up to 150 mm thick steel sheet. Since plasma cutters produce a very hot and very localised “cone” for cutting, they are very useful for cutting and welding sheets in curved or angled shapes.
About Plasma Cutting Machine.
- Basically this machine based on F4 concepts. Friendly in transportation, frieindly in installation ,firindly in operation,friendly in maintenance.
- The cutting area is 1500 x 3000mm and table structures are more precision.
- This is a dual drive system,taht can handle more weight.
- Table structural design, combines stability and portability.
- This machine comes with high precision dual shaft linear guide.
The plasma cutter machine in our Fab lab, vigyan asharm is Smart III porable table CNC cutting machine.
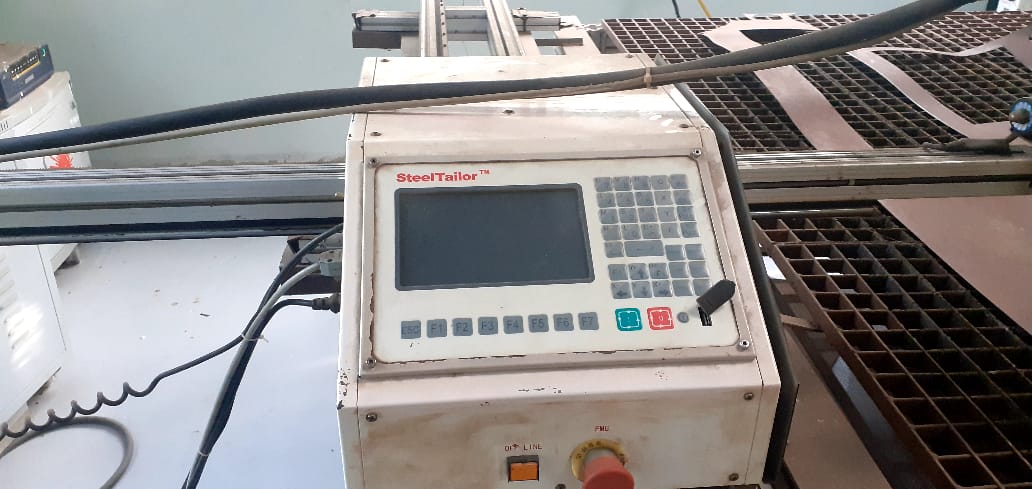
Plasma cutting Machine.
Parameters of Plasma cutting Machine.
- Type::SMART III
- Input voltage::110/220 V
- Input Frequency::60/50 Hz
- Input power::200 W
- Controller::LCD 7 ˝ color screen controller
- Effective cutting range::1500 (crosswise) X 3000 (lengthways) mm
- Max cutting speed::4000 mm / min
- Max running speed:: 5000 mm / min
- Machine positional accuracy:: 0.2 mm
- Repeated positioning accuracy :: 0.2 mm
- Cutting thickness:: Plasma cutting: depends on plasma power
- Cutting mode::Plasma
- Cutting software::FastCAM
About FastCAM Software
FastCAM® CAD CAM Software for Plasma, Oxy, Laser & Waterjet is a total NC solution for metal shape nesting and cutting; You can Draw, Path, Nest and Cut from the one system. FastCAM® allows people at a shop floor level to start profile cutting with the minimum of training.For more details click here.
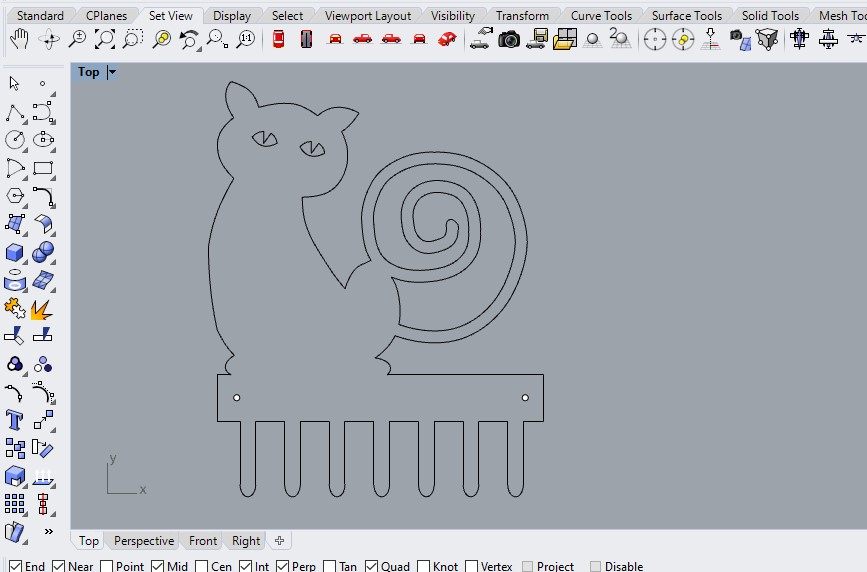
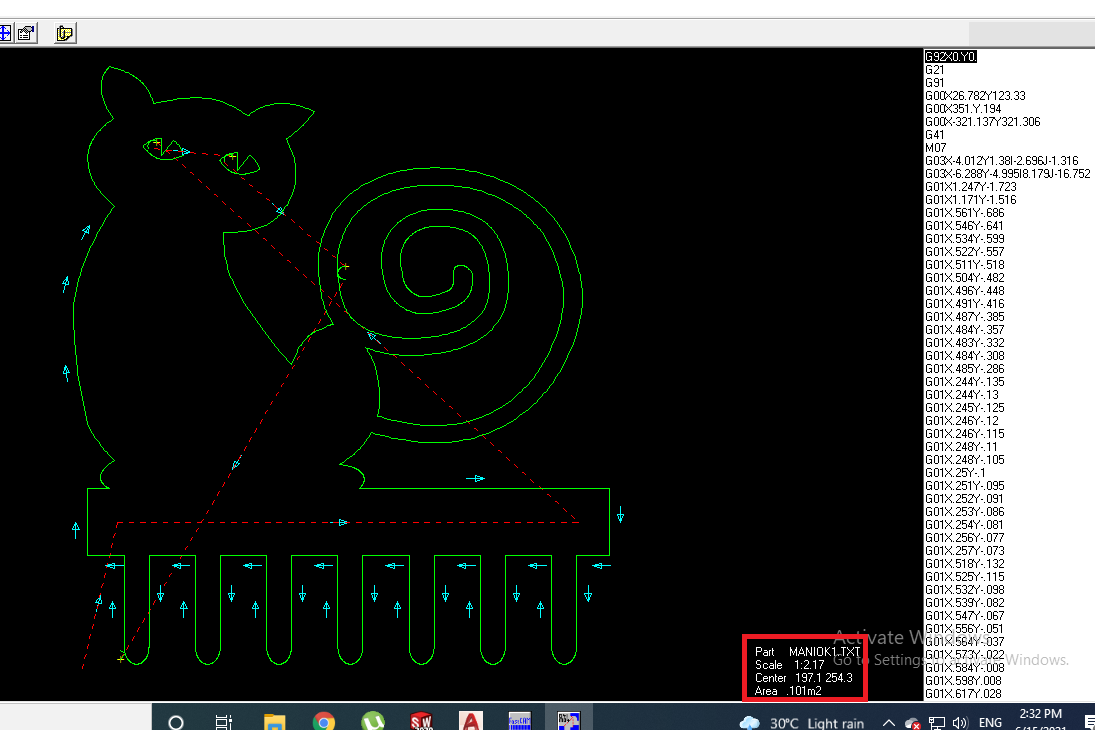
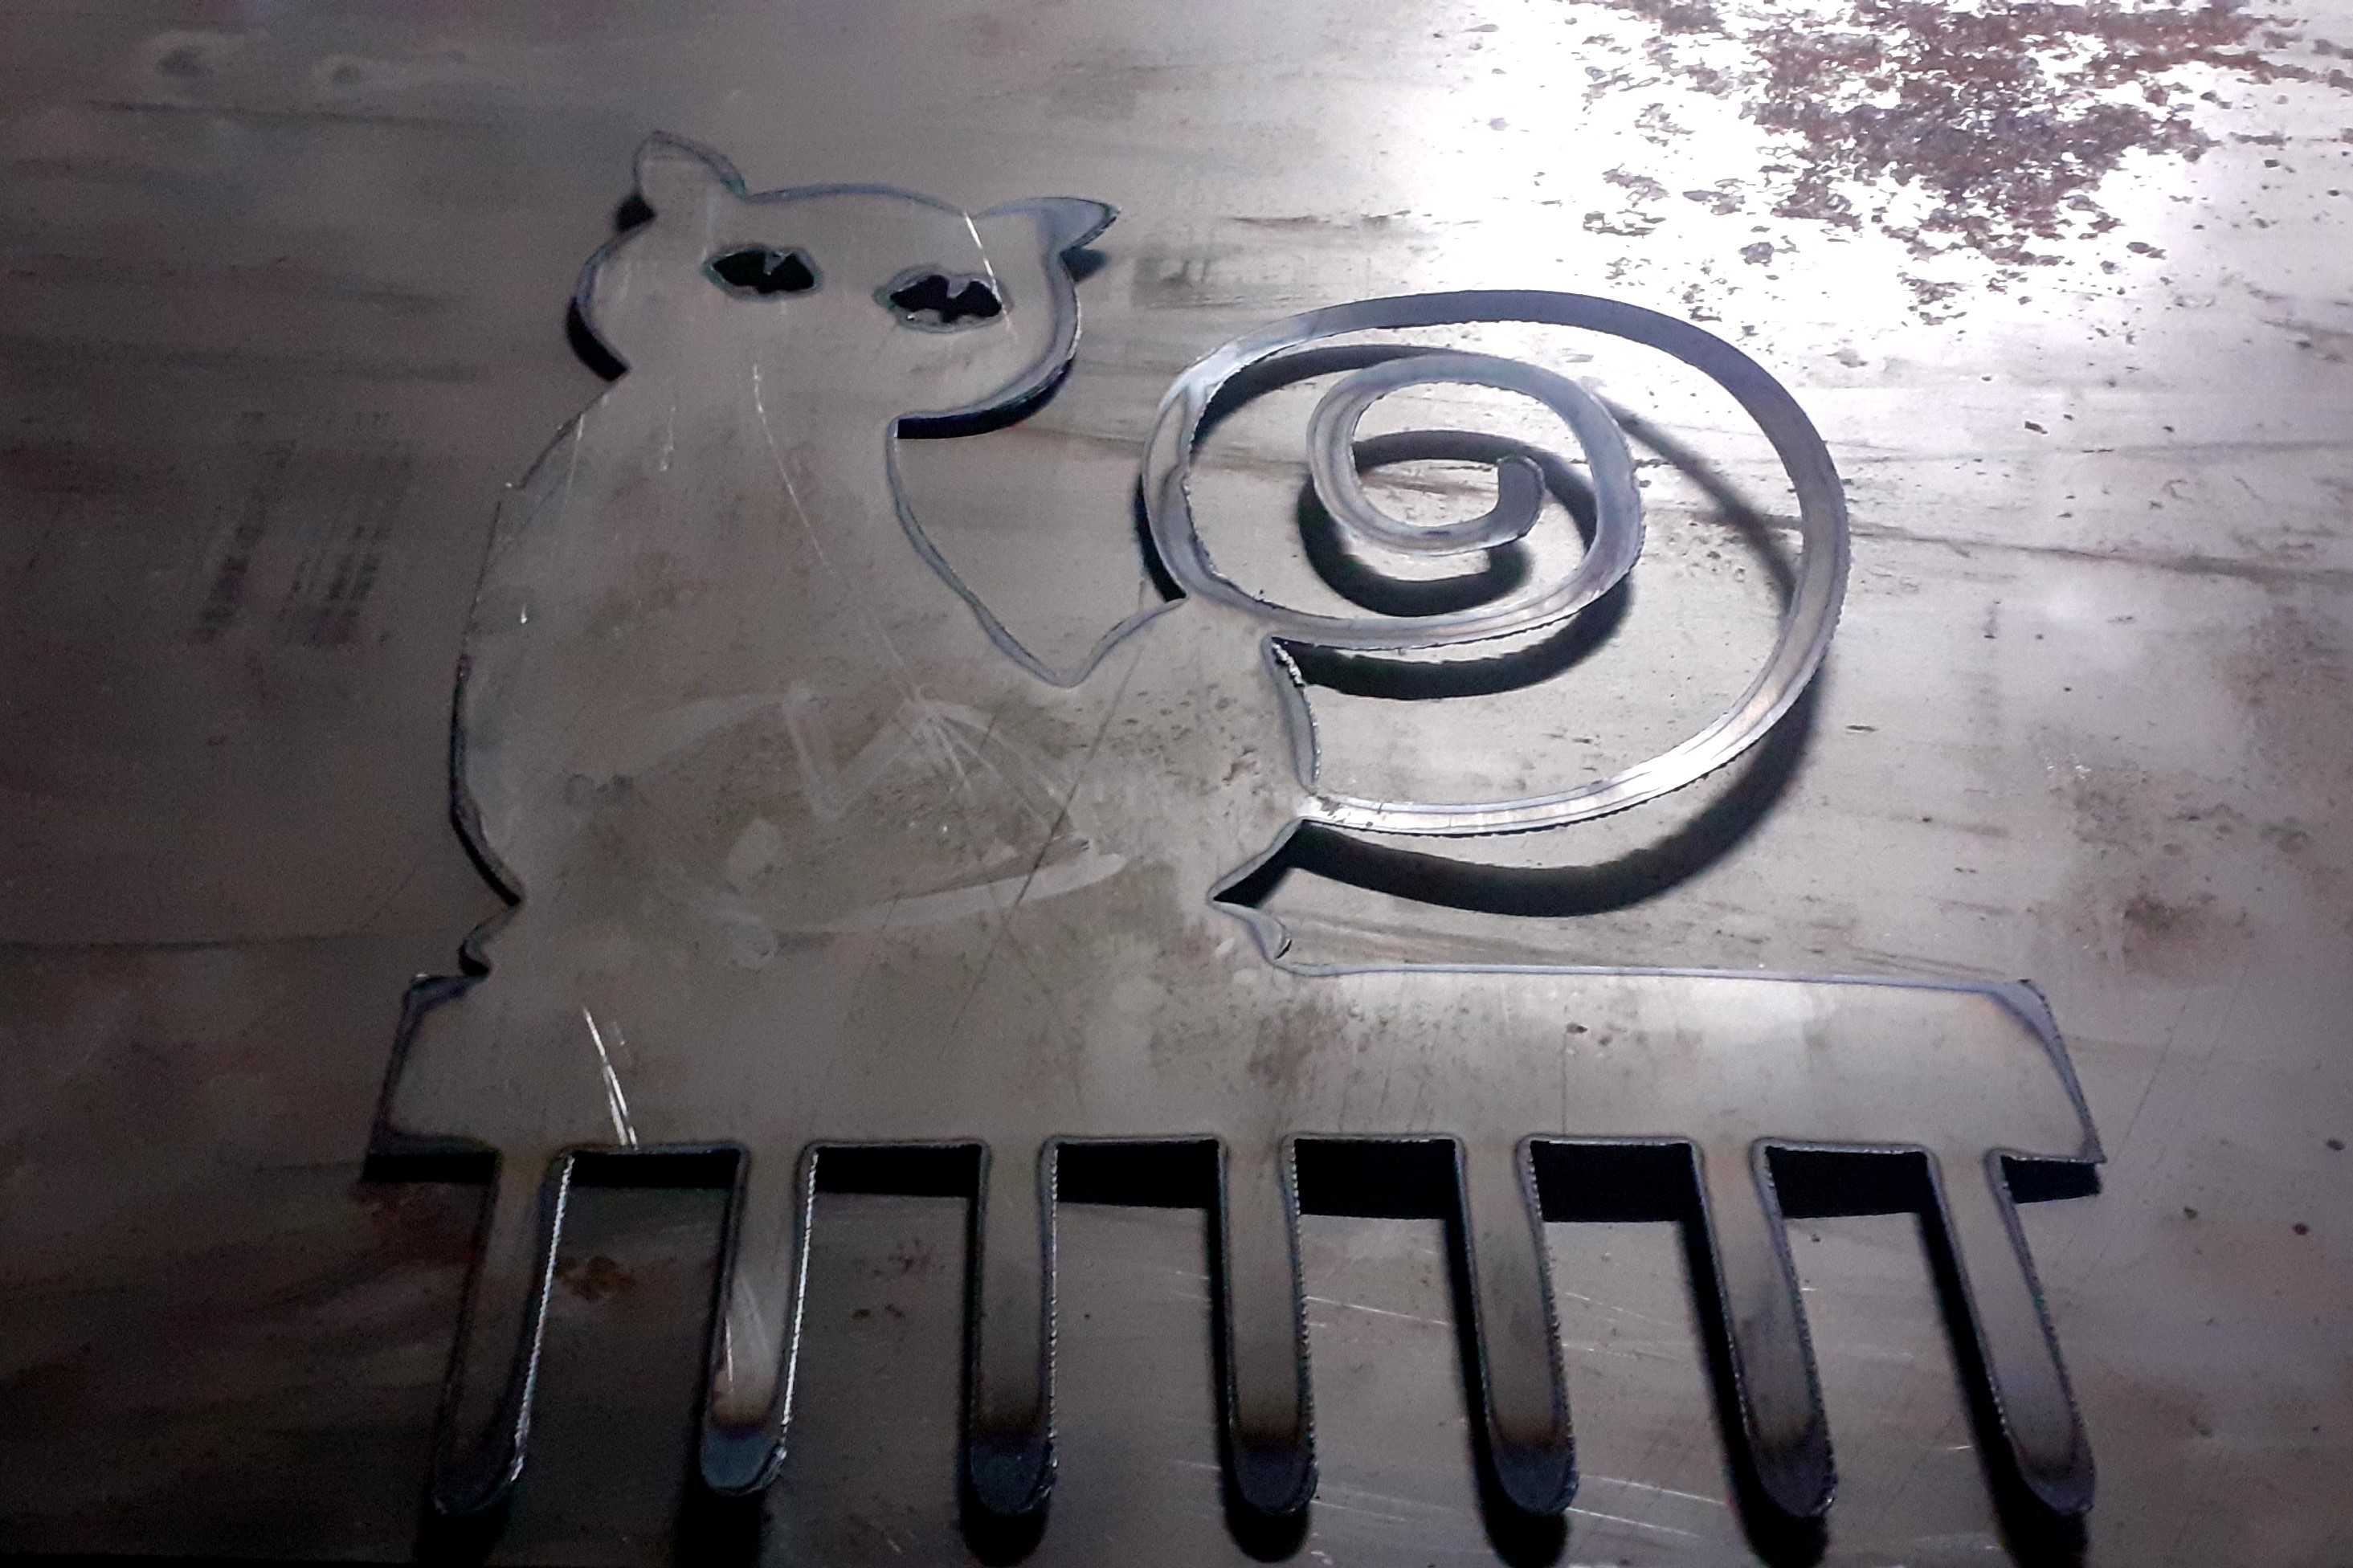
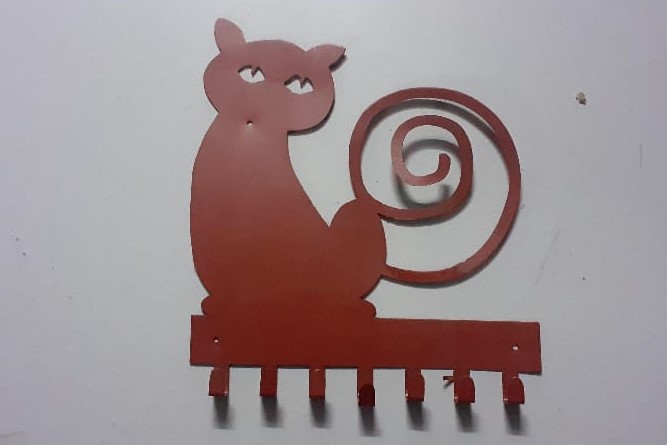
Design the Key holder in Rhino.
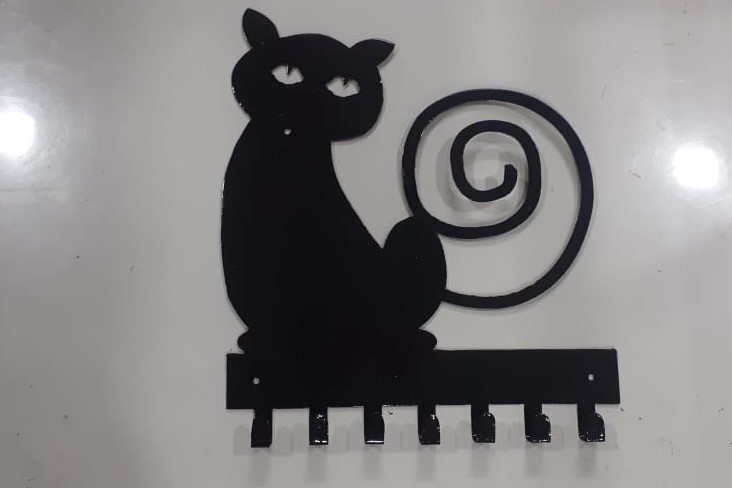
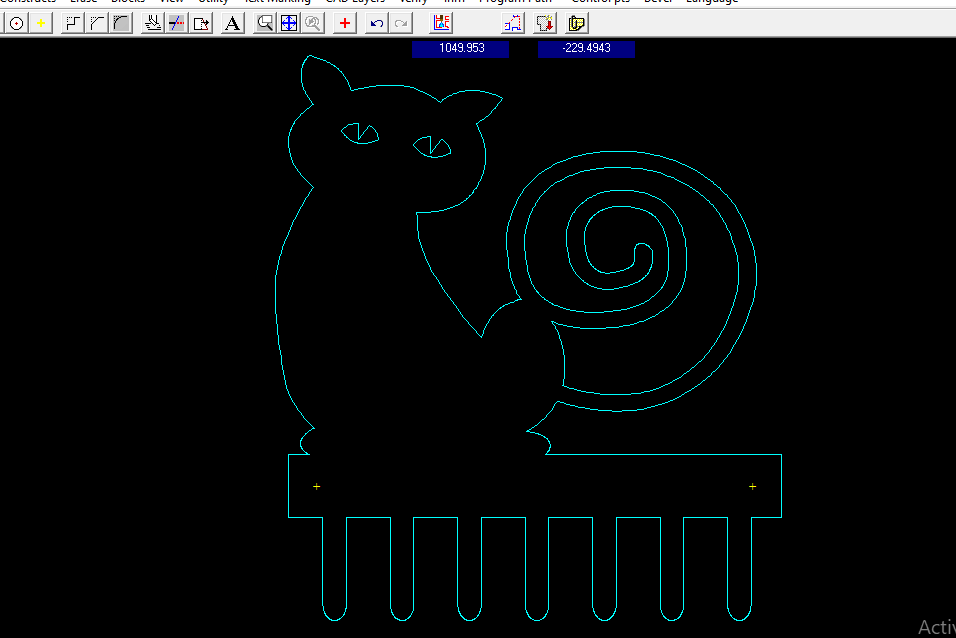
In our lab we are not having any place to locate small object like keys locks and all . so I have decide to create key holder. While thinking about design,in hostel room saw small kitty and decide cat shape for key holder. I have design the 2D shape of seated cat as shown in the image. The created 2D shape were converted in to .dxf file which is required for Plasma cutting i.e for FastCAM software.
Tool path generation using Fast CAM.
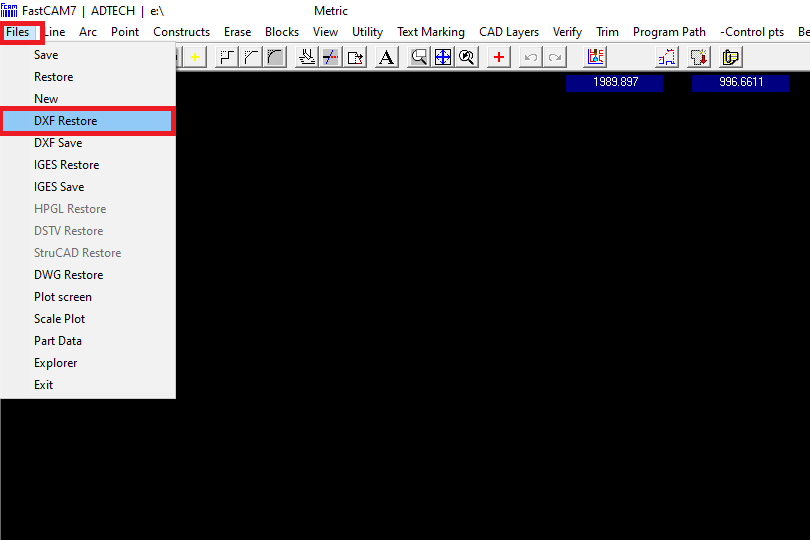
- Go to the opening window of Fast CAM software.In the file menu select “DXF Restore”.
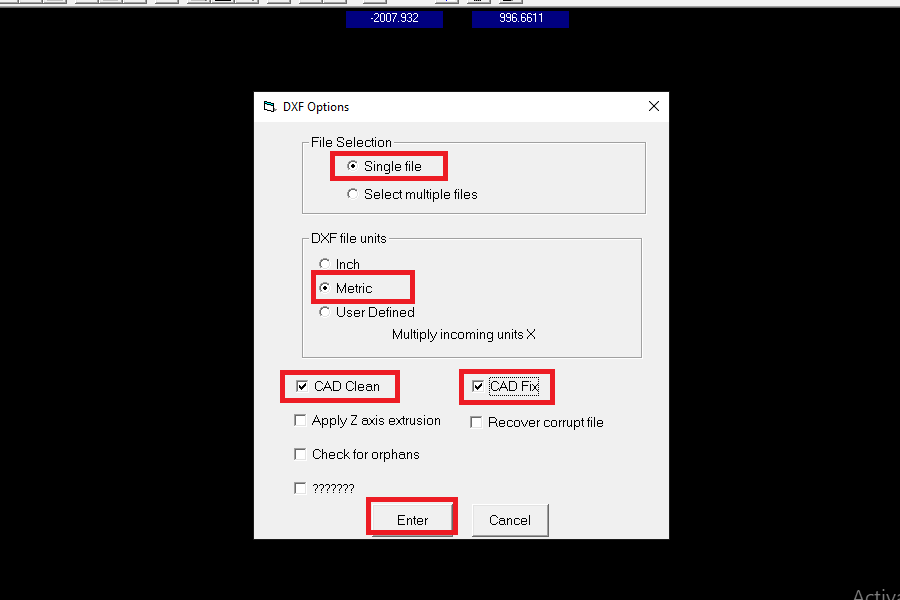
- In the opening window of “DXF Option” select file, DXF file unit and tick on “CAD clean” and “CAD fix”. Click on enter.
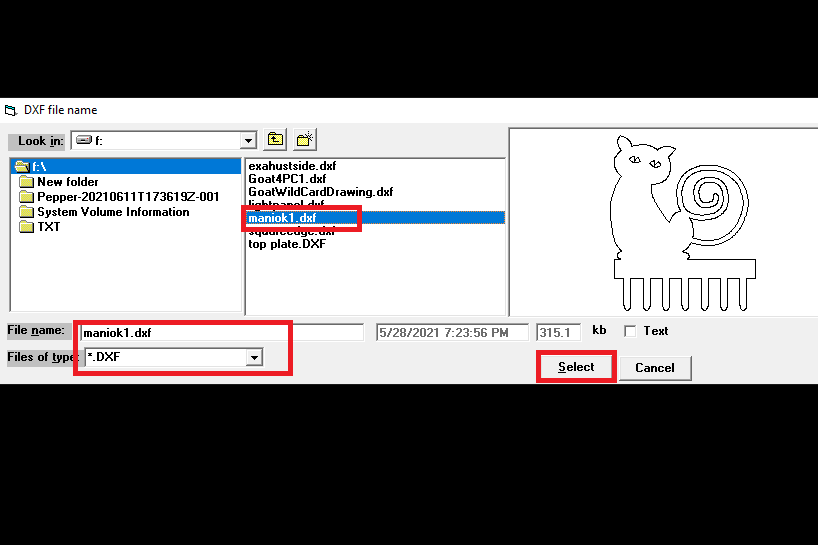
- Select the .DXF file from the drive as shown in the image.
- The DXF file is open in the FastCAM software as shown below.
- Now goto “Program path” and select “FastPATH”.
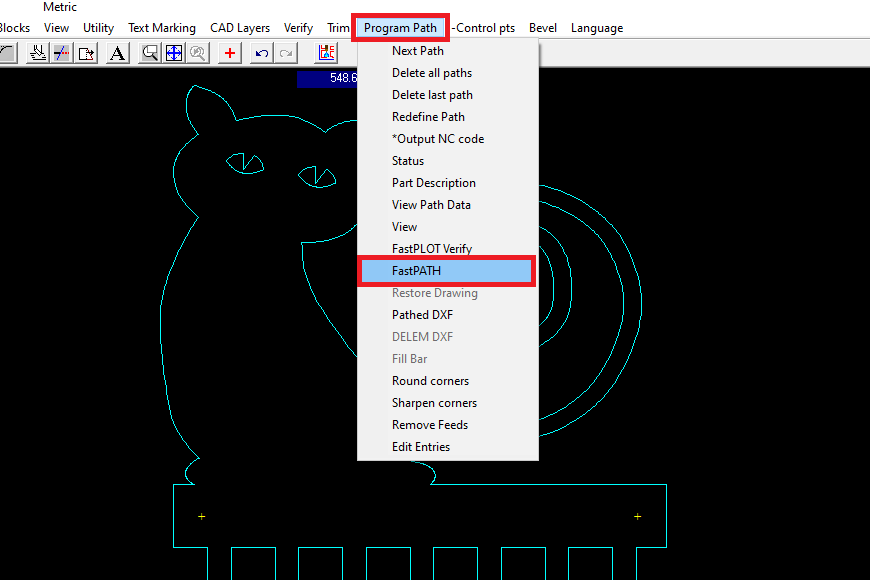
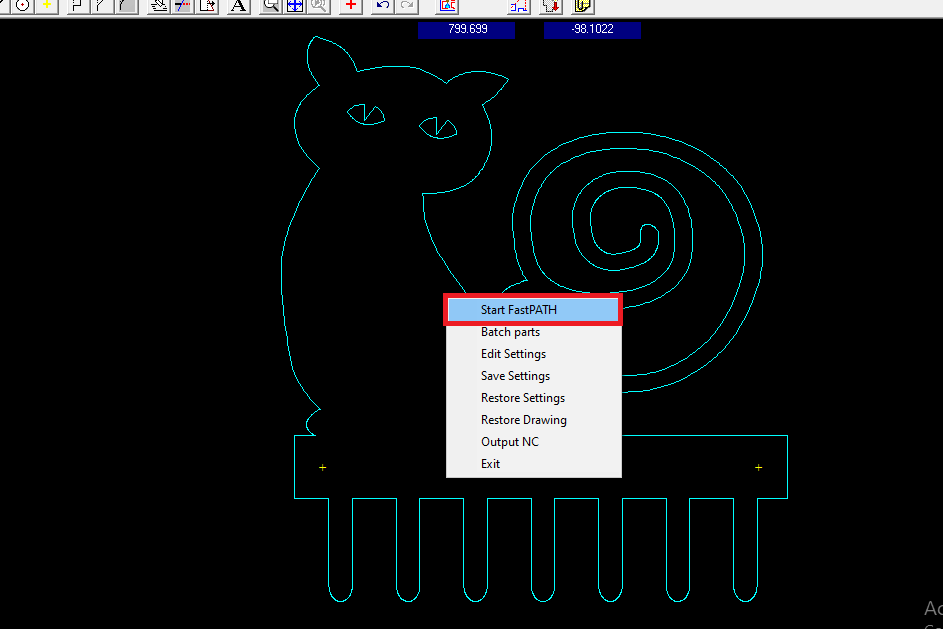
- Select “Start FastPATH’.click on any point on the window where you want to start the path.
- Click on “Yes” of out NC code.
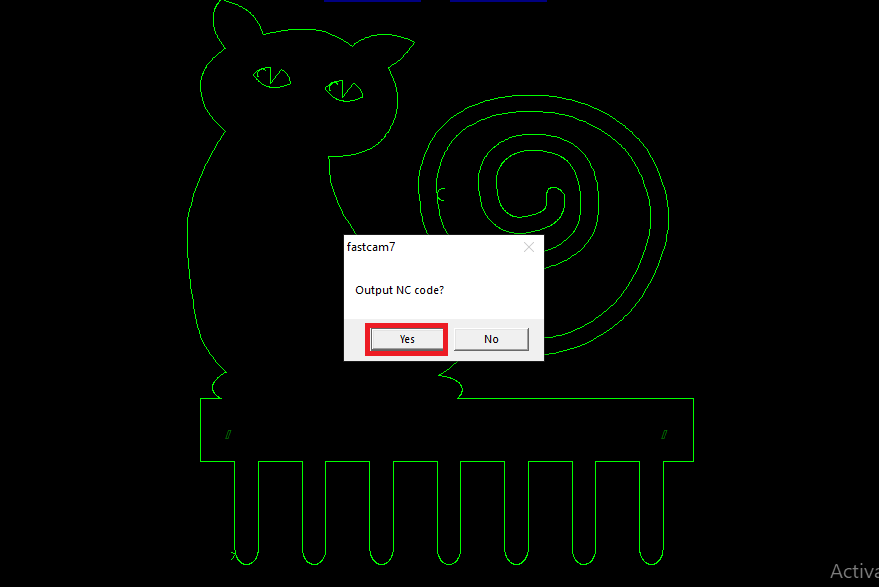
- Save the file which having .TXT extension.
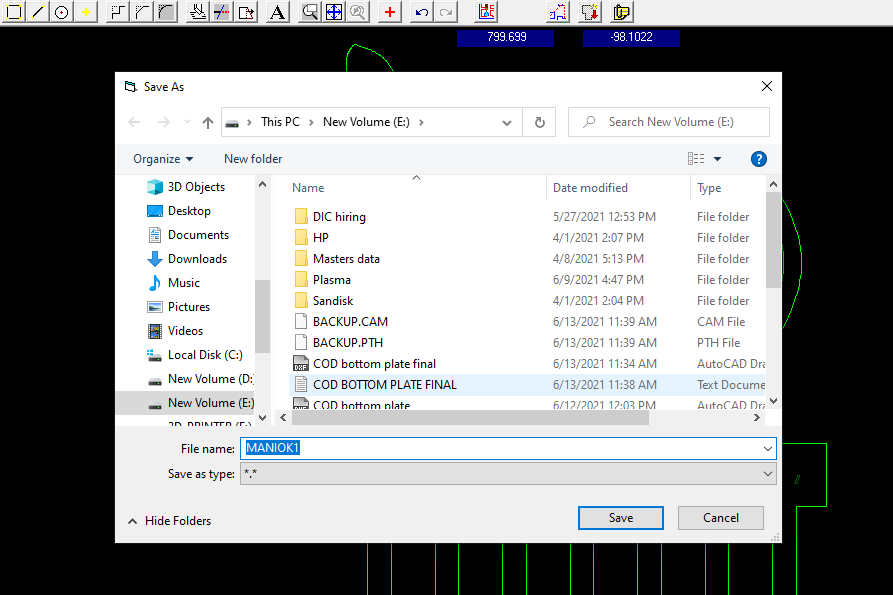
- The generated tool path for plasma cutting by FastCAM software is shown in the image.
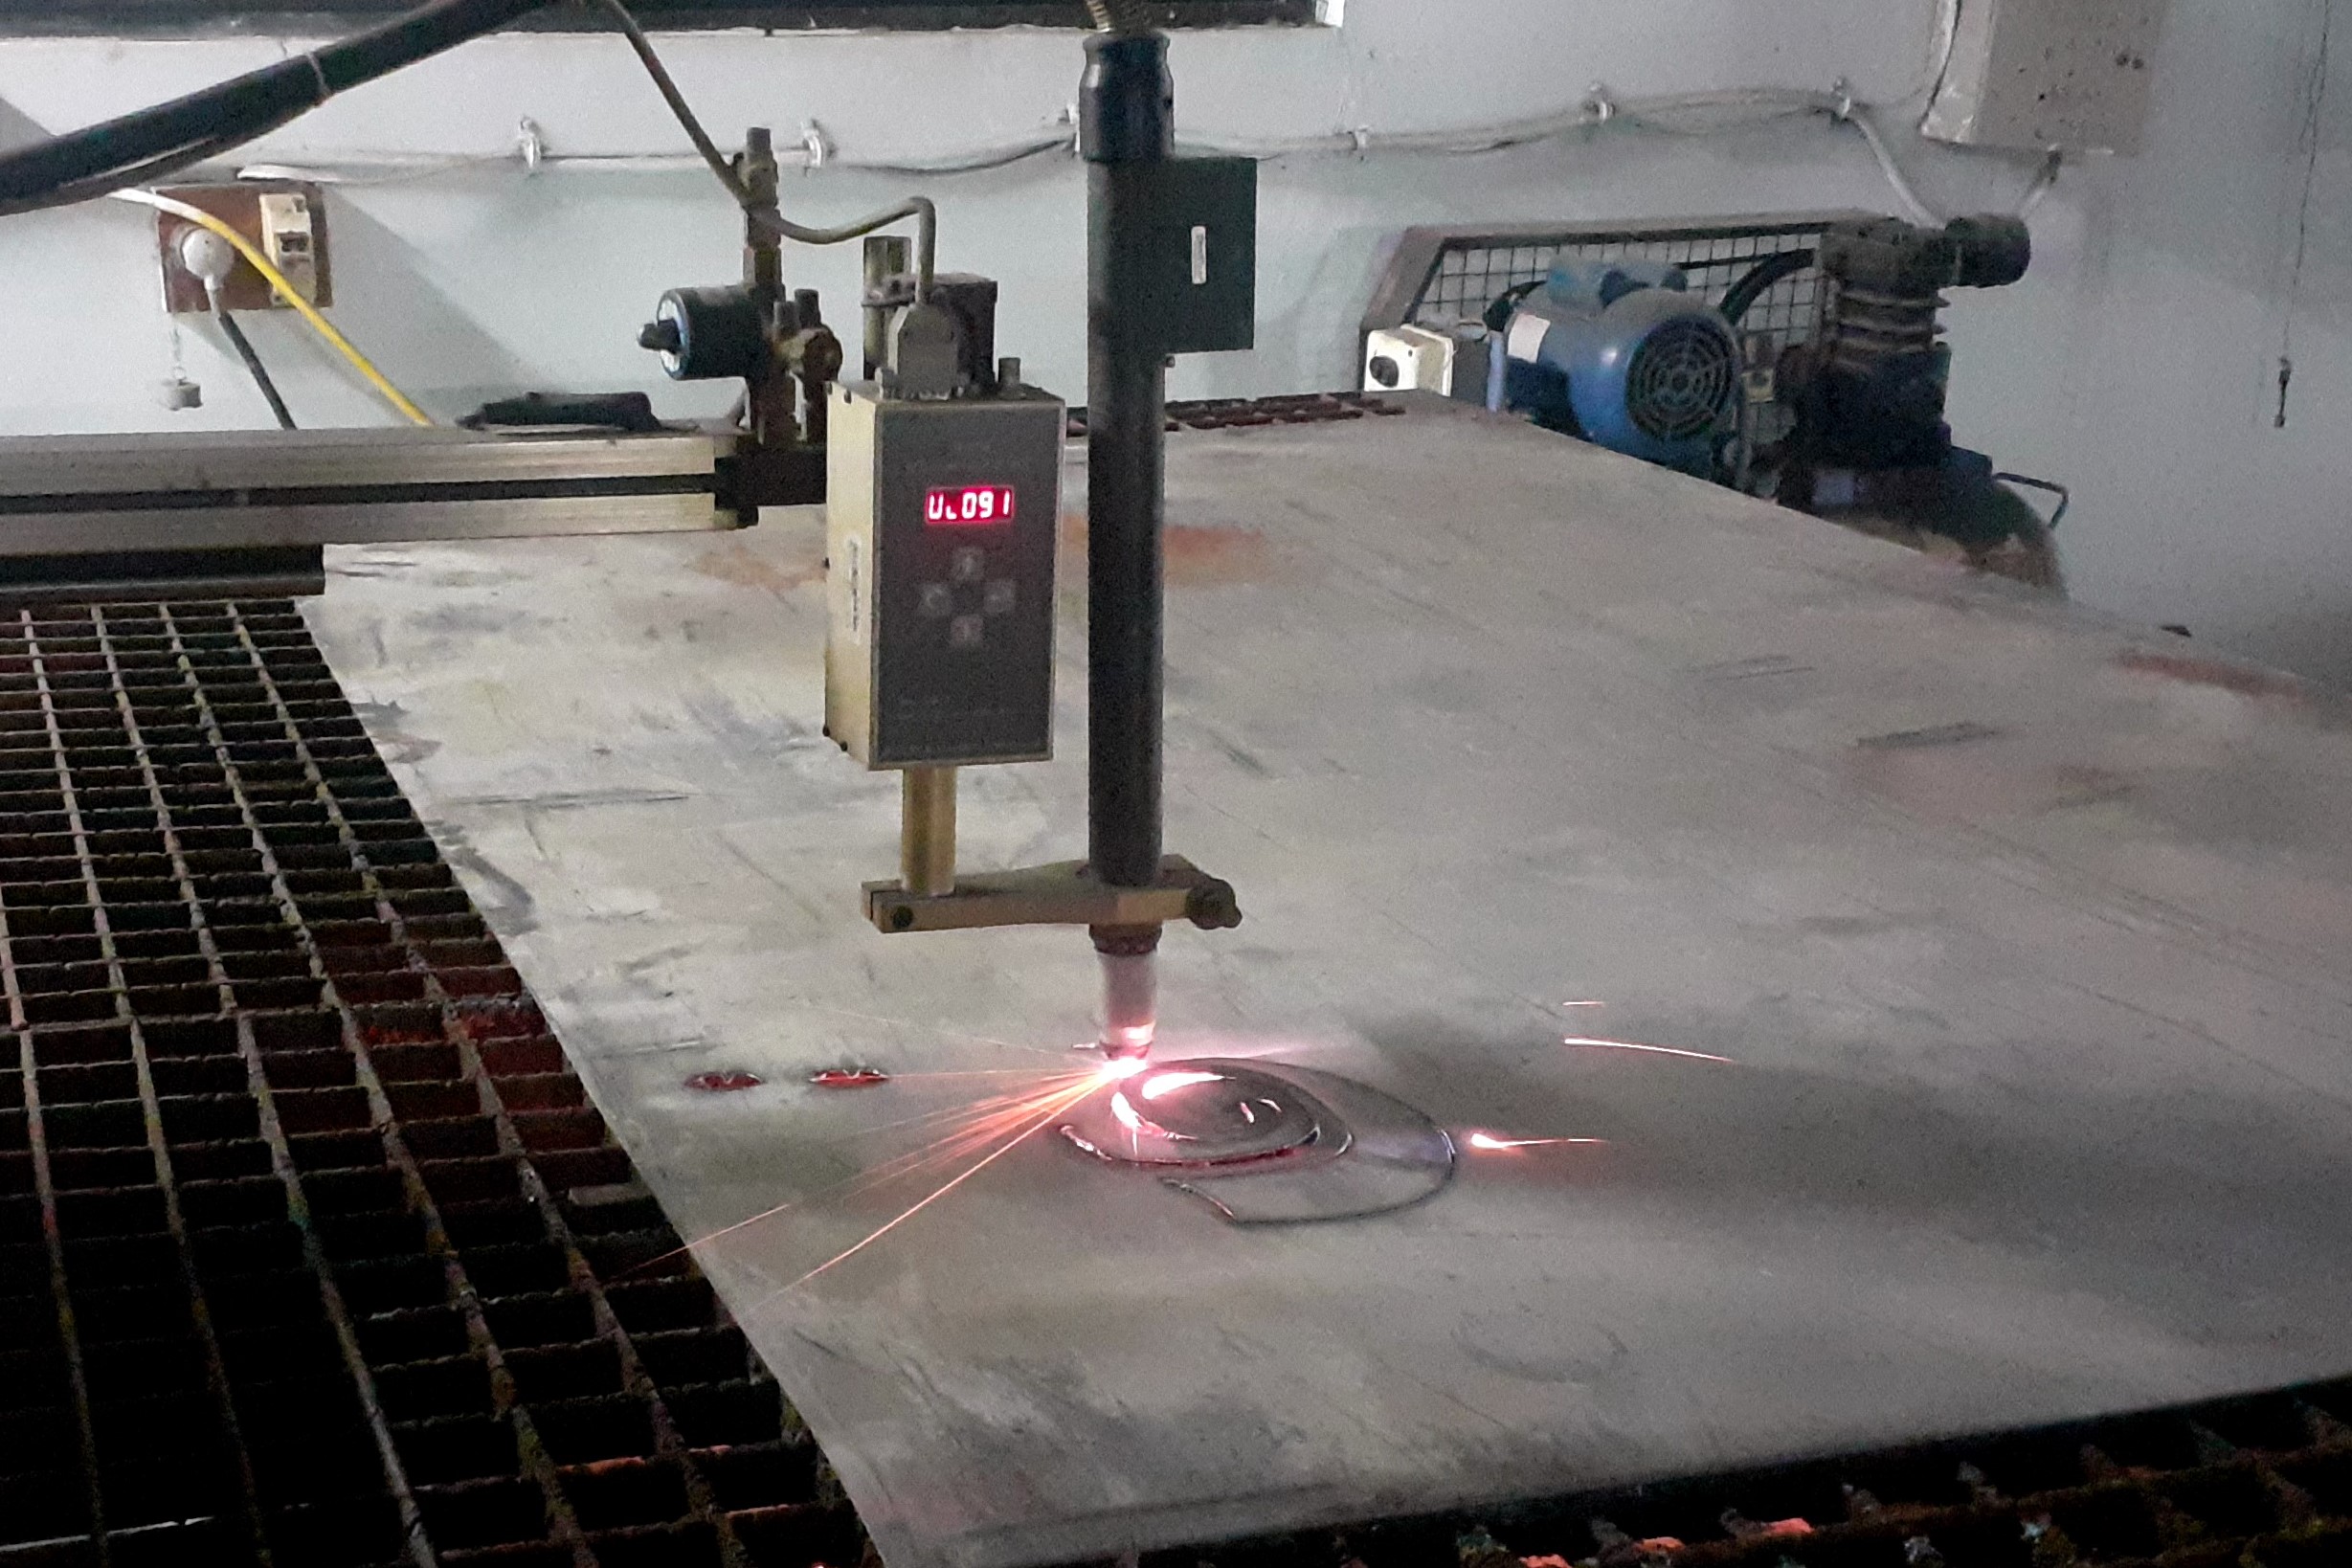
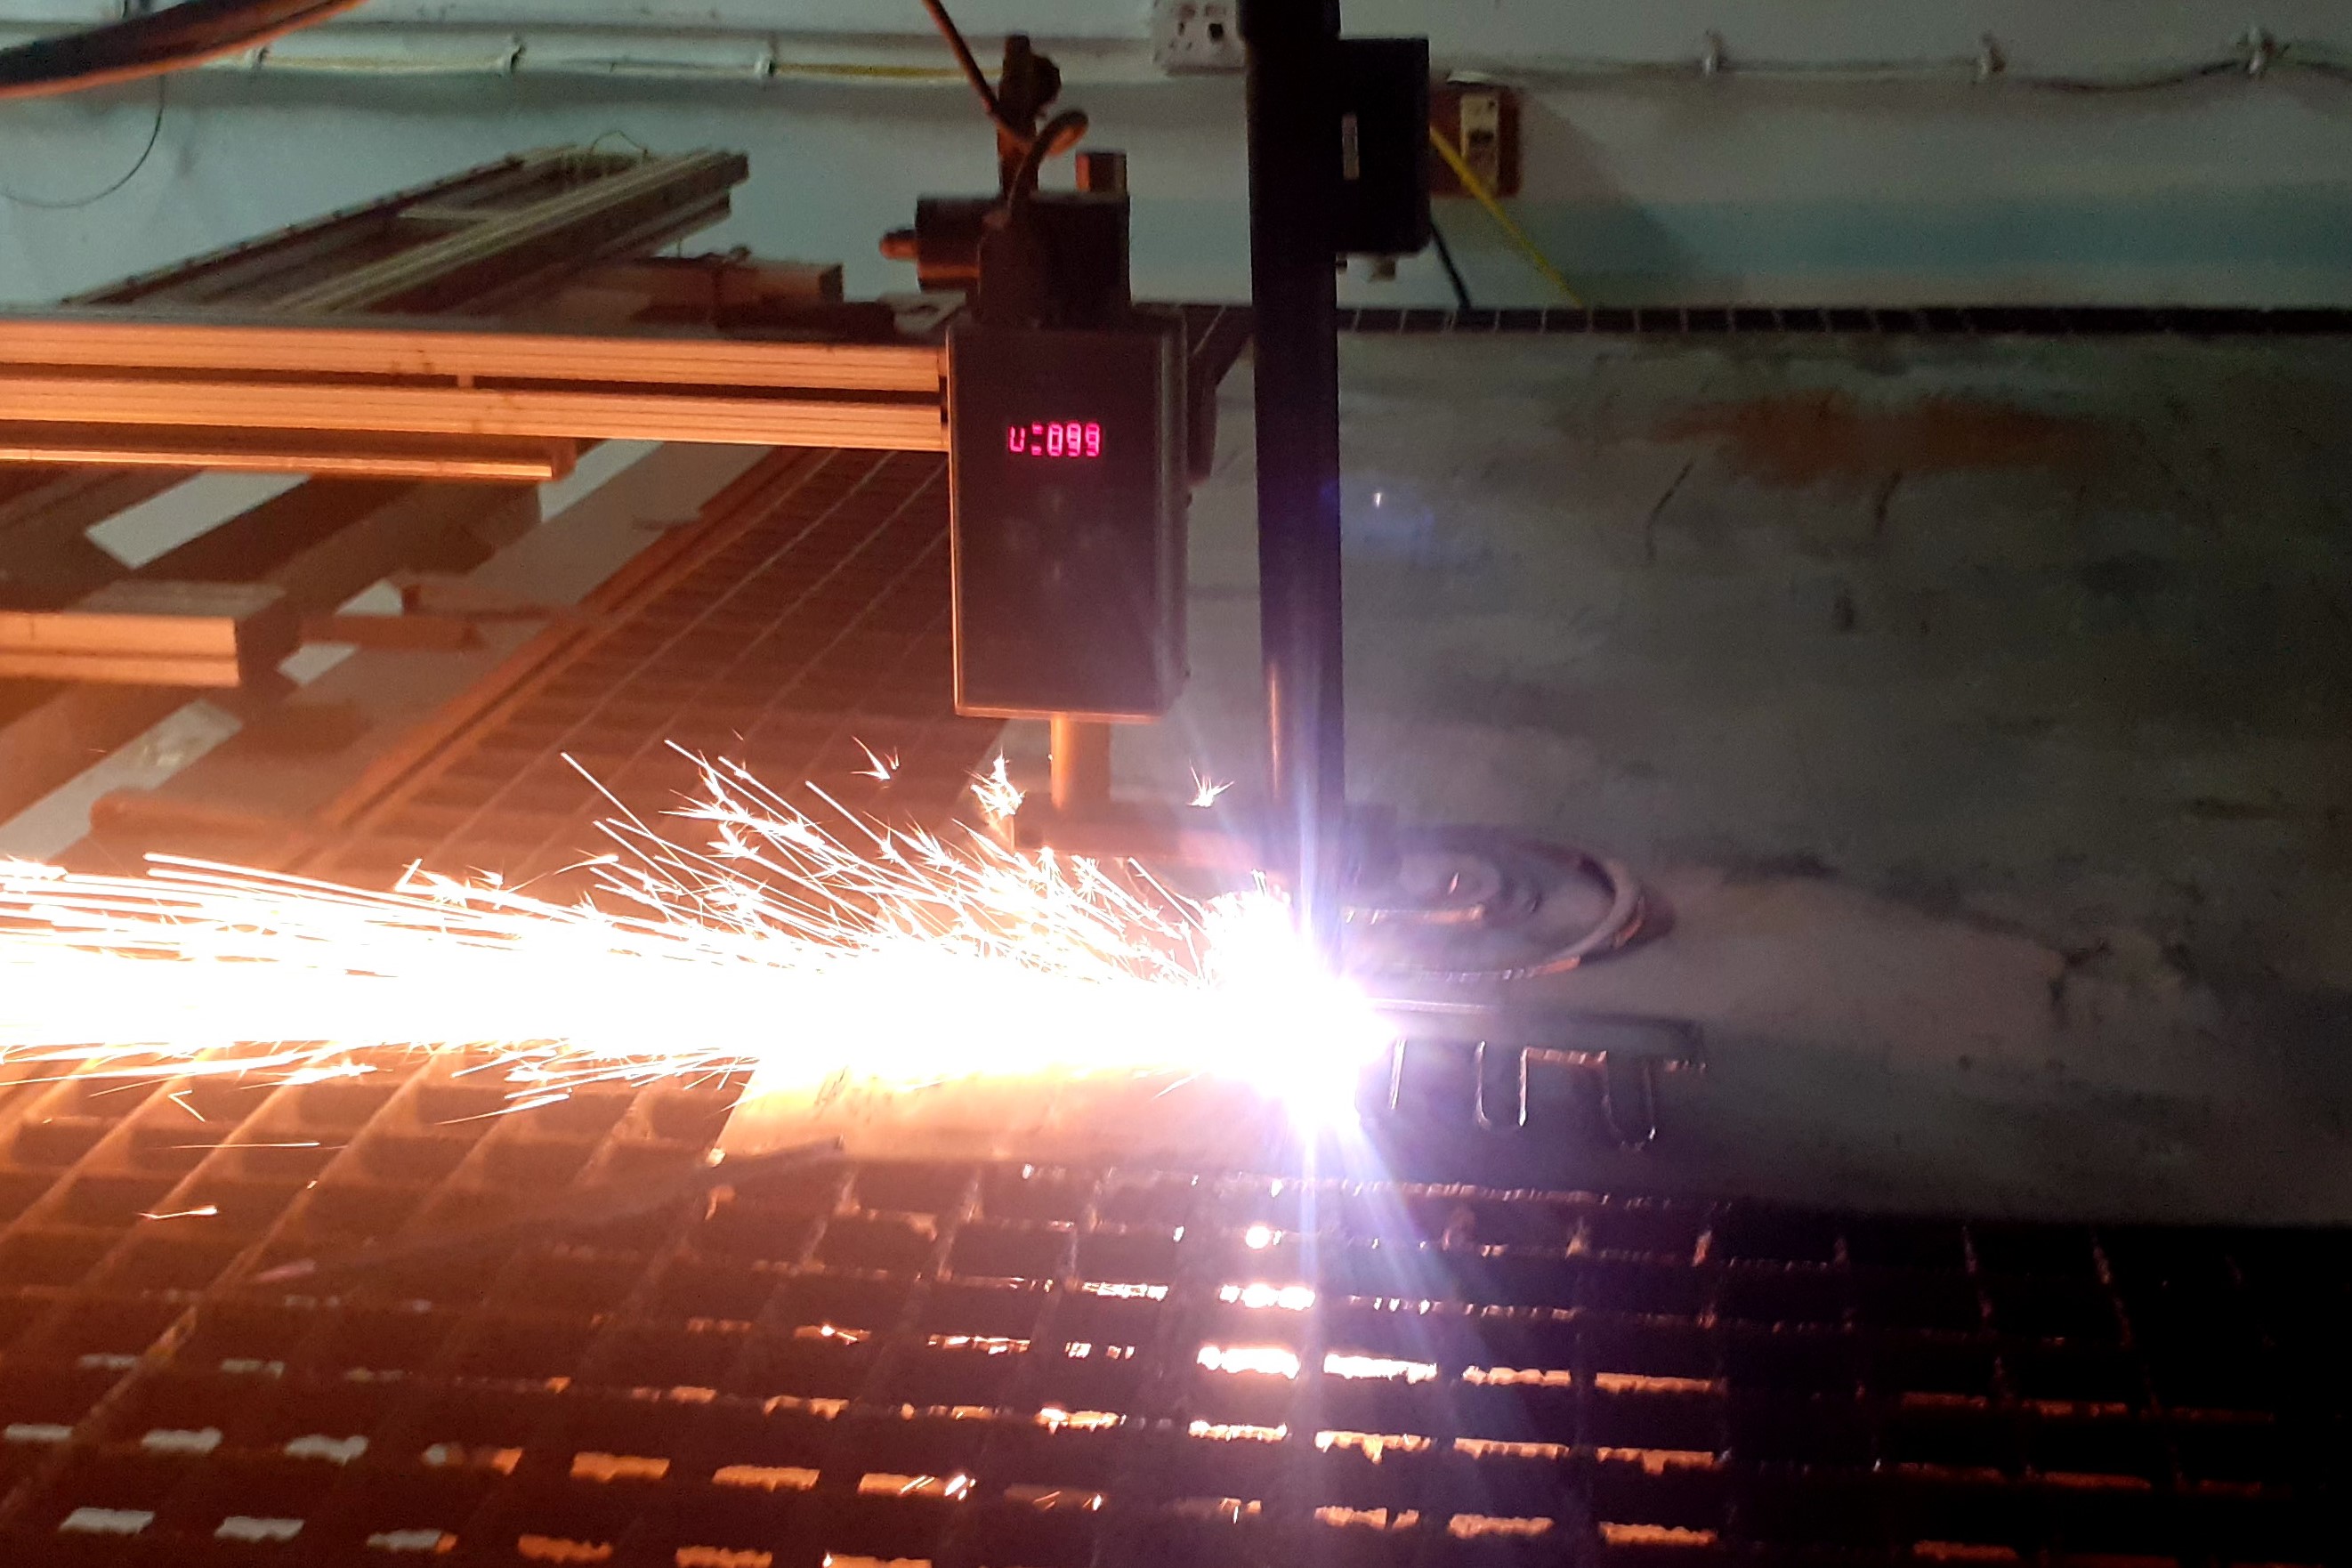
Cutting the material on Plasma cutter.
- Material used:: Metal sheet of "CRCA"
- CRCA ::Cold roll closed annealed
- thickness of metal sheet ::0.8mm
- Air pressure::7 bar
- Current set::30A
- voltage Supply::320v three phase supply
- kerf ::1mm
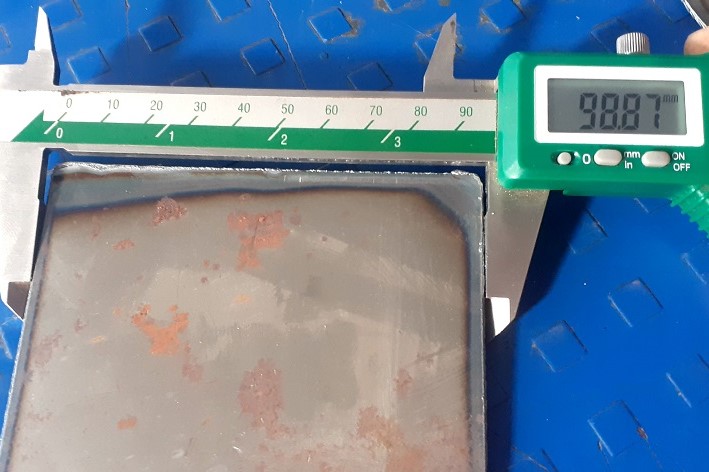
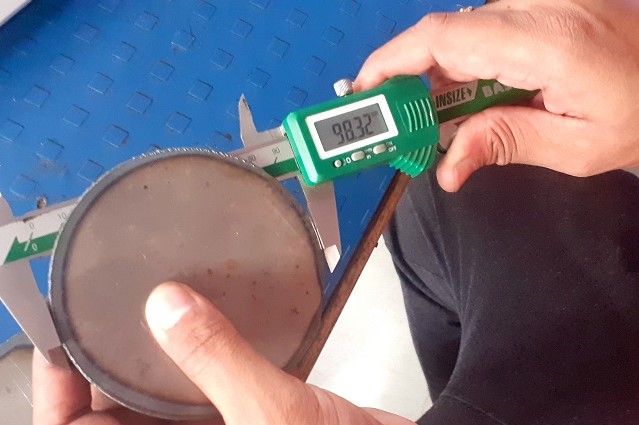
Calculating the kerf and other parameters related to the material.
For kerf calculation I have used two basic shapes Squareand circle.the dimension of square were 100mmX100mm and diameter of circle were 100mm.The image shown the dimensions of cut objects
With the kerf calculation now applying the G-code to the plasma cutting machine. Thanks to Sanket (DBRT instructor) he guided me for operating the machine. The steps for operation were shown in the video.
The cutting process shown in the following images.

Applying primer and paint to the object shown in the images.
About USHA Janome Memory Craft Sewing Machine.
Often called the computerized dream machines, the Memory Craft series of specialized and professional computerized sewing and embroidery machine is for those wanting to work across garments, quilting, and home decor etc. While its wi-fi and iPad compatibility help you expand your creativity, its speed and precision add that critical edge needed for advanced sewing. Sewing speeds of 1,000 stitches per minute, special features designed for the quilter, including specialty stitches and an advanced feed mechanism enable those who want do more and do better.For user manual click here.
Memory Craft 200E with Digitizer Jr.
A computerised embroidery machine, the Memory Craft 200 E is ideal for embroidering up to 140 X 140 mm designs. Multiple font sizes are available for each font to design monograms and a USB Port helps import customized designs. Along with this the free Digitizer Jr V5 software allows one to edit existing designs and making select custom designs. 73 built in designs and a backlit LCD screen help scale up one’s creativity.
Features
- Single needle computerized embroidery machine
- 73 Built in embroidery designs.
- USB Port for importing Customized Designs.
- Built in Memory for storing Customized designs.
- Backlit LCD screen Digitizer Jr –
- Janome’s Digitizer Jr software gives you the freedom to express yourself in stitches, monograms and more.
- It has an auto digitizing system that converts any image into a design you can sew.
- Digitizer Jr has a three-in-one application – Easy Create, Easy Import and Easy Edit
- Easy Create – Use the Digitizer Jr to create your own designs with your PC and then embroider them on your Usha Janome Memory Craft.
- Easy Import – With the auto register facility you can turn your BMP ,WMF , JPG image into an embroidery pattern (.JEF format) with one click of your mouse.
- asy Edit- The automatic layout feature makes it easy to mirror designs, add borders, add Arc Layout and to flip and rotate the design.
Techncal Specifications
- Backlit LCD Screen :: Yes
- Built in Embroidery Designs :: 73
- Built in Monogramming Fonts :: 3
- Design Resizing Capability :: Yes
- Design Rotation Capability :: Yes
- Embroidery Sewing Speed(spm) :: 650 spm (Stitches Per Minute)
- Maximum Embroidery Area ::140mm X 140mm
- Needle Threading :: Yes
- Optional Hoops :: 1
- Standard Hoops :: 1
- Thread cutter :: Manual
- USB Port :: Yes
2D design in Rhion.
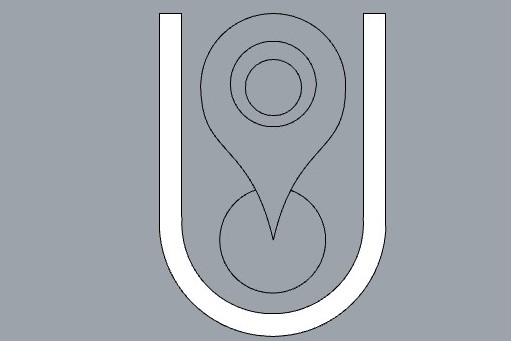
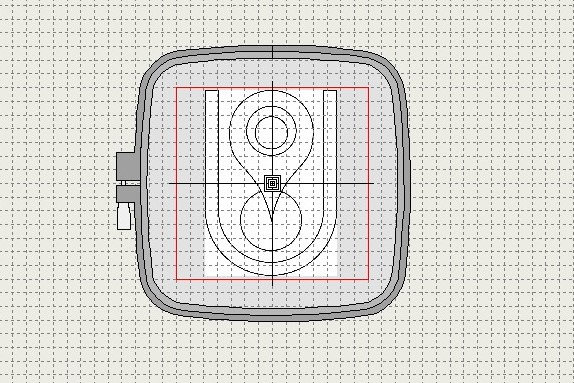
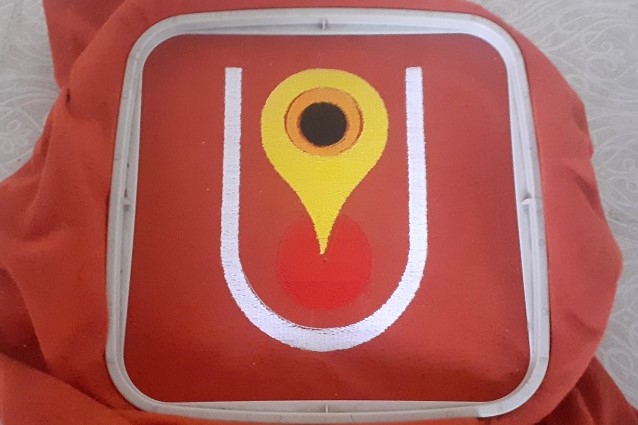
- For digital Embroidery work, I have design 2D file in Rhino. For embroidery work I have design “Mauli tika” which is spiritual representation of lord Vishnu i.e lord Vitthal in Maharashtra. Its amazing thing to design such spiritual things in CAD software like Rhino can be shown in the following image.
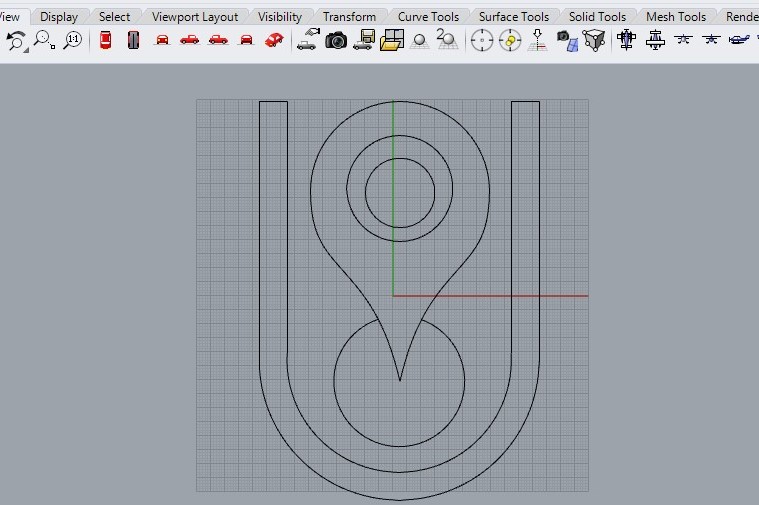
- While deign the “Mauli tika ” I got the another special feature of Rhino. The 2d design can be color by the “Hatch” command.
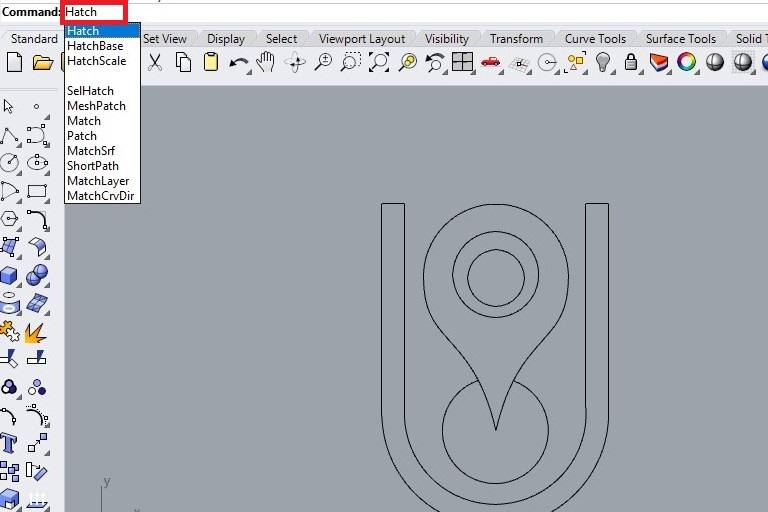
- Enter the “Hatch” command in the command line.select the curve line where you want to fill the color.
- Hatch window is opend click on ok. The 2D object take the default black color.
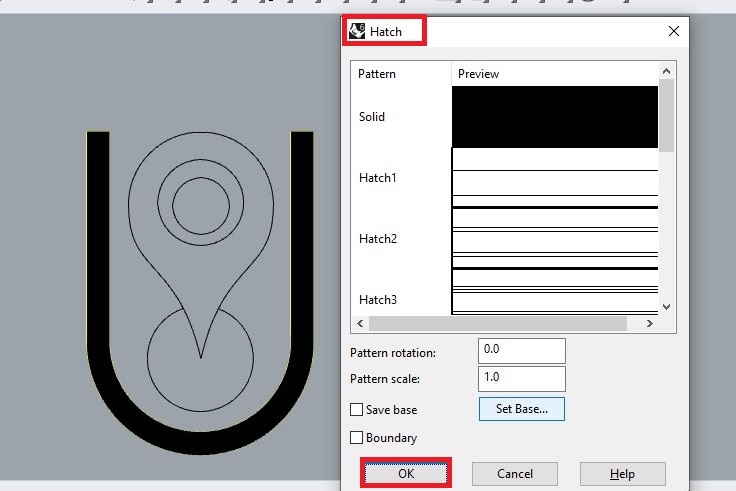
- Double click on 2D object,click on “object”. Select the required color from the display color.The color is appeared on the 2D object.
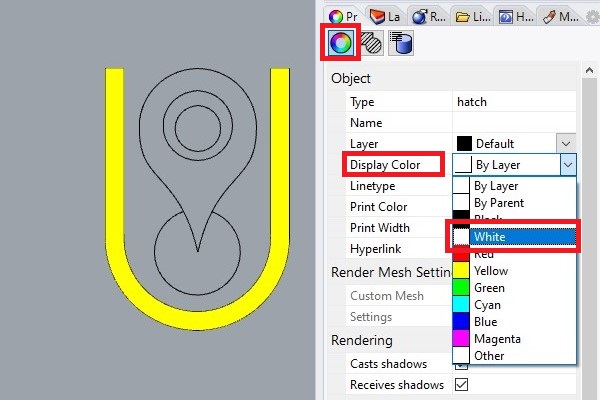
- The color is appeared on the 2D object.
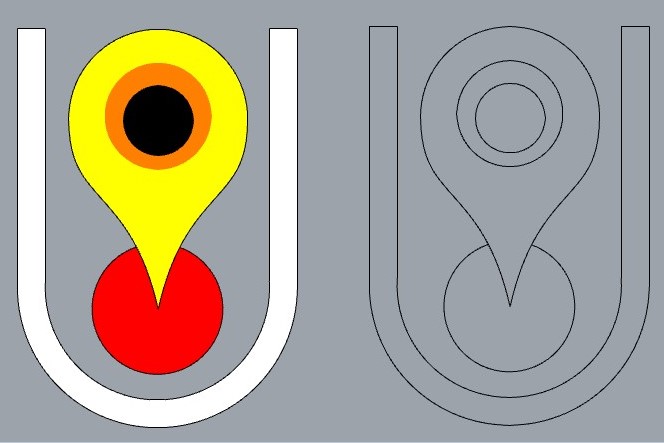
- The following is the color 2D image of “Mauli tika” as shown below.Now export the 2d design file and converted in to JPG.
About Digitizer Junior Version 5
.jpg)
- Powerful, easy to use interface with large icons.
- Multi-hoop layout with Easy Layout
- Automatic adjustment for different fabrics
- Use Lettering Create monogram designs
- Embroidery lettering editing
- Built-in fonts
- Satin and Weave fills
- Single and Triple line stitches
- ealistic view of designs with Visualizer
- Split design capability for MA/Giga Hoops
- Machine connectivity via USB cable
- Supported embroidery files: JAN, JEF, JEF+, SEW, EMD, EMX, JMT, PES, PEC, HUS, VIP, VP3, EXP, PCS, PCM, CSD, XXX, DST
- Supported graphics files: BMP, JPG, WMF, EMF
Enter the world of embroidery design with DigitizerJR! Janome's DigitizerJR software gives you the freedom to express yourself and to show off your creativity.
Use Digitizer J5 for G-code
- The opening window of Digitizer software is shown in the image.
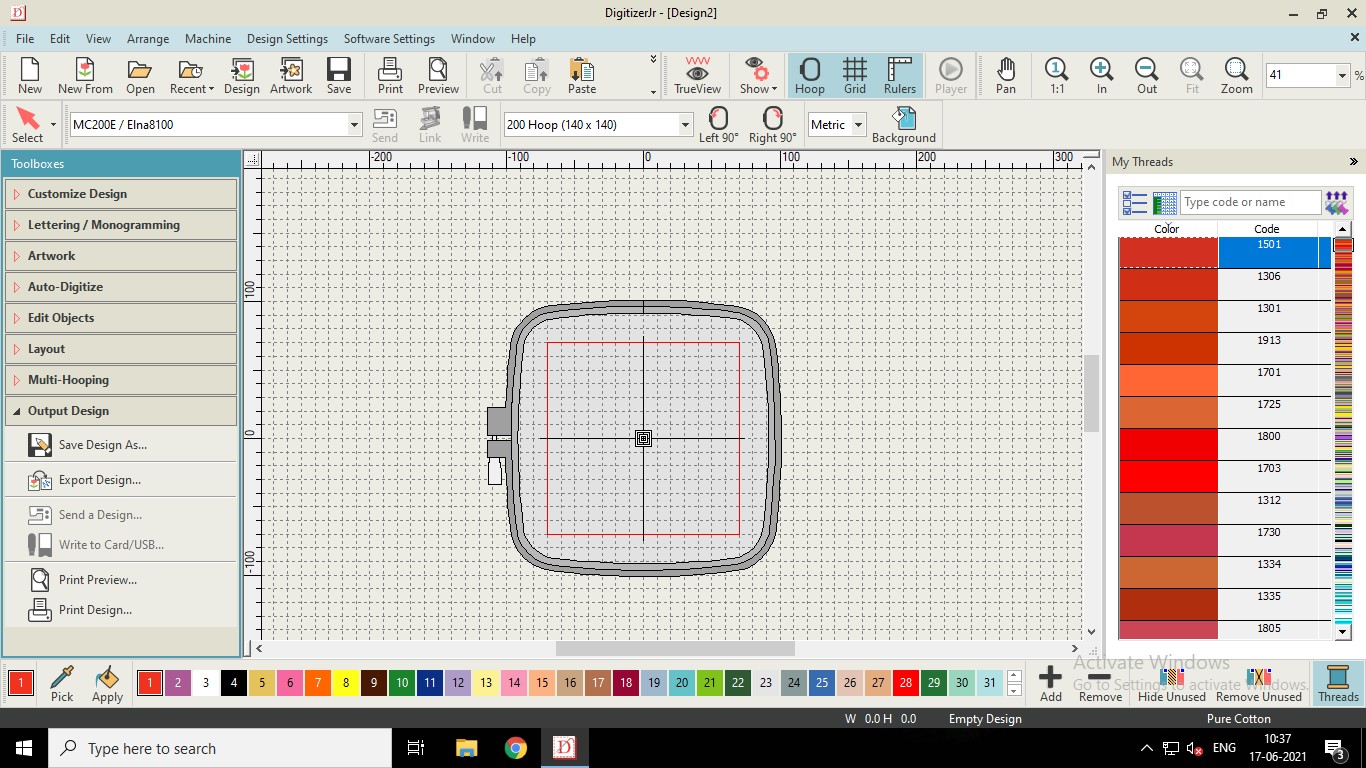
- Select the hoop of required size.
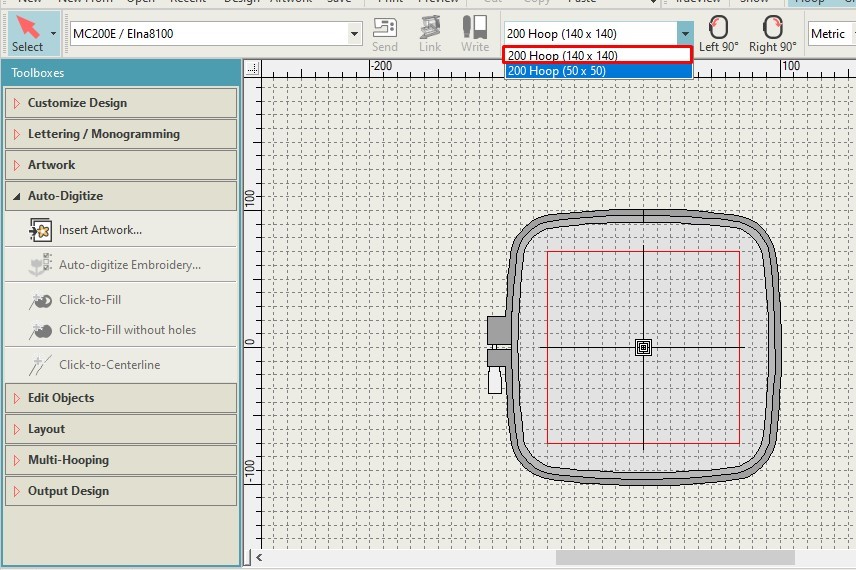
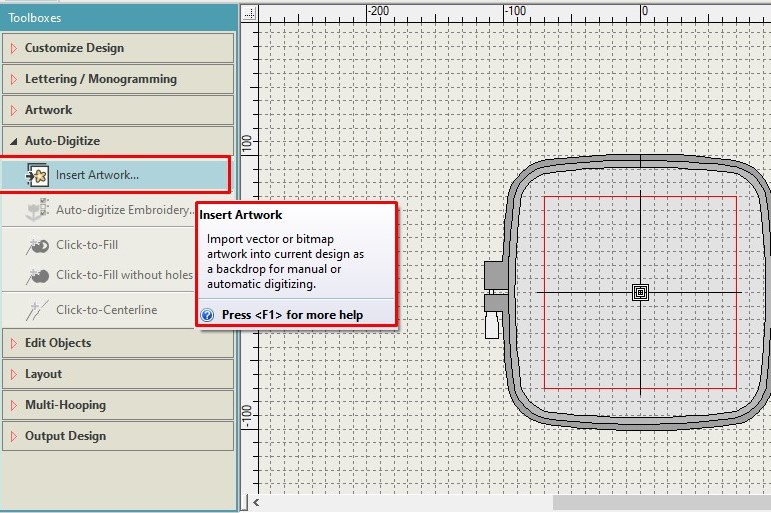
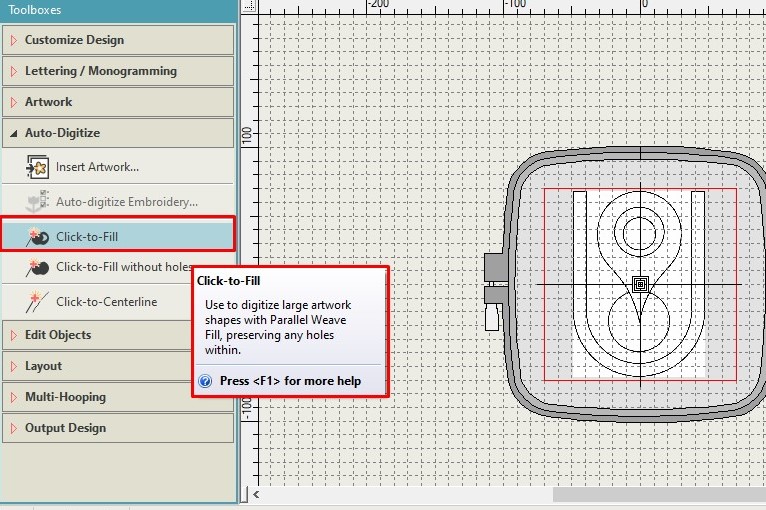
- Select “Insert Artwork” and select the required image.
- Adjust the inserted image according to the red frame given in the hoop.
- Now click on “Click to Fill”.
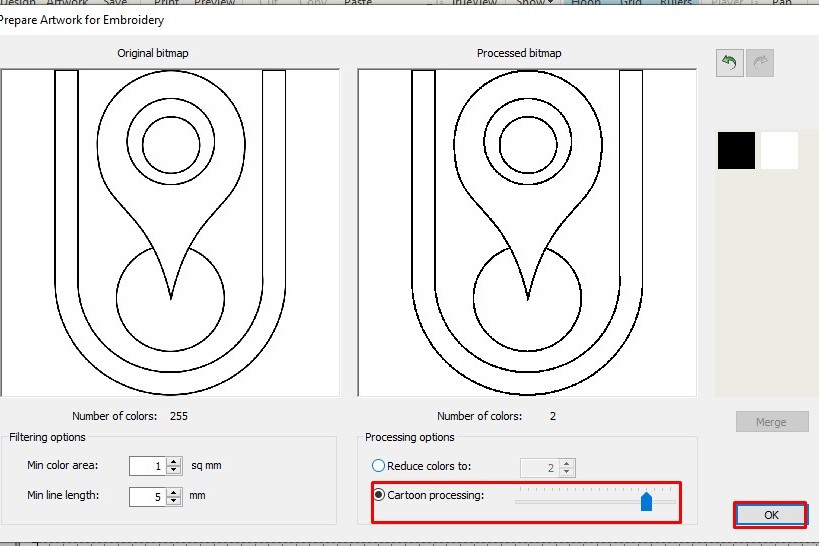
- Opening the window of “Prepare Artwork for Embroidery” click on “Cartoon processing” and adjust the bitmapping properly. Click on ok.
- Now select the different parts of an object for filling the color threads. Double click on the object, it appears netted black. Select the color from the bottom list and click on apply.
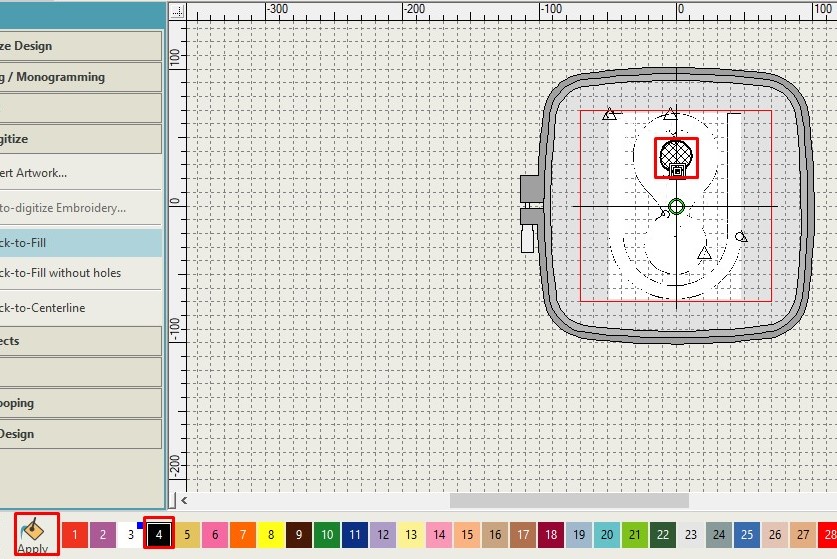
- Filled the color in all the parts of given design.
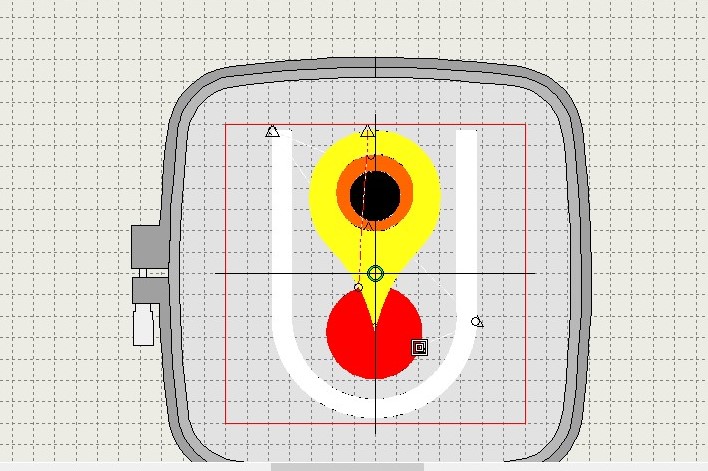
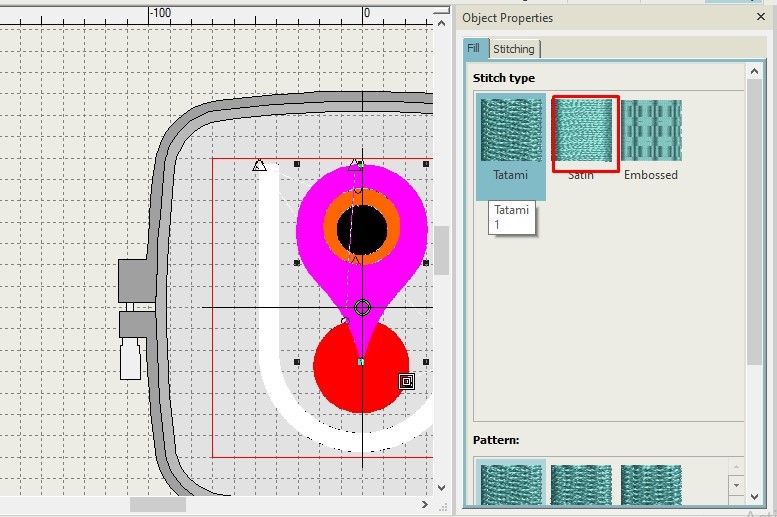
- By double clicking on the object, we can change the stitch type as shown in the image.
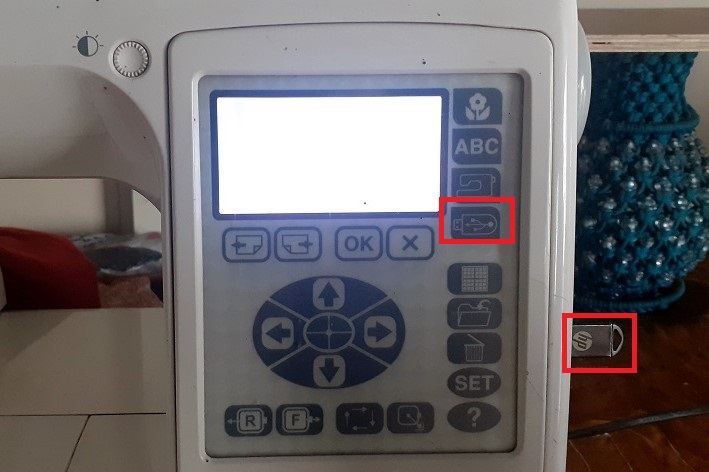
- Now goto the “Output Design” and save the file in the USB drive having extension .EMB.

- Now applying the USB drive to the sewing machine. On the machine panel goto the USB derive select the file for Embroidery.
- Fill the bobbin properly and apply the required thread to the sewing machine as per manual.
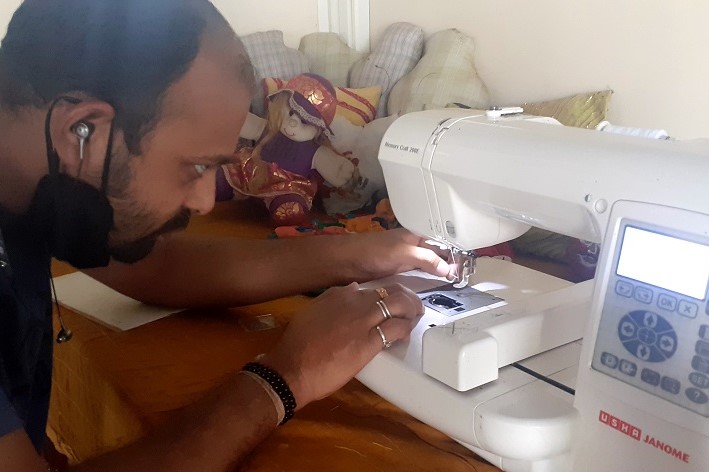
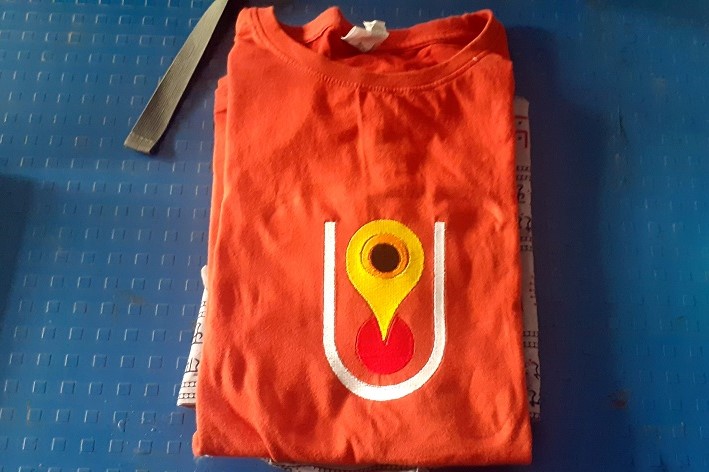
- I have used my orange color T shirt for embroidery work.Properly arrange the cloth in the hoop and applied it to machine as shown below.
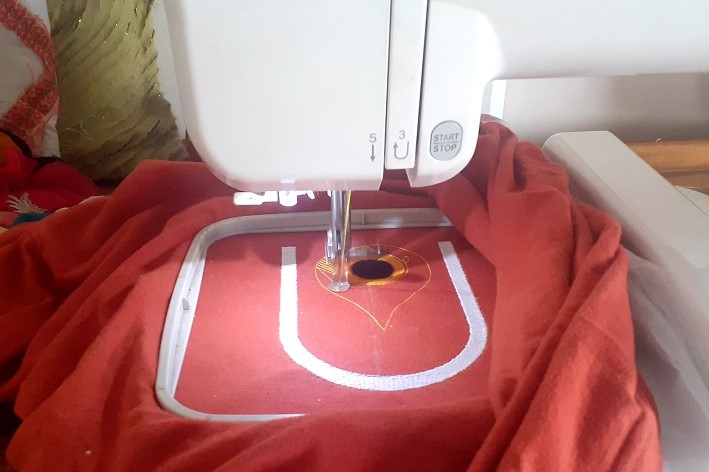
- After an hour embroidery work completed by the machine.
Learning Outcomes
- I have design 2d obejct in Rhino.
- Introduced about the working of plasma machine.
- Used FastCAM software for tool path generation for plasma cutting.
- Used the "Hatch" command in Rhino for coloring the 2D object.
- Used the Digitizer software for creating embroidery work tool path.
- used the digital sewing machine for embroidery work.
Downloads
SAMS-Smart Azolla Multiplier System by Anand S. Tale is licensed under CC BY-SA 4.0![]()
![]()
![]()