
WEEK 15
WILDCARD WEEK
Individual assignment: Design and produce something with a digital fabrication process (incorporating computer-aided design and manufacturing) not covered in another assignment, documenting the requirements that your assignment meets, and including everything necessary to reproduce it.
2. Individual Assignment
This wild week I'm going to use the Composites technique with “p-aramid = Twaron” fiber material to create a bulletproof vest. I will use the techniques of 3D scanning, Computer controlled machining (large format milling) , Computer controlled cutting (laser cutting) and composite.
2.1 3D SCANNING
First I am going to scan the back of a mannequin, to create the 3D model. I only found the child mannequin so I will have to scale the model for an adult one.

I will be using the EVA scanner with your Artec Studio 15 software. In week 5 “3D Scanning and printing” you will see how to use the EVA scanner and Artec software.


The scan mesh model is generated and the file is saved for export.

Open the scanned mesh file in the Geomagic Design X program.


I cut out the model to get the front and back separately.

I export the two models of the front and back in .stl formaty.
2.2 Computer controlled machining (large format milling)
To create the mold I will use the large format milling machine "BCNBarcenas" and its Aspire program. The material to make the molds is the extruded polystyrene panel (125x60x40). In week 7 "Computer-Controlled Machining" you will see the detailed process to use the BCN Barcenas milling machine and the Aspire software.

The provider's page link is: Leroy Merlin.
Open the Aspire program and import the .stl files of the front and back model.

I will do a 3D milling. Orient the 3D model.

I select the option "Cut the model" to make the molds in sections.

The thickness of the sections that I am going to use is 40mm equal to the thickness of the extruded polystyrene panels.

4 sections are generated (Cut 1,2,3 and 4).


I select the Roughing strategy and the “End Mill = 6mm straight point” tool.

I save the file in the usb that I will put in the control of the milling machine.
I select the Finishing Strategy and the “End Mill = 8mm ball nose” tool. I save the file for milling.


I use glue to join the sections of the molds from each “front and back” part.


2.3 Computer controlled cutting (laser cutting)
With this technology I will create the vest models. In Geomagic DesignX plans are created to cut the 3D model of the mannequin and remove the sleeves, neck and lower part of the waist. Thus, the torso part for the vest will be left alone.


You get the mesh of the back.

You get the mesh of the front.

With the Auto Surfing option the surface of the models is obtained.

With the Mirror option the model symmetry is obtained

The model is scaled to obtain an adult model.


Open the file in the Solidwork program and import the surface of the vest model, here the back and the front will be imported separately.

Then select Insert / Surface / Flatten .. to get the surface of the model on a plane and use as a cutting template.


The same is done for the front


Then select File / Create drawing from part. With this command the sketch of the model is opened.


This template is saved in .pdf format. Then I compare this template with another that I have downloaded from the internet to verify that the dimensions are correct.

I am going to use the fiber material "p-aramid = Twaron (200g / m2)" to create a bulletproof vest. Below you will find some web links of its features and applications:
- https://en.wikipedia.org/wiki/Twaron
- https://www.teijinaramid.com/en/applications/ballistic-protective-vests/
- https://www.teijinaramid.com/wp-content/uploads/2019/02/Application-brochure-aramid-and-UHMWPE-for-ballistic-vests.pdf

I cut the fabric to fit the working dimensions of the MercuryIII cutting table. I use a cutter to make the cuts, the material is very resistant so you have to do it with force.

Open Corel Draw and import the .pdf file and configure the parameters of the Laser MercuryIII printer to cut the vest templates. I am going to use Twaron material (200g / m2). In week 3 "Computer-Controlled Cutting" you will be able to see in more detail laser cutting with the MercuriIII laser cutter.
First I draw a circle to use to test cut the Twaron with the MercuriIII laser printer. The first test is set to Speed = 2.2 and Power = 100.


The laser pierces the material but burns the surface a lot. So I'll go down and speed up. Speed = 5.2

The cut works better, although it still burns the surface a bit.

Increase speed a little more = 7.6

The result is even better since it cuts without burning the surface of the material so much. This is the parameter to use to cut the vest. Speed = 7.6 and Power = 100

I select the back template to cut the layers for the back of the vest.

For the vest to be resistant to projectile impacts, several layers of the material must be placed at different angles to make the seams of the material more resistant. I am going to cut 3 layers for each "front and back" part.

2.4 composite manufacturing technique
This job of making a bulletproof vest was raised last year by Lola Ojados / Fabacademy2020 so that another Fablab student will continue this year, so I have taken over to complete this task.
I have also been guided by Alvaro Macian's page / Fabacademy2020 that uses this technique.
The materials and equipment that I will use is the following:
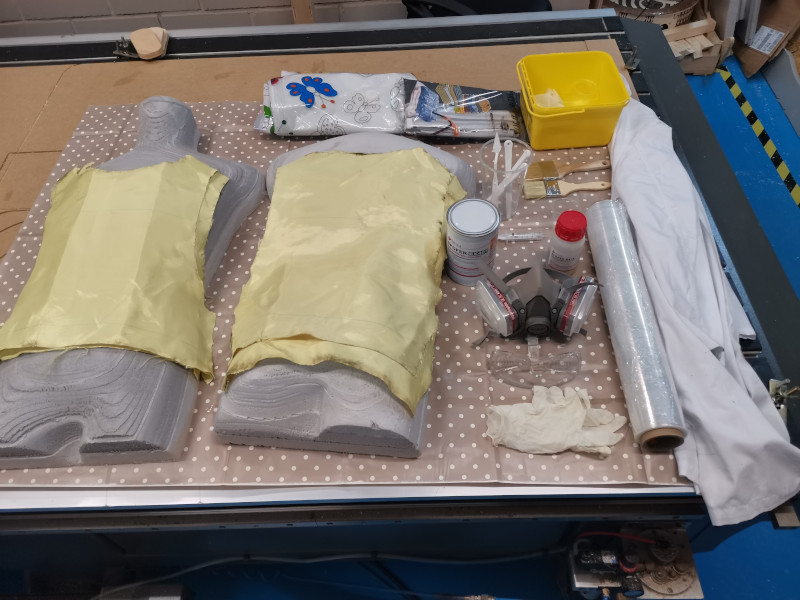
The following drawing explains the steps of "laminating"
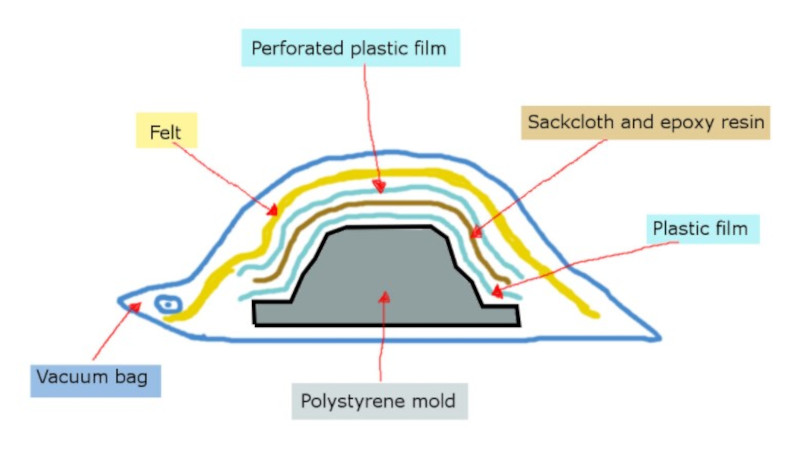
• First I put plastic film on the mold

• I mix the Feroca Epoxy Resin (EPOFER EX401 + Epoxy cast). part A: 100 and part B: 16. You only have 25 min to mix and apply.

"EPOFER EX401 + Epoxy cast" DATASHEET.
• I put the first layer and apply the mixture with a brush, I do the same operation for the other two layers.

• I put another layer of plastic film on it, drilling holes so that it breathes and the excess mixture comes out.

• I cover everything with a layer of felt to absorb the excess mixture.

• I put the mold in a vacuum bag and I extract the air inside with a vacuum cleaner. Let dry for 24 hours.


I remove the mold from the vacuum bag, remove the felt and the plastic film. I remove the mold from the vest and the result is as follows.


Remove the vest from the mold, the mold is intact. The plastic comes off easily and has not stuck to the vest.


The end result is very good, there are no plastic remains and the mixture has worked perfectly, it is not appreciated that there are 3 layers.


4. Conclusions of the week
How was the week?
This week my instructor, Lola Ojados, proposed that I address an idea that she could not start last year. The project is to design and build a bulletproof vest with the composite technique. First I scan a mannequin, then I obtained your 3d model and templates, I used laser cutting to cut the Twaron, with the milling machine I obtained the mold of the mannequin and finally I used the composite to join the layers. It has been a difficult week because I was finishing my final project to do the presentation with Neil.
What went wrong ?
I had to use Geomagic, which is a program I did not know, so I had a hard time getting the model and removing the insoles from the bulletproof vest.
What went well?
The scan came out very well and without problems. I had no problems with milling the sections of the molds. Using the composite technique is not difficult as long as you follow the indicated steps.
What will you do different next time
I would use more material because the bulletproof vest has 3 layers and the military want to do more tests and add more layers to it, until reaching 7. Later I will create a mannequin with ballistic silicone to put on the bulletproof vest and take it to the shooting range to see the results to the shots of the military.