
1.
Principles & Practice
Assignments
individual assignment
plan and sketch a potential final project
work through a git tutorial
build a personal site in the class archive describing you and your final project
Table of contents
The Final project
The problem
When I moved to Barcelona I lived in a room that had a window, but the sky was so far above that in the morning I couldn't tell if the sun was up or not.
The idea
I thought it'd be nice to have a fake window that is connected to the internet and knows at what time the sun rises and sets. It could also change color depending on the weather (if it's cloudy then it's darker), if it's sunny it's a bit blue, if it's dawn or dusk it's orange.
Who will use it
Anybody who has a dark room, an obscure office, a basement with no windows.
How to do it
I've already bought the components and been playing around with it in the past year.
Components are Raspberry Pi, 2x LED strips, NOSFETs, a breadboard and cables.
I wired 2 LED strips to the Raspberry Pi ports (one warm white and one cold white). I coded a Python script to access the API for DarkWeather, which includes the data we want to interact the window.
Depending on the conditions it would tell the LED strip to output more or less energy to have the light more or less orange.
The frame of the window would be made out of recycled plastic via injection moulds, where you can extend the size of the window if you want to.
Extra functionality would be to have an app on your phone where you can control manually the window. It automatically switches off if your phone isn't connected to the WiFi.
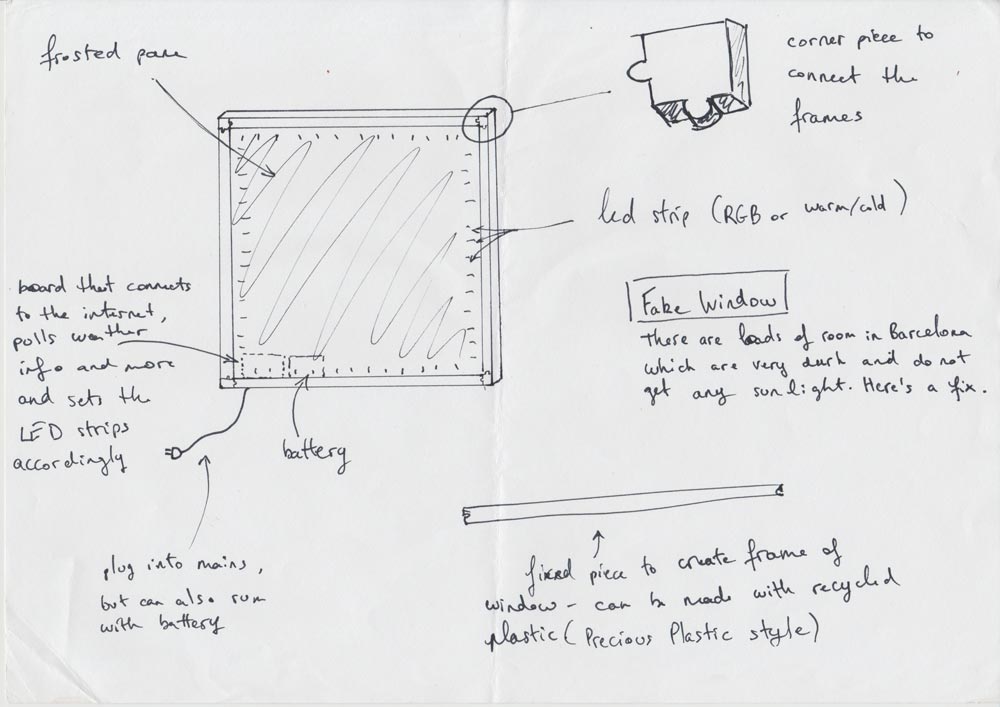
A quick sketch of the project
Extras, if time allows
I have a few extra idea for the project, probably to be developed after the Fab Academy, but here they are:
- The Window switches itself on automatically when your phone connects to the WiFi, so it seems like it’s always daylight or not - it means it also saves electricity
- Have an AUX cable to play sounds like rain, or thunder, or even fire crackling for relaxing times
- Physical knobs to adjust brightness / color + button to activate auto-brightness
- It needs to have batteries so you’re window isn’t plugged in all the time, that’d look weird
- Have an RGB LED strip instead
- Build an emulation of Philips Hue bridge so that it can be part of the system
Making the website
I’ve been playing with Git, Ruby, Python, Homebrew and other package for a little while, so I had them already installed.
Git, a version control software
Git is a free and open source distributed version control system designed to handle everything from small to very large projects with speed and efficiency.
There are 4 mains command that we will use over and over with Git, and these are:
git add: when combined with a dot (.) it adds all files that have been edited to the stage, if you specify only a filename, it adds only that file to the stagegit commit: it needs to come with the option-m "Enter message for commit here"to describe what you are committinggit push: this uploads your commit (changes) to the Git repository, and in our case publishes itgit status: checks where your project is at, what has been committed, added to the stage, edited, etc.
In Git the staging area is where you add your files after having worked on them in the working directory. You then commit those edits to the local repository. You can make multiple commits before doing the final push, which uploads it to the remote (online) repository.

A screenshot showing all steps mentioned above.

Cloning the remote git repository
First of all I followed the instructions to link my Gitlab repository to my computer through an SSH key I had already created for Github in the past.
I then created a new folder with mkdir on my computer and git clone'd the repository there. I deleted all default files that came with it and created a Jekyll website, locally for development.
Before working on your website through git, always do git pull, to make sure you are working with your latest version. I work from two computers so I always make sure to do that first.
Starting the Jekyll website
In Gitlab I deleted the .gitlab-ci.yml to then add a new one with a Jekyll template. Little did I know, some problems would occur later...
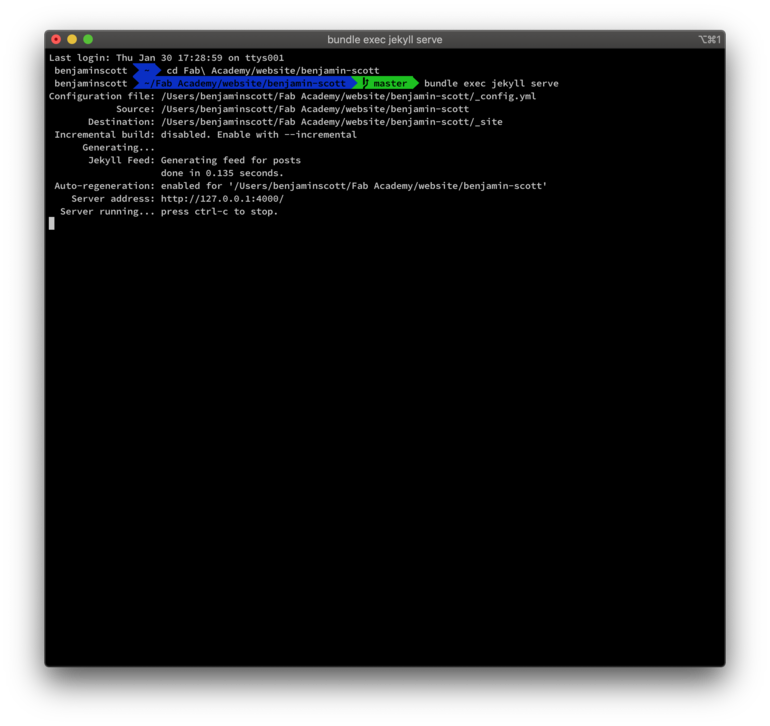
For this assignment I decided to try Jekyll locally, so I followed the instructions and installed the gem and ran the local server. It all worked perfectly.
I created a post, but with Jekyll you need to create the file yourself, with a certain format (YYYY-MM-DD - etc.) for its name for it to work. I thought it wasn’t very command-line friendly, so I looked online for a solution. Which I found here: https://gist.github.com/ichadhr/0b4e35174c7e90c0b31b
When my post was created and I had formatted with Markdown and I was happy, I decided to push to Gitlab to see it online.
#to check what’s up with my files,
git status
# to add all files to the staging area
git add .
# to commit the website to the local repository, with a message
git commit -m “Changed the entire website to a Jekyll that I developed locally”
# push it to the remote repository
git push
A few minutes later I get an email from Gitlab saying my pipeline failed…
It said “You must use Bundler 2 or greater with this lockfile”. After a bit of research I found that adding “gem install bundler” at the start of the before_script in the .gitlab-ci.yml installs the later version of Bundler, which means the next line bundle install doesn’t fail anymore… but a new error comes up: ”[...] requires ruby version >= 2.4.0”.
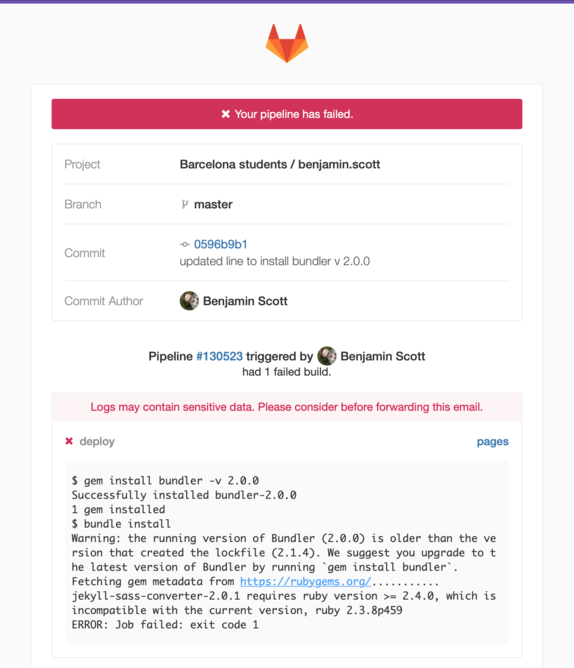
At the top of the file the first line is image: ruby:2.3, so I simply replaced with image: ruby:2.4 and it all worked!
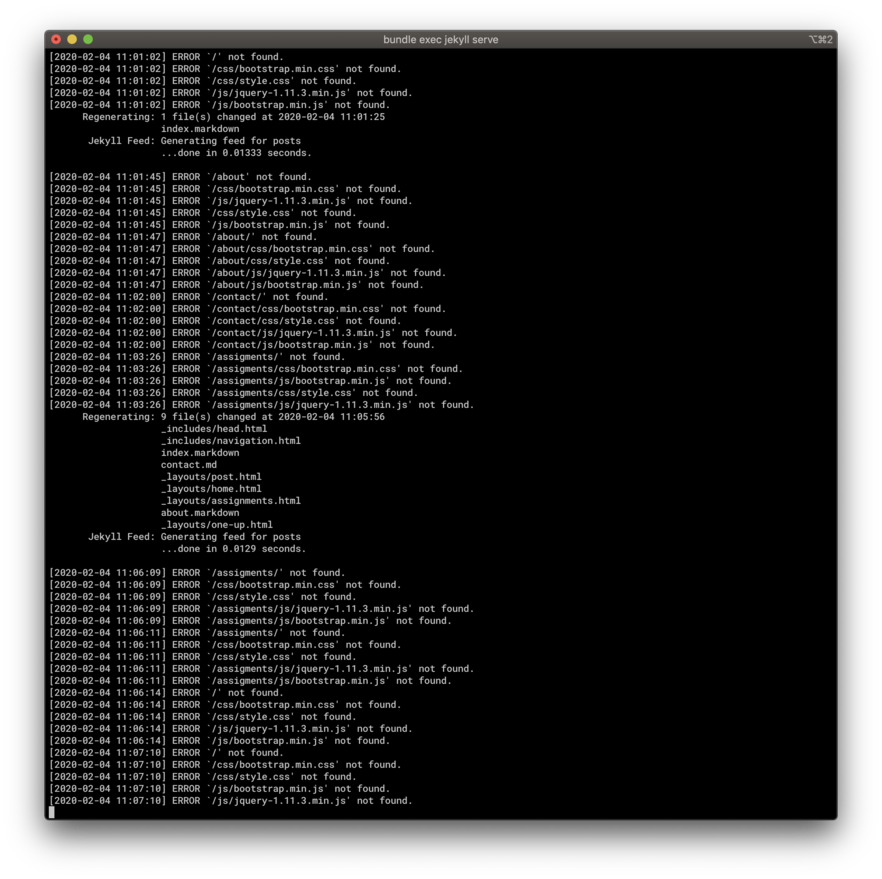
Next problem occurred though, the website works but there’s no styling, and if I click on the post I created earlier, it gives a 404 error.
I compared the difference between the local and remote repository and notice that in the local repository there’s an extra folder called _site which contains what seems like essential assets… only thing is that it wasn’t pushed to the remote repository… I check the .gitignore file and low and behold, _site is written in it.
Now… I’m guessing it was added there automatically when Jekyll was installed. The _site shouldn’t be pushed to Gitlab… but why? I thought that it must be generated automatically when you run bundle exec jekyll serve (which I confirmed by deleting the folder and then it appearing when I run the command), but then why isn’t it there? Is it because it’s only built the time of the website is being served, and therefore doesn’t live in the rep? ... but then, where do I do the CSS if it’s being generated when the website is served? And the index.html?
I decided to delete the line from the .gitignore and upload the _site folder to the Gitlab… just to see what happens.
git add .
git commit -m “adding _site, althout it was in gitignore…”
git push
Refresh the page later… nope, doesn’t change anything. Post still doesn’t load, style is still messed up.
(In the meantime I also decided to the .jekyll-cache folder to the .gitignore as I’m guessing it is not needed, and will make my repo much cleaner)
Ok, some more research, and more reading through the documentation…
Honestly I don’t understand how it works. Going through all the files one by one and nowhere do I see where you can write the index.html… or… maybe it’s because in the _config.yml file there’s a theme and it automatically pulls down a template. Maybe if I comment these lines out then it won’t have any format. And maybe I just need to create some layout file somewhere for it to take it… ok let’s see.
Okkkkk, so, the documentation on the Jekyll website isn’t really easy to find, but I managed to find something through a Google search: https://jekyllrb.com/docs/layouts/ - how to build default layouts, and then sub-layouts for posts, etc. in a folder _layouts
Now, let’s find a template we can use.
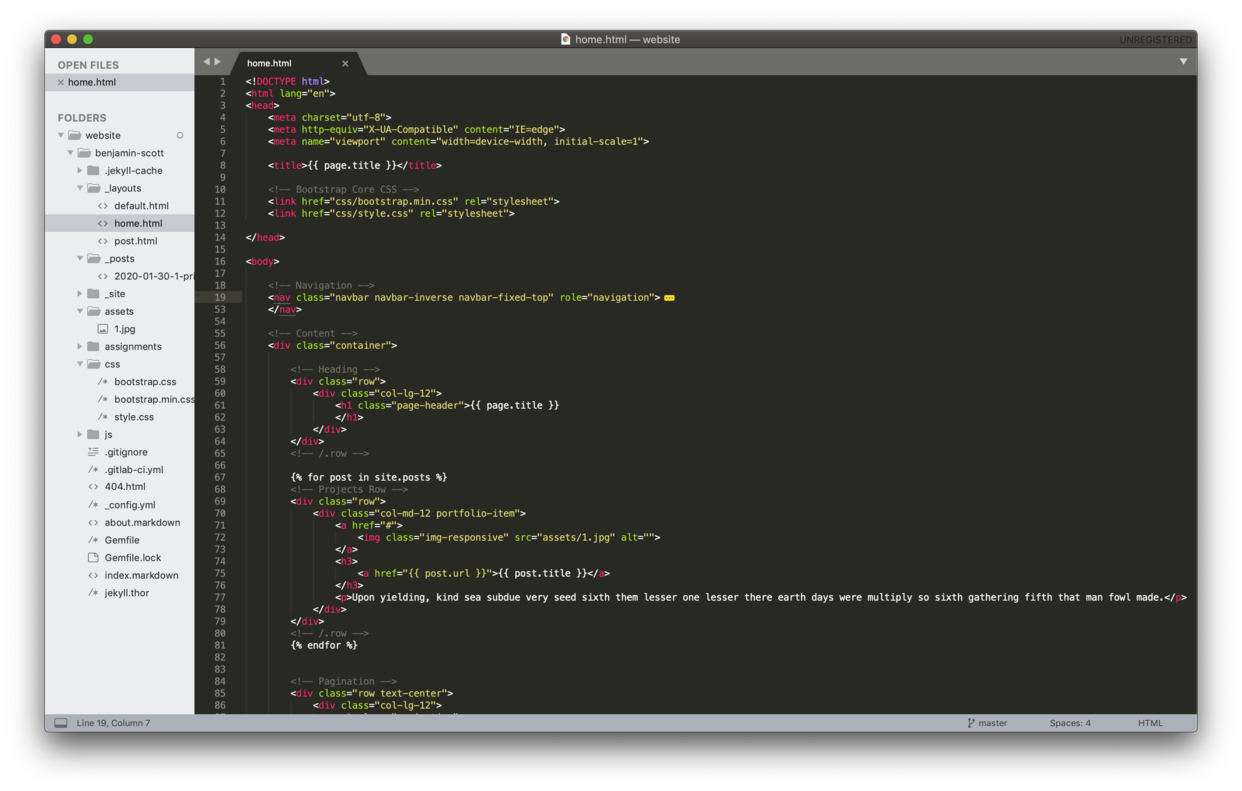
Found a simple one, copy and pasted the code in the default.html layouts and added liquid variables for the site title, page title, and even a loop of the posts in the website to display them.
Site doesn’t look too bad… I mean it does, but it’s better to than a blank page.

Now, I’m happy with this milestone, let's git add, commit and push to put this online. Obviously don't type it like this in the command-line.
I’ve now played with _layouts, _includes, added some CSS, made an assignments folder which shows all posts in the blog, played with filters for variables.
Ok, I pushed to Git, but because I used /css/style.css and /about/ (root folder with /) it means it searches for the assets at http://fabacademy.org/ rather than the root of my project.
Update: Tuesday 4 February
Now my website doesn’t work at all (403 Forbidden error), and it doesn’t work locally at all either. It gives errors about not being able to find the CSS, JS, etc.
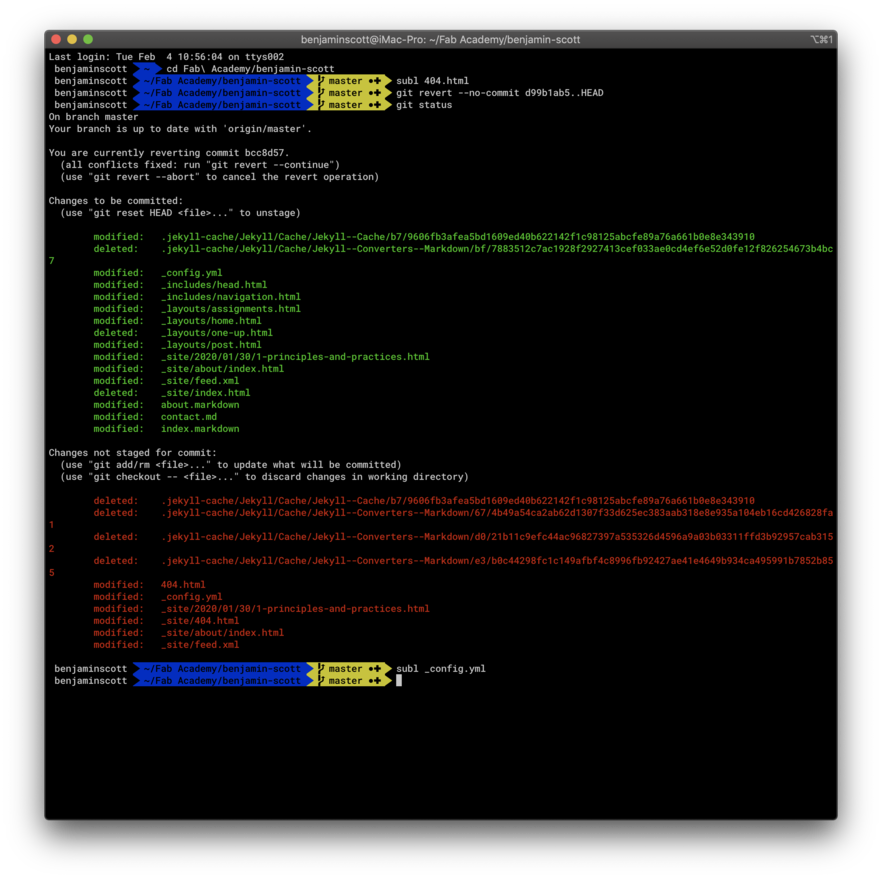
I did git revert --no-commit 0766c053..HEAD to bring back a version that was working the other day, and it still doesn’t work… not really sure what is up now… An update in Jekyll?
I’m on a different computer where I have Ruby install from previous playing around (v2.6). Maybe that’s the problem. In the .gitlab-ci.yml it has Ruby 2.4. Although I’m guessing this file doesn’t affect locally, so what is the problem.
I also installed Jekyll on this different computer, via gem install bundler jekyll and had to install bundler as well, so maybe this?
In the end
I wanted to play around with Jekyll and Markdown to see how it all works, but the final plan was always to take a nice template from online and adapt to my needs.
I went through a few, but the one I preferred was the Paradigm Shift from HTML5 UP, as it had this timeline on the left which I thought was cool as we are studying week-by-week. On the right I will have a short description of what we did that week, and a link to a more detailed article.
The website is coded with SASS to create the CSS, so I had to look around a fair amount to do what I wanted.
As each section is coded the same way (see below), I thought it’d be easy to create a script where you can enter the title and text and it’d automatically append it to the “sections” div.
Have you?
© Benjamin Scott. No rights reserved.