FINAL PROJECT
What will i do?
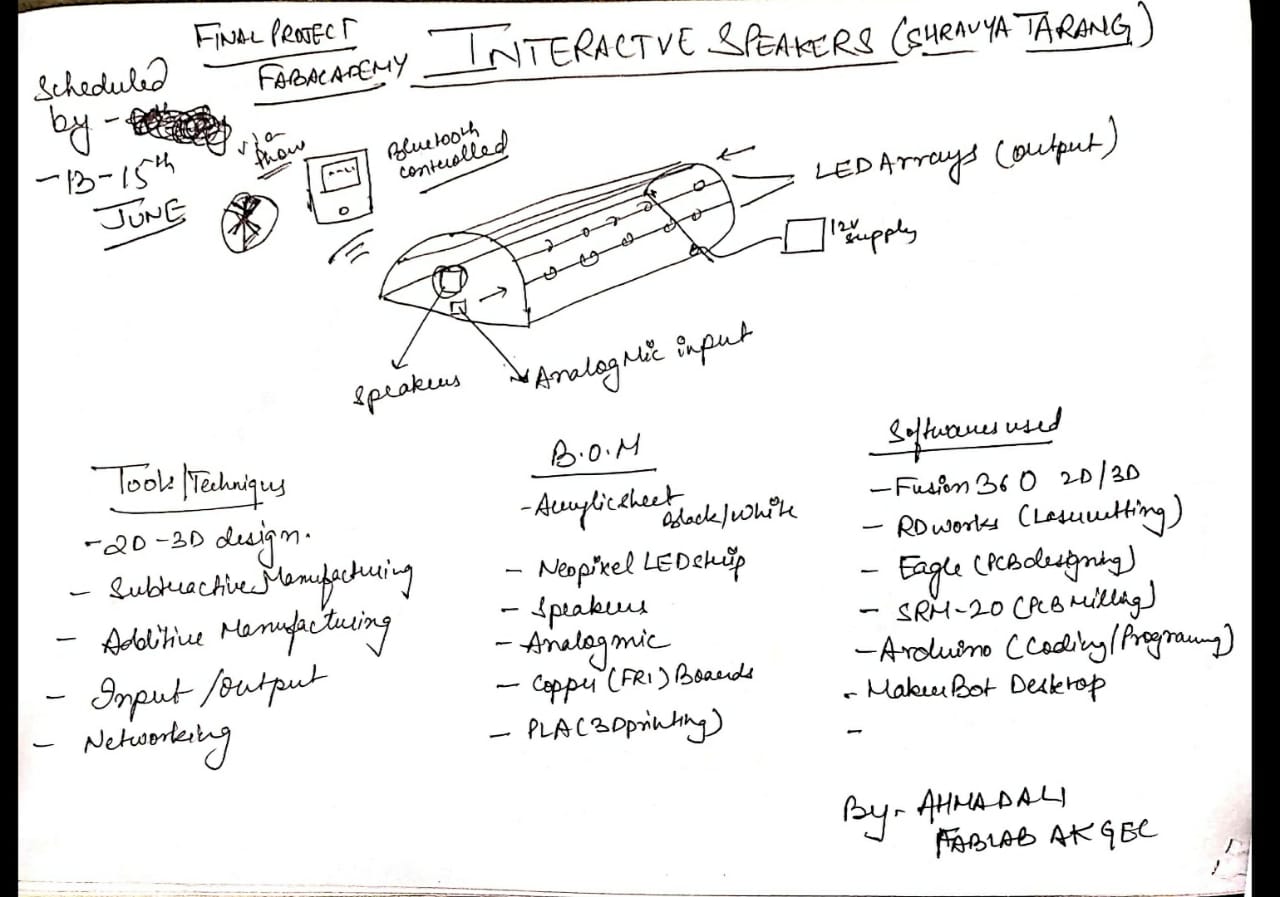
It's an Sound reactive LED speakers mapped with the amplitude of the sound waves it will receive via speakers.
i will be made by 5mm thick acrylic sheet with aparemetric pressfit design so that it can be scale according
to the size of the crowd and the space of the room.
It will be Laser Cut and the strips neopixel LED strips will be mounted on the Slots which will be mapped according to the sound.
For input I'll be using Analog Mic module and Output will be Neopixel LEDs of 5V supply.
I'll be redesigning Satshakit for m purpose using Atmega 328p AU chip for the Board and Analog Input pin as input and Analno pin as the output.
The amplifer Board will be a custom made LA-4440 IC which is power amplifier IC.
For the bluetooth connectivity I'll be dimantling a bluetooth audio receiver
For future also I plan to make a custom Amplifier Board for the assembly In the next spiral and will try to make the assembly portable.
Who's Done what Before hand
There are lot Of people that's done This tupe of projects before..
My one of the Inspiration for this was by seeing the BoomBox By Matt keeter
BOOMBOX PAGE
He did a very excellent work in terms of Designing as well as packaging to level of Product even Neil did mention Him in the class for this week.
On the other hand the sound reactive stuffs has been implemented too may a lot times My manager did his project making a
Smart reactive lamp I kind of combined both of them for my use.
Sound reactive Lamp's Documentation
What materials and components will be required?
The following list of materials and components shall be required:
Where will they come from?
Most of the above parts were provided by the lab but some of them like the spekers I took out from old speakers rather than buying them so that to utilize them. Although It too had a cost but I used the thrown Away material as a sense ofmaker to make out something of it.
How much will they Cost?
BOM
Description
Particular
Quantity
Unit Price(₹)
Unit Price($)
Total Price($)
Microcontroller
Atmega 328p AU
1
111
1.6
1.6
Resistor
10k ohm
1
2
0.029
0.058
Resistor
499 ohm
1
1.5
0.022
0.022
Capacitor
100 nF
2
1.45
0.021
0.042
Capacitor
1 uF
1
3.88
0.056
0.056
Capacitor
10 uF
2
3.5
0.050
0.10
Capacitor
22 pF
2
1.02
0.015
0.030
Crystal
16 Mhz
1
10
0.14
0.14
LED Green
1206 smd
1
5
0.072
0.072
LED Yellow
1206 smd
1
5
0.072
0.072
Switch
PushbUtton
1
5
0.072
0.072
Sound Module
Main chip -LM393
1
99
1.42
1.42
Neopixel LED Strip
WS2812B
5m
1200
17.25
17.25
Black Acrylic
8ftx4ft
1-sheet
3000
40
40
White Acrylic
6'x6'
4 sheet
395
5.68
22.72
PLA Roll
3D print plastic-
0.055
415
6
6
Connector headers
Full 10 strip x2
2.9
0.042
0.42
0.42
Ftdi Header
Borrowed
ISP Header
6 pin
10
0.014
0.14
0.14
LA-440 Audio amplifier
Audio Driver
1
250
3.5
3.5
Spekaers
4 ohm 50 Watt
1
200
2.87
2.87
Total Price- 92.944 $
What parts will be Made?
The following Parts will be made-
-The Outer Structure Of the speker i.e the main body
-The 3D printed speakers enclosure
-PCB input and Output device Boards with Analog Microphone Module and LED Strip
-Programming the above devices for a specific requirement.
-Future Dev - Interface or Application to communicate with output device through a smartphone.
What processes will be used?
-2D Parametric Modeling.
-3D Modeling.
-Subtractive manufacturing: Laser Cutting/ Vinyl Cutting
-Additive manufacturing: 3D Printing
-Electronics Designing.
-Electronics Production.
-Input & Output Device.
-Networking and Communications.
What tasks need to be completed?
The following tasks either are completed or in progress-
Completed
Designing 2D and 3D
making the structure
3D printing speaker enclosure
Testing
Electronics testing
Selection of the right module
Mappping of the audio to the neopixel
What questions need to be answered?
The placement of the LED strip, I need to work and answer the question that where I shall place the LED strip to make it attractive and also a neat product.
Also the placement of the cicuit boards, Input shall be placed on the speaker or near it, with the help of a 3d Printed component.
The Placemenet of the Mic is alos a challenge as till now I've seen the mapping is best when the mic is place very near to the speakers.
Also the power source for the boards is the important aspect I need to work on.
I also need to think about the wire management and how to manage all the wires so that It may give a neat clean look.
TENTATIVE DATES
Electronics Design & Production (Input/Output): 14th June 2019.
3D Modeling & Additive Manufacturing: 10th June 2018.
2D Parametric Design & Computer Controlled Machining: 10th June 2018.
Programming and Testing 16th June 2018.
Assembly & Integration: 17th June2018.
Video, Slide and Final Product: 18th June 2018.
The estimated date of project completion from my end is 18th June, 2019.
How will it be evaluated?
The project shall be evaluated mainly on the following aspects:
The Speaker design as a well made, good looking product, also safe and made with use of non toxic materials.
The working application of the speeaker for a user preference in regards to the display of LED light strip reacting to the sound of the environment.
Accurate communication between the input and output devices.
No wirings shall be visible, neat and tidy overall product.
Testing all the connections, networking and communication.
User friendly operation, anyone can use it.
- Projects can be separate or joint, but need to show individual mastery of the range of skills covered
- It is an individual project and expresses the range of skills mastered by me during these multiple weekly assignments. Where possible, you should make rather than buy the parts of your project
- As explained above, all of the parts of my project are available or will be made and created by me. My responsibility was to answer all of the above questions and in a way that my final project answers those questions. I hope I have answered all the questions in regards with my project.
Conclusion
The week was basically about me getting to know my project better. To finalize the design and get a better sense of how things are going to function. I split the systems according to their functions so its easier for me to sort them out. I have 2 system of electronics and 1 model. Now after this exercise I know where I stand in my project and helps me plan what needs to be done next and procure the materials necessary before it's late. Also, now I know the process I will be using to make my model and electronics design, hence I need to prepare my files accordingly. On the whole this week's documentation helped me organize my project better.