Assignment
Group assignment:Review the safety data sheets for each of your molding and casting materials, then make and compare test casts with each of them
Individual assignment:
Design a 3D mold around the stock and tooling that you'll be using, machine it, and use it to cast parts
Files
MoldFancy mold_stl
Fancy mold_mpj
We had an accident with our CNC machine you can read more here. Because of the accident we had to go to another city to borrow their CNC machine. Because of this, we didn’t have much time at the CNC so I had to make a small mold with simple designs. The edges are rounded on some of the designs this makes it fit for a 3 axis machining.
Inspiration
I have seen a lot of jewlery made with resin and wood, and thought that this could be really cool to make in this week. Because we didn't have much time on the machine I had to make a small mold and could not make two sided mold.
Designing

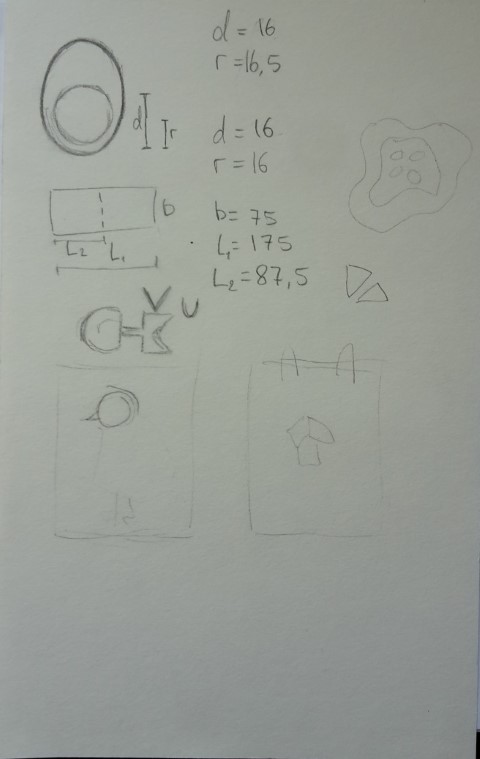 I designed the model in Solidworks. When designing this, I had to keep in mind that the model should be negative.
Because afterwards we are making a mold(1) of this mold(2) and then cast from the mold.


Milling the wax
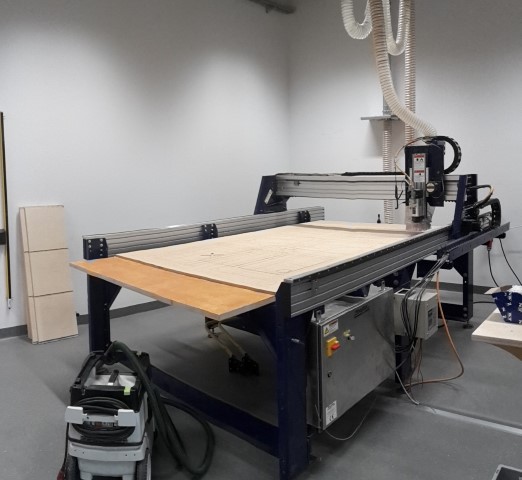 Wax is really easy to mill in because it is so soft.
The mold is stuck with double sided tape and then placed in tension. I used a 3 mm flat ended drill for drilling the mold.
I think that the drilling path caused some of the edges to crack off.

.jpg)


Making a mold of a mold

First I used water to measure the ca. volume of my mold. I filled my mold up with as much water as I could. Then poured the water in a cup and measured this (minus the weight of the cup). In this way I could see how many grams I needed. Of course the rubber has a different density than water, but this worked for me because my mold is pretty small.
Then I used the rubber for casting my mold(2). I used the oomoo25 (http://www.formx.eu/molding--casting/silicones/oomoo-series-silicone/index.php). It is two components you mix together. In this one it was 1:1.3 if you measured by weight. You have to mix each component separately before you mix them together. The trick here is NOT to mix as when you are baking. You have to slowly stir the mixture to avoid getting air bubbles. Air bubbles can ruin your mold and then you have to try again.
I had a partner for when we had to mix each component, so it was easy to mix them before they began hardening. Even though the mixture is only getting solid when you mix the two components - luckily not immediately.
After mixing the two components together (blue and green) and there are no lines of colour, you can begin to pour it in your mold. Because I’m making earrings, I needed to fill a lot of small holes. These holes are really hard to fill with the rubber because the mixture needs to slowly run along the wall of the hole to fill it all up. Otherwise it could trap an air bubble on the bottom and then the mold(2) would be incomplete. I cut off a piece from the stiring stick so I had a thinner stick to control the flow of the rubber (see picture).
Another thing you can do after the rubber has been poured into the mold(1) is to tap it on the side and on the table. This will get the air bubbles to get up to the surface. If there are any bubbles in the surface and they don’t pop by them self, you can use a sharp stick or wire.


The mold was good in the first try. I was a bit afraid that I didn’t get the rubber all the way out in the small holes in the earrings, but fortunately this was successful.


We have some old resin that we were trying to see if it would work. So I mixed the two components, the resin first and the hardener afterwards. The hardener is 2:1 so it is really easy to work with. When mixing for the first test we had some trouble with getting the hardener out and all of a sutton there was a lot coming out. It looked like there was something stuck in the tube which is understandable because the resin and hardener has been open for a while. Because of the the thing stuck in the hardener I got some specks in the resin. I tried not using this in my mold, but I don’t know if something got somewhere. I tried with adding glitter and some flowers to see what would happen. Already when adding some of the blue flowers, they started changing color. I wasn’t that careful when pouring, so I got resin on different places on the mold. I hope that I can sand this off, but otherwise I’m going to try another time and be more careful. You have a 2 min stirring the components together. Then there is 30 minutes to pour. After you have to wait for 4 hours before taking the resin out of the mold.
The resin has not yet hardened and are really sticky. I tried getting the resin out of the mold and it kind of looked like snot/slime.


I then tried with mixing some plaster. I had a cup of water and then mixed in the plaster until I had a sticky but not liquid texture.
I used a stick to try and get the plaster out in all the edges and corners.
When I had filled the whole mold up, I stamped it towards the table in order to get all the bubbles out. And you could see them coming to the surface slowly and popping.
I then gave it some time to dry. When I could see that the plaster had dried I tried popping them out of the mold. Only one of them broke in the attempt to get them out. I think this is because I left too much plaster on top of the whole mold and then had to break the whole thing and break off the edges.
This is the final result. They are a bit fragile when they are made out of plaster. But I might try it with some concrete or something else another time.


There was some small bubbles some places that I didn’t manage to get out.
You can also see on some of the objects that there are some leftovers from when I had poured in the resin. Apparently I didn’t get everything out.
Mold number 2
I have made a new mold in Fusion 360.

I am using a program called MODELA player 4 for the Roland SRM 20 to make the paths.
Picture 1: I am starting with a rough cut, to cut away most of the material.
Picture 2: Then it is important that i choose the Top Z for our machine.
Picture 3: I can here choose how I want the paths. How the machine is cutting. But for my mold the most effecient would be "Contour Lines".
It is also important that I remember to make the "start cutting point" in the lower left corner.
Picture 4: Now I have made the rough paths for my mold.
Picture 5: I can here choose the bit I am using. For the rough cut I choose "8of inch SE 2FL" (flatnose).
Picture 6: I can then use the same settings for making the fine cut, the only thing I change is the bit. For the fine cut I am using "8of inch SE 2FL bn" (ballnose).


Improvements
Use good resin.More time with the machine.
Try more different materials in the mold.