Week 16 : Machine Design
- Automate your machine. Document the group project and your individual contribution
Fab Academy 2018 - Thierry Dassé
A rotocasting machine is simple. You don't need to upload files to control it or as an input.
So it can be a standalone machine, we just have to be able to set some parameters like speed and duration.
We decided to control the machine with a rotary encoder and a screen. You can push the encoder to start or stop
the machine and turn to modify parameters.
Values ans machine state can be seen on screen. We also wanted to control screen using I2C protocol.
We first had to decide wich microcontroller we will use.
We'll need 3 pins for rotary encoder (2 for rotation and 1 for switch), 2 pins for I2C (SDA & SCL) and 3 pins
for A4988 stepper driver (step, dir and enable pins). We will need 8 digital pins.
We can't use ATTiny85 because it has 5 pins (6 if we reprogram reset pin).
We tried to use ATTiny84. It has enough pins. So, I searched a library to control I2C screen and before tu use I2C.
TinyWireM has been written for ATTiny85. On tutorials, some speek about a version for ATTiny84. They all link to
http://www.scenelight.nl/?wpfb_dl=22 but unfortunately, link is no longer available. I tried to find somewhere else without result.
That's why we decided to change microcontroller and to use ATmega328.
I made test on 16x2 LCD display (with LiquidCrystal_I2C library)
and OLED SSD1306 (with U8glib library). Both can be used with ATmega.
We decided to use the second one beacause display si smaller and more readable.
By default speed is set to 80 rpm, duration to 3 hours and mode (acceleration amplitude) to medium.
You can start by clicking. When elapsed time returns to 0, the rotocaster stops by itself and duration is reset to 3 hours.
Before or during running time, you can modify parameters by rotating encoder, choose menu, click on it and modify the value with encoder.
Speed increase or decrease by 10rpm.
Duration increase 30 mn if elapsed time is more than 2 hours, 10mn if time is more than 10mn and 1 mn else.
Mode can be set between smooth, medium and sharp wich modify acceleration intensity. It changes second rotation.

Rotary encoder A, B and Switch pins are directly connected to ATmega digital pins, other pins are connected to ground.
Using pullup resistor we can read a high level when circuit is opened (switch button released) and low level when closed(switch button pressed).
You can detect switch pin is pressed when pin state change from high to low level.
You can detect rotation when A or B pins change. When A turn form high to low before B, button turn clockwise else counterclockwise.
So, I have to keep previous pin level and read new one to compare. I will use 6 bits to have all, 3 low bits for previous states and 3 for new ones.
unsigned short encoder = 0b000111; // new S:0 B:0 A:0 previous S:1 B:1 A:1
To write new rotary encoder pin A level :
readPin = (unsigned short) digitalRead(encoderPinA);
encoder = (encoder & 0b110111) | (readPin << 3); //write encoderA state in the fourth digit
When rotary encoder is pressed, encoder variable value becomes 0b011111 because switch pin turns from 1 to 0.
When rotary encoder is turned clockwise, encoder variable value becomes 0b110111 because pin A turns from 1 to 0.
When rotary encoder is turned counterclockwise, encoder variable value becomes 0b101111 because pin B turns from 1 to 0.
To copy new states to previous ones :
encoder = encoder >> 3;
To drive stepper motor, I should send a pulse on step pin 200 times a second to turn 60 rpm.
To modify speed making second rotation, I calculate delay as :

where s is speed and m mode in [0..2] and i step number in [0..199].
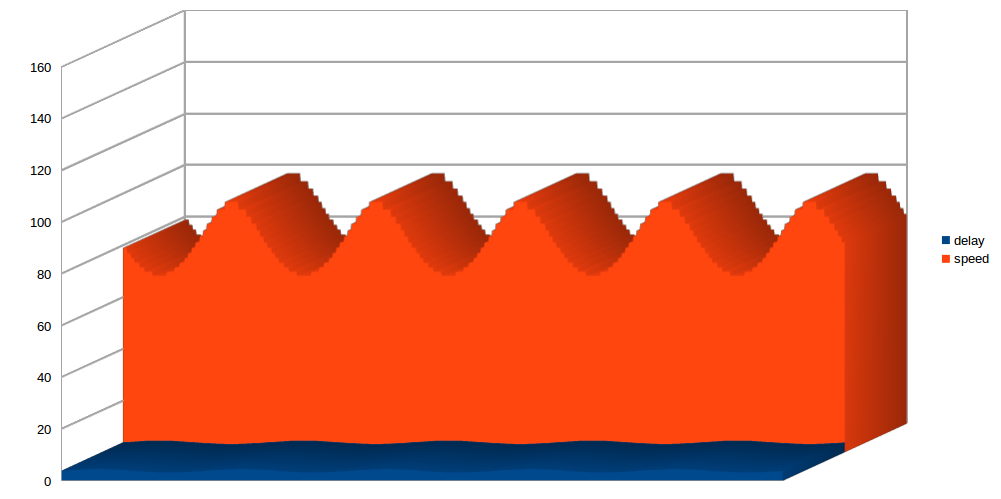
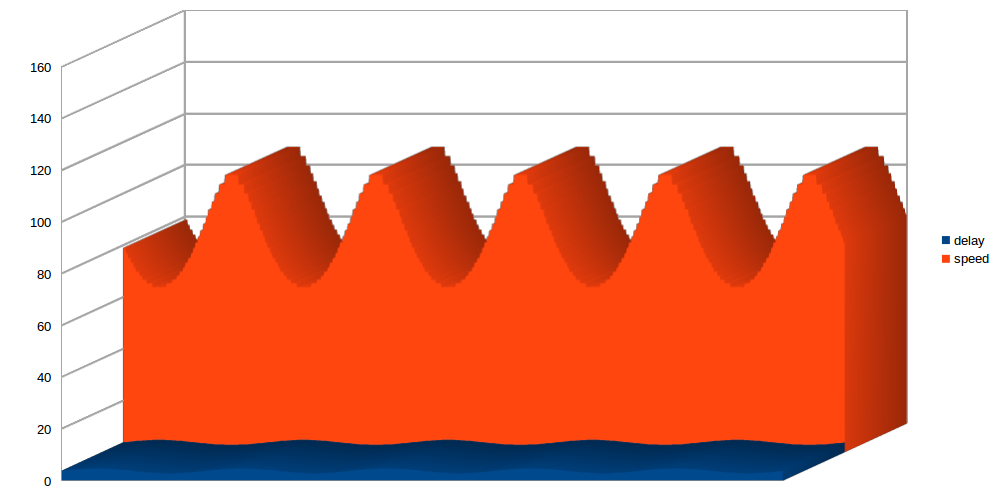
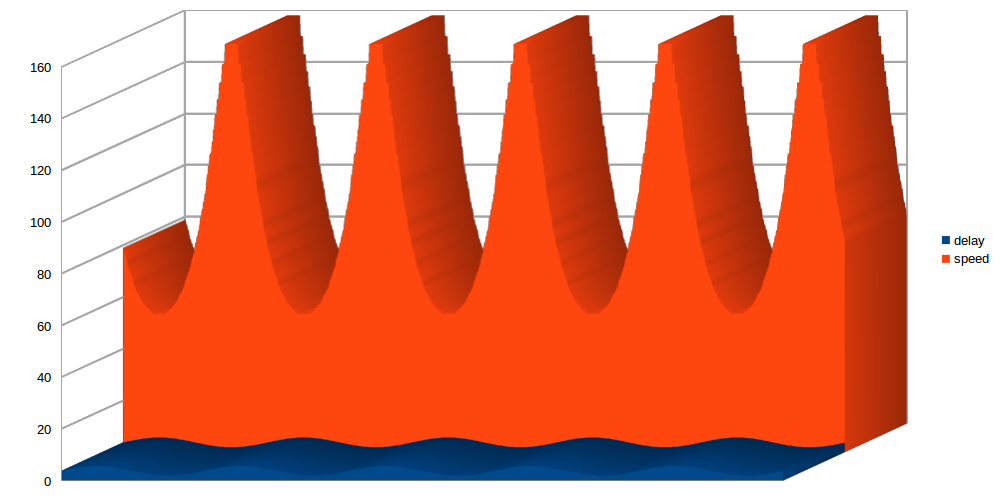
Instantaneous speed graph with smooth, medium and sharp modes are below.


After integration of screen functions and motor controls, program is finished.
You can find full program here.
We have just finished the machine. After months of uses, we will be able to know if parameters
are good and to adapt default values (duration : 3h00, speed : 80 rpm, mode : medium) and extrema.
Oled SSD1306 functions in u8glib use time and we have small stops on motor when screen is updating.
To avoid this, we may use a more simple screen like lCD 2 lines screen.