13. Networiking and Communications
Group Assignement
- Send a message between two projects
Individual Assignement
- Design and build a wired &/or wireless network connecting at least two processors
Send a message between two projects
You can view the group assignemnt here: Group assignment Opendot
Design and build a wired &/or wireless network connecting at least two processors
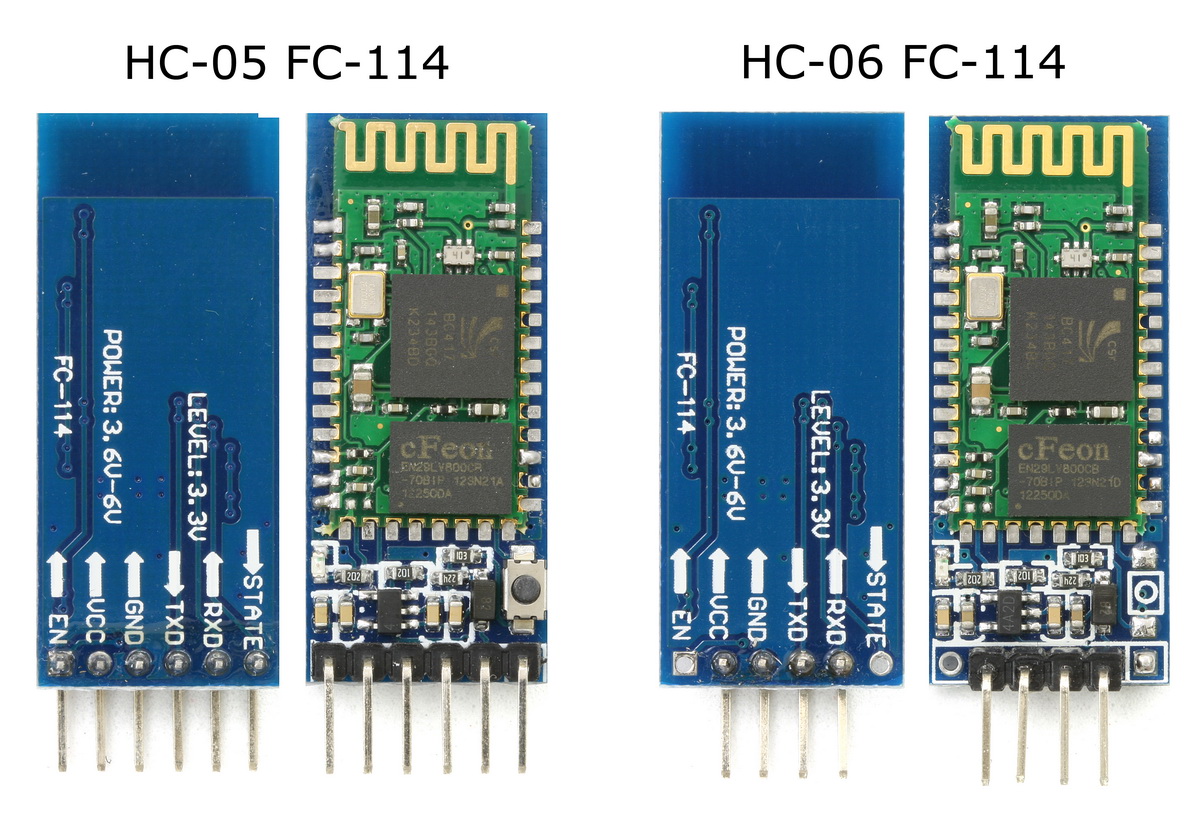
For this week I chose to work on networking and communication between two bluetooth devices. In my Final Project, i plan to create a smart controller that control the movements of my Lampbot through a bluetooth comunication. That's why I've chosen to work on this protocol. I've studied lots of example and tutorial on this kind of comunication, and was not simple to find someone that have worked on communication between two bluetooth modules, each one mounted on a different board. The most useful for me was this from Martin Currey. In a bluetooth communication between two devices, one of them must be the slave, and the other one must be the master. The device that initiates the connection is always the master at connection time. The modules I used were the HC-05 as Master and HC-06 that is pre-configurated as Slave. The Master HC-05 can require connection to other bluetooth devices, while the slave HC-06 just can recive the connection requirement. Here the difference in depth between two devices.
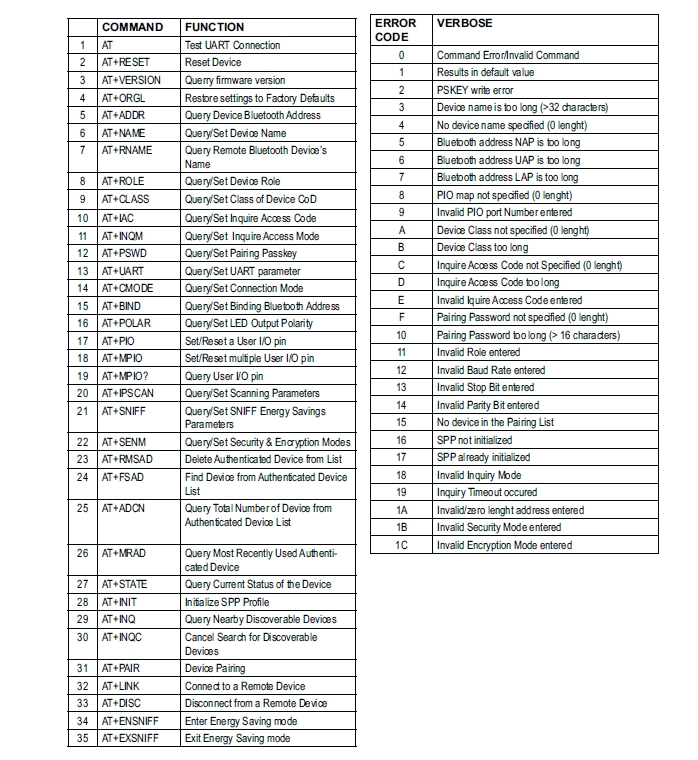
My goal is to create an univocal communication between Master and Slave, so that when I power on the Master device, it automatically connect with the slave one and only with it, without interferences with other bluetooth devices eventually present in environment. To do this I need to go in AT-mode on both devices. AT-mode is the configuration mode of bluetooth device. I've downloaded here the manual of the bluetooth modules mounted on the break out boards. These are the EGBT-046S for HC-06 and EGBT-045 for HC-05. In the manual I could read the data sheet and all the AT-commands. To have an univocal communication, the first step was to enter in AT-mode in both the devices.
To enter in AT mode on the HC 05 you need to press the button when the device is powered, disconnect the VCC whit the button pressed, riconnected the VCC and then relase the button. When the light of the led (light blue for the HC-05) begin to blink at intervals of 2 seconds, the module is in AT-Mode. I connected the HC-05 to an Arduino UNO as you can see in the following speech.
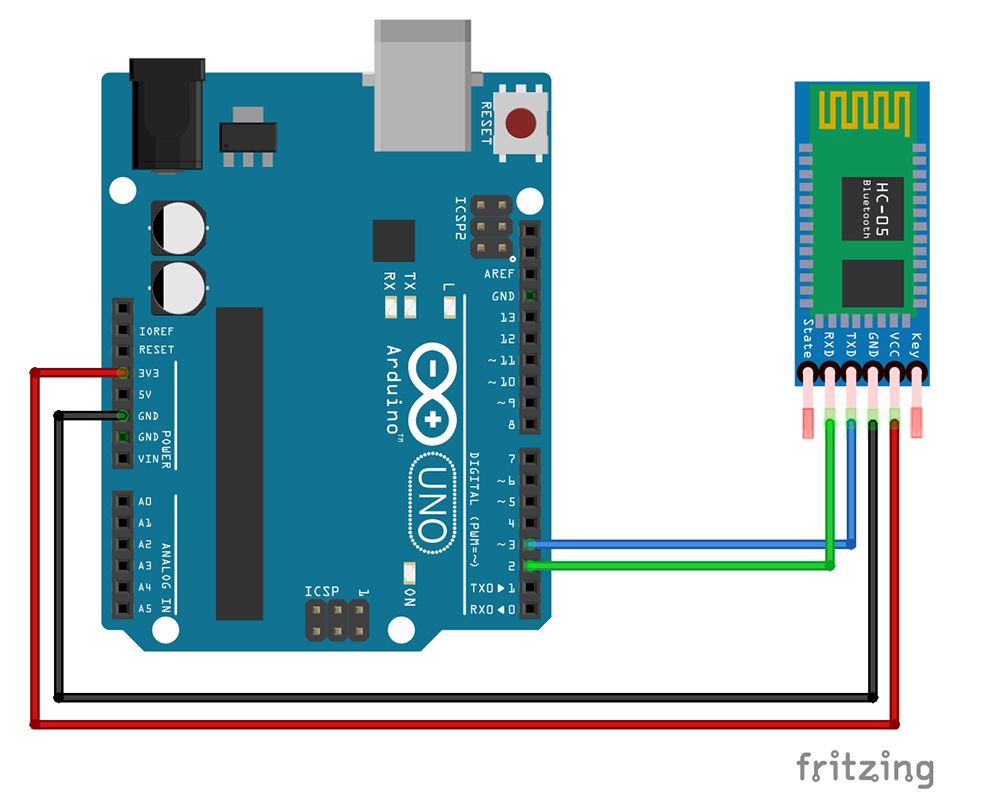
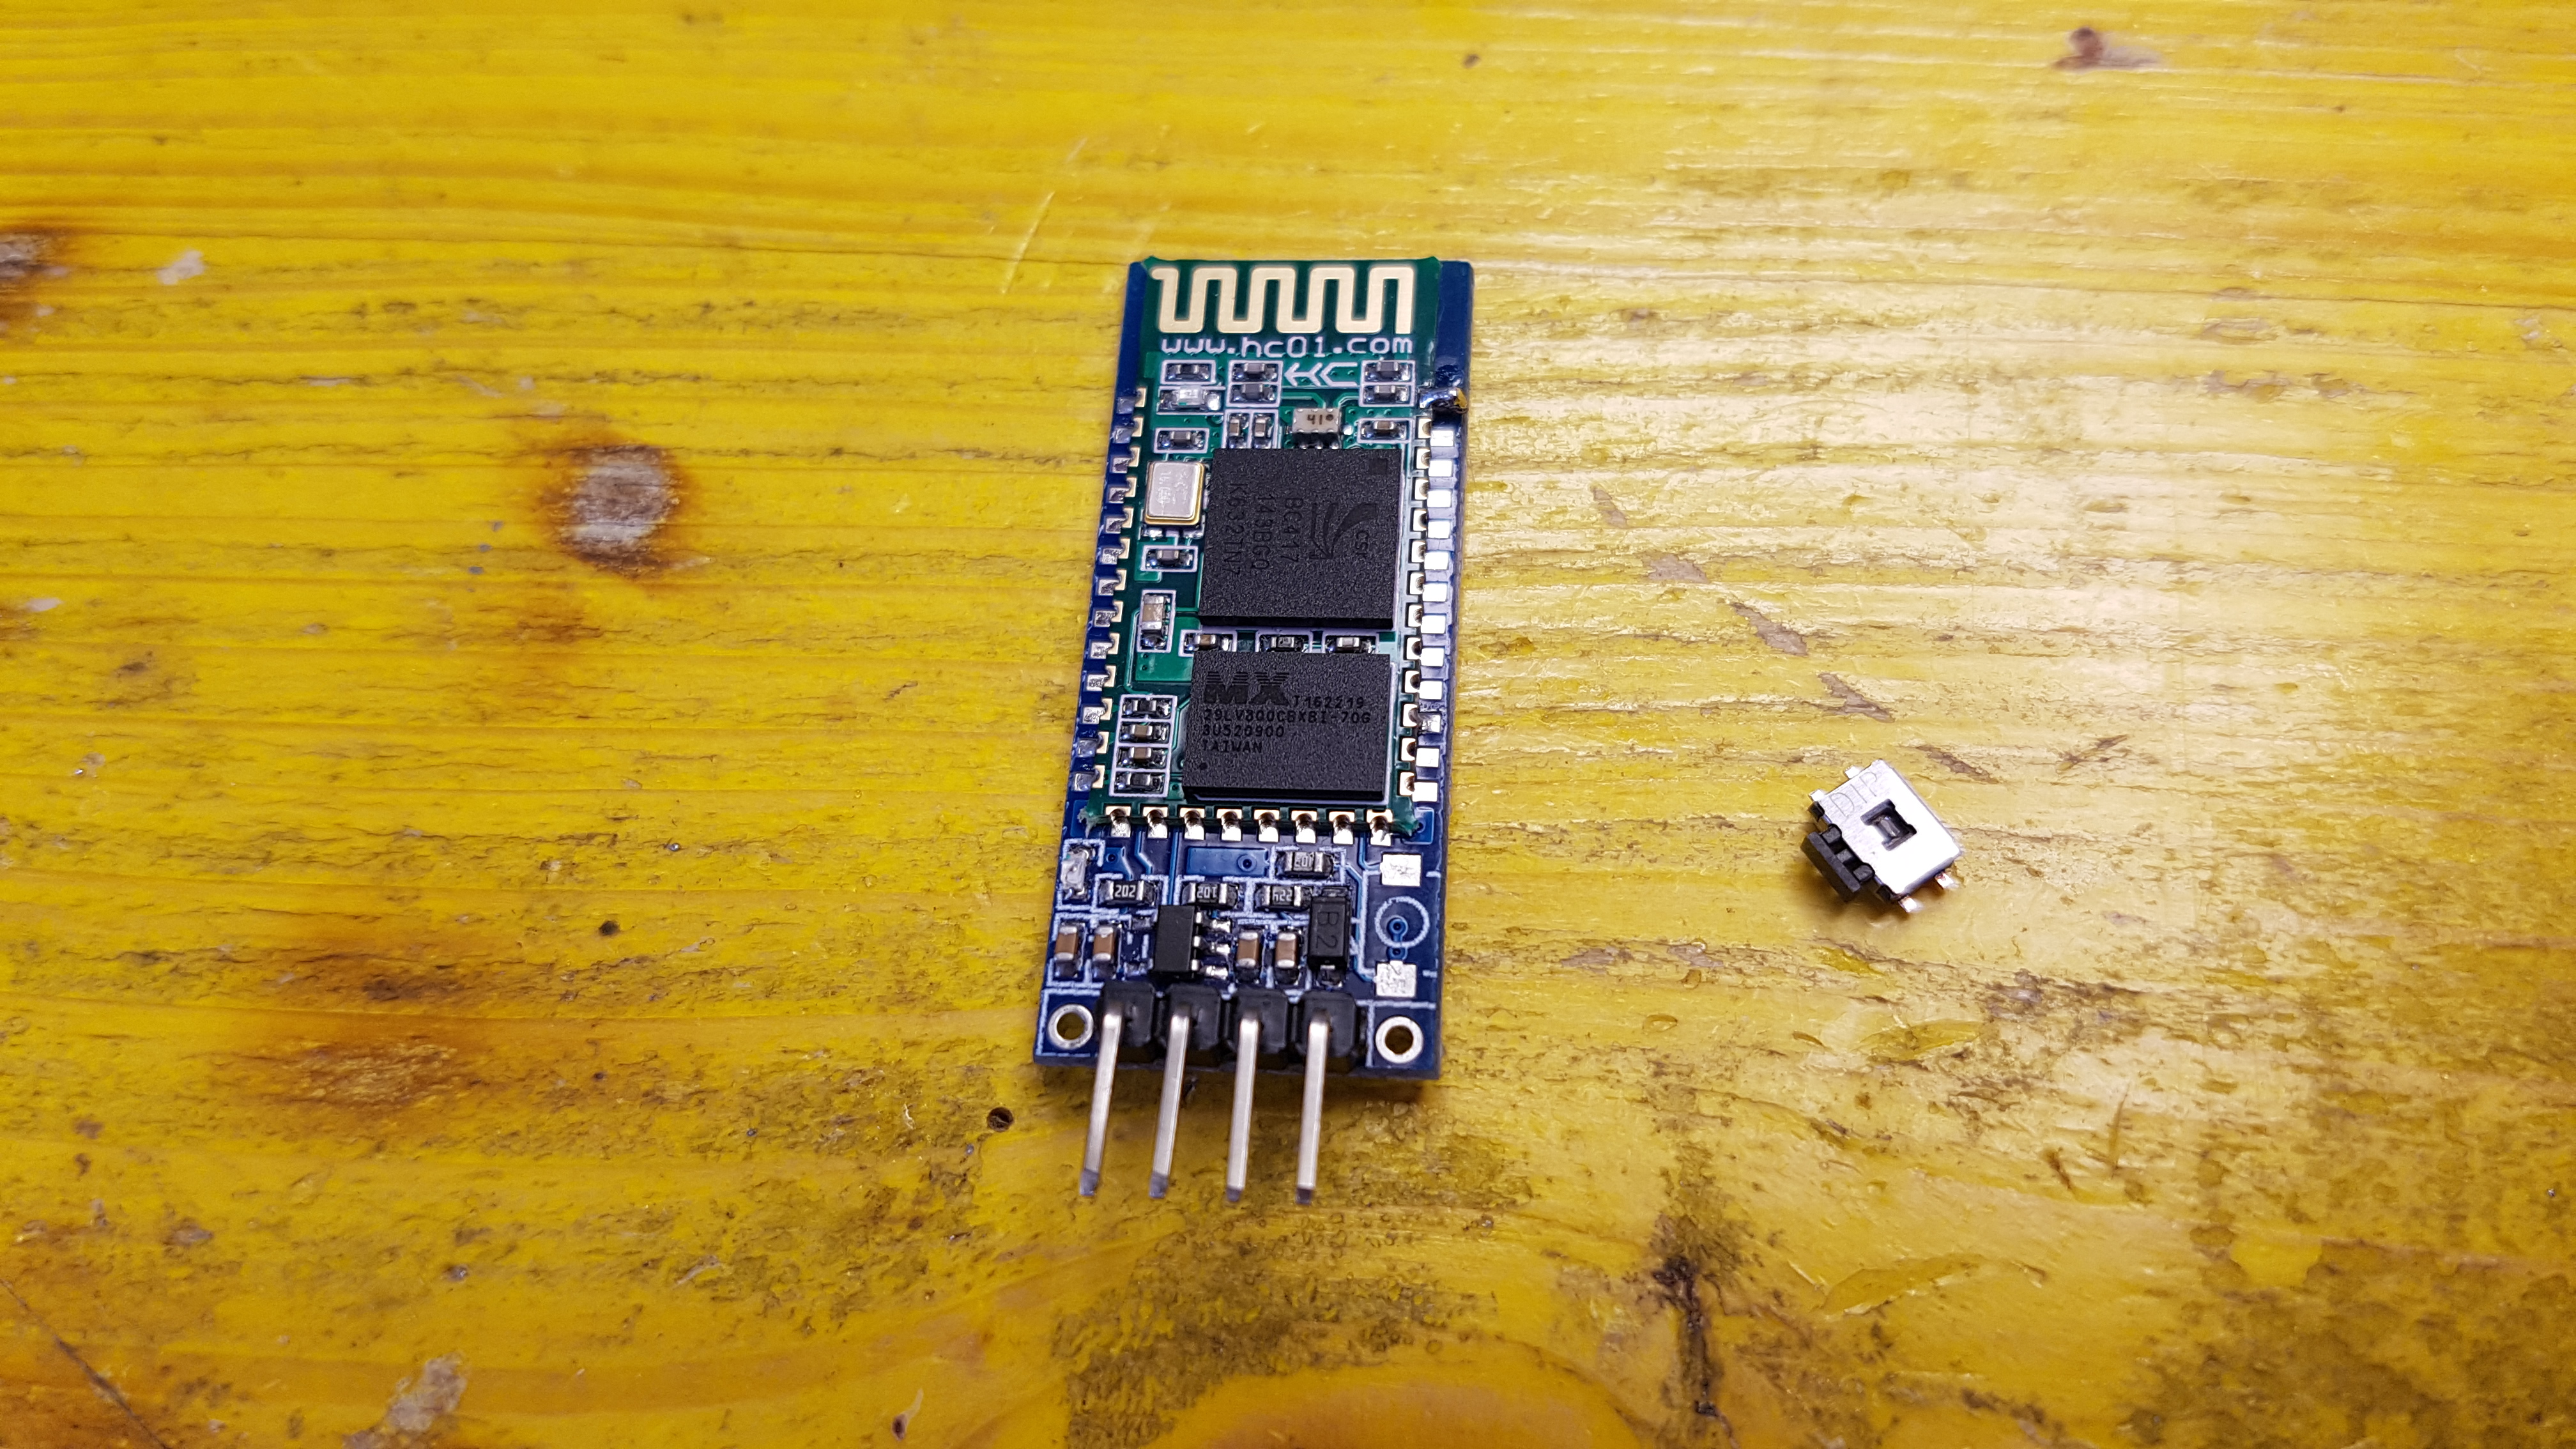
On HC-06 there is not the button, but you can soldering one on it and use for the AT-mode activation. When pressed, the button create a bridge between the pin 34 of bluetooth module and the 3,3V. I connected it to another Arduino with same schema of the HC05.


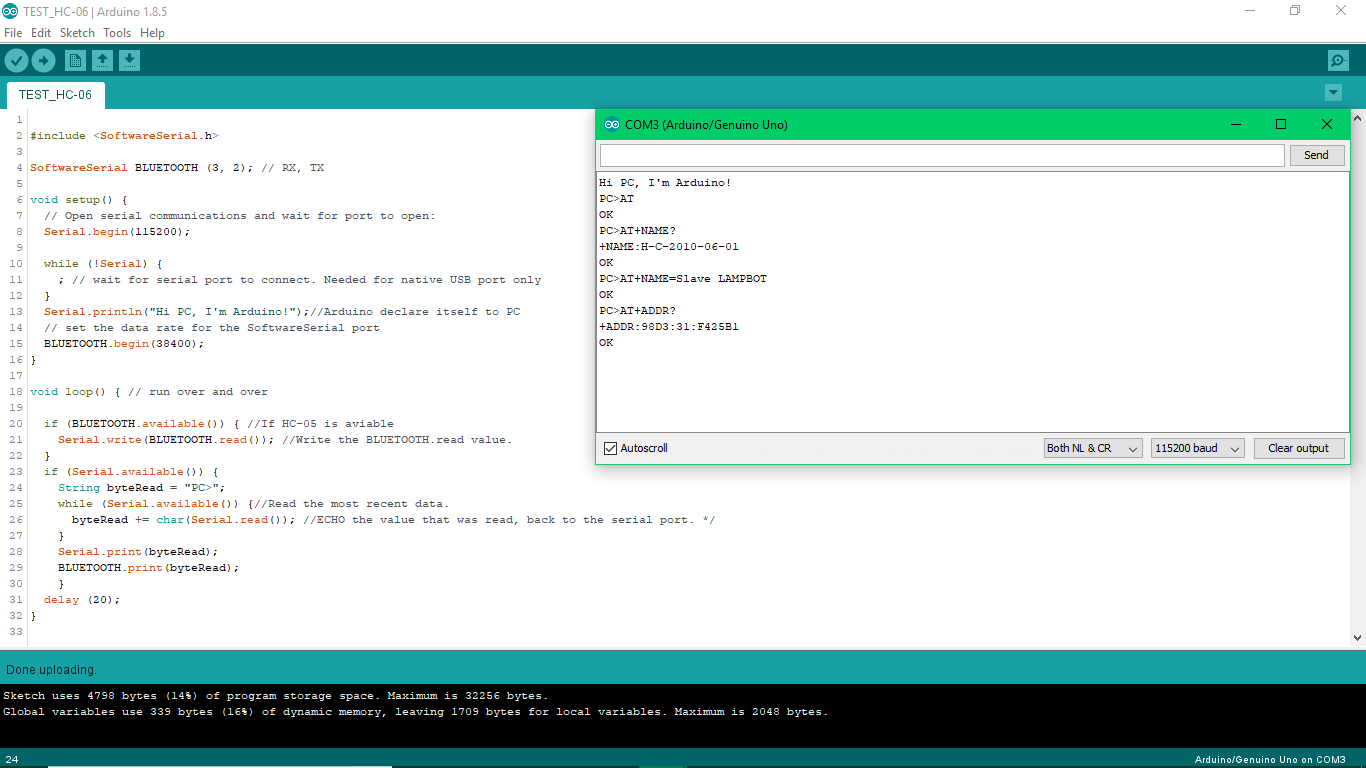
Once I was in AT-MODE, I create the following sketch to set the pin, test the serial connecton between Notebook, Arduino and Bluetooth. Also I launched on HC-06 the commands to test the AT mode status, set the name of device, and ask the address (rembering that HC-06 works with 9600 BaudRate). The AT-commands must be launced into serial monitor of IDE
Here the Arduino Sketch for the slave
      #include

      SoftwareSerial BLUETOOTH (3, 2); // RX, TX

      void setup() {
      // Open serial communications and wait for port to open:
      Serial.begin(115200);

      while (!Serial) {
      ; // wait for serial port to connect. Needed for native USB port only
      }
      Serial.println("Hi PC, I'm Arduino!");//Arduino declare itself to PC
      // set the data rate for the SoftwareSerial port
      BLUETOOTH.begin(38400);
      }

      void loop() { // run over and over

      if (BLUETOOTH.available()) { //If HC-05 is aviable
      Serial.write(BLUETOOTH.read()); //Write the BLUETOOTH.read value.
      }
      if (Serial.available()) {
      String byteRead = "PC>";
      while (Serial.available()) {//Read the most recent data.
      byteRead += char(Serial.read()); //ECHO the value that was read, back to the serial port. */
      }
      Serial.print(byteRead);
      BLUETOOTH.print(byteRead);
      }
      delay (20);
      }
And here the AT-commands I launched and the report of Bluetooth device
       PC>AT
       OK
       PC>AT+NAME?
       +NAME:H-C-2010-06-01
       OK
       PC>AT+NAME=Slave LAMPBOT
       OK
       PC>AT+ADDR?
       +ADDR:98D3:31:F425B1
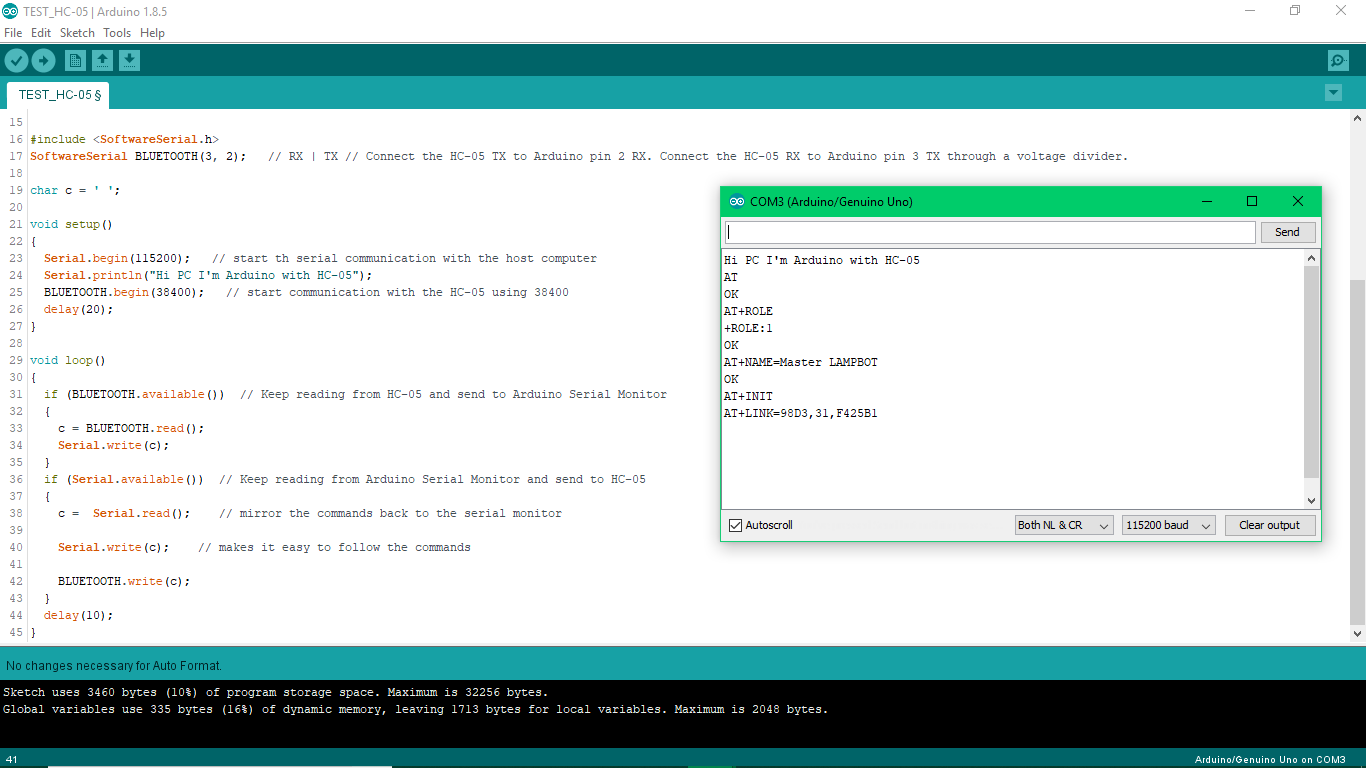
Now was the time of the master device HC-05. The sketch is similar to the one of HC-06, but now the AT-command I launched were different. I tested the AT mode Status, then I setted the role to as Master (to 1), I setted the name of device, I initialized it and then I force the connection only with the address of my Slave
Here the Arduino Sketch for the Master
      #include
      SoftwareSerial BLUETOOTH(3, 2);   // RX | TX // Connect the HC-05 TX to Arduino pin 2 RX. Connect the HC-05 RX to Arduino pin 3 TX through a voltage divider.

      char c = ' ';

      void setup()
      {
      Serial.begin(115200);   // start th serial communication with the host computer
      Serial.println("Hi PC I'm Arduino with HC-05");
      BLUETOOTH.begin(38400);   // start communication with the HC-05 using 38400
      delay(20);
      }

      void loop()
      {
      if (BLUETOOTH.available())  // Keep reading from HC-05 and send to Arduino Serial Monitor
      {
      c = BLUETOOTH.read();
      Serial.write(c);
      }
      if (Serial.available())  // Keep reading from Arduino Serial Monitor and send to HC-05
      {
      c =  Serial.read();    // mirror the commands back to the serial monitor

      Serial.write(c);    // makes it easy to follow the commands

      BLUETOOTH.write(c);
      }
      delay(10);
      }
And here the AT-commands I launched and the report of Bluetooth device
       AT
       OK
       AT+ROLE
       +ROLE:1
       OK
       AT+NAME=Master LAMPBOT
       OK
       AT+INIT
       AT+LINK=98D3,31,F425B1
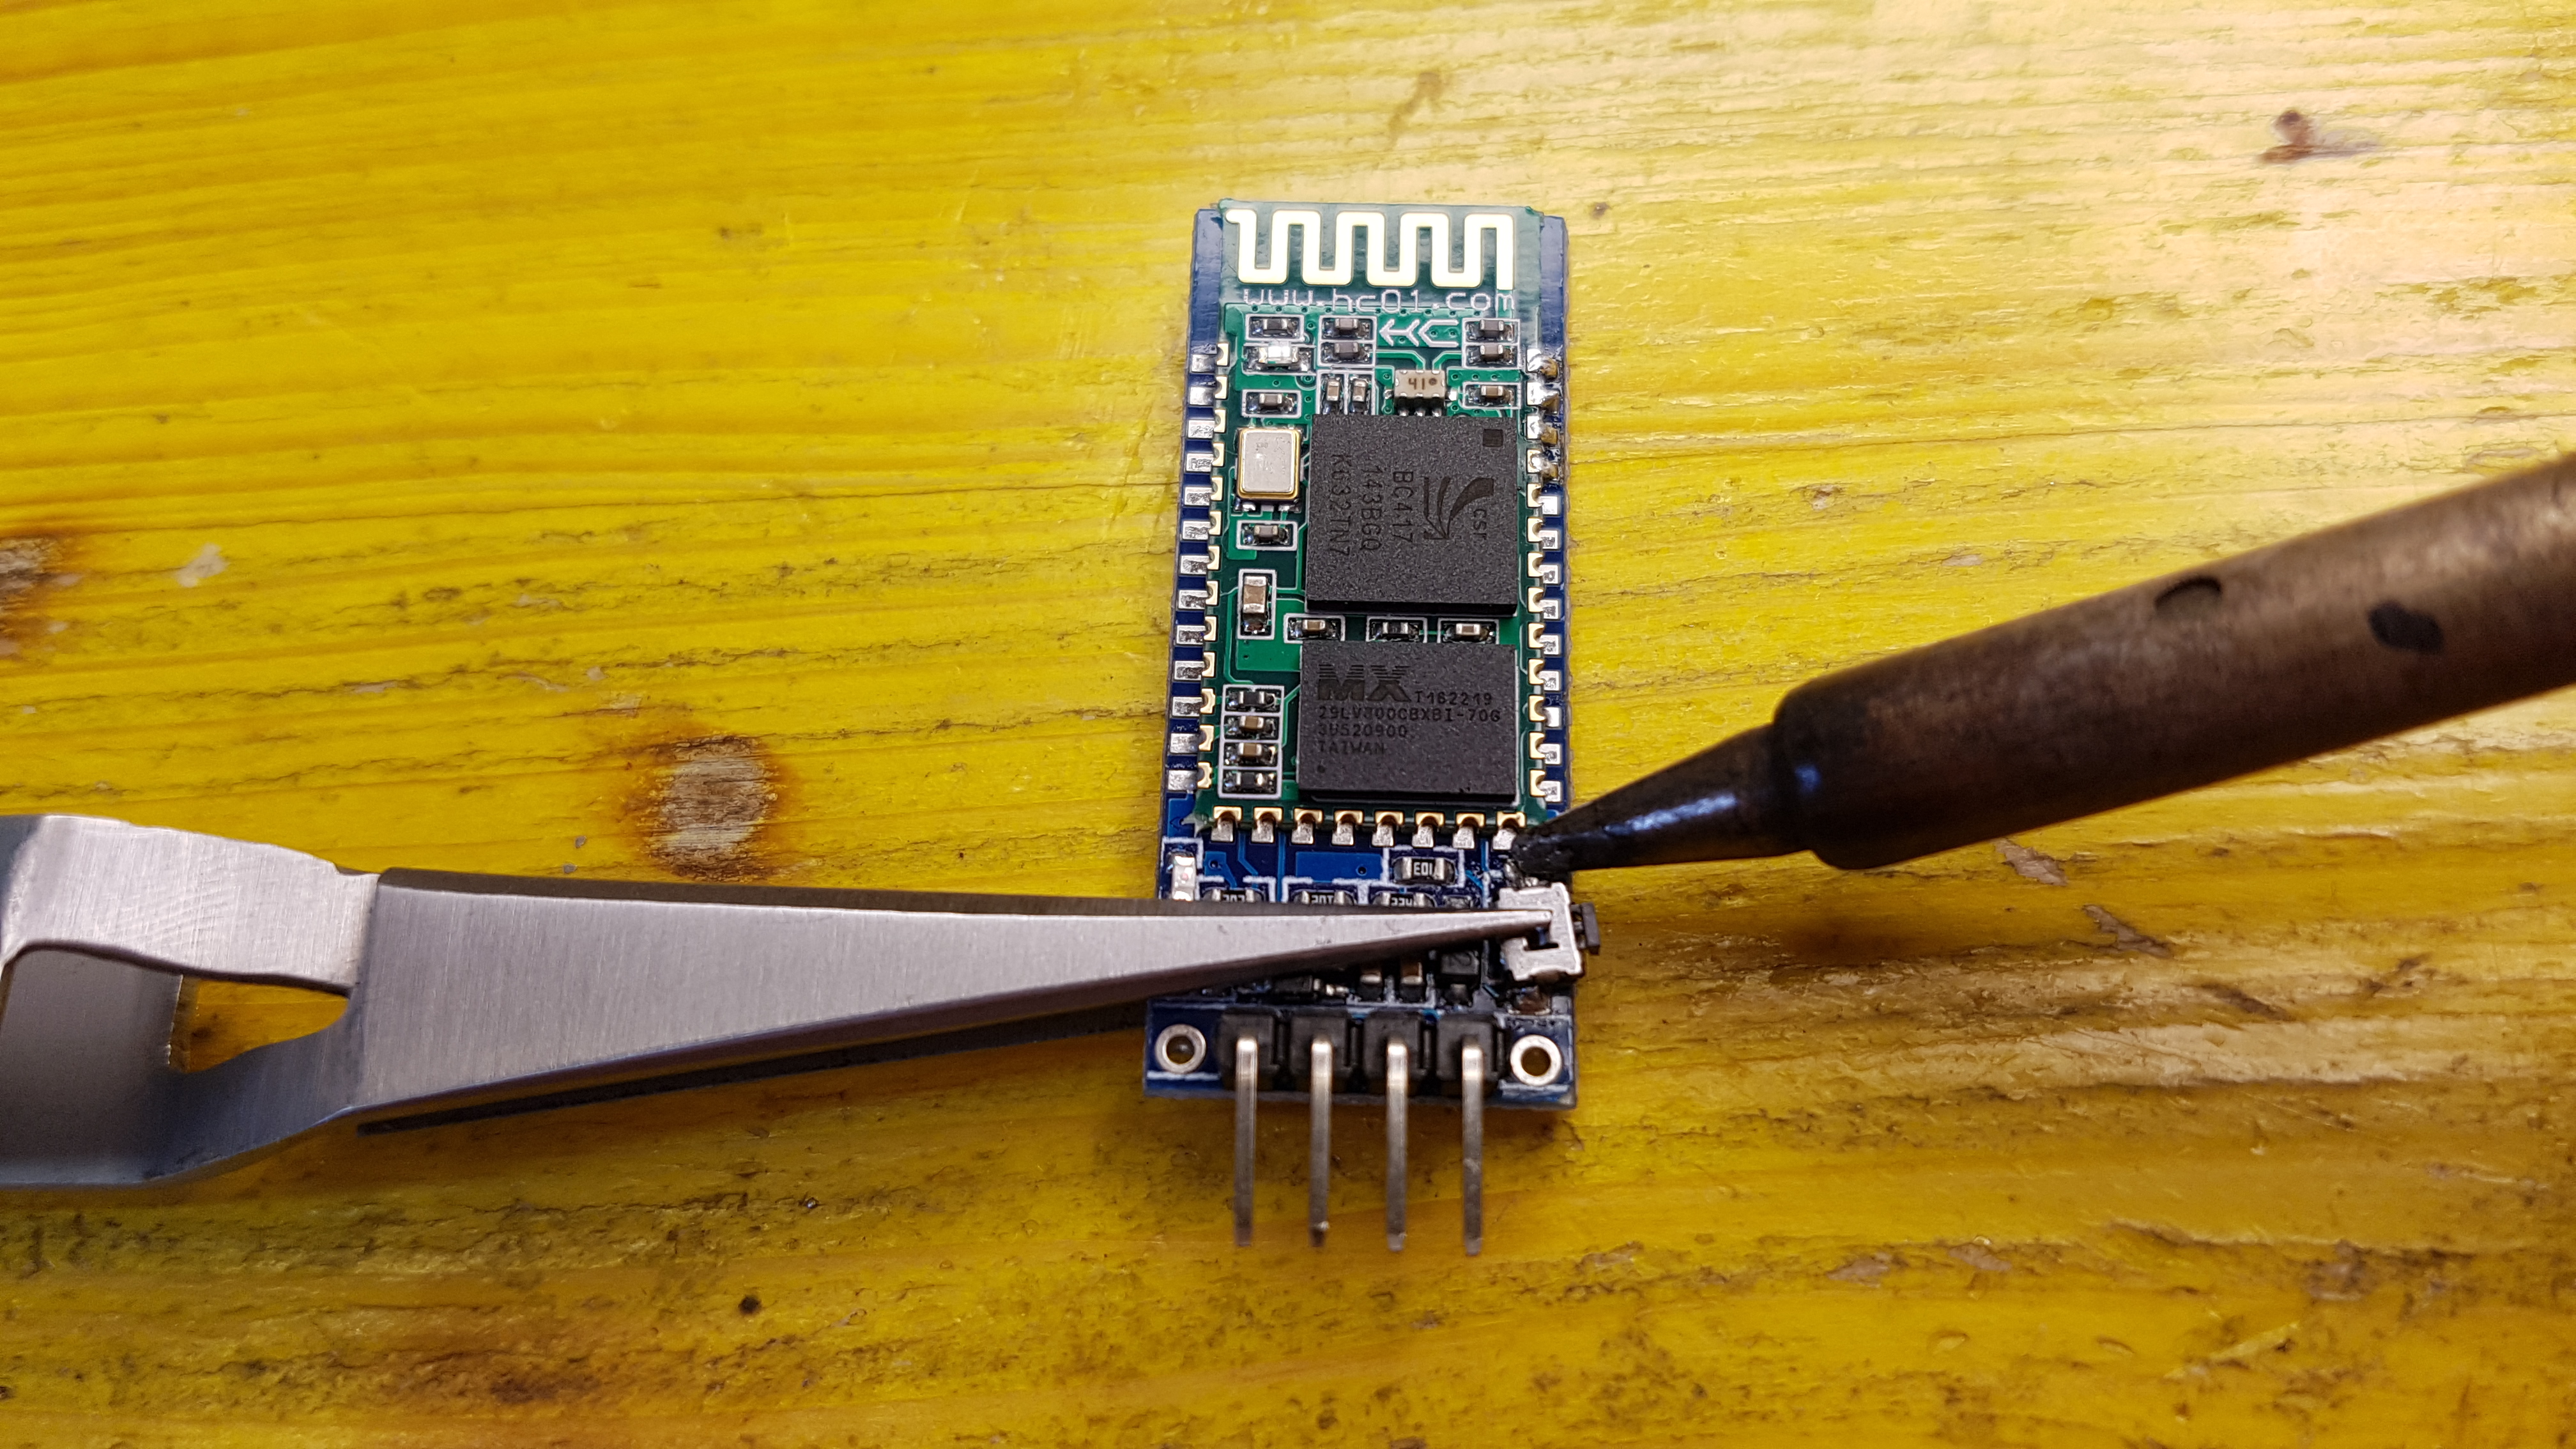
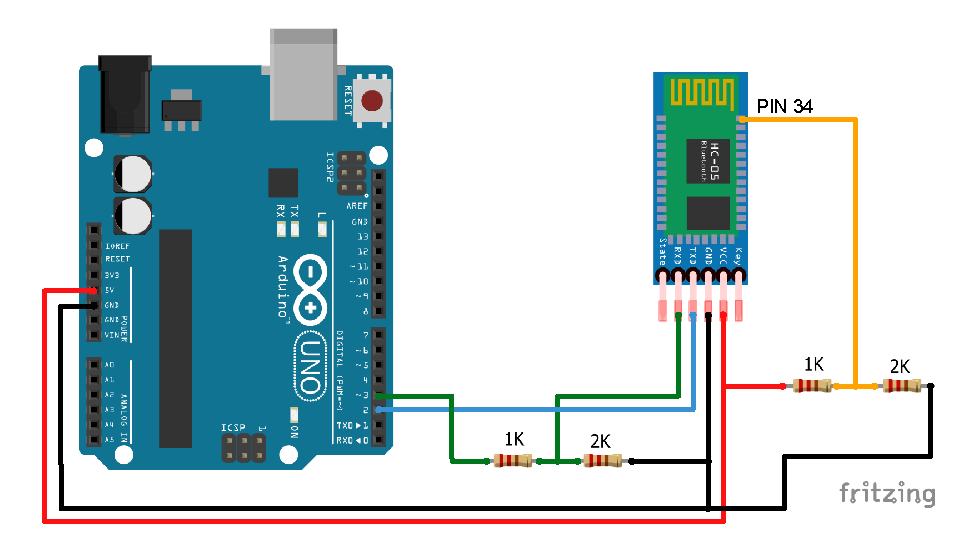
Now the two devices are perfectly associated. But when I powered off the master, the connection is losen and i must to return in AT mode to re-launch the AT+INIT and AT+LINK commands to re-associate. So I decided to make a modding on the master. I soldered a cable to 34 pin and through a voltage divider made with some resistors, i connected the port34 to the 3.3V, in this way the module read always the button pressed. Then I included in the sketch of the Master the AT command to automatically initialize and connect to the Slave with its address.
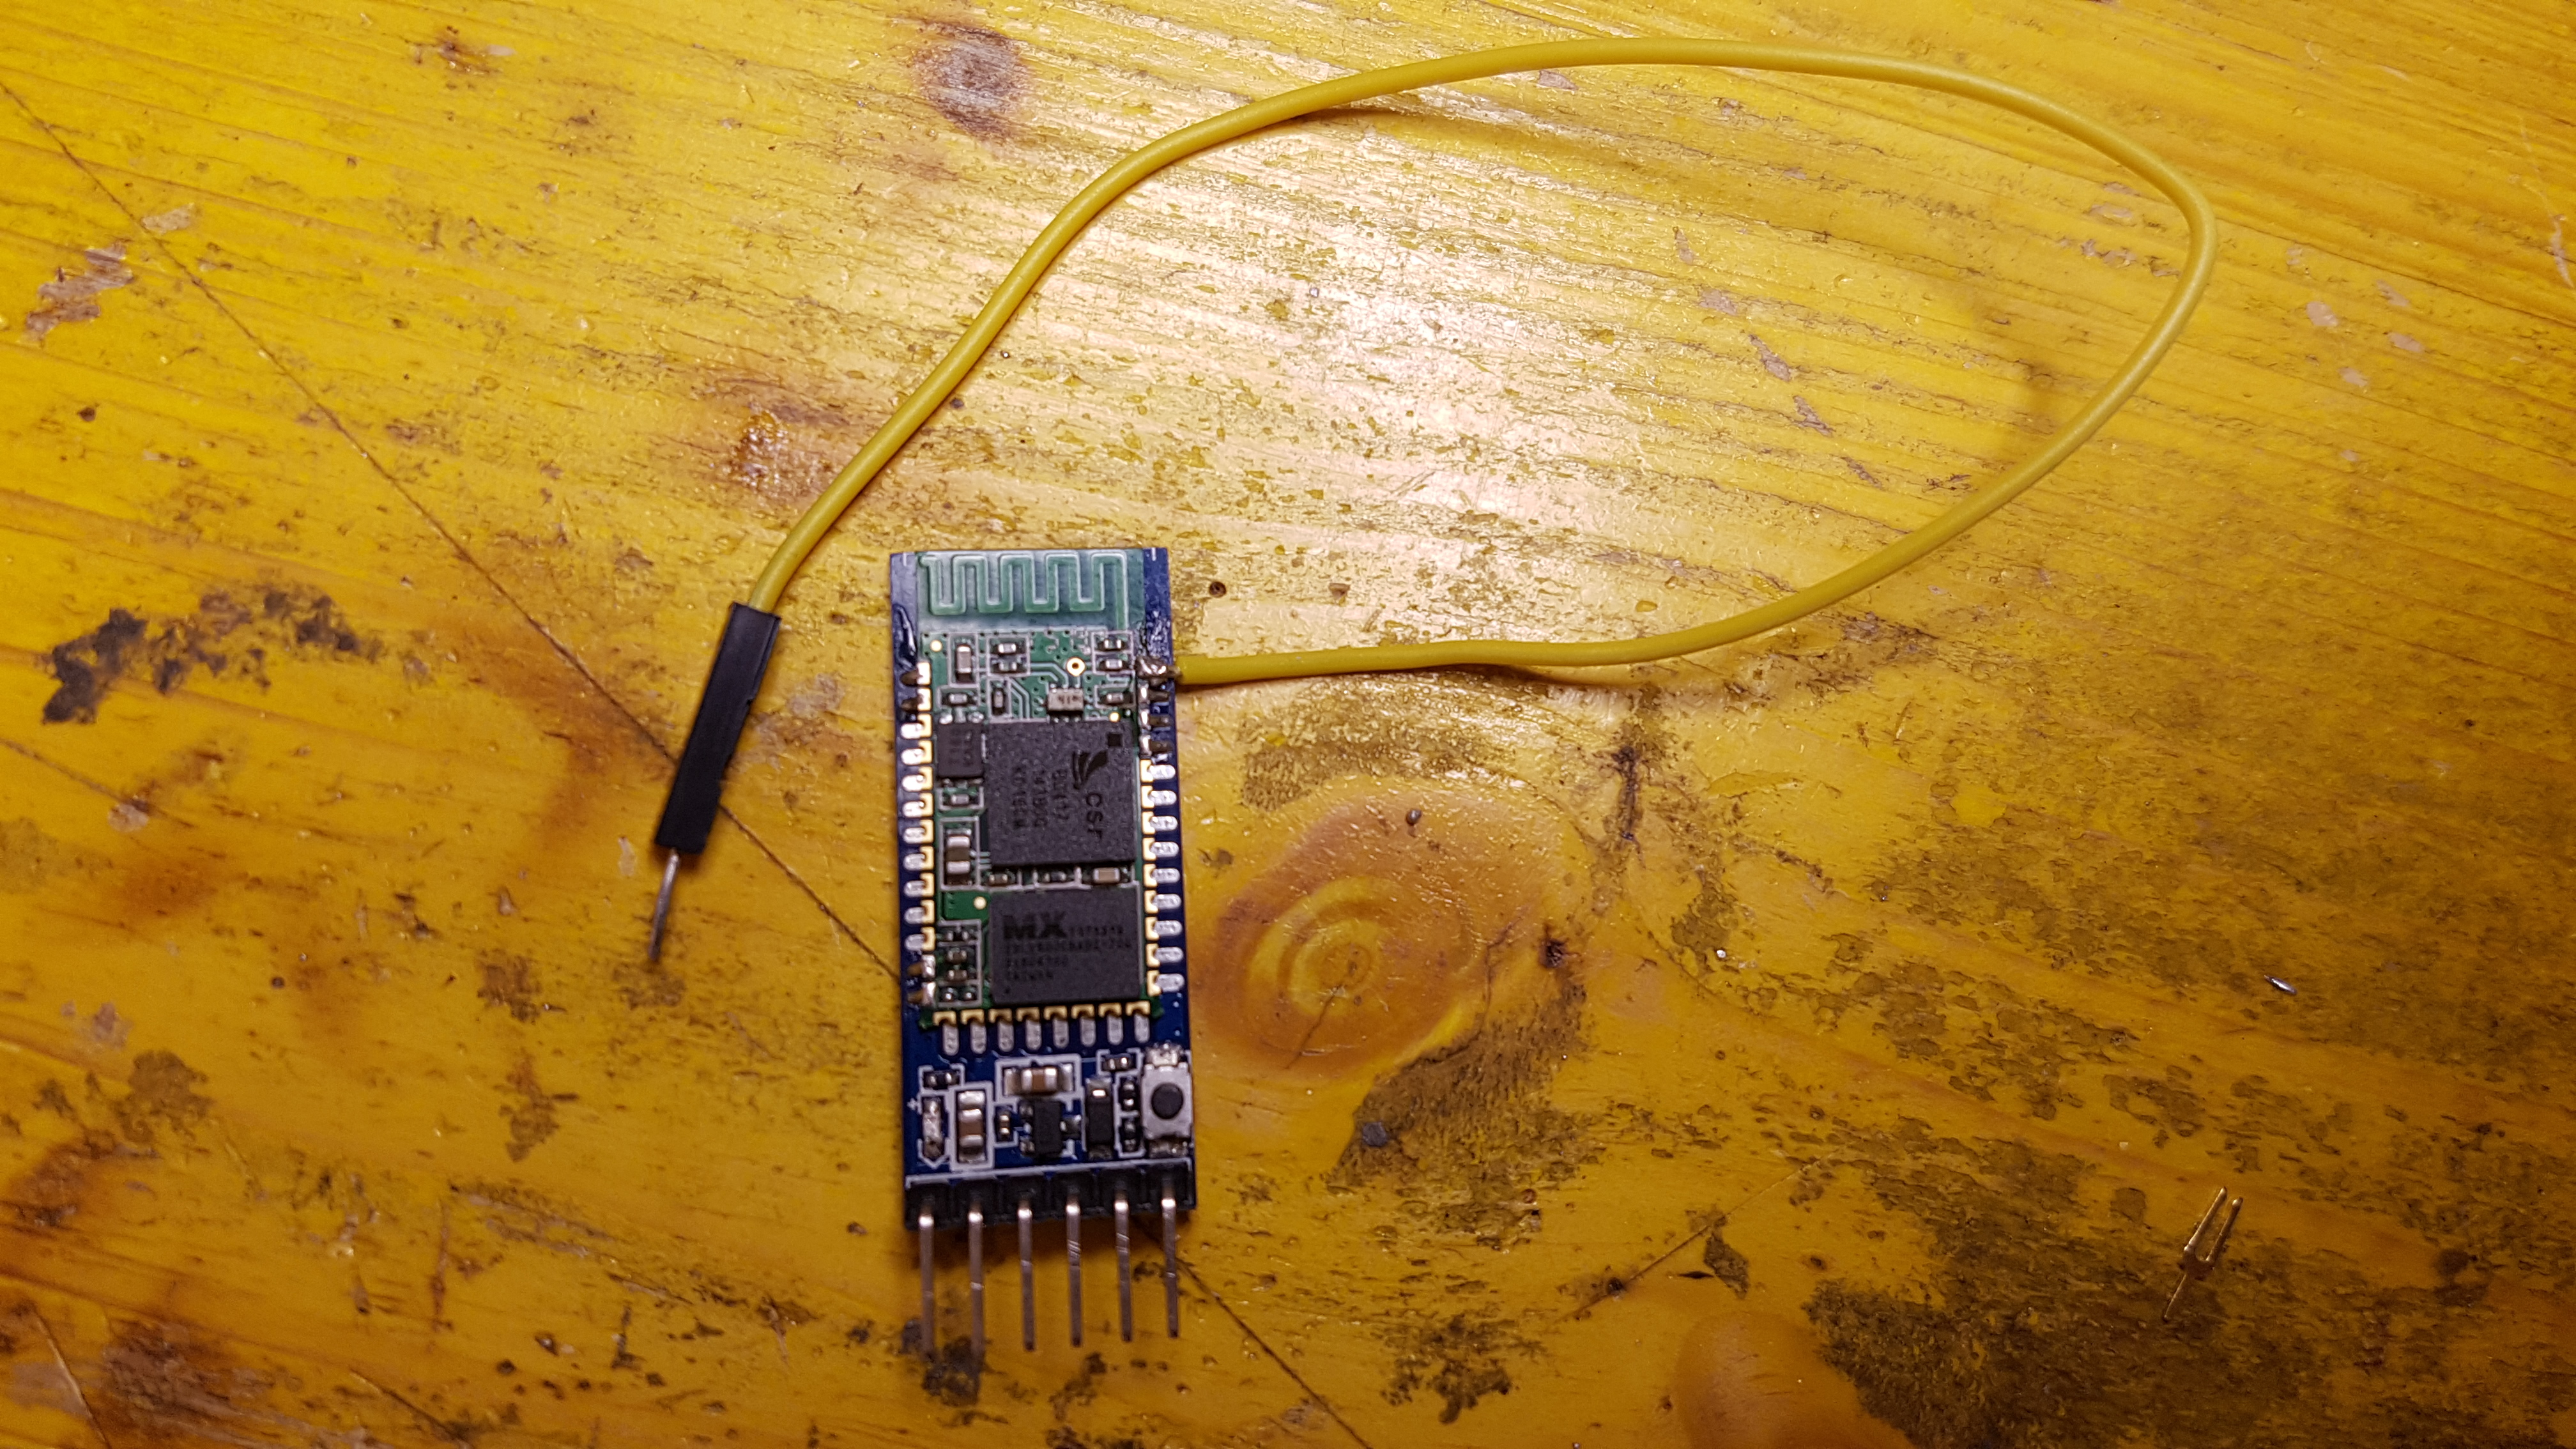
Here the new configuration of the board for the slave
And here the updated sketch of Arduino
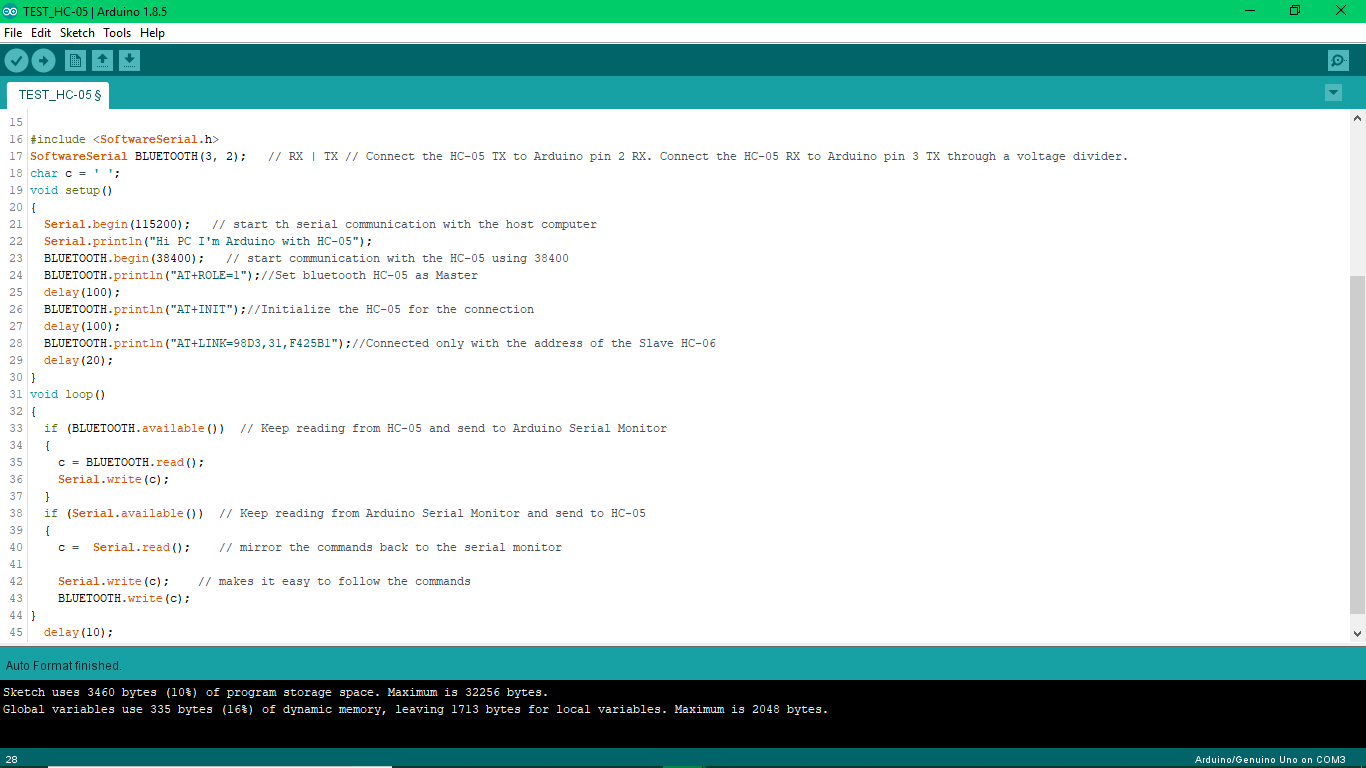
This is the updated sketch
      #include
      SoftwareSerial BLUETOOTH(3, 2);   // RX | TX // Connect the HC-05 TX to Arduino pin 2 RX. Connect the HC-05 RX to Arduino pin 3 TX through a voltage divider.

      char c = ' ';

      void setup()
      {
      Serial.begin(115200);   // start th serial communication with the host computer
      Serial.println("Hi PC I'm Arduino with HC-05");
      BLUETOOTH.begin(38400);   // start communication with the HC-05 using 38400
      BLUETOOTH.println("AT+ROLE=1");//Set bluetooth HC-05 as Master
      delay(100);
      BLUETOOTH.println("AT+INIT");//Initialize the HC-05 for the connection
      delay(100);
      BLUETOOTH.println("AT+LINK=98D3,31,F425B1");//Connected only with the address of the Slave HC-06
      delay(20);
      }

      void loop()
      {
      if (BLUETOOTH.available())  // Keep reading from HC-05 and send to Arduino Serial Monitor
      {
      c = BLUETOOTH.read();
      Serial.write(c);
      }
      if (Serial.available())  // Keep reading from Arduino Serial Monitor and send to HC-05
      {
      c =  Serial.read();    // mirror the commands back to the serial monitor

      Serial.write(c);    // makes it easy to follow the commands

      BLUETOOTH.write(c);
      }
      delay(10);
      }
Now the two devices can find very easy and in automatic.
Finally I've connected the slave on my board. I setted A2 and A1 for RX and TX and tryed again. It worked!!! .