Networking and Communication
Group Assignment
To transfer data between different micro controllers they need to be connected, either wired or wirelessly and have a shared communication protocol.
I2C
The advantage of the I2C protocol is that it lets us put multiple devices on the same 2 wires, keeping the other pins available for other uses. It can operate over 100 devices, such as sensors from just those 2 pins (plus a common ground, see below).
The disadvantage is that it is slow because of the number of calls and responses between the master and slaves, first to determine that the slave is ready to receive messages and then to ask for and receive the data. I2C is a good choice where speed isn't too important.
The 2 wires are called Serial Data and Serial Clock. The data transferred on the serial data wire is synchronised with the pulse on the serial clock. The relevant pins are marked SDA and SCL on Arduino boards and on many sensors capable of being used for I2C.
Pull Up Resistors
The pins on Arduino board can have 3 states - on off and floating. On and off depend on power being applied or turned off, floating is when the pin is picking up a small amount of background electricity and is generally oscillating at 60 hertz. Two pull up resistors are needed on the wires for I2C but the Arduino data sheets show that the boards have inbuilt pull up resistors so it wasn’t necessary to add them to the circuit.
The clocks must be set to the same speed. This is called baud rate and is commonly set at 9600 bps (bits per second)
Set Up
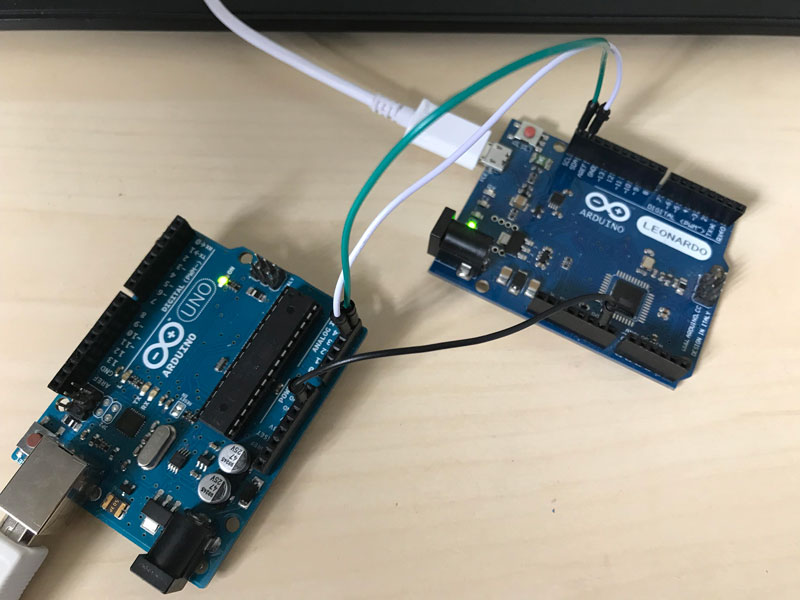
I put a Seeed base shield on top of the Uno board to plug I2C sensors into later, but started with a blink sketch to establish if the setup was working. Following the schematic for each board, I attached SDA and SCL wires between the Uno and the Leonardo, power wires from 5V to 5V pins and created a common ground. Then I plugged both boards into my computer to download Luiz Bueno's master sketch to the Leonardo and his slave sketch to the Uno.
To test the connection I opened the serial monitor (found in the Tools drop down menu on Arduino or the icon at the top right hand side of the sketch ), typed a number and Return into the bar at the top a few times and watched for onboard lights going on and off.
The master worked as expected, with the LED at the end of the board going on for 1, off for 2 etc, but the light at the end of the Uno didn’t do anything. I later realised, that unlike the Leonardo, the LED for pin 13 is in the middle of the Uno board, and I didn’t see it work because it was hidden by the shield.
In the meantime, my attempt to fix something that wasn’t broken, made matters worse. I watched tutorial videos to see what I was doing wrong, tried using TX and RX pins instead of Data and Clock, and replaced the jumper wires in case they were the problem. I noticed the Uno was getting hot, so I disconnected the power and ground wires from the boards and gave the Uno a separate power supply. It was probably getting hot because I left it plugged into my computer after downloading the sketch, but disconnecting the ground from the boards meant everything else I tried wouldn’t work.
I eventually found that a common ground is essential by reading about the wire.h library in the Arduino resources.

Having returned to the original configuration, without the shield, it worked, as shown above. So I repeated the same set up with my own boards and an LED on pin A0 and altered the code so that typing A - D does the following:
- A gets the slave LED on A0 to blink 4 times
- B turns the on board LED on the master (pin 13) and the slave LED on A0 off
- C turns both the above LED's on
- D turns the slave LED off
The video below shows it working:
Master Code
// Adapted from Luiz's Bueno's code

#include <Wire.h>

void setup() {
Serial.begin(9600);
Wire.begin();
}

void loop() {
  while(Serial.available())

{char c = Serial.read();

  if(c == 'a')
  { Wire.beginTransmission(5);
    Wire.write('H');
    Wire.endTransmission();
    digitalWrite(13, HIGH);
        }
  else if(c == 'b')
  { Wire.beginTransmission(5);
    Wire.write('L');
    Wire.endTransmission();
     digitalWrite(13, LOW);
    }

     if(c == 'c')
  { Wire.beginTransmission(5);
    Wire.write('S');
    Wire.endTransmission();
     digitalWrite(13, HIGH);         }

  else if(c == 'd')
  { Wire.beginTransmission(5);
    Wire.write('T');
    Wire.endTransmission();
     digitalWrite(13, LOW);
    }
}}
Slave 1 Code
// Adapted from Luiz's Bueno's code

#include <Wire.h>

void setup() {
 Wire.begin(5);
 Wire.onReceive(receiveEvent);
 pinMode(13, OUTPUT);
 digitalWrite(13,LOW);
 pinMode(A0, OUTPUT);
}

void loop() {
 }
 void receiveEvent (int howMany)
 {
  while(Wire.available())
  {
    char c = Wire.read();
  if(c == 'H')
  {digitalWrite(13, HIGH);
  digitalWrite(A0, HIGH);
  delay(50000);
  digitalWrite(A0, LOW);
  delay(50000);
  digitalWrite(A0, HIGH);
  delay(50000);
  digitalWrite(A0, LOW);
  delay(50000);
  digitalWrite(A0, HIGH);
  delay(50000);
  digitalWrite(A0, LOW);
  delay(50000);
  digitalWrite(A0, HIGH);
  delay(50000);
   }

  else if(c == 'L')
    {
      digitalWrite(13, LOW);
      digitalWrite(A0, LOW);
    }
  else if(c == 'S')
    {
      digitalWrite(A0, HIGH);
    }
   else if(c == 'T')
   {
      digitalWrite(A0, LOW);
    }
  }
 }