Project Management
The assignment this week was to build a personal website as a document of progress on this course and learn to use GitHub to upload the website to the class archive.
I previously built my own website using WordPress, but this exercise stretched me to learn more HTML.
I installed the GitHub app and created an account using:
git config --global user.name "userName"git config --global user.email "myemail@email.com"I inputted the text using Brackets because it is open source. I found it less intuitive to use than WordPress, which I prefer. So I took a time management decision not to choose a theme and fancy layout for this website as they are not necessary for a record of learning. Instead I have used a template by Massimo Menichinelli, which is available to download from here. This will give me time to pursue a personal objective of creating some Instructables and YouTube videos to share my learning and creative ideas with a wider audience. (I only became an official student at a later date and was too far behind to revisit that decision. I would have done more thorough documentation if I had become an official student earlier)
https://drive.google.com/drive/folders/1X6cijs5TWDE3sKdKnCSRwvYfcuAvfDPAUpdate: I produced Instructables for:
HTML (HyperText Formatting Language) is a set of standard succinct terms for formatting and displaying information on the Internet.
Features and terms I found useful:
- Links: <a href="http://fab.academany.org/2018/labs/fablabbrighton/students/poppy-mosbacher/index.html">Example Link</a>
- Images: <img src="media/images/project_management/greater_less_than_code.jpg" class="image1" alt="Git Push">
- Paragraphs: <p></p>
- Titles of varying sizes: <h1></h1> <h2></h2> <h3><h3> <h4></h4>

I had an issue where arduino code using greater and less than symbols wouldn't show up on the website, (as shown above) because the website software, brackets, will have recognised it as html code. The solution was to replace the symbols with the following characters without gaps & l t ; and & g t ; (I have to put gaps in here otherwise Brackets will convert it into a greater or less than symbol)
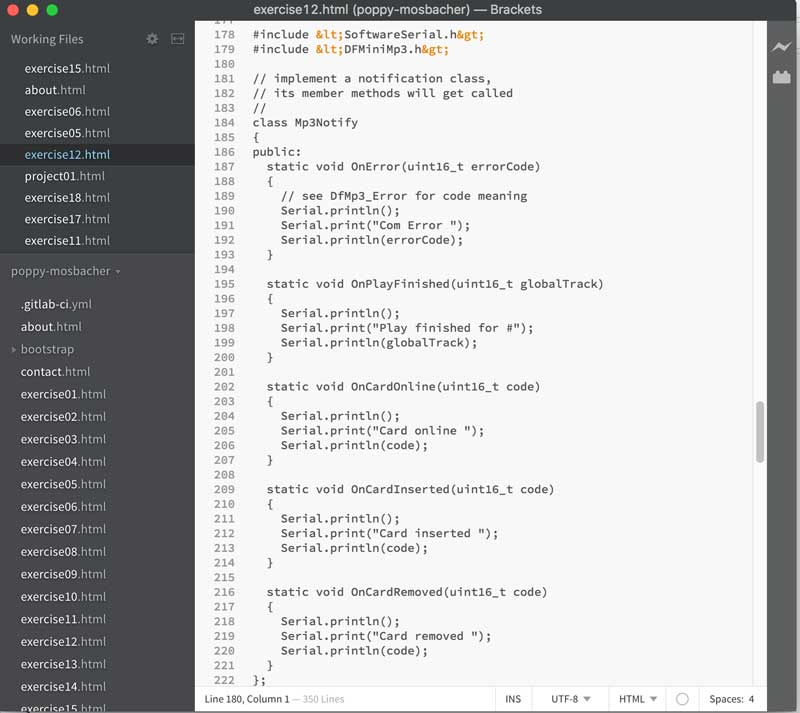
This solved the problem on website, as shown below:

A list with more characters and the html solutions are available here
CSS (Cascading Style Sheets) has been added to HTML to give more control over how web pages are displayed. I used it to resize the images:
.image1 {
    width: 60%;
    height: auto;
}

.image2 {
    width: 40%;
    height: auto;
}
<link rel="stylesheet" type="text/css" href="main.css">class="image1"class="image2"Uploading to the Class Archive
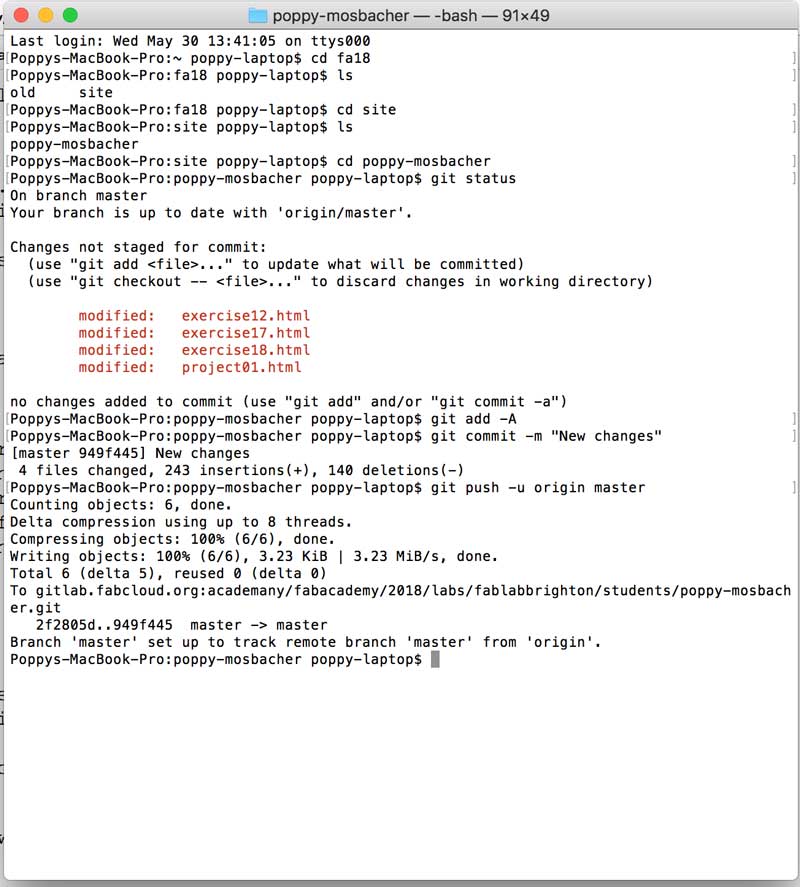
These are the steps I used on a Mac computer:
- Open Terminal
- Go to the relevant folder, by using the cd command. E.g. for my site:
- Then:
- To check it worked:
cd fa18cd sitecd poppy-mosbachergit add -Agit commit -m "Write a description of changes here"git push -u origin mastergit statusA useful command is
ls