PCB: Printed Circuit Board
Boards made out of a series of components that give certain capabilities to the computer. There is a central components that it’s a processor (like a mini-computer), and then many other components around it that can be arranged and chosen depending on the required needs of the computer you are building.
They are standardised components, which make the price cheaper and easier to build up onto.
Comercial electronics don’t look like this because all the components of the PCB have been arranged and integrated together, since they will produce millions of units and that makes it cheaper to produce (and smaller?).
characterize the specifications of your PCB production process (group assignment)
We started out by...

text... Lorem ipsum dolor sit amet, consectetur adipiscing elit. Aenean sodales imperdiet tincidunt. Fusce tempor ex quis diam dapibus rutrum. Nunc laoreet imperdiet mauris. Maecenas efficitur diam sit amet libero venenatis bibendum. Fusce sed ullamcorper nibh. Quisque ac leo sit amet nulla gravida ultrices. Nullam nulla nisl, ultrices vel justo eget, sodales ultricies metus. Vestibulum fringilla et ex quis ornare. Praesent at lectus nulla. Vestibulum ante ipsum primis in faucibus orci luctus et ultrices posuere cubilia Curae; Vivamus posuere convallis neque, nec pretium ligula tincidunt nec. Quisque laoreet fermentum nulla in congue. Morbi vulputate gravida elementum.
text... Lorem ipsum dolor sit amet, consectetur adipiscing elit. Aenean sodales imperdiet tincidunt. Fusce tempor ex quis diam dapibus rutrum. Nunc laoreet imperdiet mauris. Maecenas efficitur diam sit amet libero venenatis bibendum. Fusce sed ullamcorper nibh. Quisque ac leo sit amet nulla gravida ultrices. Nullam nulla nisl, ultrices vel justo eget, sodales ultricies metus. Vestibulum fringilla et ex quis ornare. Praesent at lectus nulla. Vestibulum ante ipsum primis in faucibus orci luctus et ultrices posuere cubilia Curae; Vivamus posuere convallis neque, nec pretium ligula tincidunt nec. Quisque laoreet fermentum nulla in congue. Morbi vulputate gravida elementum.
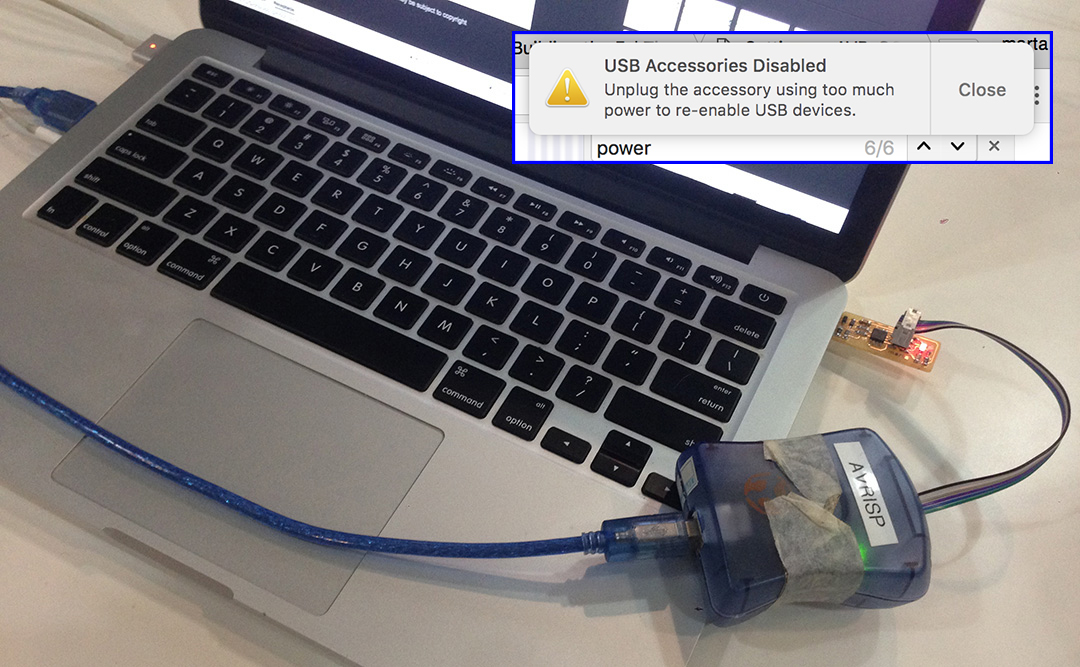
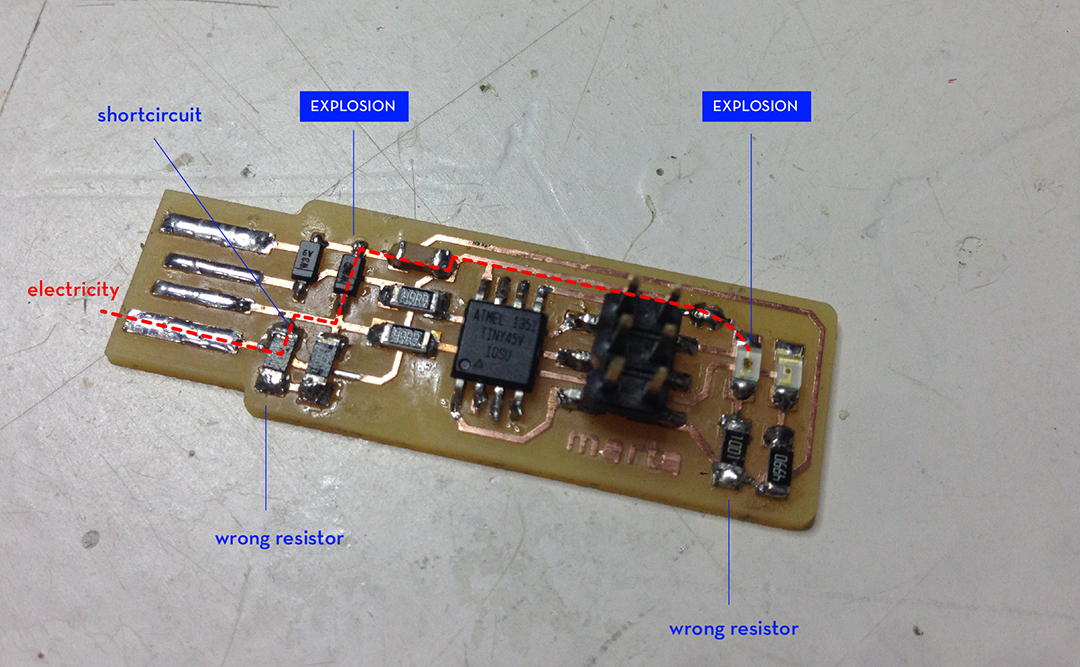
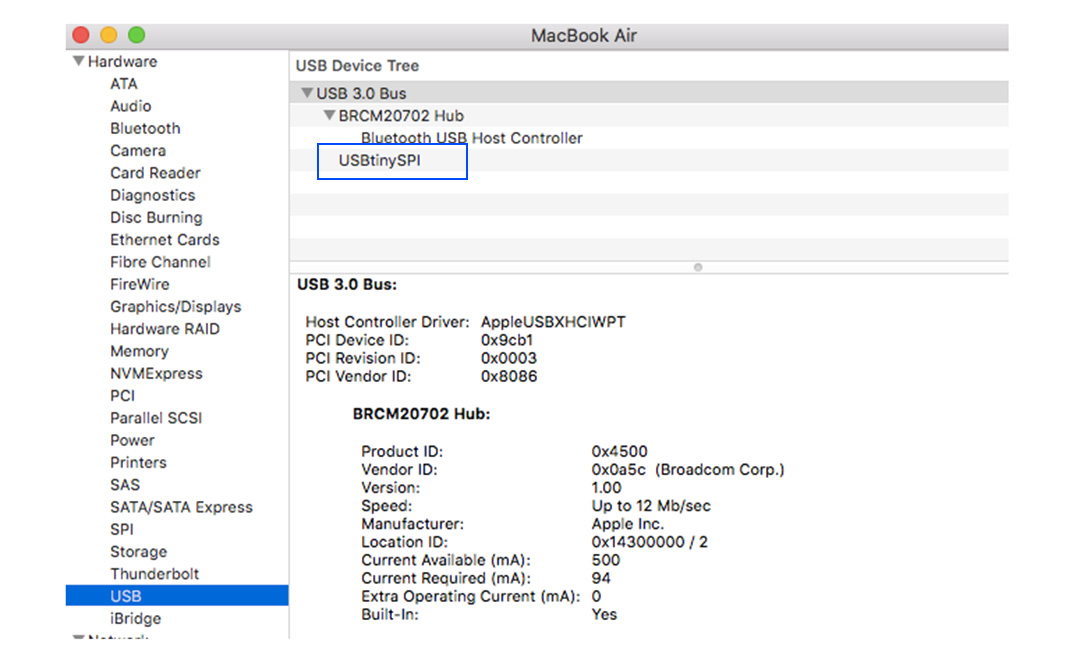
Mistakes and what I learned... Lorem ipsum dolor sit amet, consectetur adipiscing elit. Aenean sodales imperdiet tincidunt. Fusce tempor ex quis diam dapibus rutrum. Nunc laoreet imperdiet mauris. Maecenas efficitur diam sit amet libero venenatis bibendum. Fusce sed ullamcorper nibh. Quisque ac leo sit amet nulla gravida ultrices. Nullam nulla nisl, ultrices vel justo eget, sodales ultricies metus. Vestibulum fringilla et ex quis ornare. Praesent at lectus nulla. Vestibulum ante ipsum primis in faucibus orci luctus et ultrices posuere cubilia Curae; Vivamus posuere convallis neque, nec pretium ligula tincidunt nec. Quisque laoreet fermentum nulla in congue. Morbi vulputa elementum.
Files:
ruler interior(.png)
ruler outline(.png)
ruler interior mill parameters(.rml)
ruler outline mill parameters(.rml)
make an in-circuit programmer by milling the PCB, then optionally trying other processes
I decided to make the Brian PCB.
Once I downloaded the tracing and cutting files I did the following steps to mill:
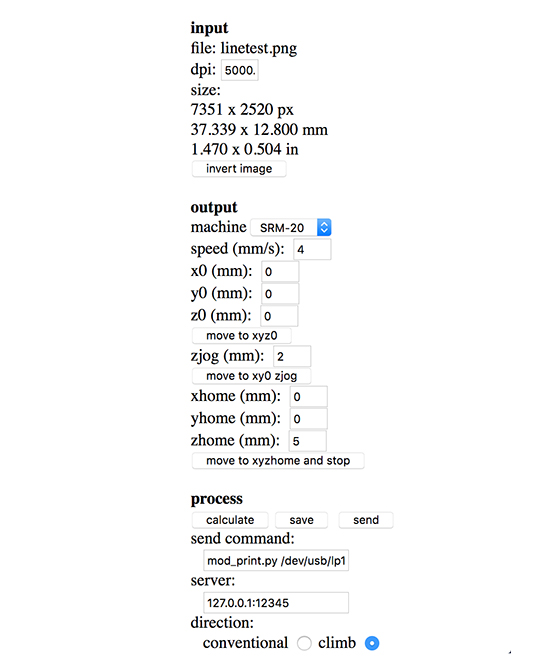
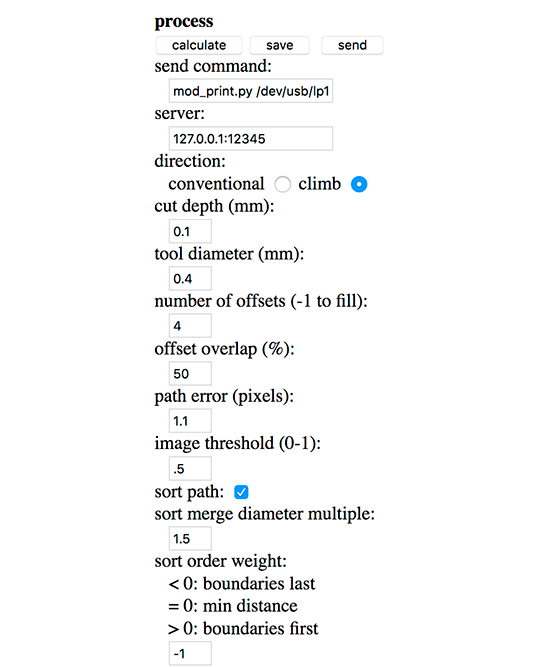
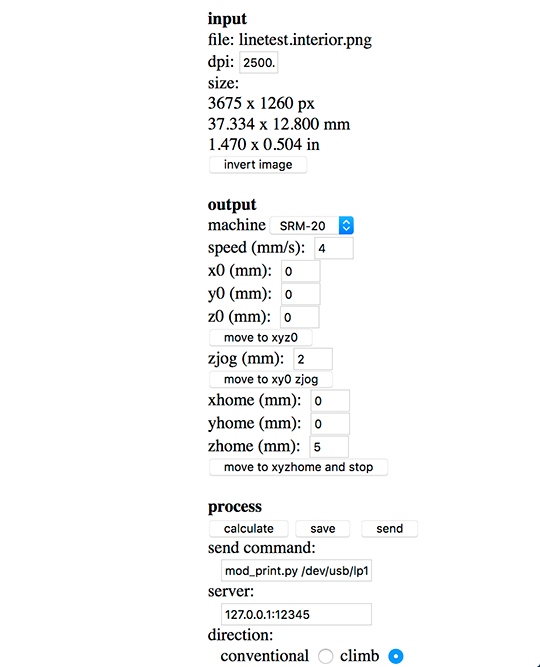
To preapre the file:
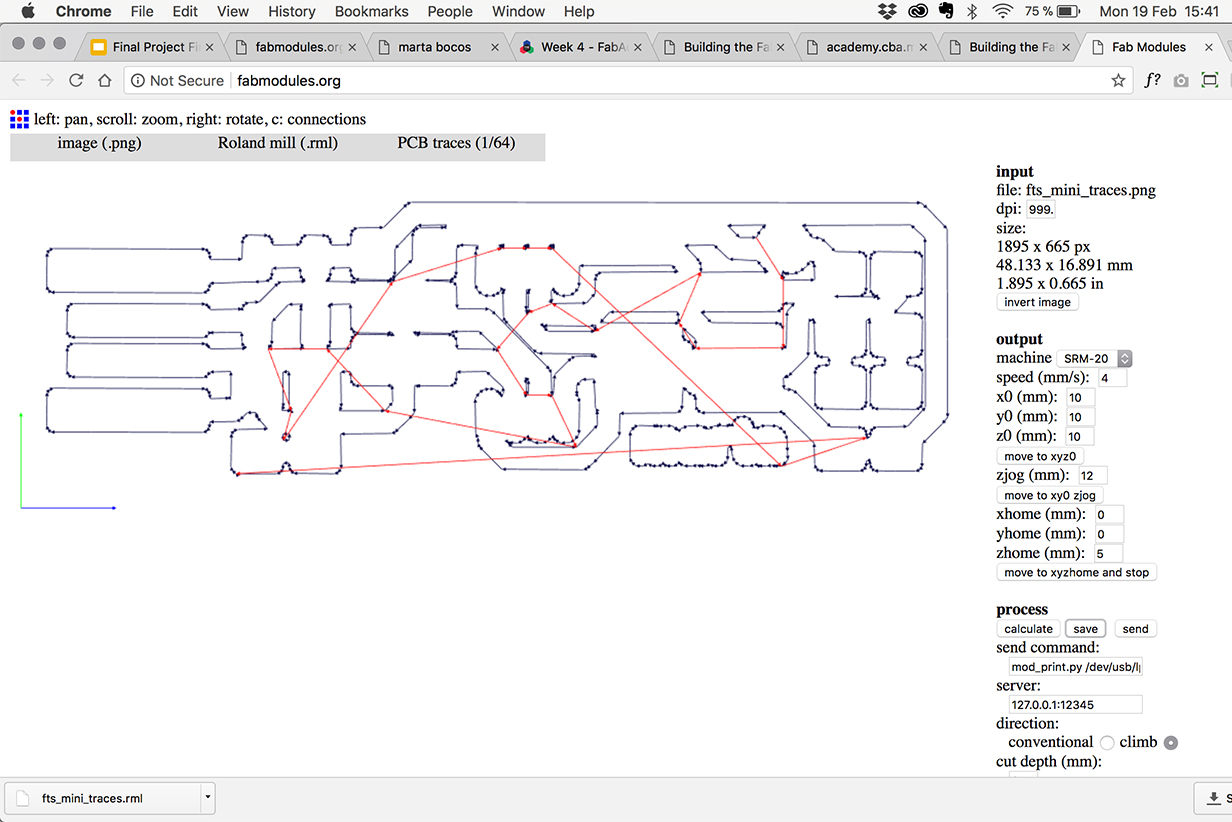
- Go to http://fabmodules.org/
- Choose Input Format> and import the file.
- Choose the printer (Output Format)> For Fab Lab BCN : Roland Mill
- Choose PCB Traces > For Fab Lab BCN : 1/64 for tracing or 1/32 for cutting
- Choose Output Machine> SRM (in my case)
- Change preset parameters> For Fab Lab BCN : Tracing and Cutting Output: Change xhome, yhome and zhome to 0, 0 and 5, respectively.
- For Tracing: the number of offsets to 4, but if you have time and want to set it to -1 it will clear all the space between the offsets resulting into a clean board. (leave rest as it is)
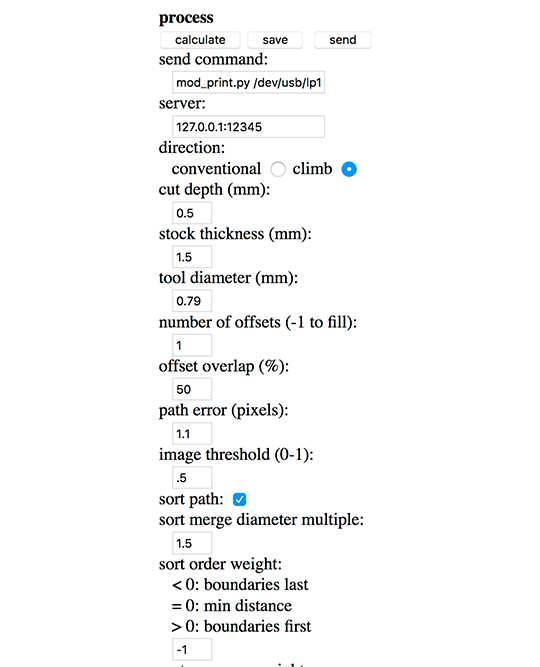
For the Cutting: Change Cut depth to 0.5, the stock thickness to 1.5 mm, the tool diameter to 0.79 and the number of offsets to 1. (leave rest as it is)
- Press Calculate and save the .rml file.
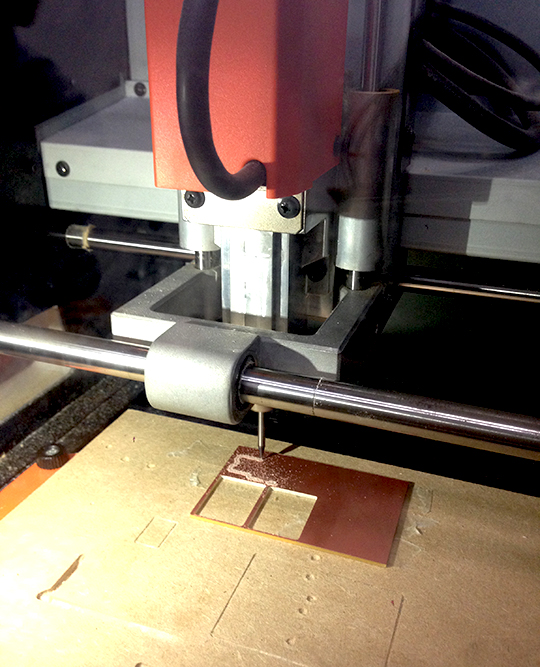
 At the mill machine:
- Open the lid and remove the support with the MDF. Clean the MDF with alcohol. Make sure there is no left over tape. Check if board is flat by placing it over a ruler. If not, bend it slightly. After that, clean the board with alcohol to remove eventual oil left from your fingers.
- Put 3 stripes of the double side tape on the back of the board. Make sure you do not overlap the stripes otherwise it would create a bump. The tape should surpass the length of the board, also to avoid any bumps. Clean again the board with alcohol. Screw the MDF back on the machine and close the lid.
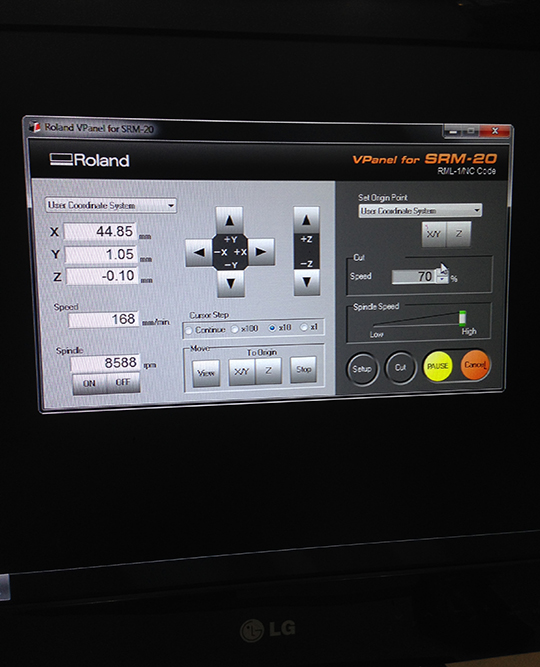
- Go for the computer. Open VPanel software.
- Choose the moving scale parameters and adjust the position in order to be able to insert the tool. Put the tool (1/64 for tracing or 1/32 for cutting) and screw it slightly.
- Place the x and Y “0 0” via the software. - by trying to reach the very corner with a little margin. To adjust the height (the Z) move the tool via software to roughly 3 cm above the board, unscrew the tool , let it go down gently (by holding it) until it touches the board and then screw it back.
- Set origin points (X Y and Z) in software by choosing “User Coordinate System” and pressing X, Y and Z. Choose the speed. Start slow with the speed at 10. If during printing, all looks nice you can increase the velocity to 70%. No need to go to 100%.
- Load the file: pressing the cut button. Delete all of the previous jobs and then click add to import your file.
And then press output.
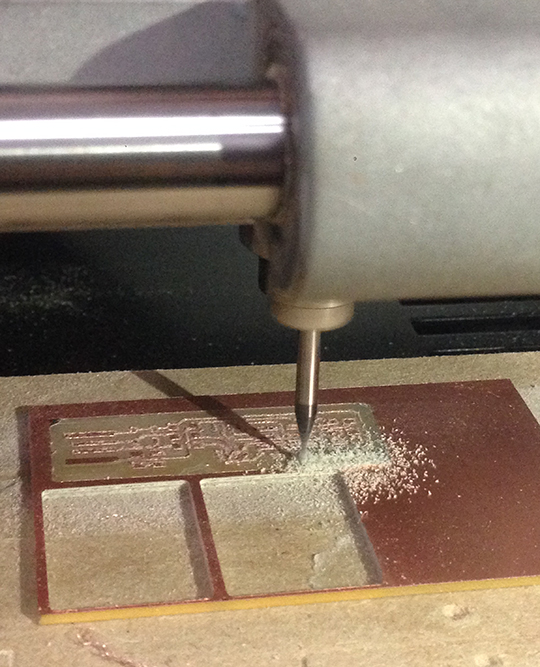
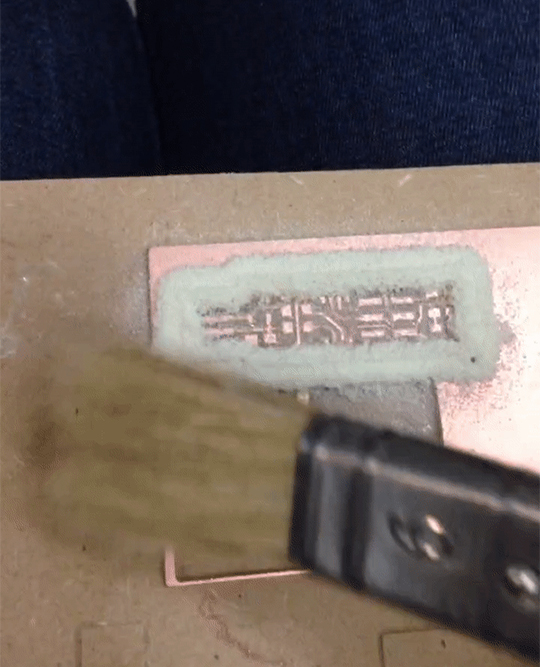
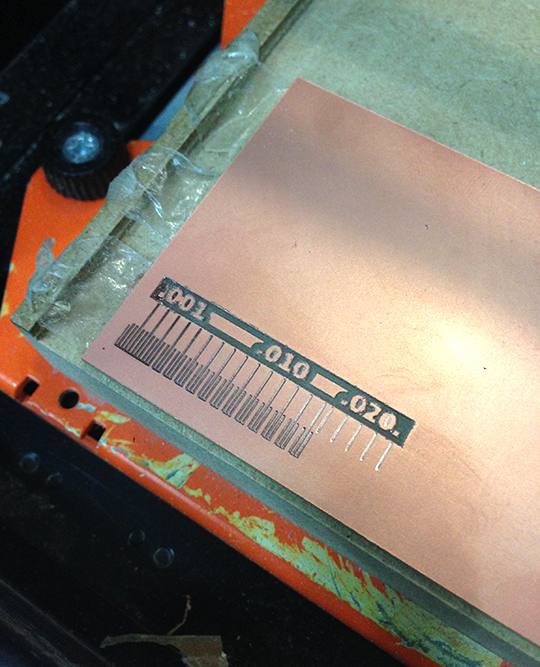
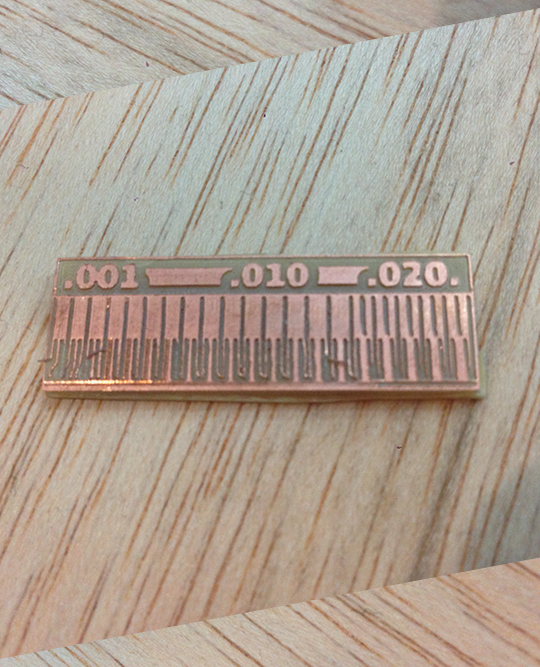
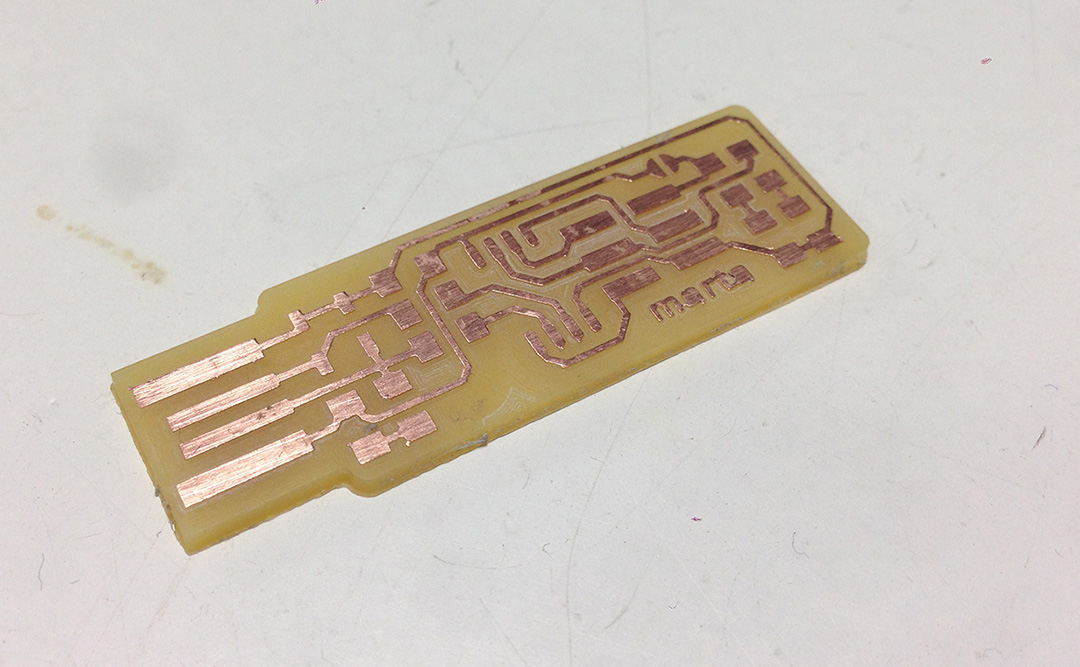
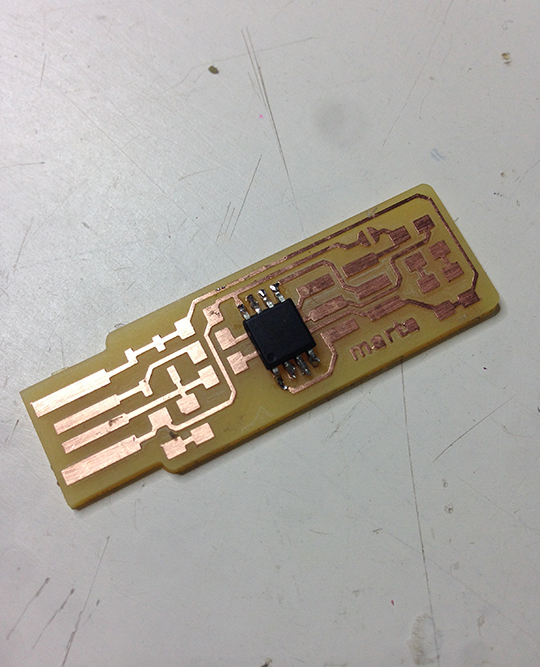
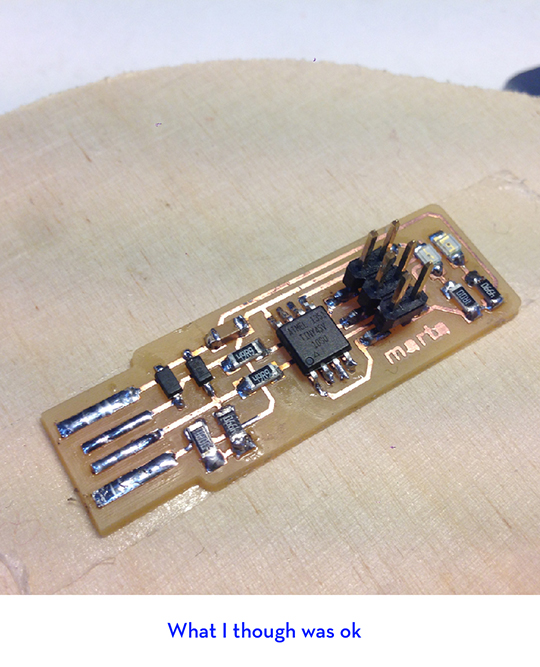
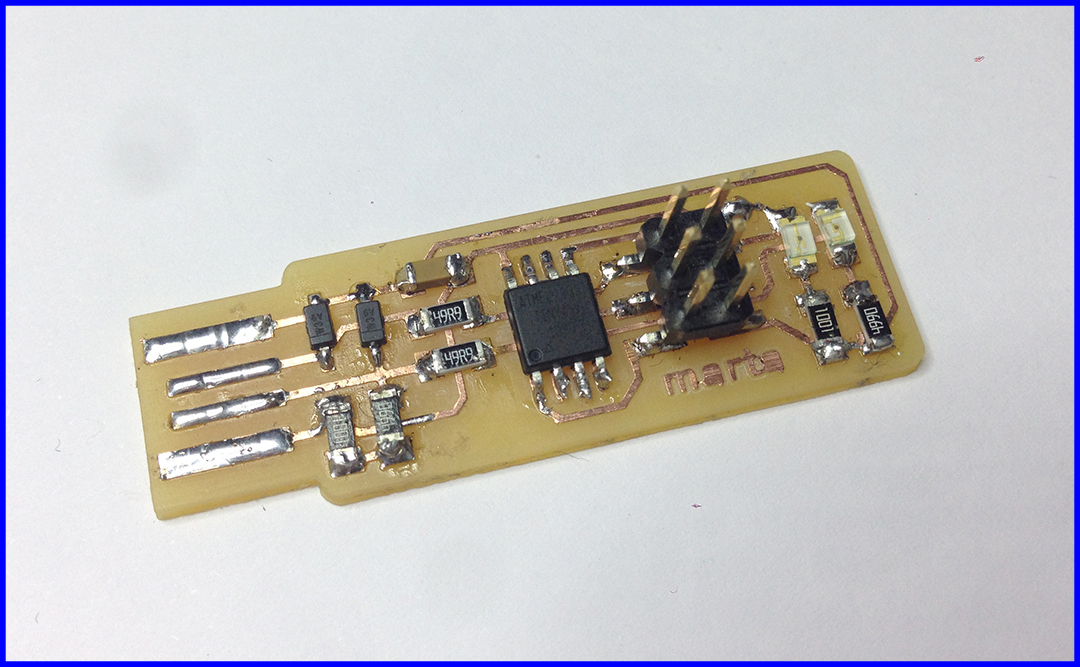
Below, the final result of milling my PCB board. I customized it by adding my name in photoshop to the original .png. I am happy with the final result, I think it looks really clean and precise. This due to the fact that I added an offset of 4 in order to take out all the unnecessary copper.
General Recommendations:
Remember that the 0,0 of the XY axis is placed at the lower left corner.
If anytime during the process you wish to see the job, click pause and then view.
Never touch spindle velocity. It should be high always for this job.
Always print the traces before cutting the plate (interior).
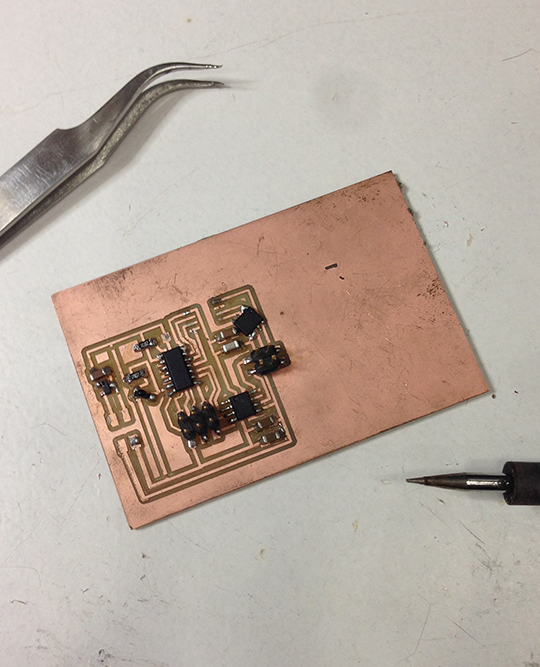
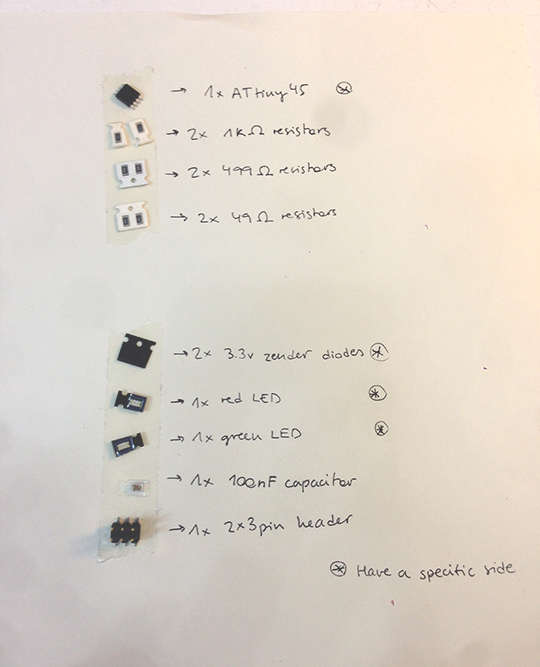
The next step to build my programmer is to start solding the components.
text... Lorem ipsum dolor sit amet, consectetur adipiscing elit. Aenean sodales imperdiet tincidunt. Fusce tempor ex quis diam dapibus rutrum. Nunc laoreet imperdiet mauris. Maecenas efficitur diam sit amet libero venenatis bibendum. Fusce sed ullamcorper nibh. Quisque ac leo sit amet nulla gravida ultrices. Nullam nulla nisl, ultrices vel justo eget, sodales ultricies metus. Vestibulum fringilla et ex quis ornare. Praesent at lectus nulla. Vestibulum ante ipsum primis in faucibus orci luctus et ultrices posuere cubilia Curae; Vivamus posuere convallis neque, nec pretium ligula tincidunt nec. Quisque laoreet fermentum nulla in congue. Morbi vulputate gravida elementum.
text... Lorem ipsum dolor sit amet, consectetur adipiscing elit. Aenean sodales imperdiet tincidunt. Fusce tempor ex quis diam dapibus rutrum. Nunc laoreet imperdiet mauris. Maecenas efficitur diam sit amet libero venenatis bibendum. Fusce sed ullamcorper nibh. Quisque ac leo sit amet nulla gravida ultrices. Nullam nulla nisl, ultrices vel justo eget, sodales ultricies metus. Vestibulum fringilla et ex quis ornare. Praesent at lectus nulla. Vestibulum ante ipsum primis in faucibus orci luctus et ultrices posuere cubilia Curae; Vivamus posuere convallis neque, nec pretium ligula tincidunt nec. Quisque laoreet fermentum nulla in congue. Morbi vulputate gravida elementum.
text... Lorem ipsum dolor sit amet, consectetur adipiscing elit. Aenean sodales imperdiet tincidunt. Fusce tempor ex quis diam dapibus rutrum. Nunc laoreet imperdiet mauris. Maecenas efficitur diam sit amet libero venenatis bibendum. Fusce sed ullamcorper nibh. Quisque ac leo sit amet nulla gravida ultrices. Nullam nulla nisl, ultrices vel justo eget, sodales ultricies metus. Vestibulum fringilla et ex quis ornare. Praesent at lectus nulla. Vestibulum ante ipsum primis in faucibus orci luctus et ultrices posuere cubilia Curae; Vivamus posuere convallis neque, nec pretium ligula tincidunt nec. Quisque laoreet fermentum nulla in congue. Morbi vulputate gravida elementum.
text... Lorem ipsum dolor sit amet, consectetur adipiscing elit. Aenean sodales imperdiet tincidunt. Fusce tempor ex quis diam dapibus rutrum. Nunc laoreet imperdiet mauris. Maecenas efficitur diam sit amet libero venenatis bibendum. Fusce sed ullamcorper nibh. Quisque ac leo sit amet nulla gravida ultrices. Nullam nulla nisl, ultrices vel justo eget, sodales ultricies metus. Vestibulum fringilla et ex quis ornare. Praesent at lectus nulla. Vestibulum ante ipsum primis in faucibus orci luctus et ultrices posuere cubilia Curae; Vivamus posuere convallis neque, nec pretium ligula tincidunt nec. Quisque laoreet fermentum nulla in congue. Morbi vulputate gravida elementum.
Files:
PCB interior(.png)
PCB outline(.png)
PCB interior mill parameters(.rml)
PCB outline mill parameters(.rml)