Introduction:
There are two processes of 3D printing using additive and subtractive method
Object 1: 3D Modeling and Printing additively using ABS
Object 2: 3D Scanning and Printing additively using ABS
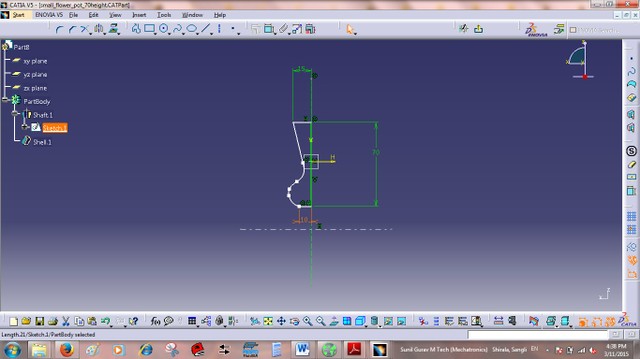
I decided to 3D print the flower pot model in Catia.Following figure showa the 2D sketch in sketcher mode with proper dimensions.
Figure.1
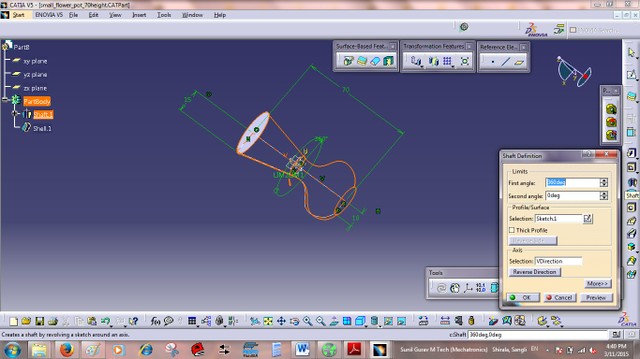
To make 3D model one has to get out of sketcher mode. following figure shows the part design mode.In the following mode,One can revolve the scketch OR 2D profile around the relative axis.
Figure.2
Using SHAFT command i can revolve 2D profile around specific axis with required revolving angle.Here i want 3D model, so i will select 360 degree angle.
Figure.3
Above 3D model of flowerpot is solid model.For 3D printing i require hollow 3D object.following figure 4 shows the shell command setting to make it hollow, I will prefer Object thickness 2mm.
Figure.4
Now its time to save the 3D model in .stl format.Save the file in .stl format.To 3D print object we require object to be saved in .stl format.
Figure.5
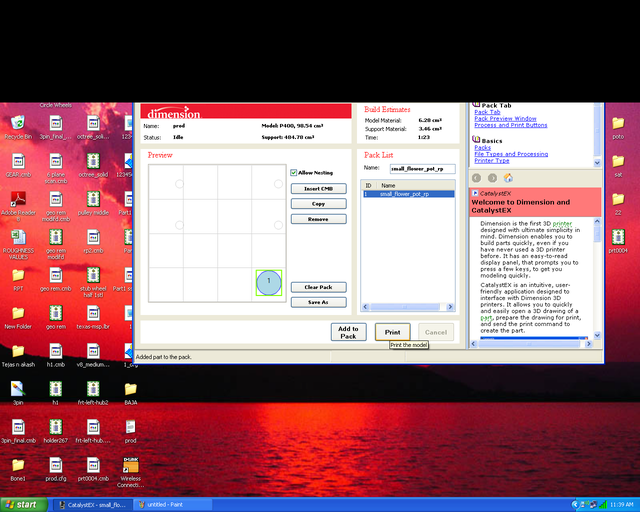
In rapid prototyping process i am using Fuse Deposition Technique to 3D print the object.It has windows based software CATALYST EX. It shows material require to print 3D object and available material in the machine.This Fuse deposition machine contains wireform ABS material.
Figure.7
Figure.6
Open the software and import .stl file,here we will open above .stl that we created in catia.
Browse the file from the perticular location .stl object is visible in the black are It shows the layer thickness,Model material, and the support fill - sparce(it takes minimum time)and scale
Figure.7
Then Click on add to pack button
Figure.8
after adding the pack it show material required to print object and material for support red color is actual material and the purpal color is support material
Figure.9
click on the pack tab it shows material required for 3D printing and here we can alter the location of object where exactly we want to print the object on Base plate.
Figure.10
finally click on the print.
Figure.11
following are the snaps after printing the flowerpot.
Figure.12
Figure.13
Figure.14
Flower Pot .stl file
On beach i found shell and i am scanning Shell on the roland modela Scanner.I disconnected the milling spindle and connected contact type scanner.following Figure.15 shows the shell that i found
Figure.15
to scanned I selected X pitch = 0.020 Inch, Y pitch = 0.020 Inch and Z bottom = 0.010 Inch, following figure .16 shows the scanned data in mesh form
Figure.16
Select the Render option in Dr. Picza tosee solid object form of the shell.Now I am going to print using the fused deposition techniques.
Figure.17
Following figure shows the imported .stl object in the CatalystEX file
Figure.18
Following figure shows the orientation of the .stl file in the catalystEX printing software with the support material and the actual ABS material form.Blue color shows the support material and red color is the actual material.
Figure.19
Left side Shell in following figure is original Shell and right side Shell has printed using Fused deposition techniques. As shown in figure 10 and figure 11. I have used catalyst EX software, to print shell object on FDM machine and it has taken only 10 minutes.
Figure.20
Dr. Picza Shell scan file
Shell Scan .stl file