BKOM//

// WHAT IS?

• My Final Project is a Uri Beacon. It’s similar to QR Codes that operates over BLE (Bluetooth Low Energy).

• BKOM sent your devices (mobile or tablet) a short internet link via BLE.
BKOM connect the physical and digital worlds by adding location-specific information to our mobile.

• The idea is help Fab Labers to have easier access to this info when they are close to the machine.
So when you are in a Fab Lab you can have access to the booking, wiki of materials, instructionsl of the machine... directly to your devices.
BKOM have a configuration service, so Fab Labs can update easily with new information and change over time, whole internet is BKOM data base!

// DIGITAL FABRICATION

• I've designed a structure for my sensor. The idea is to put inside the electronics.
The box need to be possible to open it to change the coin battery. I've extimated it'll be every 2 years!.
The base need to fix with magnetic or double tape to the machines.

• My first design was a basic 2D box with holes for the ventilation of the electronics an a door for the extra supply energy, just in case!
I cut it in fluor methacrylate. I used it for my prototype 1.0.
After that I designed another box more stilysh.

• In this process I understand the structure could be more resistant in 3D printing, so I move my design onto 3D and I arrived the final solution. I took inspiration for the packaging of my nails polish brand.

• Cinema 4D// I use it to design in 3D my structure, important before to export the model put on 0,0 and export on .stl.

MeshLab// I use it to be sure the mesh is close. Just press the red cross on the top to verificate the mesh and check, if not just check the parameters that are no close and save it.

• My first attempt with the 3D printing was with the Ultimaker 2 Machine.
At first I was still standing structure, so I had to tilt 45 degrees either side of the structure and I made holes on the top for the electronics inside and a bed to fix the electronics there and be sure that my board are save.

Cura// I use it to prepare it the GCode for the RepRap BCN Plus model.

• Materials//
TOP: black PLA of 3mm. 210º print temperature, 60º the bed.
BOTTOM: white ABS of 3mm. 230º print temperature, 80º the bed.

• Fabrication Files: TOP & BOTTOM

• The keys of my design are: nice, simple to open and close to check the electronics, reprograming it or change the coin battery and use friendly for very Fab Lab.

// TECHNICAL DEVELOPMENT// ELECTRONICS

• I've studied the different boards to work with Bluetooth already in the market:
BLEDUINO, BLEBee, Bluefruit LE.
To understand what they do and what I want to do with my own board base on BLE 112 Bluetooth 4.0 Low Energy.

BLE 112 description//
The BLE112 is a Bluetooth Smart module based on TI's CC2540 chip.
Targeted for low-power sensors and accessories.
It integrates all features required for a Bluetooth Smart application, including Bluetooth radio, software stack, and GATT-based profiles.
The BLE112 Bluetooth Smart module can also host end-user applications, which means no external micro controller is required in size or price constrained devices.
Morover, it has flexible hardware interfaces to connect to different peripherals and sensors and can be powered directly from a standard 3V coin cell battery or a pair of AAA batteries. In the lowest power sleep mode it merely consumes 500 nA and will wake up within a few hundred microseconds.

• Key Benefits//
Fully integrated Bluetooth Smart solution
Integrated Bluetooth Radio, micro controller and software stack
Fast time-to-market
Low development risks

• Application hosting capabilities//
All application code can be executed on the BLE112. I'm using Arduino to do it.
No need for external micro controller
Lower cost and smaller size

• Flash-based//
Firmware is field upgradeable. Application data can be stored on the flash Settings can be stored on the flash
Good radio performance
Long range and robust connections

• Software programmable TX power//
I've left on my board the conection to this pins to do it for every Lab in base to his needs.

• Specifications//
Radio features:
Bluetooth 4.0 low energy radio
Transmit power: +3 dBm
Receiver sensitivity: -92 dBm
Integrated antenna or U.FL connector
TX peak current: 27 mA (o dBm)
Sleep mode current: 0.4uA

• Bluetooth features//
Bluetooth Smart (low energy) support
L2CAP, ATT, GATT, GAP and Security Manager
Bluetooth Smart profiles
Client and master mode
Up to eight connections in master mode
100kbps+ throughput
Over-the-Air firmware upgrade

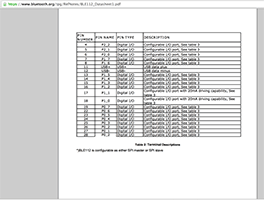
• Hardware features//
UART and USB host interface
SPI, I2C, PWM, UART, GPIO peripheral interfaces
12-bit ADCs
Power supply : 2.0 - 3.6V
Temperature range: -40°C to +85°C (for this I made holes on my piece to take a good ventilation of the board.
Dimensions: 18.10 x 12.05 x 2.3 mm

• MCU features//
8051 microcontroller
8kB RAM
128kB Flash

• Software features//
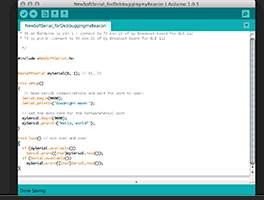
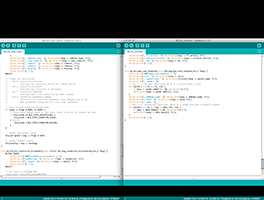
I add on Arduino BGLib library to do it load on my BLE 112 through my Barduino microcntroller.
BGLib uses the binary API to send commands and receive events from my Barduino microcntroller,

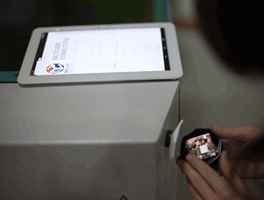
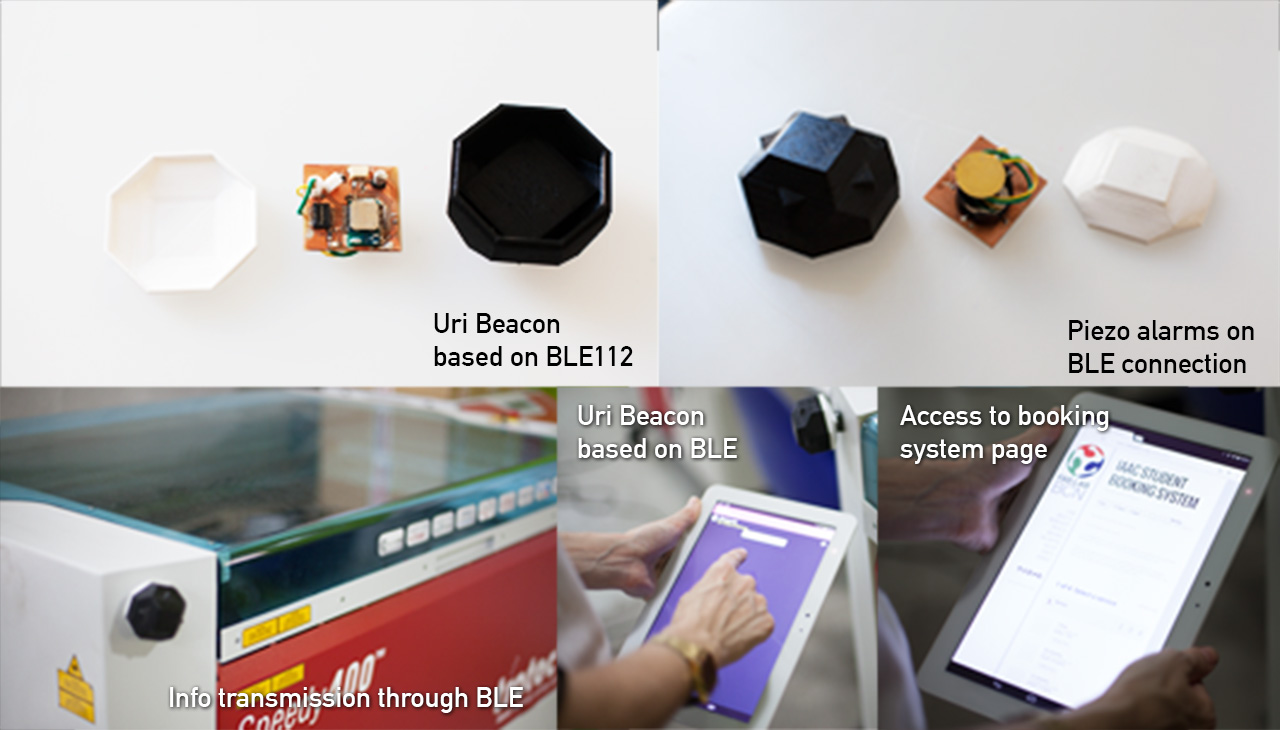
• After made my first prototype using Raspberry Pi I could quickly and easily understand what I want to do with my Beacon and how it works.

• So I had a series of goals in mind for my Final Project:
- Hardware with 100% Arduino Compatibility
- Compact size
- BLE as both Central or Peripheral
- Long Battery life
- Easy to reprogram for every FabLab and every FabLabber
- Internet as data base
And I'm very happy to have achieved them!!!

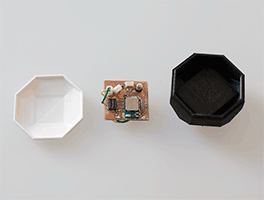
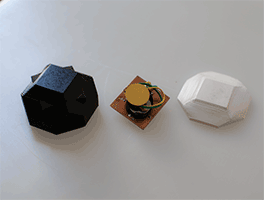
• On the next steps I've explained how I've developed my Uri Beacon and how each Fab Labber can make one from and for his Fab Lab. All the project is base on Open Source License.

• My Uri Beacon is developed using open source code and my designs can be reuse and customize.
All the files are hosted on my page.
All the manufacturing procees can be done locally, so enjoy in your Fab Lab!

• The Intellectual Property of my project will have an Open Source Hardware and Software licensed under MIT license, to let other Fab Labers to continue devoloping this tool to many propouses.
The key points of the MIT license are:
The project is delivered "as is" with no warranty or responsibility whatsoever.
Do whatever you want with the code
Remember, give attribution.

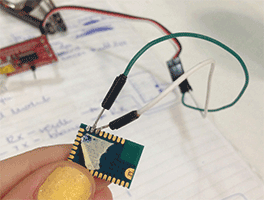
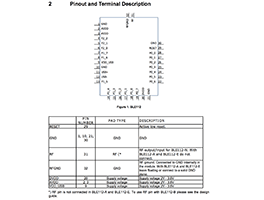
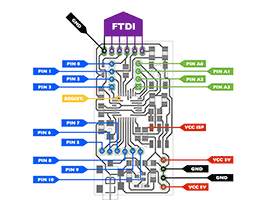
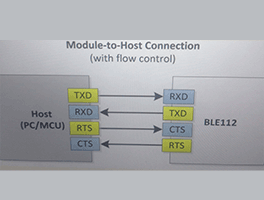
• First of all, I read the datasheet of BLE 112 module to understand which pins I need to solder to make the debbuging and program the module using Barduino of BLE 112 module.
My first attempt was solder wires directly on the BLE 112 to this PIN CONFIGURATION:
- pins 2,3,9,20 to 3.3V in put on my Barduino
- pin 30 to GDN in put on my Barduino
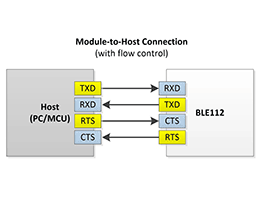
- pin 23(RX) to pin 1 TX on my Barduino
- pin 24(TX) to pin 0 RX on my Barduino
- pin 25(RTS) to pin 34 random digital on my Barduino
- pin 26(CTS) to pin 32 random digital on my Barduino

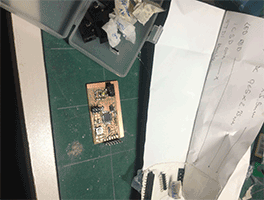
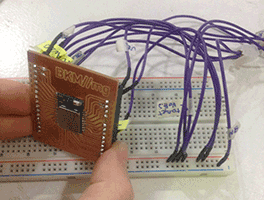
• When my pin 9 from BLE 112 brokes because I lost of the solder material on its pad I realized that I should design a BREAK OUT BOARD for my BLE 112.
In this way I just solder once all the module to the board.
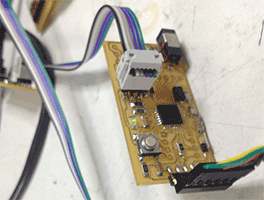
Connected the wires to the female heads to debugging and program through Barduino.
And after that desoldering from here to solder on my double layer Beacon board.

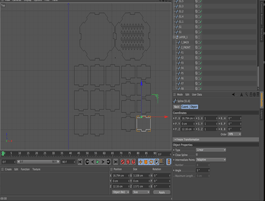
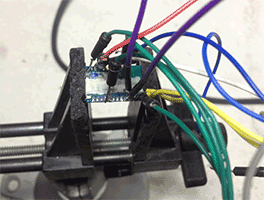
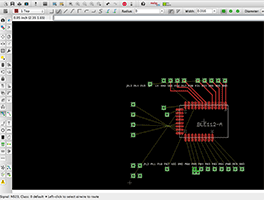
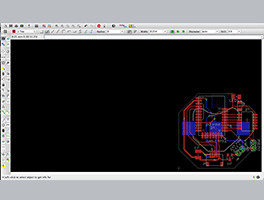
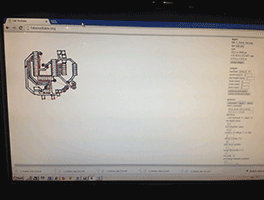
• So I designed a breakout board for my BLE with Eagle.
It took me time to make it clear and I put all the pin numbers and pin names on my Eagle design but at the end it was very useful to follow when I was attaching by wires my breakout board to my Barduino througn a bread board.
I made to holes for the 100uf capacitor on Pin 29 (AVDD) and 30 (GDN) EAGLE files: schematic and board

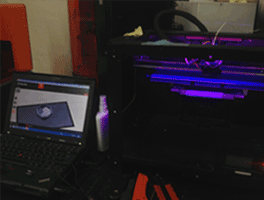
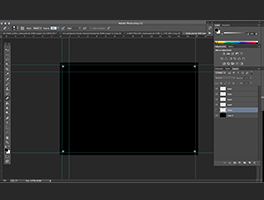
• I export my Eagle design in monochrome .png, 1000dpi.
Then in Photoshop I just add 20 pixels and made this files to milling: BREAKOUT BOARD files: traces, holes and exterior.

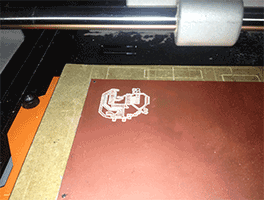
• I sended to the Modela Milling machine the files in this order.

• After milling I pass the holes with a small drill because it was a bit smaller for my female headers.

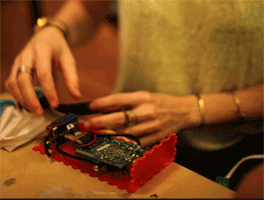
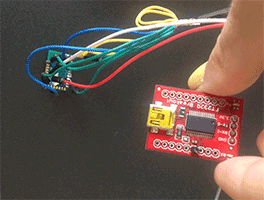
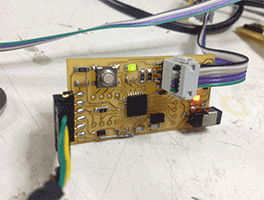
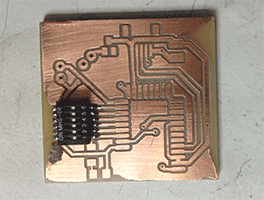
• I solder the module using liquid FLUX.

• I fix the female header and my board is done!

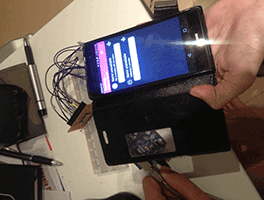
• In the Lab suggest me to test with CoolTerm software if my board can send data from USB to serial UART connecting with the SparkFun USB to Serial Breakout for the FT232RL.

• So I tried it and I connect with wires my breakout board pins:
- pins 1, 10, 21 and 30 all together to GDN FT232RL board
- pin 23(RX:sender info) to pin TX FT232RL board
- pin 24(TX) to RX FT232RL board
- pins 2 and 3: AVDD ,9: VDD-USB and 20 to 3.3V FT232RL board

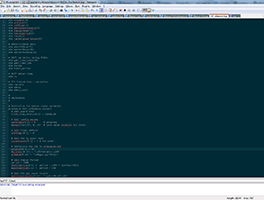
• I read this info to understand how to use CoolTerm for UART.
On Coolterm I set the BAUD 9600.
And TX when I'm typing are blinks on green, that's mean it's receive.

// TECHNICAL DEVELOPMENT// ELECTRONICS// Barduino Microcontroller

• I've made a Barduino Microcontroller to debbug and program my BLE 112 module.
My first board did not work. I was trying with the multimeter to understand which components didn't works to resolder it, but some traces was wrong, so I made it a new one and it blinks!

• The second time I follow carefully the steps that Luciano put on his page to sucess!

• Design files// EAGLE files: schematic and board Barduino to milling files: traces and outside.

• I solder the components from smaller to bigger as I use.

• COMPONENTS//
ATMega 328, Resistor 1K, Resistor 0, Capacitor 10uf, Capacitor .1uf, Red LED, Green LED, Shottky Diode, 5V Regulator, Power Jack, ICSP Connector, Button ,FTDI Header, Crystal 16 Mhz, Capacitor 18pF and 6 POS Header

• Programing with Arduino//
I follow the pinout guide which displays the pin numbers according to the arduino IDE conventions so it will come in handy when testing and working with my Barduino. Programming After soldered my Barduino I connected the FTDI cable to the board and to my computer Red LED blinks so I followed. I connected it to my fabISP and to a power to my computer. I connect the ISP to my computer and launched the Arduino IDE. I select from the Tools menu: Programmer: USBtiny ISP I select from the Tools menu: Board: Arduino Pro or Pro Mini (5V, 16MHz) w/ ATMega 328 These boards come preloaded with the IDE and there is no need to mess with the boards.txt file! Thanks Lucinao ;-) Hopefully you got a success message (Done!) after the last operation and your barduino is ready to go. Congratulations! My Barduino blinks on the green LED so, it's works!

// DEBUGGING & PROGRAMMING my BLE112

• I wanted establish communication between my Barduino and my BLE 112 module through UART.
UART is a two wire interface (GND) with one RX and one TX.
I use the new SoftwareSerial library to define my communication object on my Barduino, because it supports the ATMega 328.
In contrast, the BLE112 uses four.
And the additional two are RTS and CTS (Request To Send and Clear To Send).
I configure the UART with this sketch
I’ve established communication at 9600 BAUD.
DONE!

• I've used 2 batteries of 1,5V to give energy the board.

• I programmed my Beacon as a Uri Beacon because I want to use internet as my BKOM data base and because URI BKOM have a configuration service, so every Fab Labber can update easily with new information and change over time.
These are the differences with the other beacons as iBeacon or AltBeacon is that "set up once and leave running forever".
Uri Beacon is a Google project that is part of they Physical Web iniciative.
Uri Beacon is similar to QR Codes that operates over BLE.
BKOM send a short link to internet via BLE advertising packet.
BLE let us exchange data in one of two sttes: connected and advertising modes.
CONNECTED mode use the Generic Attribute (GATT)layer to transfer data in a one-to-one connection.
ADVERTISING mode is a one-to-many transfer and has no guarantees about data coherence.

• Data Spec//
The URIBeacon spec uses 28B of the 31B available in an advertising packet.
Of these 28 bytes,19 are used to encode the URI being sent.
The prefix ('www.','http://', etc) and suffix ('.org/','.com/', etc) are each encoded to a single byte.
This saves space overhead, but has the unfortunate side effect of limiting what domains can be short-coded to those supported by the official specification.
Currently only www addresses (both http and https) and UUIDs can be transmitted via a URIBeacon.
Things like ssh: and gopher: are not supported.
The suffix is also encoded to a single byte, but only if it is one of the well defined ones.
This means a url of 'http://www.google.com' would be encoded down to eight bytes, one for 'http://www.', six for 'google' and one for '.com'.
For a full list of supported prefixes and suffixes you should see the official spec.
If you use the supported prefixes, it is possible to have a URL of 17 characters (with one byte for the prefix and one byte for the suffix).
It is worth noting that the URIBeacons are meant to be used with URL shortening services like goo.gl, bit.ly, tin.ly which will shorten any long URL to eight to ten bytes.

• My url is http://www.fablabbcn.org/book-now/.
UriBeacon only let short link with .com(7) .org(8) and encoding massimun 16 caracters.
I made a short link with Google URL Shortener: http://goo.gl/IUWCsB = 14 caracters
So I use Note Pad to upload my Uri Code to the BLE112 module.
On line 83 size, I put 14 (for the caracters of my short link) and on line 84 bytes data, I put goo.gl/IUWCsB (for my link).
And it's done!

• I install two Library to communicate my BKOM and my devices through a Reader BLuetooth App:
BGLib Scanner and BGLib Slave
Choose Sketch -> Include Library -> Manage Libraries...
Type BLEPeripheral into the search box.
Click the row to select the library.
Click the Install button to install the library.

• I install a Beacon Monitor Scan on my Android device:
Beacon Monitor for Android and Light Blue for Apple and I can see my BKOM.

• I had a problem with my Barduino at the last minute programming, so I uploaded the code using my Arduino Duemilanove.
BE SURE YOUR BATTERIES ARE FULL, BATTERIES AND I MY BOARD DIDN'T WORK SO I CHANGE MY BARDUINO FOR A ARDUINO, AND THEN I TEST WITH THE MULTIMETER AND DISCOVER THAT THEY WAS 2,5V SO I PUT I NEW ONCE AND THE BOARDS WORKS!

// TECHNICAL DEVELOPMENT// ELECTRONICS// Uri Beacon

• I've made a double layer board. Base on BLE 112A module

• BOM (bill of materials): parts and numbers, Budget aprox 24,40$

Part Value Device Package Description

1 BLE112-A SF-BLUEGIGA_BLE112-A-VISUAL SF-BLUEGIGA_BLE112-A Bluetooth Low Energy single-mode module - Bluetooth 4.0, chip antenna
http://www.mouser.es/ProductDetail/Bluegiga-Technologies/BLE112-A-v1/?qs=ScTHCgOnmkJ6UytbwX03ig%3D%3D 11,56€
1 CR2032 3 V BATTERY20SMD BATTCON_20MM Battery Holders
http://es.farnell.com/renata/hu2032-lf/soporte-bater-a-tht-cr2032/dp/1319749 1,29€
1 CR2032 3 V BATTERY20SMD BATTCON_20MM Battery
http://es.farnell.com/multicomp/cr2032/pila-litio-cr2032-210mah-3v/dp/2065171 0,89€
1 100 µF 6.3 V C-EUC1210K C1210K CAPACITOR
http://www.digikey.es/product-detail/en/0/PCE3852CT-ND 0,45€
1 ZLLS1000 BAS40 SOT23 Schottky Diodes
http://www.digikey.es/product-detail/en/0/ZLLS1000CT-ND 0,63€
1 JST_SH_5 JST_SH_5 JST SH series TERMINAL
http://es.farnell.com/jst-japan-solderless-terminals/shr-05v-s-b/caja-cone-crimpar-recept-1mm-5v/dp/1679111?searchRef=SearchLookAhead 0,15€
FEMALE
http://es.farnell.com/jst-japan-solderless-terminals/ssh-003t-p0-2/terminal-de-crimpar-sh-series/dp/1679142?MER=i-9b10-00001460 0,07€
MALE
http://es.farnell.com/jst-japan-solderless-terminals/sm05b-srss-tb-lf-sn/conector-macho-smt-r-a-1-mm-5/dp/1679121?MER=i-9b10-00001460 0,54€
1 DIP-6OMRON DIP-6OMRON OMRON_HALFPITCH_DIP_6 DIP switch
http://es.rs-online.com/web/p/interruptores-dip-y-sip/7122582/ 0,69€
1 PIEZO PIEZO PIEZO
https://www.sparkfun.com/products/10293 1,50€
1 EXT. PWR
http://es.rs-online.com/web/p/soportes-accesorios-de-montaje-para-baterias/6119598/?origin=PSF_409441|acc 0,52€
2 BATTERIES 1,5V
http://es.rs-online.com/web/p/pilas-aa/4488476/ 1,45€
1 LED 1260 Fab Hello Library
http://es.rs-online.com/web/p/led-visibles/4663908/ 0,09€
1 RESISTOR 1260 Fab Hello Library
http://es.rs-online.com/web/p/condensadores-ceramicos-multicapa/2644141/ 0,035€

FABRICATION PIECES//
1 Magnetic disc of 0,25 mm, 3 mm height
http://www.superimanes.com/ferrita-discos/571-iman-ferrita-25-03.html 0,16€
3D Printing Material 2€

BUDGET// 22,025€

DESIGN of the double layer board//

• I based my board on BLE 112 I put the components that I said above on the BOM list.

• On EAGLE I connect all the components.
I connected the green LED to GND and Resistor and Pin 28 of my BLE.
I connected the PIEZO to GND and Pin 22 of my BLE.
Important design the holes to communicate the power over the two layers.

EAGLE// schematic and board

• After all my board was designed I check on drc the clearance: 10 ml to check that all the traces will be OK for the milling process.
I exported as: image, MONOCROME, 500 dpi.
Export files: TOP layer open and then BOTTON layer open and the last one the HOLES.

• In Photoshop I put in Grayscale mode and I fix it on the main canvas to make the double layer board.
I have a PCB of 15,3 x 10,2 cm.
So I made on Photoshop a black rectangle with this misures and put a hole for drills in evry of the 4 corners.
This will fix the board to the bed and let us have a reference when we turn 180º the board to mill the second layer in vertical.
After this I just fix my TOP traces on the left angle on TOP.
I put on the same position the BOTTOM traces and I turn 180º towards me.
I put exterior traces on this Bottom layer and It's ready!!

MILLING//

• Files for Milling
First of all I sent the 4 holes to fix the main PCB board.
So we put the plain screws to fix the board.
Cut depth 0,6 , tool diameter 0,4 number of offset: 1.
After that I sent the TOP traces with a 0,010 tool because the traces are too close.
Cut depth 0,3 and tool diameter 0,25 number of offset: 4.
Then I clean the PCB and we turn 180º the PCB as we plan in the Photoshop design.
Then the BOTTOM traces with a 1/64 tool.
Cut depth 0,4 and tool diameter 0,4 number of offset: 4.
And to finish the exterior with a 1/32 toolto cut the board.
Cut depth 0,5 , tool diameter 0,4 number of offset: 1.
My first double layer board is done!! We was super excited in the Lab because for all of us was the first time.
Thanks Santi and Ferdi ;-)

SOLDERING AND ASSEMBLING//

• I use this tools to solder:
A tempature controlled soldering iron
Solder with flux core
Tube of Flux, that save my life, or at least my board ;-)
Because after desolder my BLE 112 module from the Breakout Board I solder it on this double side board.
Wire cutters and wire strippers for the super small holes to pass the power from one side to another of my BKOM board.
Dremmel tool to repass the holes for the external Power supply (just in case and for reprogramming)
Sandpaper to clean the sides of the board
Alcohol to clean the board too.
Quick Set Epoxy
MultiMeter to check all the components are conectted
Tweezers
Solder Sucker
Solder Helper (Grippers) to fix my board
And a lot of patience and calm!!

• I ude the JST SH5 connector and to assembled this the parts of this component I would need a expensive tool to close them.
Ferdi suggest me to use those:
http://upload.wikimedia.org/wikipedia/commons/3/34/6_Pin_Female_Header.jpg
And the male part on the board:
https://www.google.es/search?q=JST_SH_5&source=lnms&tbm=isch&sa=X&ved=0CAcQ_AUoAWoVChMIoO6zlMKRxgIVg3EUCh3FuAAC&biw=1366&bih=631#tbm=isch&q=male+header+smd
I was trying to find other alternatives but my board was already milled and the steps was a 1mm.
So, at the end I assembled by hand with a looooot of patience! And it works!

CODE//

• I left two HEADERS for the external Battery supply jsut in case I need it during the reprograming.

• I put a swicht with 6 channel to send more than one link without change the firmware.
At the moment I just program one channel, but it is possible to program till 6.

• And I put the JST wit 5 pins conector is to reprogram via UART in the future my BKOM. example of CODE

• This URIBeacon implementation uses BGScript from BlueGiga to implement the full URIBeacon API.
It currently supports configuration mode for 30 seconds only when the unit is powered up (assuming there is no hardware button on the device).
Even if I'm not planning on using BGScript, it is still useful as a sample app to guide for future implementation.

// APPLICATIONS

• In my case I want to make the acces to the machines easier to the Fab Labber and funcional when you are close to the machine.
But I can use my Beacons for:

• Business// sending a link to a coupon on the website. Customers follow the link and show the coupon to the cashier. Because the URIBeacon can be updated, it is possible to enable time-sensitive links. For example the coupons can show up only at a certain time of day.

• Interactivity// users follow a URIBeacon link to a webpage where they could control a third party service. For example, lights on an internet-connected display. In this case, the URIBeacons serve as a way to get users to the control webpage. This could also apply to interactive historical markers, or anything that could be enhanced by having web content attached to it.

• Gaming// Because URIBeacons are modifiable, they could be left open so anyone could modify them. Therefore lending an element of community participation or gamifying the experience to see who can control how many beacons.

• Future//
URIBeacons hand out links to the internet. This enables them to link to more relevant content, and possibly context-aware content.
In addition, URIBeacons are meant to be easily modifiable.
Further, with the adoption of the BLE IP standard, it may be possible for a URIBeacon to talk to the internet through the receiving phone, meaning the
URIBeacons can have a two-way communication channel.
I believe URIBeacons are already the most useful of the beacon lot, and will become even more useful as the spec continues to evolve.
Because iBeacons and AltBeacons are almost the same thing: they broadcast a UUID from the beacon itself and use external databases to give beacons meaning. iBeacons are closed source, Apple-branded, and widely used; AltBeacons are open source and provide more data fields to use, but few people use them yet. URI Beacons are different: they don't require an external database, instead they use web links to either link to data directly or, in the future, possibly as a two-way communication method. That said there is a heavier app-side workload to URIBeacons as compared with iBeacons or AltBeacons.
iBeacons are currently the most widely used, but I think URIBeacons have a great deal of untapped potential and will become a driving force of IoT in the future.

• My Uri BKOM is done and works!!!

HOW URI BKOM WORKS//

// READY!! Wacht the video.

Contact me

If you have some inputs, ideas, links... and you want to share with me I would love to share too, write me to:

mg.meryglez@gmail.com