W5 3D Scanning and printing

From reality to digital and vice versa

Introduction

Just imagination is a limitation

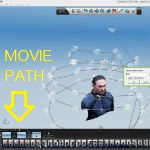
Just think, design and send it to the 3D printer. 3D printing are wings and your muscles are your imagination. 

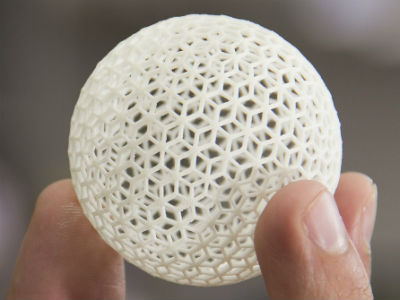
This is mostly true, but only "mostly". Actually yes, there are some limits on the material, create raised areas without supports, etc. In any case, the possibilities of creating objects, have opened dramatically.

Summary

All around 3D: Design, print and scan

Design an object with Rhinoceros, print it with Makerbot 3D printer and scan myself with Autodesk. The object designed and printed could not be made subtractively.

Step 1

No supports needed

I've started with Rhino, in order to create a simple and easy figure to practice the 3D design and print. 

The first idea was to create a hollow cube and print something inside of it. I wish to use the MakerBot 3D printer, but it seems that with this technology make a hollow cube is almost impossible. Top of the cube needs some supports. 

Then I was thinking how to solve it: One possible solution is to make a lot of supports inside the cube and try to take them off through the holes of the cube. Another possible solucion is to make an internal structure that support the top of the cube. That last solution I tried.

The inside structure is a piramid. We could see the view from the bottom of the inside of the cube at the the picture . 

Download CAD files here

Some subtractions to see the interior and structure.                             

Inside the cube, just in the middle of the piramid's structure, I created a little ball with an easy breakable support.

Finally , I took a few bites of the upper corners of the cube to save some material.

At Blender Software, I make sure that all the normals are well-targeted.

Step 2

Set the MakerBot Replicator 2 3D

MakerBot Replicator 2 3D printer have his own software. This are the setting I've use to print the cube:

  1. Standard 
  2. Infill:8% 
  3. Number of Shells: 2 
  4. Layer Height: 0.2mm 

Step 3

Printing features

These are the printing features:

  1. Time: 4h, 36m 
  2. Filament: 67.28g (0.148lb) 
  3. Resolution: 0.2mm 
  4. Rafts: off 
  5. Supports: off

Step 4

3D Printing

MakerBot working.

The ball is made inside!

Tachaaaaaaan!

Step 1

Install 123Catch

Autodesk have created a software family free to use. There you can find software to create a 3D model, design circuits, 3D mashups, and many more.

Go to www.123dapp.com and download + install the 123D Catch software. 123D Catch software turn ordinary photos into extraordinary 3D models.

Step 2

Taking photos, recommendations

  • Make sure you have accessibility to move around the object to scan

    It is necessary to take photos around the object several times and take photos from diferents angle shoot.

  • Number of photographs to shoot: between 50 and 70.

    Make a photo every 5 to 10 degrees moving on circles if the object have many surfaces, like scan a person. Make a photo every 20 degrees if the object have few surfaces, like a cube. Make 2 circles and 1 or 2 photos from the top view.

  • Overlap photos

    123D Catch need the photos be overlaped at least 50%

  • No oclusion photos

    Occlusive objects do get confused software.

  • Avoid symmetry or ambiguous features

    Symmetry is dificult to know where start each part

  • Light constantly

    As much light as you can

  • Don't try to scan glasses or any object that have a high value of refraction or reflection, like water, glases, etc.

    Reflections have many dificulties to mesh data.

  • Objects cannot move.

    Objects or subjects cannot move.

  • Number of photographs to shoot

    Cras sit amet nibh libero, in gravida nulla. Nulla vel metus scelerisque ante sollicitudin commodo. Cras purus odio, vestibulum in vulputate at, tempus viverra turpis.

  • Step 3

    Get Started

    Open 123D Catch software and follow this easy steps. Select "Create a new capture" on the left side.

    Step 3.0
    Log in Autodesck apps

    Step 3.1
    Create a new project

    Step 3.2
    Select all photos

    Step 3.3
    Quick Registration form

    Step 3.4
    Project done

    When the project is done, 123D Catch Software will show 2 menus bars. One is up centered and the second one is  on the left side of the bottom

    Step 3.5
    Orbit and zoom

    The model can me moved in 3D motion using the button "orbit". Zoom in, and zomm out with mouse scroll button

    Step 3.6
    Movie path

    On the left side of the bottom bar menu there is the button to create a movie path. Add scenes by clicking on "+" and select time between scecenes

    Step 3.7
    Export video

    Export video created. The button to export is on the top bar menu.

    Step 4

    Upload the movie

    I have used YouTube in this case.

    Enjoy!

    Download 
    Autodesk Scanning files here