PORTABLE 3D PRINTER-SCANNER
STEP 7: EMBEDDED PROGRAMMING
Home
OBJECTIVE
- Understand at least a small part of the data sheet
- Program my board to do something
DATASHEET
ATTiny44
Document what you learned from reading a microcontroller datasheet.
1.The first thing (and perhaps the most important) that I learned is that it is fundamental to know what each pin of the microcontroller stands for; otherwise, one may burn something...
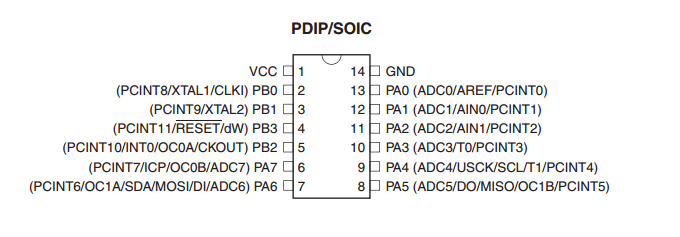
ATTiny 44
2.
I learned that when identifying pins of an ATTiny 44 for connecting
them to other board pieces, you should always save pin 1 for VCC and
pin 14 for GND.
3. I should mention that this week I had trouble programming my board, as I later realized it had too much flux and tin. Up to this moment, I am not very fluent solding. Therefore, I decided to wait until I became more skilled to keep advancing with other week assignments that were coming. I consider this a good strategy, as it allows me to start from intermediate to hard. I totally recommend it.
ATMega 328
1.After finishing with next week assignments, I kept becoming more skilled with easier to sold boards from Input, Output and Networking and Communications boards, until I eventually became very fluent in solding!
2. I decided to program my Fabduino for this week, as this is the most complex board I have solded. I should say, I am very proud :)
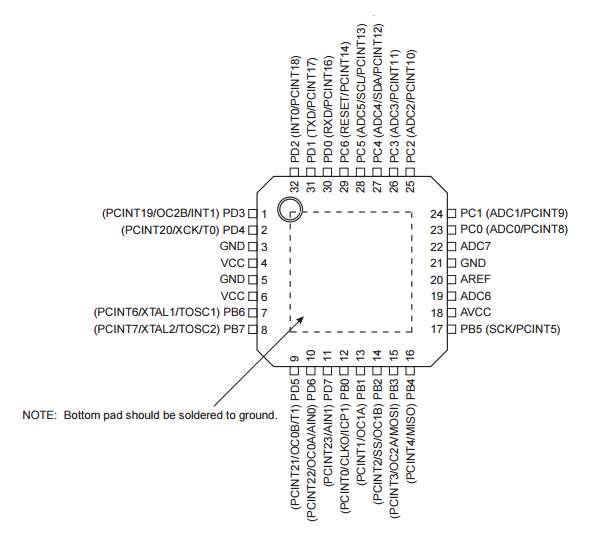
3. I first looked at ATMega 328 datasheet to understand why it was connected to each piece that way.
4. Now, using my knowledge after analizing the ATTiny 44 Pin Configuration, I infer that I have to save pin 3, 5, and 21 for GND and pin 4 and 6 for VCC
PROGRAMMING
1. I started programming in Arduino, because I have a glimpse that I will need it for my final project development; although I have never used Arduino before.
2. I changed the Blink example and made a simple program. I understood every line (as commented in every line below)!
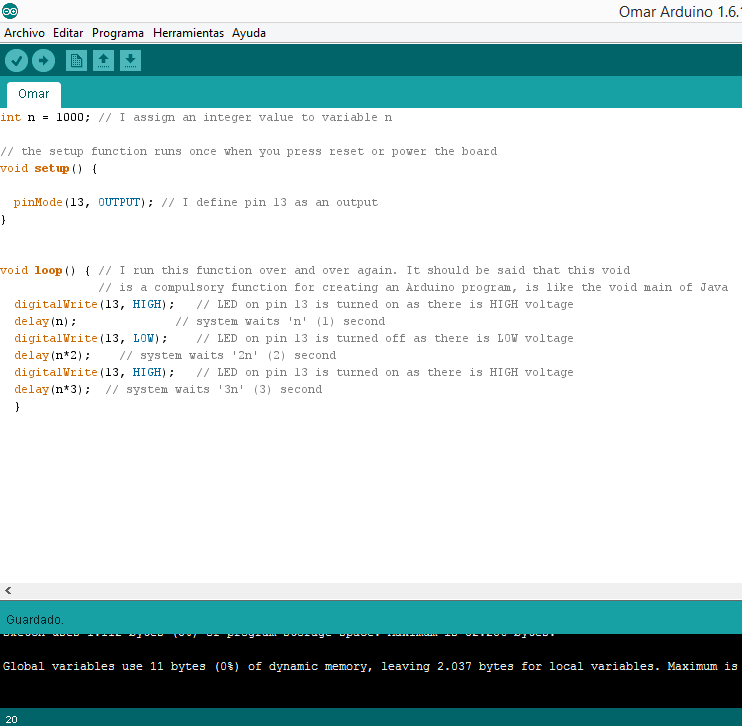
3. I concluded that in a programming environment such as Arduino IDE, definitions (ex.int n) are made before void setup(); otherwise you they are created again and again if they are defined inside the void loop(); thus occupying unnecessary memory and not allowing the variables to change.
4. I developed a way to understand basic Arduino IDE programs in terms of variables.
Definitions (before void setup()): What are the variables?
void setup() information: Where are the variables?
void loop() information: What do vairables do?
5. I replaced the integer inside the delay for a variable, to learn how to manipulate variables.
6. Here is my code.
7. Here is the video that proves that my program works:
3. I should mention that this week I had trouble programming my board, as I later realized it had too much flux and tin. Up to this moment, I am not very fluent solding. Therefore, I decided to wait until I became more skilled to keep advancing with other week assignments that were coming. I consider this a good strategy, as it allows me to start from intermediate to hard. I totally recommend it.
ATMega 328
1.After finishing with next week assignments, I kept becoming more skilled with easier to sold boards from Input, Output and Networking and Communications boards, until I eventually became very fluent in solding!
2. I decided to program my Fabduino for this week, as this is the most complex board I have solded. I should say, I am very proud :)
3. I first looked at ATMega 328 datasheet to understand why it was connected to each piece that way.
4. Now, using my knowledge after analizing the ATTiny 44 Pin Configuration, I infer that I have to save pin 3, 5, and 21 for GND and pin 4 and 6 for VCC
ATMega 328
PROGRAMMING
1. I started programming in Arduino, because I have a glimpse that I will need it for my final project development; although I have never used Arduino before.
2. I changed the Blink example and made a simple program. I understood every line (as commented in every line below)!
3. I concluded that in a programming environment such as Arduino IDE, definitions (ex.int n) are made before void setup(); otherwise you they are created again and again if they are defined inside the void loop(); thus occupying unnecessary memory and not allowing the variables to change.
4. I developed a way to understand basic Arduino IDE programs in terms of variables.
Definitions (before void setup()): What are the variables?
void setup() information: Where are the variables?
void loop() information: What do vairables do?
5. I replaced the integer inside the delay for a variable, to learn how to manipulate variables.
6. Here is my code.
7. Here is the video that proves that my program works: