13 Interface and Application Programming
Processing
I chose to use processing this week as I had never used it before and am curious about it's similatities to the Arduino IDE.
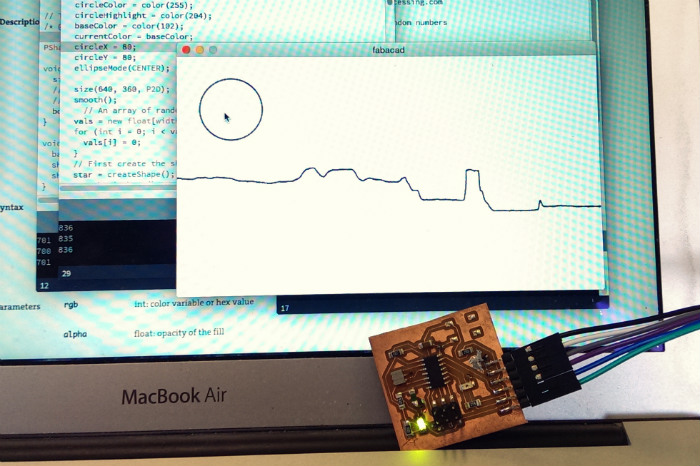
Much like with most Arduino projects I started by playing with a few example sketches. I ended up hacking together parts from the built in serial SimpleRead example and this example for plotting a graph. With those two I was able to get a simple live graph running that would display light levels from my board over time onvce the arduino was setup.

Arduino Setup
I setup my input/output board to continuously read light levels from the photo trnsistor and send the reading out on the serial port. I also porgrammed it to listen to the serial port and turn on the boards led on or of depending it a '1' or '0' is recieved on the serial port input. (The full code is at the end of this post)
void loop()
{
   lightValue = analogRead(sensorLight);
   mySerial.println(lightValue);
   if (mySerial.available())
     { // If data is available to read,
      val = mySerial.read(); // read it and store it in val
     }
   if (val == '1')
     { // If 1 was received
      digitalWrite(ledPin, HIGH); // turn the LED on
     } else {
      digitalWrite(ledPin, LOW); // otherwise turn it off
     }
   delay(30); // Wait 30 milliseconds for next reading
}
And then used parts of this example for adding in a button that could trigger the sending of a '1' or '0' to the board. (The full code is at the end of this post.)
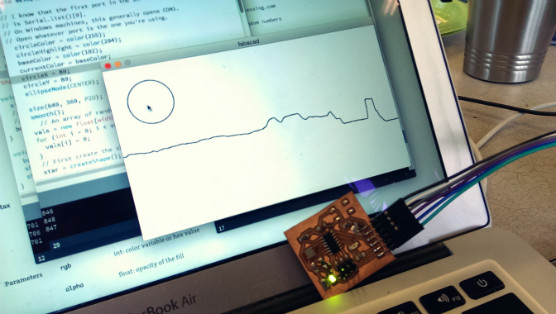 At this point I had a funtioning GUI that could display input from the board and send output to control the board!
Processing code
import processing.serial.*;

Serial myPort;  // Create object from Serial class
String val;     // Data received from the serial port
float[] vals;   // Array for previous data

int circleX, circleY;  // Position of circle button
int circleSize = 93;   // Diameter of circle
color  circleColor, baseColor;
color currentColor;

boolean circleOver = false;
boolean LedOn = false;


void setup()
{
  circleColor = color(255);
  baseColor = color(102);
  currentColor = baseColor;
  circleX = 80;
  circleY = 80;
  ellipseMode(CENTER);

  size(640, 360, P2D);
  smooth();
    // An array of random values
  vals = new float[width];
  for (int i = 0; i < vals.length; i++) {
    vals[i] = 0;
  }

  String portName = Serial.list()[2]; //change the 0 to a 1 or 2 etc. to match your port
  myPort = new Serial(this, portName, 9600);
  background(255);
}

void draw()
{

  update(mouseX, mouseY);
  //background(255);

  stroke(255);

  int valint =0;
  if ( myPort.available() > 0)
  {  // If data is available,
  val = myPort.readStringUntil('\n');         // read it and store it in val
  //println(val);
  if(val != null)
  {
  val = trim(val);
  valint = Integer.parseInt(val);
  println(valint); //print it out in the console
  background(255);
     // Draw lines connecting all points
  for (int i = 0; i < vals.length-1; i++) {
    stroke(0);
    strokeWeight(2);
    line(i,vals[i],i+1,vals[i+1]);
  }
  stroke(0);

  //Draw out button
  ellipse(circleX, circleY, circleSize, circleSize);

  // Slide everything down in the array
  for (int i = 0; i < vals.length-1; i++) {
    vals[i] = vals[i+1];
  }
  // Add a new value
  vals[vals.length-1] = valint/2.5 - 100;

  }
  }
}

void update(int x, int y) {
  if ( overCircle(circleX, circleY, circleSize) ) {
    circleOver = true;
  }  else {
    circleOver = false;
  }
}

void mousePressed() {
  if (circleOver) {
      if (LedOn == true)
  {                           //if we clicked in the window
   myPort.write('1');         //send a 1
   println("1");
  LedOn = false;
  } else
  {                           //otherwise
  myPort.write('0');          //send a 0
   LedOn = true;
  }
  }
}

boolean overCircle(int x, int y, int diameter) {
  float disX = x - mouseX;
  float disY = y - mouseY;
  if (sqrt(sq(disX) + sq(disY)) < diameter/2 ) {
    return true;
  } else {
    return false;
  }
}
Arduino Code
#include <SoftwareSerial.h>

SoftwareSerial mySerial(0, 1); // RX, TX
//int sensorTemp = A7;    // select the input pin for the potentiometer
int sensorLight = A3;    // select the input pin for the potentiometer
int ledPin = 8;      // select the pin for the LED
int tempValue = 0;  // variable to store the value coming from the sensor
int lightValue = 0;  // variable to store the value coming from the sensor
char val; // Data received from the serial port

void setup()
{
  // set the data rate for the SoftwareSerial port
  mySerial.begin(9600);
  mySerial.println("Hello, world?");
  pinMode(ledPin, OUTPUT);
}

void loop() // run over and over
{
   lightValue = analogRead(sensorLight);
   mySerial.println(lightValue);
   if (mySerial.available())
     { // If data is available to read,
      val = mySerial.read(); // read it and store it in val
     }
   if (val == '1')
     { // If 1 was received
      digitalWrite(ledPin, HIGH); // turn the LED on
     } else {
      digitalWrite(ledPin, LOW); // otherwise turn it off
     }
   delay(30); // Wait 30 milliseconds for next reading
}