WEEK 14
14. Interface and Application Programming
I started from Processing, as I found it pretty simple for a newbie like me. I made a lot of search on the web and found a firmware that you can upload on an Arduino compatible board like the Satshakit to make it ready to communicate with anything you write in Processing. This firmware comes as a sketch you need to upload to your board and is called Firmata.
Processing
Processing is very similar to Arduino IDE. For my application, I wanted to do something that I could use for my final project, so I searched the internet and I found some useful information I used for my sketch.
As a first thing I used ControlP5 which is a GUI (graphical user interface) library for Processing. It is useful to create sliders and buttons for your app. Then I included the arduino library I previously imported in Processing and I used part of the code I found on Fabian Winkler's website.
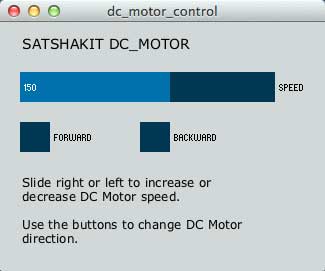
DC Motor Control
/*modified by Saverio Silli on may 12th 2015.
Week 14 excercise for Fab Academy 2015.*/


import processing.serial.*;
import cc.arduino.*;
import controlP5.*;

ControlP5 controlP5;
Arduino arduino;
RadioButton r;
Textarea myTextarea;

int speed = 150; // 0-255
int direction = 1; // 0: backward, 1: forward

void setup() {

  size(325,250);

println(Arduino.list());
arduino = new Arduino(this, "/dev/tty.usbserial-FTH052EW", 57600);

for (int i = 0; i <= 13; i++)
arduino.pinMode(i, Arduino.OUTPUT);
// pin3: PWM, pin 6: 1A, pin 7: 2A (see SN754410 datasheet, same as L293D)

controlP5 = new ControlP5(this);

myTextarea = controlP5.addTextarea("txt1")
                  .setPosition(20,10)
                  .setSize(255,30)
                  .setFont(createFont("verdana",14))
                  .setLineHeight(14)
                  .setColor(color(0))
                  .setColorBackground(color(204))
                  .setColorForeground(color(204));
                  ;
  myTextarea.setText("SATSHAKIT DC_MOTOR CONTROL v1.0"
                   );


controlP5.addSlider("speed",0,255,speed,20,50,255,30);
controlP5.setColorCaptionLabel(0);


r = controlP5.addRadio("radio",20,100);
r.setSize(30, 30);
r.setColorLabel(color(0));
r.setItemsPerRow(2);
r.setSpacingColumn(90);
//r = controlP5.setSize (50, 50);
//r.deactivateAll();
// use deactiveAll to NOT make the first radio button active.
r.add("forward",0);
r.add("backward",1);

myTextarea = controlP5.addTextarea("txt")
                  .setPosition(20,150)
                  .setSize(255,100)
                  .setFont(createFont("verdana",12))
                  .setLineHeight(14)
                  .setColor(color(0))
                  .setColorBackground(color(204))
                  .setColorForeground(color(204));
                  ;
  myTextarea.setText("Slide right or left to increase or decrease DC Motor speed."
                    +"                                              "
                    +"                              "
                    +"Use the buttons to change DC Motor direction.");


}

void draw() {

arduino.analogWrite(3, speed);

if (direction == 1) { // run in one direction, i.e. forward
arduino.digitalWrite(6, 1);
arduino.digitalWrite(7, 0);
}
else { // run in the opposite direction, i.e. backward
arduino.digitalWrite(6, 0);
arduino.digitalWrite(7, 1); }
}

void radio(int theID) {
  switch(theID) {
    case(0):
    direction = 1; // forward
    break;
  case(1):
  direction = 0; // backward
  break;
} }
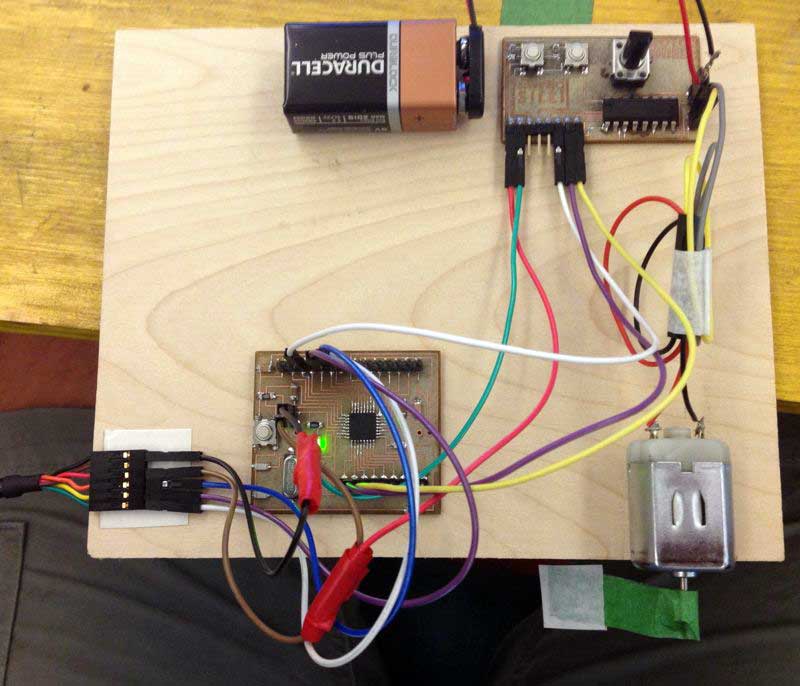
Setting up the Satshakit
The set up is the same as my Output device week's assignment. I still use my Motor Shield, but this time the two buttons and the potentiometer are not connected to the Satshakit. The input they where providing will come from the desktop application.

File available here