Only the bottom part of the object, it is missing the top part, due to printing flaws, I still have to re print it.
_PRINTING IN MAKERBOT
To design the object I used SketchUp for drawing the whole object and after that, I exported it to rhino and started trying grasshopper to get a parametric design of the top case of the object.
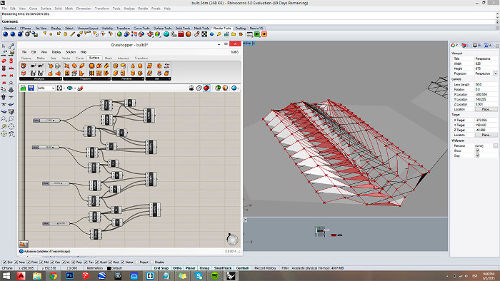
Attemps to do the upper part of the object in Grasshopper.
After the design was ready, I exported the 3d model as a .stl file. As I wanted the object to be translucent, I decided to print it in nylon on the MakerBot Replicator 2.
The first step for using the Makerbot Replicator 2, is to download the Makerbot Desktop and set the model of the machine: in this case, Replicator 2. The second step is to ADD FILE (.stl) and finally change the preset according to the material to be used. For printing nylon I used the following settings:
Uncheck Use Raft/Support
Filament Diameter: 1.75mm
Object Infill=30%
Layer Height=0.25mm
Number of Shells=2
Feedrate=90 mm/s
Travel Feedrate= 120 mm/s
Print Temperature= 255c


_3D SCANNING
The process of scanning myself took a bit long, but definetely took some useful conclusions. The first attempt was done manually with a high resolution camera, but it completely failed. I tried it both in 123D Catch and ReCap to check which had better resolution even though I knew the pictures weren't correctly done. And actually 123d Catch confirmed it.
Although both softwares worked with the same pictures, 123D Catch was really helpful to see where the mistake was, there is almost no order in the shooting sequence, which is not to easy to percibe while taking the pictures. The negative thing about 123D Catch is that you only ge to upload 50 pictures so you have to be more precise. On the other hand, ReCap showed a higher definition on the resolution of the model.
For a more precise scanning, I used the XBOX360 scanner, but first downloaded the Skanect software. The XBOX 360 works only for Mackintosh OS, so if you are using Windows OS, make sure to download and install the Kinect for Windows SDK (version 1.8)


_FIXING THE 3D SCAN
After scanning with, KUKA and Skanect I saved the file as .obj and sent it to Blender. Once in Blender, I filled the holes by removing the overlapped faces, vertices or edges and creating new ones. Then smoothen some areas and the model is ready to be printed.

Fixed model in Blender.
