I have previous experience with programming with Arduino platform and their boards, but I am far from advanced so I will do some examples before moving on with other programming languages. Before I get to doing anything, I have had to deal with a computer issue as I had to restart my operating system, which means I have to reinstall all the software required for the course (which turns out is quite a lot). Let's begin with some Arduino coding with the LED and Button on the Hello Board.
Starting off
Before we got started with programming our HelloWorld boards, James gave us a talk on the values of looking at the datasheet for valuable information. I must admit that 95% of the datasheet is hard to understand but it does give you some useful information such as understanding the pinOuts for the chip. It also showed me which pins were capable of Pulse Width Modulation which proved to be very useful when designing the board (there is no point putting a button the PWM pin, instead the LED can be used). Other useful information is the basic details of the chip including internal oscillation speed, memory storage and reset pin.
For a more advanced user, understanding how the chip can be programmed in C is very useful and I look forward to researching this further as it gives real life examples of implementing the code (in C).
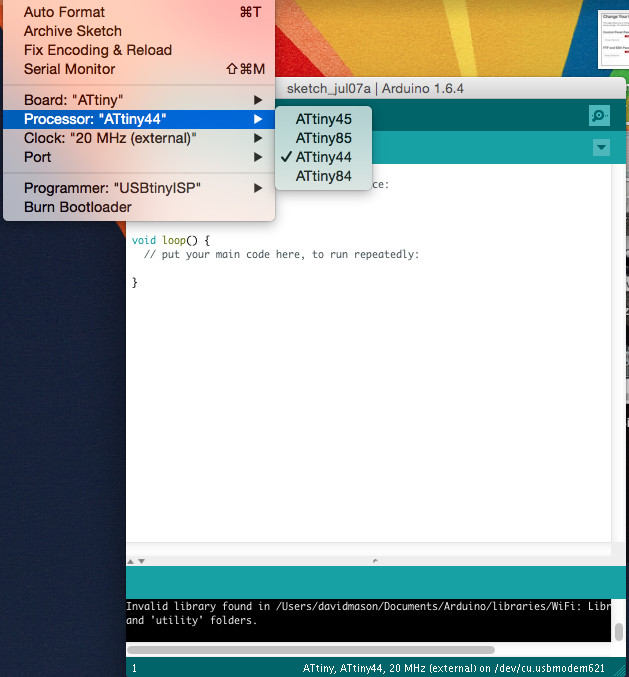
Using the Arduino software is very easy, once you have the right hardware on your computer (you need to download the attiny hardware file). Once in the Arduino software I then had to select certain options (see below)
I selected the ATtiny category
I selected the ATtiny44 option (works fine with the 44a)
As I put an external resonator on the board, I selected the 20Mhz external
If the FTDI cable was plugged into my computer, there would be an option in port. I would select that and then proceed to programming the Arduino like normal
Arduino Example 1 - Blink LED
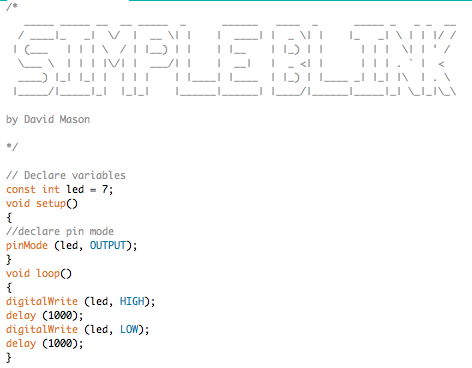
This is the simplest code going for the Arduino. The main features of this code code are:
Declaring variables - Though this is optional, declaring the name of the inputs and outputs makes it much easier for later when reading through the code.
Setup - Declaring the pinModes of the variables, meaning the LED is set as an output
Loop - Digitalwrite allows you to instruct the chip to set the voltage on the pin as HIGH (LED is on) or set voltage low (LED is off)
Delay - This is not a desired command most of the time in coding, as it stops all commands to the chip in the delay period (meaning a button pressed would do nothing). In the next programme, I will be achieving the same result but without with the delay command.
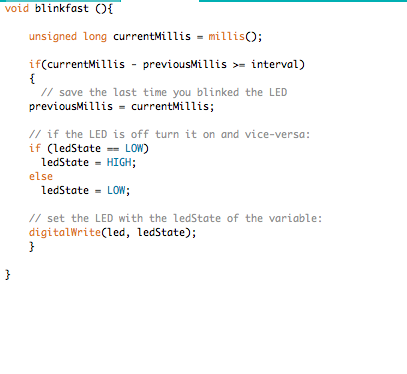
Arduino Example 2 - Blink LED with Millis()
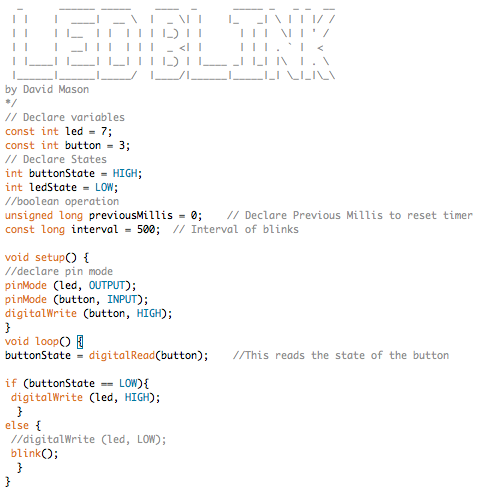
In this example, I have brought the button into the equation. This programme is based on the Arduino example but I have made some slight changes to highlight certain parts of the code.
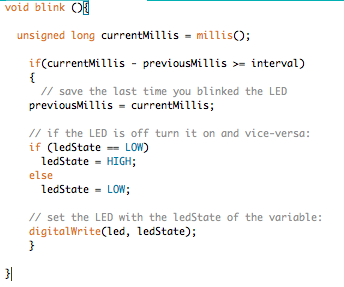
In this example, we use the millis() to count to an interval, and if we go above that we can run the blink code. This is very easy to use and we can change the interval in the global variables at the beginning of the code. With this example, the LED will flash when the button is not pressed, but will stay on when pressed. Here are the interesting points of the code:
The button 'int' is added, along with the button State which is a boolean state (HIGH/LOW) indicating the state of the button. Note the button is set to (digitalWrite - High) to activate the internal resistor in the chip.
In the loop, we ask the chip to read the state of the button and save that to the variable buttonState. We then use the if else rule, so if the button is pressed (when the button is pulled to ground), we can then instruct the program to turn the LED on
If not (else) we can 'call' a subroutine which runs a seperate routine. This is useful when you have a long and complex programme, we can then simplify it by calling smaller parts to run
Arduino Example 3 & 4 - Button for LED On/Off
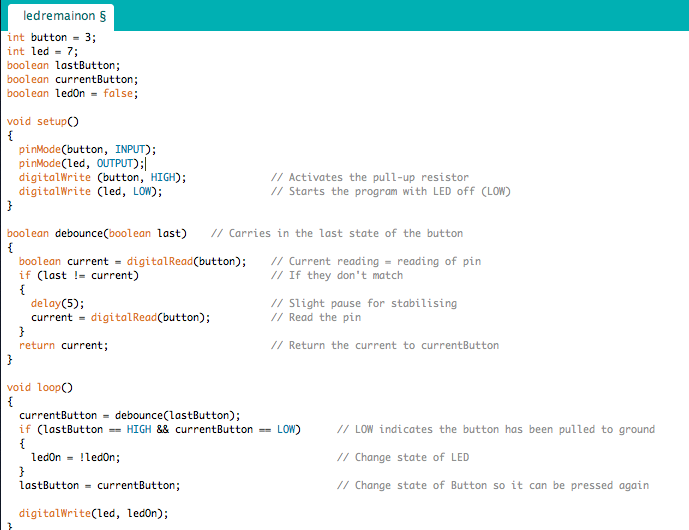
Pressing a button and the LED lights up is fun, but most of the time you want it to remain in that state. Getting the LED to remain on when pressed requires a little bit more work than you would think. The reason I chose this 'debounce' program was because the Arduino 'debounce' program does not change the state of the button until you have taken your finger off the button, so it is too slow. This is because it activates a millis() timng which compares the press to a set time. This can only read after you have taken your finger off.
This example is based on Jeremy Blum's 'debounce' LED function which compares, the button state again after 5 milliseconds to see if it was really pressed (as compared to noise on the button). 5 milliseconds is plenty of time for you to remove your finger from the button (you can't press it faster). Here is a breakdown of the sketch:
Added a few boolean operatives. One for last button state, current button state and ledOn. These don't need to be set at the start because they will be varied throughout the code excepet LedOn which makes sure the led stays off at the start.
A boolean debounce function (which calls the previous state of the button) checks to see whether the button has changed state
If it has, it will reread the button in 5 milliseconds and declare that to be the state of the button
This state of the button is 'returned' into the main loop where the state of the button is checked to make sure it is low (i.e. it has been pressed), then change the led state
Finally, the most important part is to make sure the lastButton = currentButton. This is to make sure that there is no difference later (last != current) on when the code repeats. This will change next time the button is pressed.
Arduino Example 5 - Serial Count
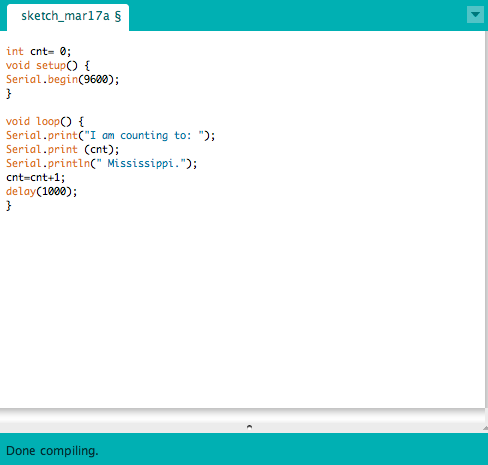
Now I had accomplished something with the LED and button. I wanted to try and achieve something with the serial monitor. After trying to use the Arduino serial.print("") command, I found that this was not recognised by the chip and after quite a bit of research I realised the chip didn't do serial communication like the Arduino Uno. So for awhile, I put aside my Fab Hello Board and utilised my Arduino Uno
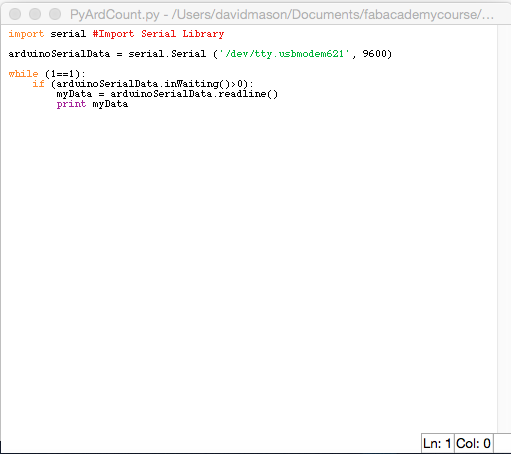
With this board, I wanted try and use the serial communication to read the Arduino, but I had also seen a good video of someone using a python programme to catch the serial command from the Uno which I found very interesting.
Looking at the code below, the Arduino code is on the left, whilst the python coding is on the right. I just followed the example for this sketch and got the python code to monitor the serial port. I intend to learn more about this process because I want my final project to have some sort of python/processing GUI to tell the state of the bath. If I am to do this, I will have to use the more powerful Atmel chips available at Fab Lab and create my own Fabduino. There are ways of getting the board to talk through a spare pin, but I have not found any easy way (not without Neil's ability in coding). This is an area I will be coming back to!
Arduino Example 6 - Ultrasonic Sensor
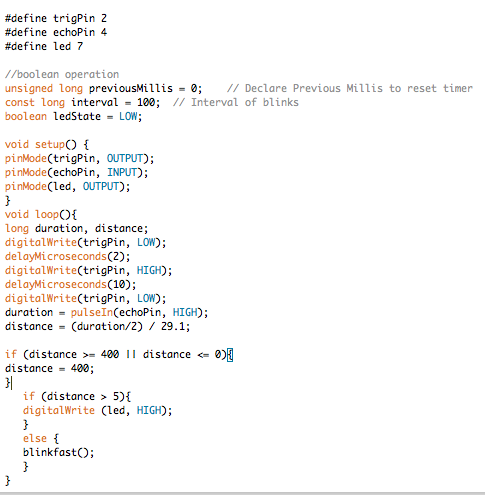
After failing to get my board to do a serial communication, I wanted to see how it faired with a sensor. I used my spare board and attached a HC-SRO4 ultrasonic sensor to 5v, GND, Trigger and Echo. I edited the code from Instructables which had a good page on my Ultrasonic Sensor. I will not go into how the code is done because I have not written most of it and I want to talk more about other topics later on. I then adjusted the program to blink if the water got to within 5cm of the sensor (a useful way of stopping the water at different levels.)
Below you can see my code and the actual working of the sensor in two seperate videos
Arduino Example 7 - Dim LED
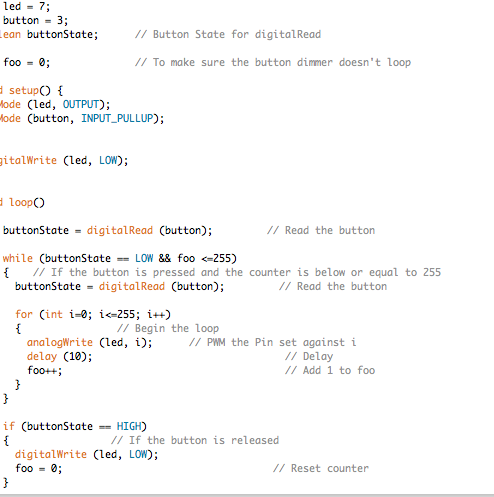
My colleague Kasper was trying to emulate a volume button with the button, and wanted the LED to dim whilst the button is being pressed. I decided that was a challenge, so I set about trying to code it.
My first example took a bit of time but centered on the button being pressed, and while this is happening the led will slowly dim because I have set a counter. This program is quite messy and following a very useful chat with James from last year's Fab Lab, we were able to shorten the code whilst retaining the original ability. I could have shortened the code to only use 1 counter (i.e. i) but the code had bigger issues because it didn't matter if your finger was held or not: it would dim the led up. I wanted the led to dim to a certain level and stay there. This was because the code was stuck in the loop. Time for some changes courtesy of James...
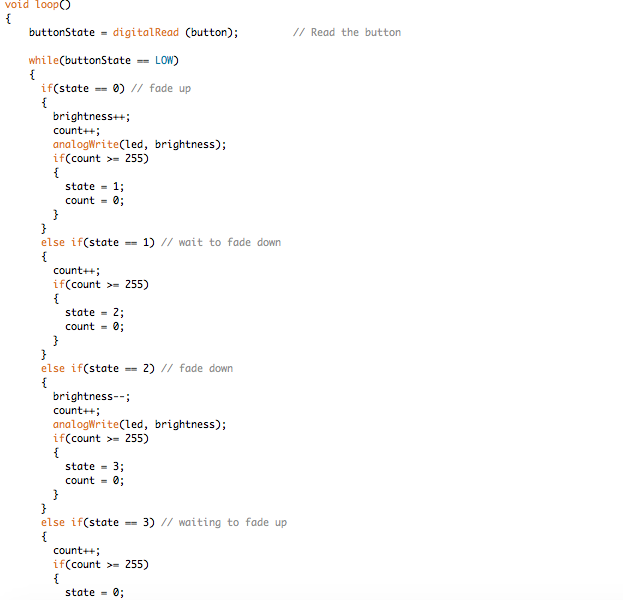
Arduino Example 8 - James help with Dim LED
James proved invaluable as I learnt how to use a state machine to setout my code to follow a certain path. In this code, if the button is pressed:
The LED will dim until to desired level. This will then stay until user wants to change it
If the user holds the button, it will cycle through 4 states of; led dimming up, led waiting to dim down, led dimming down and led waiting to dim up
This will cycle until the user takes their finger off, which will store that value.
This code has been the biggest learning of the week, but it takes time to learn how to think in such a structured way
My Downloadable Files
Arduino Files
You will need to put the correct Arduino files in a folder together to work for certain examples