
Embedded programming
This week is about programming small micro-controllers. Last week I made this little HelloWorld-board, I now will try to program to execute small tasks. The first thing I will try, is simply to turn on the LED by pushing the button. Afterwards I will try a more complicated program, where I can control the brightness of the LED with the button. This will illustrate the sound of my speaker, and there by the volume-control. My speaker needs at least two button, so I can turn up and down the volume.
Understanding programming
To understand how the micro-controller handles the program, I have looked into the attiny44 datasheet. The datasheet is a really long document, so you have to know what you are looking for before diving in. I wanted to get some knowledge about what the different pins can do, and how to "talk" with them. The datasheet can be downloaded here .
Before sending the program to the board it is important to get some settings right in the arduino software. Go to the tool menu, and here you can define which board, processor and clock rate thhere is the right one for the task you are about to do. I made the settings:
Board: ATtiny
Processor: ATtiny44
Clock: 20 MHz
Also make sure that it is the right port.
First coding
I will be using the arduino-software, because programming is all new to me. My first code should get the LED to blink. I have used an tutorial from arduino.cc. The code looks like this.
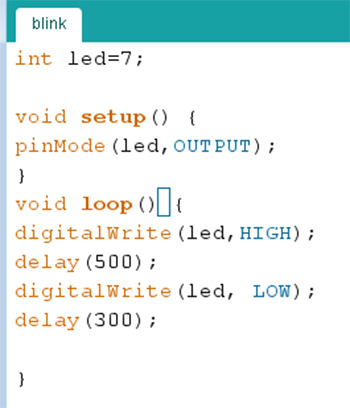
Here I will make a quick walk-through what I did. The code is build up in three steps. Before the void Setup function I can define some variables that I can later on refere to. ex. names of the different pins. In my code I will call pin 7 "LED" this mak the code easier both to write but also easier to read later on and understand. In the Void Setup, I define what the different pins are. To control the LED i would have to make pin 7 an OUTPUT, i do that by using "pinMode".
In the the Void Loop function I write the code it self. In this program I will make the LED blink by first turning on the LED by making a DigitalWrite High to pin 7, a delay, and then a DigitalWrite LOW. I can change the way the LED is blinking by vary the delay time. Now the program is ready to be send to the micro-controller. It worked well, I tried to change the delay time a bit to change the way the led blinked, easy and simple. You can get the code Here and another code I made to control the led by pushing the switch here