Assignment: 1) Scan an object (optional: print it) and 2) design and print an object that couldn't be done subtractively
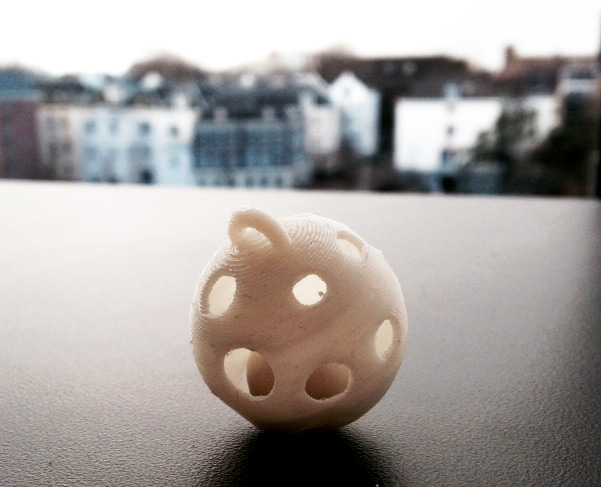
A ball in a ball, final print
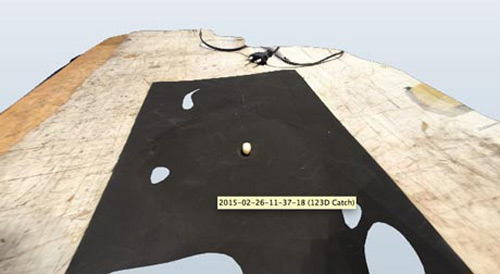
3D Scanning with 123D Catch
The first scan I made was by using the 123D Catch app for iPhone and iPad. I chose a natural pearl because it has a very subtle irregular oval shape that would be hard to model. The first attempt I did, i quickly found out that I needed to get way more up close and personal with my object. I had captured an entire table, and my pearl was so tiny that it was really pixely and not at all hi-res.
Second attempt: I got closer, but my iPhone was unable to focus properly and after 6 pics I figured I kept getting really blurry pictures.
Third attempt! I put my pearl in the photo booth and borrowed Casper's Olloclip x10 macro lens for iPhone to capture the images. TRAGIC fail....Shirley suggested a white background, which worked for her. Let's try it.
Fourth attempt! Taking pics on a white backdrop in the photobooth. Focusing was a lot easier now for some reason, perhaps because the relative difference between yellow pearl and white background is smaller than (so less overcompensation on the automatic white balance). Wow gigantic fail again! My pearl looks like a shell now, or a boob...Well by the looks of current prosthetic boobs and bras getting a good model for that is hard enough nowadays, maybe there's money in my pearl boob, haha. Almost the same but not really. I'm starting to think it's the reflective quality of the pearl that's giving problems because the other students are getting their scans in with much less problems.
I'm not giving up on the pearl but I need to try something else now. To rule out my failures are caused by the shiny surface. So I did my bird machines. Now this is more like a 3D scan. It's just upside down...and missing some of the cutout details and it's funny about the surface it's standing on.
Conclusions 123D Catch
Get really close!
Be very patient
Take care of lighting
The resolution is not very high
Don't use objects with reflecting surfaces....
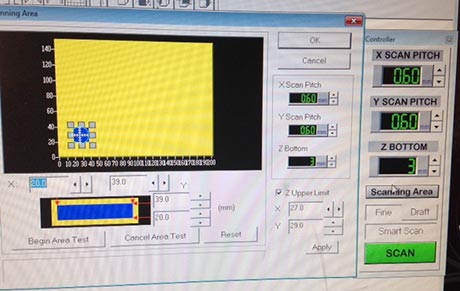
3D Scanning with the Roland Modela
A quick and dirty scan
After Shirley's object took hours and hours I decided let's go for quick and dirty. Compared to a walnut my object is not only very small but also less complex in terms of curves.
These were my settings, I was done in 10 minutes. Well I would never have been able to model this in 10 mins with the skills I have today. About the scan pitch: 0.6mm compared to 0.2mm for a walnut is quite a big one but it worked well enough for practice).
I glued the pearl on with some hotglue. And filmed it. Because this is like machine porn. Wow :D
Oh yes and of course some pictures of the results
The steps to scan with a Roland Modela:
Boot windows (Linux is default)
Change the proces - machine sends info instead of receiving.Change milling head to scan head
turn machine off
pull white plug out
unscrew 2 plugs on the side of the square
clean machine with a cloth
screw on scan head
put white plug back in (carefully)
turn machine on
take out sacrificial layer, put back original metal plate
Go to > Devices & Printers to disable the standard driver (used for milling):
right click on Modela > printer properties
>ports > disable COM2, and enable any other port
Open app Dr. Picza
Controller panel:
Pitch: can't be lower than 0,05mm because it takes forever
Z-bottom = how low it should go (cannot scan overhangs)
enable "Z upper limit" and specify the x & y
The machine's zero point is the hole on the bottom left
make sure object is steady (hotglue!)
define scanning area: be precise to save time. note: "begin area test" shows you on the machine what it's working area will be. It stops at the furthest points, but also in the middle, and finally in the origin. Don't be confused.
set upper limit = how far up it should go, what is the highest point of the object
click "APPLY" to check the upper limit, adjust if necessary
hit SCAN
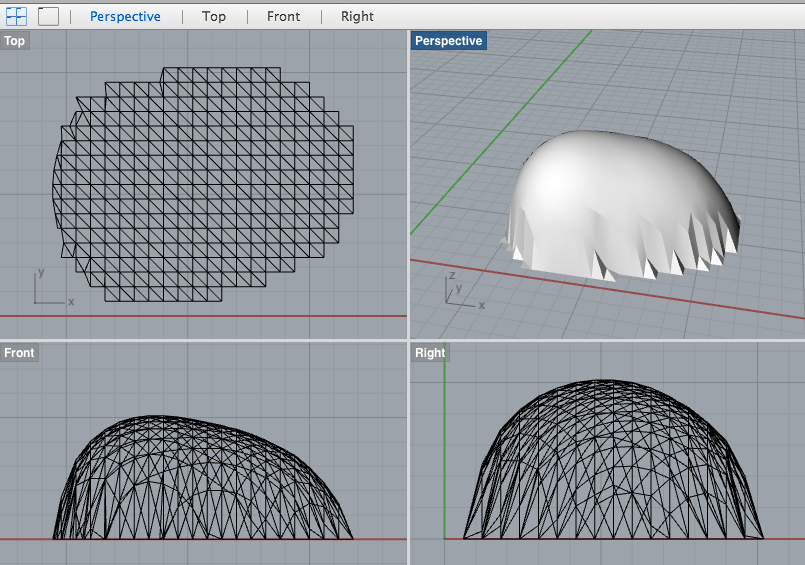
3D modelling an object that couldn't have been made subtractively
I modeled up some ideas in Rhino, one thing is a pendant that reminds me of an ivory thing my grandma had from Ceylon. I haven't been super thoughtful about the design because I also just had to practice. But I tried to keep it small.
Design process in Rhino:
make spherical surfaces
put three small spheres inside big sphere and put on separate layer
used smaller ones to trim holes in the big ones. This breaks the edges of a solid so it becomes a surface
for each sphere: offset surface by 1 mm, tick "solid" to make it a solid again.
select the surfaces underneath the new solids, delete them. Actually later I found out that you can use the shell command in Rhino to do this more efficiently
analyse > edges. If any, delete naked edges
Exported to STL as binary with 0.1mm tolerance
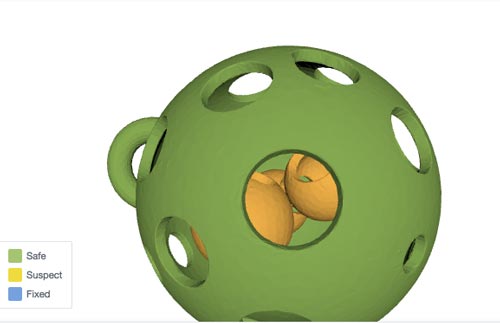
I uploaded my first design, a ball with three smaller balls inside and various holes cutout to shapeways because I know it has some handy tools to tell you whether your model can be printed and if so with which materials. If there's problems with it, eg. with wall thickness and space between objects. It will point out the problem areas too and help you fix them, in some cases. Really handy. My model shows problems for some materials, but not for others.
Shapeways can fix some stuff that you can then download as X3D file, but Rhino doesn't open that. But with this knowledge I can also go back into my design and try to fix the wall thickness of the inside balls (min 1mm), and the proximity of the inside balls. I kept having open edges showing up all the time. And I guess the space (1.8cm or so) was a bit small for three balls that have thick enough walls and enough space between them. So I replaced them for one inside ball, problem solved.
I kept having problems with my upload to shapeways because of problems with the scale. It kept saying my file was 468 metres(!) long. After some searching I saw than a small object had flewn off into 3D space. My design passed the shapeways check so I'm happy to try printing it at de Waag and on Monday at HvA where they have a printer that can print support that is dissolvable with acid. Who knows, if it looks good maybe I'll treat myself to a brass version.
Using the Ultimaker Original
Fablab Amsterdam has Ultimaker original as weapon of choice. I printed my ball (with no ball inside) using Cura. I deleted the inside ball because these printers can't create support that can be dissolved. I'll keep that for later. Above you can see attempt 1 (on the left) and the second attempt (on the right).
1st attempt on the Ultimaker
we printed support (type = touch buildplate) for this one, but it wanted to build a pole inside the ball. The inside should be empty so that's ugly
the outside of the ball was really rough and bobbly, probably because of the wall thickness being very thin: 0.1mm
also the quality was really low. I kind of like the wobbliness of it but gonna try a better quality to understand the process a bit better
2nd attempt on the Ultimaker
this time we printed without support, this gave much better results and no pole
the walls are thicker now: 1.0mm rather than 0.1mm which makes the outside smoother
the cutouts remain quite rough
there was a problem with the retraction (probably too slow), which is why there's hairs in the cutouts
a known problem is that the fan cools one side more than the other. Because my sphere has no support, it started overhanging on the right side when it reached the widest point of the sphere
as it started printing the eye on top, it started wobbling a lot. Of course it doesn't have much of a leg to stand on. you can see that the eye is a bit droopy because of that too.
These were the settings I used for the second one
Steps to operate the Ultimaker Original
Filament
usually you'll work with PLA because ABS has toxic fumes
ABS gives smoother objects because you can polish it with aceton
look also at other materials such as plastics mixed with: linen, wood, polyflex stuff, bronze etc
shapeways has loads of different ones to print a design to order.
filament we use for ultimaker is 2,85-3.0mm
Machine: Ultimaker Original
turn on machine
open Cura 13 (don't use 14, don't run updates)
Load STL file
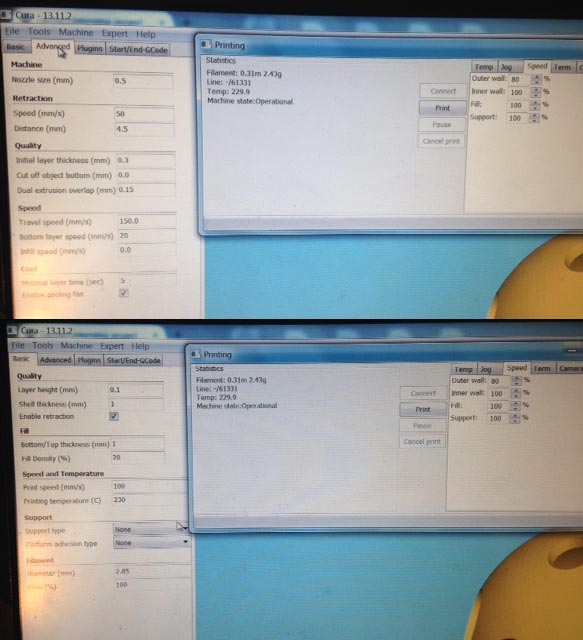
work in expert mode, not quick print. > Expert > full settings
settings Hover over settings for detailed information
layer height = thinkness of printlines. Thinner is more precies but risk of burns and defomration of objects. Range: 0.25-0.6
keep shell thicknessand bottom/top thickness should have thesame settings
fill density = keep it low! 20 is usual
temperature: see box of filament if unsure. Usually ABS = 230 and PLA = 190-210 degrees. You can tell from the way the filament flows whether it's at the right temperature. When it's not moving it should build a perfect tower (see pic below)
in advanced: set nozze size to 0,5
in advanced: retraction speed 50, distance 4.5
hit start print to open new settings screen
click 230 so nozzle heats up
use jug tab to test filament flow before you print (perfect tower!)
speed = don't go over 130! outer and inner = 80-90%, fill = 110-120% and support= 130% so it's a bit thinner and easier to break away later
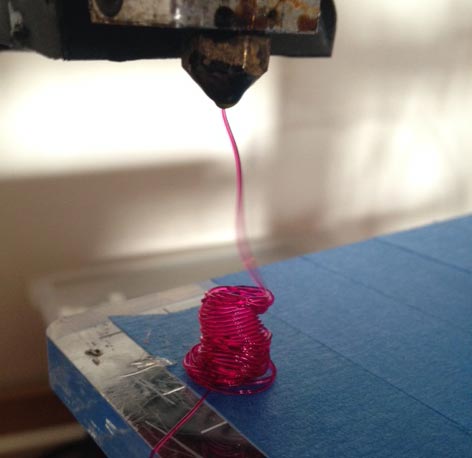
load filament
straighten first end of filament
release balck clip, stick it in and push out residu by clicking > jug > extrude. Lock clip
make a perfect tower!
> then hit PRINT! And wait til done
> to kill a job: click cancel print... then quickly go to JOG and double click Z to move the nozzle away from your object.
> remove filament while nozzle is still hot!
--------------------------------------------
Using the uPrint (Dimension)
At the university where I teach, we have a make space with a uPrint Dimension. The software of choice they use is CatalystEX, also by Dimension. The workflow is relatively easy and very comparable to Cura. You check the sizing, orientation and some settings and you send it to the printer. One benefit this printer has is that it prints special support material that you can wash away afterwards, which will allow me to print my ball inside the ball. It calculates all this itsef.
Some features
It calculates how much support the model needs and builds it. You can make nested objects and moving objects really easily that way
it calculates itself how thick the walls should be and how high the accuracy should be, not much to choose there
it heats up the nozzles but also the inside temperature, this results in more accurate sizing because the model will shrink less during printing.
the printer and the software show you an estimate of how much filament there is left in the machine.
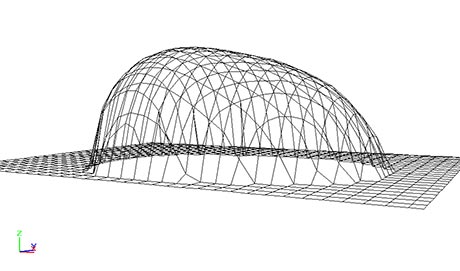
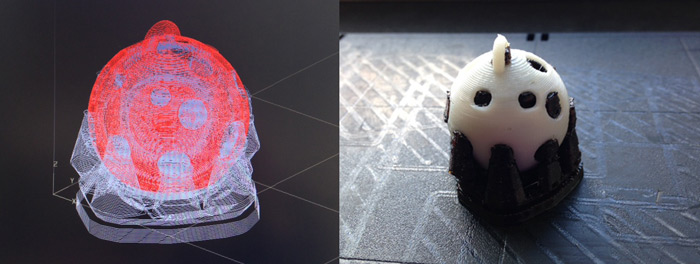
it also has a view option that shows you how the layers will be built up (the blue material is support, the green material is the actual model. See a video below going through the layers of my model
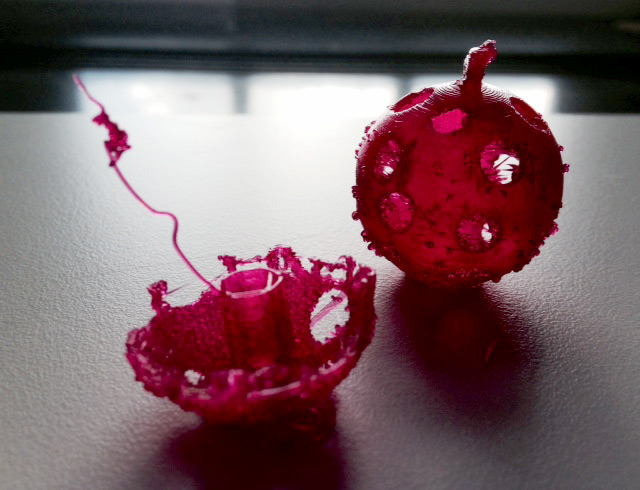
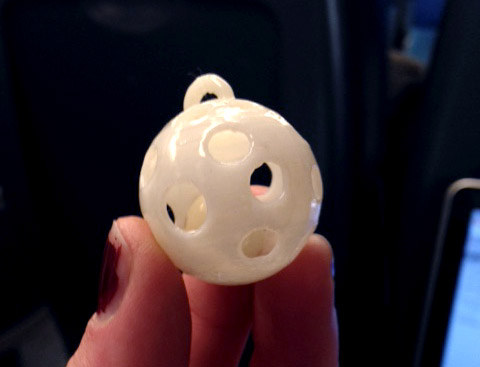
the material used is ABS, ivory color
the nice thing about the automatic support structure is that you can fully choose the orientation of the object: if you want the ridges of the printlines in a certain way to make it look nicer, you can do that. Considering that you might waste more support material
I also learned that any straight corners with sharp edges will become more vulnerable and it's better to make rounded curves to make them stronger.
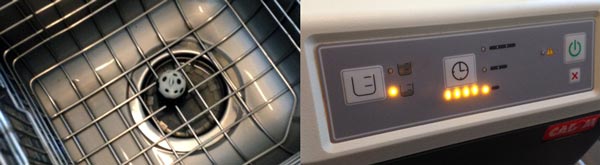
My print job took about 1.5 hours (the printer is very accurate, but not very fast. And it generates a lot of waste in terms of support material I guess. Nice for some projects but not really quick and dirty or adjustable. After printing I removed the support material by washing it out in a WaveWash machine with biodegradable citric acids (and other stuff). I washed it for 3.5 hours on the short cycle, half full progam.
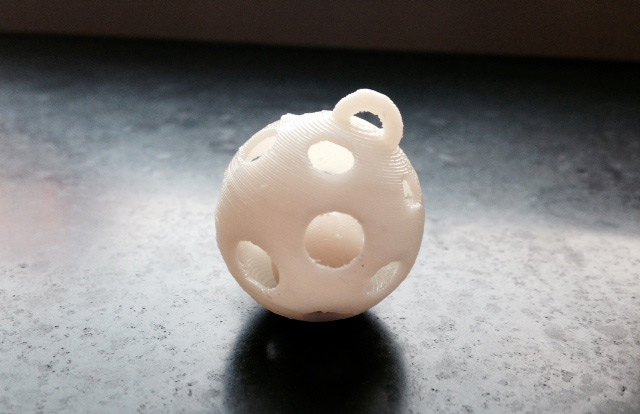
It looks supernice! Really tight print, some strings there as well, but nothing i can't tweezer away.
Polishing ABS prints with aceton (doesn't work with PLA)
The next day I went to the chemistry lab at my university to get some aceton rub going. I wasn't really impressed with the results of rubbing with aceton, so looked it up and only then I saw that you're supposed to polish it with the vapor of aceton. Like in this DIY tutorial.
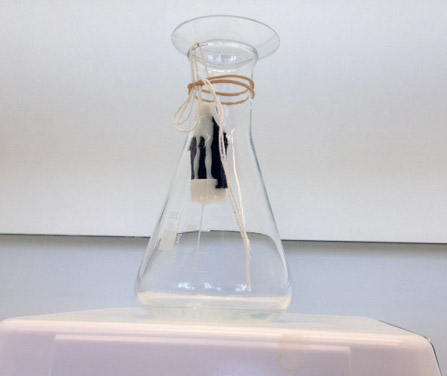
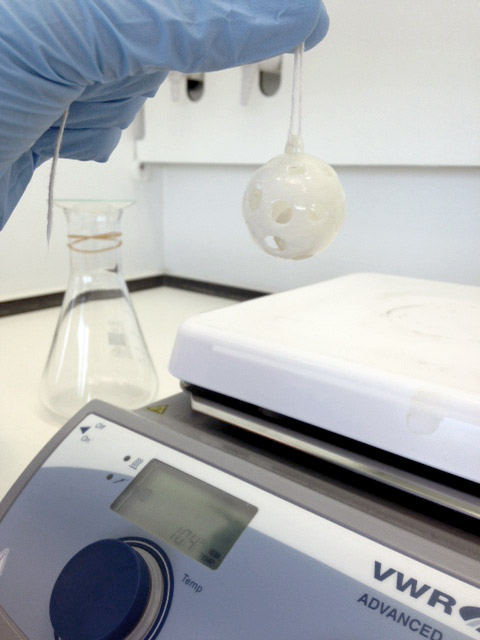
The prac assistant offer to help me again with that so I went back a week later. It was done in a jiffy! Just a simple boiling plate, piece of wire and an erlenmeyer, oh yes and a professional chemistry suction system for the toxic fumes....:). I first tested with a failed print (miniature version of me) to play hangman in the bottle:
The aceton vaporizes around 60 degrees, you bring it to the boil first, then lower your piece (we put a rubber band around the bottleneck to secure its suspension), cover it with a top glass, wait for 10-20: when it gets glossy its done. Take it out before it starts drooping, then it's dissolving too much. Hold it up to dry, don't touch it, you'll make marks. The ball inside got glued to the wall, I could wiggle it loose afterwards, but it leaves some traces. Anyhow: wonderful results!
Extra extra: scan to print with Autodesk Memento (beta)
Rather than cleaning and printing my pearl. I will look into autodesk's app Memento: an app that allows you to scan objects and clean the meshes to make them fit for printing. I will try another object at home and see how far I can get with a print
First problem! This is only for Windows, luckily I could get my hands on a machine. Then found the setup got stuck because it can't find a licence agreement for Dutch (same problem goes for German users). Solution here though! Make small change in the AdskLicence.ini file (change Dutch.rtf to English.rtf.
Ah time was up this week before I continued this track. I spent some time working on the mechanical movement studies and made the second version of the handcrank cam wave instead.