INTRODUCING

DEVISED
AND BUILT AT
FAB LAB
MANCHESTER
2015
Phílip Hemstead, Dåvid Mason, Käsper Andersan, Sâlly WIlliams
Phílip Hemstead, Dåvid Mason, Käsper Andersan, Sâlly WIlliams
Group Assignment:
• Make a machine, including the end effector
• build the passive parts and operate it manually
• document the group project and your individual contribution
Brainstorming
Over the course of a few days, we all brought to the table different ideas that might suit the challenge of Mechanical and Machine Design. These included a 3D scanning bed; golf putting exerciser; robotic arm; hot wire cutter; roulette-style random page selector (for Neil).
The one that had the overall approval by the group, was an idea by Philip Hemstead - a digitally controlled ball-tilting maze game. This would usefully utilise the the capability of the stepper motors to provide control over the level of the game-bed plane to move the ball through an obstacle course.


FABNET :
The 'Fabnet' network would provide the communications system for the machine using muliple nodes whilst sharing a single set of communication wires - described below:


Connecting the Fabnet Adaptor to a single node:

Assembling cardboard stages
We made two linear stages. The cardboard cut files were downloaded and Pacon 80% recycled spotlight single-walled tri-fold presentation board cut on the Epilog laser cutter.
The Epilog 2'x1' bed meant the frame parts were cut in 3 parts with box joints and glued together using Gorilla glue, this did not work as there was no cardboard in the box cut to glue, so the joints were gaffer taped together.
In Nadya's <a href=“http://monograph.io/james/m-mtm” target="_blank"> instructions </a> she recommends gluing all cardboard laminate parts to achieve maximum stiffness. In haste we omitted this step causing issues with robustness of the stages.</p>
There was a problem assembling the frame, stage, shafts and stepper motor/leadscrew parts together - they did not fit! As a work around we removed the inner lengthways flaps from the frame to get the stage to fit with the aluminium shafts. Also the stage internal dividers interfered with the exterior cardboard so were trimmed to get the stage to fit together.


The second stage was assembled ready for the the maze assembly and fixing.
Building the housing for the stepper motor:
Cardboard was cut on the lasercutter using the templates provided:

Calibration
The python code defined that 1 x revolution of the leadscrew would travel 6.096mm. This did not reflect the distance for the leadscrew supplied in the kit. This was estimated to be 8.0mm, and this was changed in the code. With this calibration, a request to move 10mm would deliver 10mm.

(David Mason) Creating the control console with wx python:
wxPython is a visual front for Python script (which Gestalt runs in), therefore we aimed to create a visual control for the stepper motors. We began by looking what was required for a button to be pressed on the interface. Once we had a button interface, we then made it adjust a value +-10mm. This was achieved with the assistance of James Fletcher (alumna of Fab Academy) who helped to take snippets of wx code that would help to build up our code. Below is snippets of the code and how they operate;operateopsnippets uilhelp thelped to ;
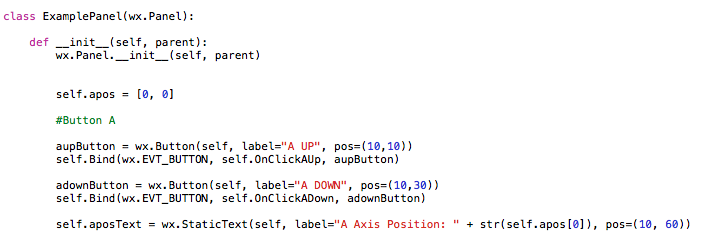
In the example above, we declare an object which will be the location and identification of the button. The button has a label and a position plus the position. This is a relative position and will be updated when the stepper motor moves.
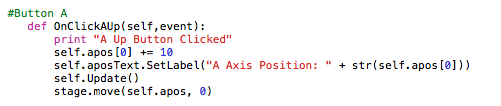
In this example, the button (AUp) is linked with the axis position and the stepper motor (in this instance, this is the X axis as the self.apos is 0). stage.move self.Update() then update the axis.e t()te selfpos

In this snippet, the y and x axis stepper movements are defined as well as the direction. This is important because the final section determines the direction, I ended up having to change the direction in self.apos[0] instead of choosing TRUE or FALSE.ded

Finally we add the section which produces the frame on the screen 'frame.Show(True)' which allows the user to control the stepper motors with the visual display. The supercoords were used in the previous application of this Python code, this is now not called.
Issues with wxPython
It is a great skill to have a visual way of controllingthe stepper motors, but it soon became clear that the application is not very responsive to quick movements, and pressing too many times could crash the application due to too much information. At this present time, we have not found a clear way of alleviating this situation therefore the experimental code will not be published.


Creating the game maze bed on the lasercutter:


Lasercut plywood maze design with living hinge to enable flexibility during bed-tilting (Kasper Andersan)

Link to Tutorials:
Fab in a Box
Tutorial
Explanation of Fabnet
Download files:
Fabnet Board size