Using CorelDraw with the Laser Cutter
I. Introduction
This guide will introduce you to using CorelDraw with the Epilog Mini 24 Laser Cutter, and teach you how to create a new document or import your pre-existing design and format properly to be sent to the laser cutter. This is the current supported system at the AS220 Labs, use this as a reference if you forget the steps to laser cutting.
II. CorelDraw X5
CorelDraw is a vector design program that is compatible only on the Windows Operating System. It is recommended that you design outside of CorelDraw and import your design. CorelDraw is only a means to job setup and printing, please avoid designing with it. Our laser cutter computer is located directly to the right of the machine, you will find the software shortcut on the desktop on the computer, double click on it to open.

1. Welcome Screen
On this screen, you must decide whether you want to create a new document or import a design that you have already prepared. Select “Open other...” and navigate to your design file to import it. Check out the “Importing Files” section to find out more about file format and compatibility. If you wish to start from scratch, select “New blank document” and you will be prompted with the new document settings menu.

2. New Document Properties Menu
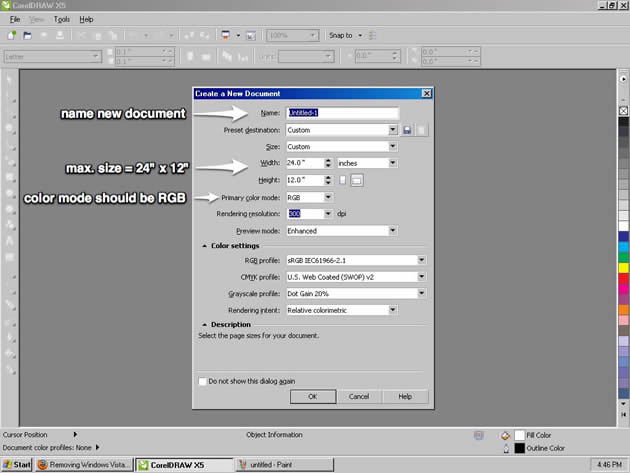
There are a couple of important settings that all laser cutter documents should have:
- useful file name - please include a name that is easily recognizable and a date and/or version number - example of a good file name = “10_21_2011_pressfit_birdhouse.cdr”
- document size - our laser cutter has a 24” (width) x 12” (height) working area, please keep all documents sizes to a maximum size of 24” x 12”.
- color mode - the laser cutter coverts the color mode into a greyscale mode before engraving and cutting, for the most successful results please always use RGB.
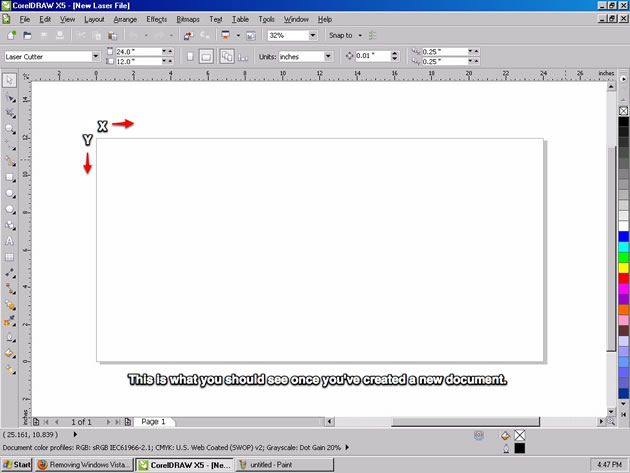
3. Document View
Whether you open a preexisting file or create a new one, you will see the document view when you are prepping your design for cutting/engraving. If you have set your document to 24” x 12” in size, then you will see a document that represents the entire work area of the laser cutter. The orientation of your document and the laser cutter are the same, the X direction is the width of your document and the direction that the X Carriage of the laser cutter travels. Likewise, the Y direction is the height of your document and is the direction that the Y Carriage that the laser cutter travels. The home position for both is the top-left corner.
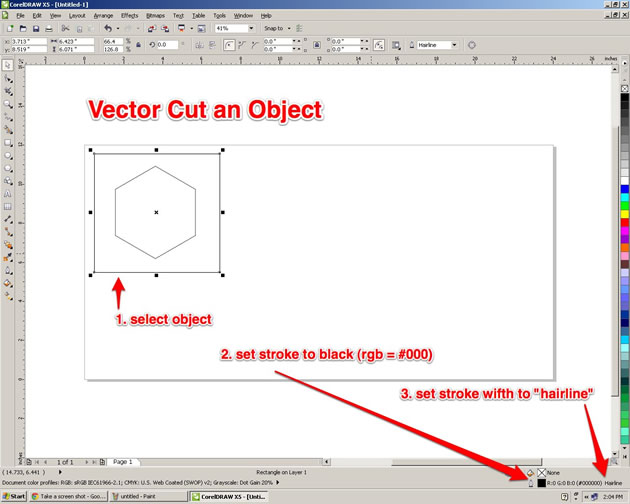
4. Setting up an Object to Vector Cut
Vector cutting is when the machine is tracing the shapes of the vectors cutting through the material. If we want to cut shapes out of our material, this is the mode we want the laser to be in. In order to the machine to cut an object out, we have to set the properties of that object to the following:
- No Fill = remove the fill of the object.
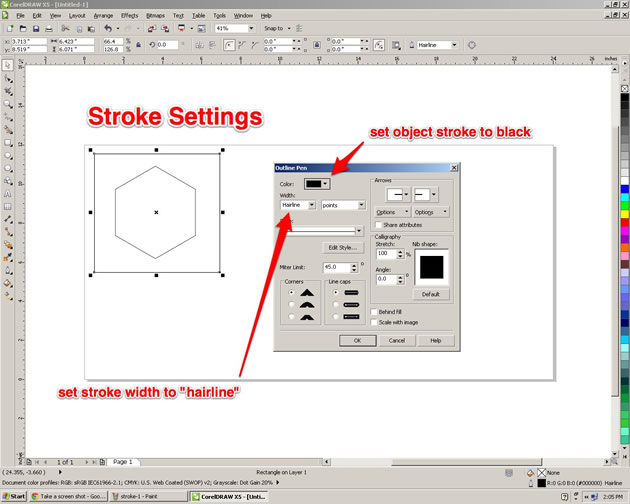
- Stroke Color = set the stroke color to black (RGB = #000).
- Stroke Width = set the stroke width to “hairline”, a dimensionless unit.
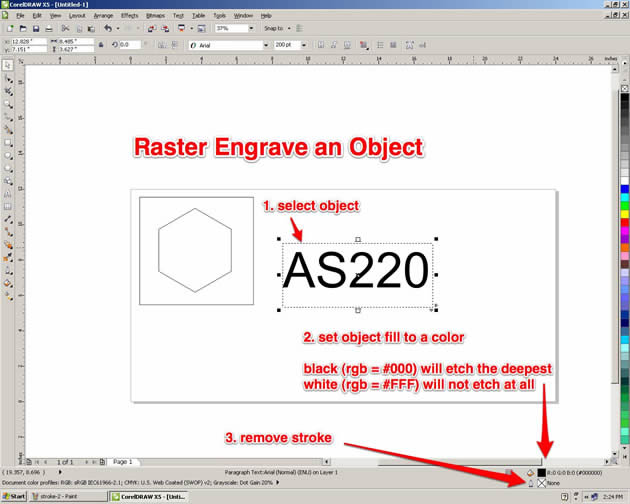
5. Setting up an Object to Raster Engrave
Rastering is when the machine is engraving a graphic into the material, it is a similar process to an inkjet printer except that it removes materials to create the graphic instead of adding layers of ink. Raster engraving is a bit more forgiving than vectoring, we have some room for experimenting with different settings. This also means there is not a clear path to a “good” engrave, that will determined by you and the job you are trying to do.
In general the following properties can be applied for engraving jobs:
- No Stroke = remove the stroke of the object to avoid accidentally cutting it out.
- Fill Color = set it to black (RGB = #000).
Note about colors and etching - the machine is going to map different colors to different etching depths. This is how the machine is about to etch a complex graphic into a piece of material. The machine will map Black (RGB = #000) to the deepest part of the etch and it will not etch White (RGB = #FFF). Any colors will be mapped to a gray scale mode and will etch to depth somewhere in between Black and White.
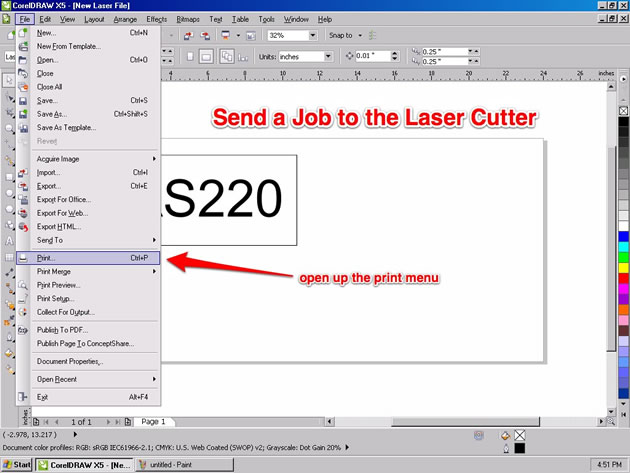
III. Using the Epilog Print Driver
1. Setting the Laser Cutter Properties
Once you have gone through and properly formatted all of your vector cuts and rasters, you are ready to set up the appropriate machine settings based on the material that you are using. This is a very crucial step! Failure to pay attention to all the settings and you may ruin a perfect piece of material.
To edit the machine settings, first enter the general print menu. The laser shows up just like a normal home printer machine.
Once in the printing menu, select “preferences” to edit the machine properties.
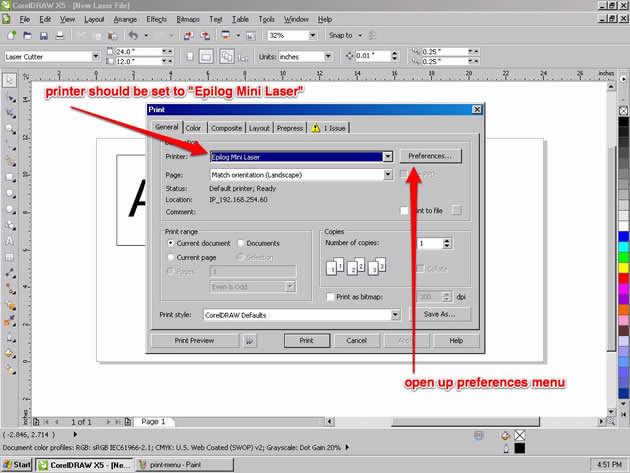
You will then be prompted with the official Epilog Laser Cutter Printer Properties dialogue. This is where you adjust all of the machines settings according to the material that you are using. Please check out the materials guide located above the machine, and also check out the Epilog recommended settings.
IMPORANT: If you don’t know what you material is, don’t cut it! Especially if you think it is made of vinyl, pvc, or any chlorinated material.
Step 1 - Resolution (only if you are engraving)
If you are engraving any objects into the material, you need to select what resolution you want the machine to operate at. It has the ability to do high resolution (1200dpi max) for really delicate and detailed engraving, but it also has the ability to do low res work (75 dpi min) for rough sketches or mark making. 300dpi is a good standard resolution to use for most jobs. An important to know if that job time increases significantly with an increase in resolution. If you are just prototyping, its usually best to keep the resolution low.
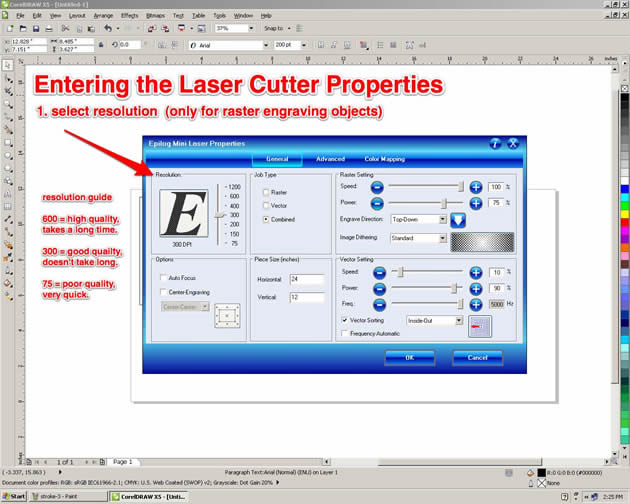
Step 2 - Job Type
There are three different types of job types on the laser cutter.
- Raster - used for only engraving onto material
- Vector - used for only cutting through a material
- Combined - used for doing both engraving and cutting in the same job

Step 3 - Options
The only option you ever need to change is “Auto Focus”. By default, this will be set to be off, which means you need to manually focus the machine. If you want to use the auto focus feature on the machine, click on the button to activate it.

Step 4 - Piece Size
This is important. If you do not change this, it will be set to 8.5” x 11” by default. This is not the size of the laser cutter or your document, and will result in a incorrect job. Change this to 24” x 12” which matches your document, this will give you the best results.

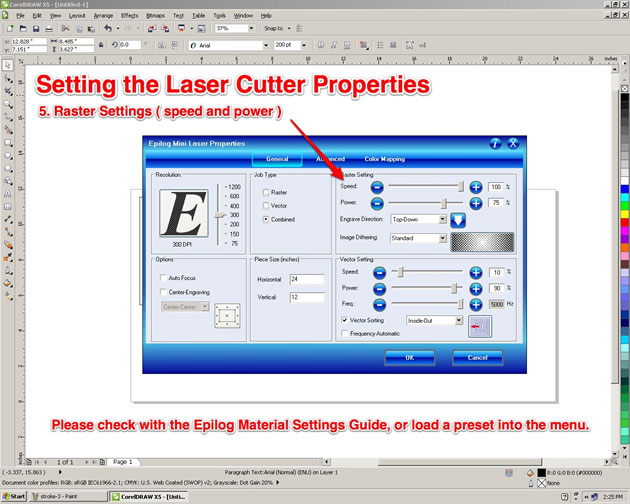
Step 5 - Raster Settings (if applicable)
If you are doing any engraving you will need to set a couple of settings here:
- Speed - This controls how fast the machine will engrave into the material. Slower speeds will result in a more power etch, because it will be spending more time on the material
- Power - This controls how much power (out of 35 Watts) you use to engrave. The higher that this is set, the more power will be used and the deeper the engraving will be.
Please refer to Epilog’s Material Settings guide if you are unsure of the settings you need to use for your material.
Step 6 - Vector Settings (if applicable)
If you are doing any cutting you will need to set a couple of settings here:
- Speed - This controls how fast the machine will cut through the material. Slower speeds will result in a more power, because it will spend more time on the machine.
- Power - This controls how much power (out of 35 Watts) you use to cut. The higher that this is set, the more power will be used and the deeper the laser will cut into the material.
- Frequency - The laser is not a continuous stream of energy, it is actually pulsing down on your material. The rate at which it does so is determined by the frequency. You can set it from 20-5000 Hz (pulses per second).
- Vector Sorting - You select from “inside-out” which will cut the vectors in your design from the inside out, prevent larger objects with inside cuts to cut first. The other option is “optimize” which will cut your design in the most efficient way.

7. Sending the Job
Once you have entered in all of the settings you need, double check to make sure everything looks okay. Then press “OK”. You will then be brought back to the normal print menu, click “Apply” to save the settings in case you need to go back and make some small tweaks, otherwise you’ll have to start from scratch. Finally, select “Print” on the print menu and your job will be sent to the laser cutter and will show up on the display screen of the machine. 
