
This week we had to program our hello-world board to make it work with LED and button. The easiest way was to make it is to use the aduino IDE. To do that you need to pass through four steps:
This week I am trying to pass through this assignment only using ubuntu on my notebook. I have dual-boot with win8, so maybe later I'll describe the other way to do that.
Arduino IDE is easily installed from ubuntu app center. You can also install it from terminal by typing "sudo apt-get install arduino".
To add attiny44 to the list of controllers in arduino IDE you need to follow the instructions from here. If shortly, you need to download the specifications for needed controllers and copy them to the sketch folder. Doing so in Ubuntu I faced a strange thing: I could not get acces to usb to flash the controller unless I was launching arduino IDE as a root-user. But in this case the sketch-folder wasn't located in my home-folder. Instead of this it was located in "/usr/share/arduino/examples". That was a little strange to me and I didn't understand it instantly, but then I just copied the specifications file to this folder and everythig began to work well. So, be careful!
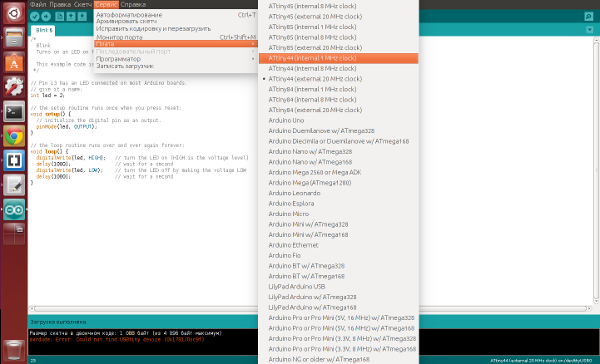
After you finish with specifications you can choose tiny microcontroller from the list:
screenshot TBD here
NOTE: when I was watching through tutorial I saw that there is a board manager that allows you to make the list of controllers shorter. Didn't try it yet. Instead of this I just deleted those parts in specification-file that were not related to the controller I was about to use right now (before doing so I saved the copy of this file to have a backup in case I do something wrong).
Those specifications mentioned before are nithing but parameters needed to compile the program for avr-microcontroller and flash it.
The file boatds.txt consist of text blocks with parameters for different microcontrollers like this (for example let's see the text for attiny44 with internal 8 MHz oscillator and clock divider (result frequency is 1 MHz):
attiny44.name=ATtiny44 (internal 1 MHz clock)
attiny44.bootloader.low_fuses=0x62
attiny44.bootloader.high_fuses=0xdf
attiny44.bootloader.extended_fuses=0xff
attiny44.upload.maximum_size=4096
attiny44.build.mcu=attiny44
attiny44.build.f_cpu=1000000L
attiny44.build.core=arduino:arduino
attiny44.build.variant=tiny14
What are those parameters? first one is just name definition (to display it in arduino IDE), then we have three fuse-bytes (they configure the way microcontroller works like if the clock source is internal or external, or wether SPI is enabled or disabled and in what ange of frequencies does the oscilator work and many more. For more information see the attiny44 datasheet); the rest options are the maximum sketch size, the name of microcontroller (it is necessary to know for what CPU do you build your project), the CPU frequency, set of "core" files (those which allow you to use arduino functions) and the pinouts for the current microcontroller.
I highly recommend to read the microcontroller datasheet to improve the very understanding of the programming process even if you are using the arduino IDE. It can be also helpful if you need to use the microcontroller you have no specification for.
Writing code in arduino IDE is really simple, because you have a lot of examples and though you are programming with c++, in fact you have a lot syntax constuctions that save you a lot of time. But at the same time arduino-programming has really poor optimsation. That's why I would like to make a step further shortly. After passing the preparations described above flashing attiny-microcontrollers is just as easy as flashing arduino itself.
When your code is ready you need to upload it to the microcontroller.
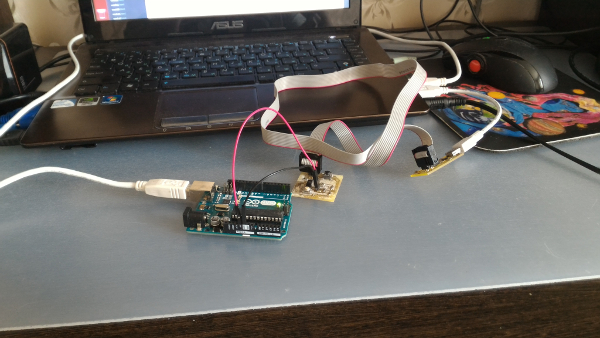
That's done easy. Just connect the board to your ISP programmer(I used Fab-ISP, but still it's possible to use the arduino as an ISP-flasher) in a right way and then choose the right board in arduino IDE, and then use "upload with programmer" from "file" menu in arduino IDE.
|
|
|
|
That is it. Our HelloWorld-board is flached and works well. I made a mistake while developing it and forgot to add the FTDI-connector, so I had to solder extra wires to attach VCC and GND. Let's see how does it work!
I flashed my board with example sketch "blink" from arduino IDE. It makes my board turn the LED on and off every 1000 milliseconds:
To do so I modified the ordinary arduino IDE "blink" sketch. The source code is here
The next step in playing with my hello-world board: turning the LED off when the button is pushed and turning it on again when it is released:
To do so I modified the ordinary arduino IDE "digital read" sketch. The source code is here
And the last thing in this scope is making a trigger i.e. to turn the LED or off whenever the button is pushed. To debounce (avoid multiple reaction for single pushing the button) I used the delay for 300 milliseconds (It is high above the necessary level which is about 50 milliseconds as far as I know. It helped me while debugging and I didn't change the time because it is nor necessary in this case to react really fast).
To do so I modified the previous sketch. The source code is here
There are many interesting challenges ahead: making electronics for my final project, finishing the input/output devises and network assignment. What I want to try is to start programming avr on pure c with assembler incapsulations. I studied that in theory, hope thats not too long left for practice!
Back to my main page