Final Project :: 44aRDUINO
contents
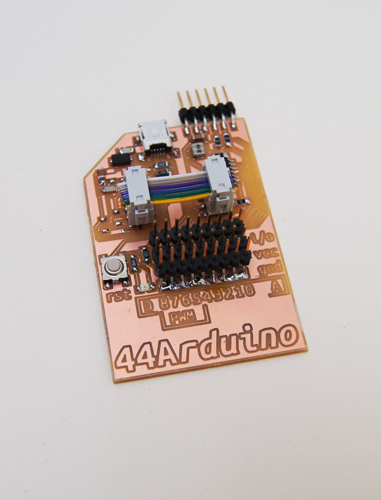
The 44Arduino
background
("what you did" & "what it does")
Quite often, we need to experiment with various circuit designs before milling a board is practical -- that is where prototyping boards come in. As of yet, there has not been a FabLab-based combined ISP and prototyping board, and so, that void is what my final project hopes to fill.

packaging
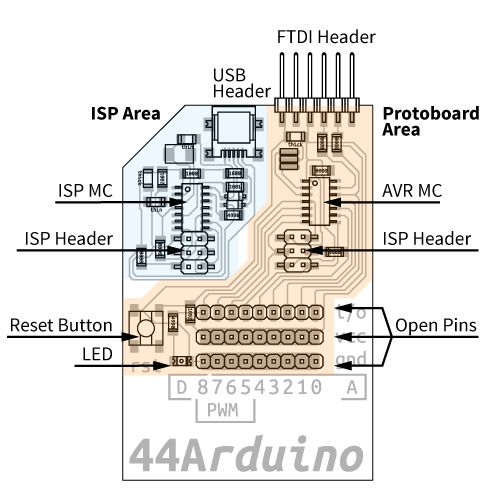
mechanical diagram
The 44Arduino is a dual ISP and prototyping board fabricated with all standard FabLab inventory and processes. It (and its accompanying kit) is meant to be a great first project where someone can learn how to mill, stuff, and program a board and walk away with a fully functioning prototyping board that can be programed at their leisure.
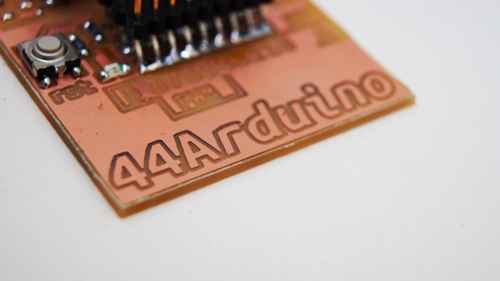
a close-up of the board
The board has a dedicated reset button as well as a on-board LED connected to pin 8 -- the purely digital pin. Additionally, there is one vcc and one gnd pin per i/o pin so that each can run one sensor. This was based on a suggestion from a friend who does a lot of electronics.
In addition to designing the complete circuit, I designed the packaging of the kit to house the loose component and act as a guide for whoever is making the board. This, too, can be made in any FabLab (currently made on the laser cutter). This packaging is meant to facilitate a lab who has to run a workshop (large or small). A Lab could keep a stock of several dozen of these kits ready to go, either for workshops or for someone who comes to the Lab for the first time and whats to learn electronics and programming.
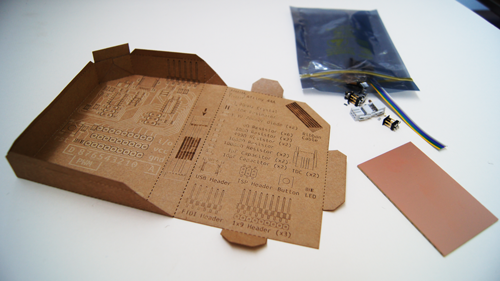
A kit-of-parts.
process
("what worked, and what didn't" & "what you learned")
I learned a ton about electronics through this exercise (as throughout the entire class), I have significant experience with most of the other forms of fabrication, so it was very good to focus on electronics for this exercise. Throughout this exercise I kept bumping up against the limits of my knowledge, luckily, these limits have been -- slowly -- moving forward. I have a long way to go, but I feel that I can assist someone else while they are learning and even give some advice when it comes to electronics.
At the same time, in the process of trying to make the board smaller and smaller, I did reach the edge of reliability of fabrication when it comes to the material/material/geometry trifecta.
Initially, my goal was to use V-USB to connect the entire board to the computer via one USB cable (USB to mini/micro USB). I was not able to accomplish this (though I have no doubt that someone with more electronics/programming experience could accomplish it), so the board interfaces with the computer via one USB to mini-USB cable and one USB to FTDI cable. The former controls the on-board ISP and the later interfaces with the programmer.
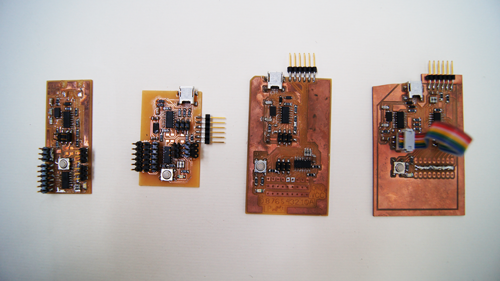
The series of prototypes.
During the process I also experimented with making a similar board but with a ATTiny 45. This didn't go that far into development, but would be a good project to do later.

The prototype for a ATTiny 45-based board.
Right now, the board works! Though for some reason, the IC (not the ISP) only works when it is plugged into the ISP. The problem becomes apparent when running a simple "blink" program using the on-board LED attached to pin 8 (the purely digital pin). When the IC is connected to the ISP the LED blinks as the program prescribes (1 sec. on, 1 sec. off, for instance), but when the IC and ISP are decoupled, the LED just stays on (or appears to stay on, it could be flashing at a very hight rate). I am not sure what the reason for this is. I have tried a lot of debugging but have been unable to fine the fault. The ISP gets its power through the USB header and the IC gets its power from the FTDI header. My current theory says that there is something wrong with the reset. Any help debugging this issue would be greatly appreciated.
design
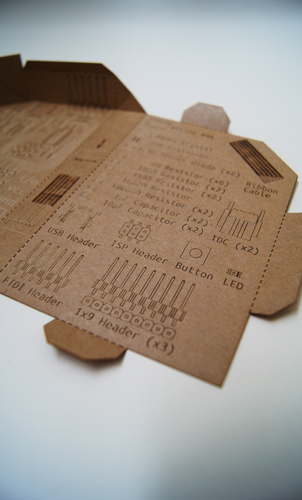
The inside of the packaging.
bill of materials
Will also need an FTDI to USB cable, USB cable, and AVR programmer and files.
| item | part number(s) | quantity |
|---|---|---|
| PCB stock | 3"x2" single-sided FR1 | 1 |
| ATtiny 44A | ATTINY44A-SSU-ND | 2 |
| 0Ω resistor | 311-0.0ERCT-ND | 6 |
| 100Ω resistor | 311-100FRCT-ND | 2 |
| 499Ω resistor | 311-499FRCT-ND | 2 |
| 1000Ω resistor | 311-1.00KFRCT-ND | 1 |
| 10000Ω resistor | 311-10.0KFRCT-ND | 2 |
| 1µF capacitor | 445-1423-1-ND | 2 |
| 10pF capacitor | 311-1150-1-ND | 2 |
| 20MHz Crystal | 644-1039-1-ND | 1 |
| 20K Resonator | XC1109CT-ND | 1 |
| 3.3V Zener Diode | BZT52C3V3-FDICT-ND | 2 |
| LED | 160-1167-1-ND 160-1169-1-ND 160-1403-1-ND 160-1889-1-ND 160-1737-1-ND | 1 |
| button | SW262CT-ND | 1 |
| USB header | H2961CT-ND | 1 |
| ISP (2x3) header | 649-95278-101A06LF | 2 |
| FTDI (1x6) header | 649-95278-101A06LF | 1 |
| 1x9 header | S1143E-36-ND | 3 |
| 2x3 IDC connector | 649-71600-006LF | 2 |
| ribbon cable | AE10M-300-ND | few inches |
fabrication
- Make packaging.
- Using the Adobe Illustrator files, laser-cut and mark (via laser-etching or otherwise). Using double-sided tape, tape tabs to set the box -- only the lower, left-hand corner and the mitered corner of the box need tape.
- Mill board & stuff board.
- This part of the exercise will need some personal help from the FabLab manager or whoever is "teaching".
- Program ISP.
- Using the ISP programming tutorial program the ISP. You will need the AVR programmer (either FabISB or other).
- Test IC.
- Test with Arduino and the "Blick" program below.
sample Arduino program
/*
Sample 44A*rduino* program
Fab Academy 2014
Henry Skupniewicz
-----------------
"Blink" program :: blinks the LED connected to the fully digital
pin (pin8) on the board.
*/
const int led = 8;

void setup(){
  pinMode(led, OUTPUT);
  digitalWrite(led, LOW);
}

void loop(){
    digitalWrite(led, LOW);  // LED off
    delay(1000); // wait 1 sec.
    digitalWrite(led, HIGH);  // LED on
    delay(1000); // wait 1 sec.
}
importaint considerations
geneology
The 44Arduino is based on the work of many other people; due thanks is necessary. The ISP circuit is based on Neil Gershenfeld's FabISP, which is based on David Mellis's FabISP, which is based on Limor's USBTinyISP, which is based on on Dick Streefland's USBTiny. The IC circuit is mainly based on the Fab Hello Echo board.
IP

44Arduino is licensed under a Creative Commons Attribution-ShareAlike 4.0 International License.
distribution
As of now, this page is the only place to source all files and information needed for the production of the 44Arduino. This will remain the case until stated otherwise (this will occur if someone more capable offers to shepherd this project, or if another forum opens that would be more appropriate for the distribution of this product).