Schnyder - 3D Printing and 3D Scanning: A Small Pump and a Mess
of Mesh
For the 3D Printing project, the task was to design an object
that couldn't be made with a milling machine, laser cutter, or
vinyl cutter. I interpreted this as a single object that couldn't
be made from one piece on the machines. An easy object for this
task would have been an egg or some shape that had an undercut.
Instead I tried to create a small pump from a single 3D print.
The inspiration for this single print design was an elephant that I
printed from Thingiverse. The elephant was a single print and was
designed so that pairs of its legs would swivel around an axle and
that its head would move around a socket. I got it in my head that
designing an object with moving parts would be the ideal first
experience with a 3D printer.
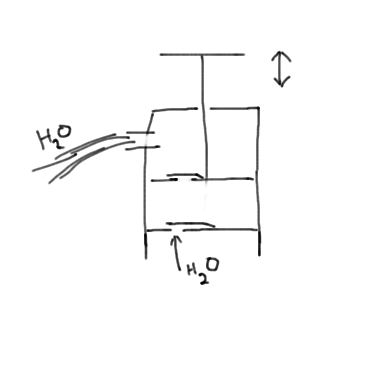
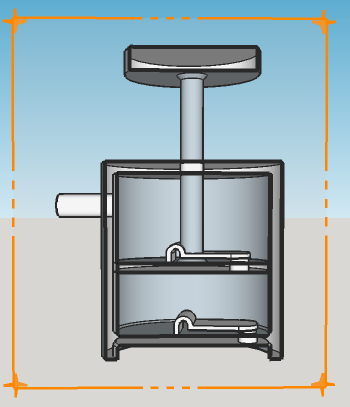
I created the pump using SketchUp. I made a space of 0.005" between
the cylinder walls and the piston and the opening at the top of the
pump and the shaft attached to the cylinder. I figured that there
would be some filaments leftover from the print that I would have to
break (as was the case with the elephant), but I wasn't too
concerned about those affecting the pump's performance.
For the valves, I tried to imitate the hinge that I've seen on small
plastic cases--a half loop of material. Since I wasn't using a very
flexible material for the valves, I added a little nub of plastic
that would partially fit into the holes the valves were controlling.
I assumed that if there were some filaments that I could break them
free after printing with some careful work with a nail or some other
probe.
I printed the design using MakerWare on a Replicator 2 with ABS. For
the print settings, I created a raft but did not create supporting
structures. I also changed the scale of the object because I was
nervous that the print would take too long. In hindsight, not having
the supporting structures and changing the scale were not wise
things to do.
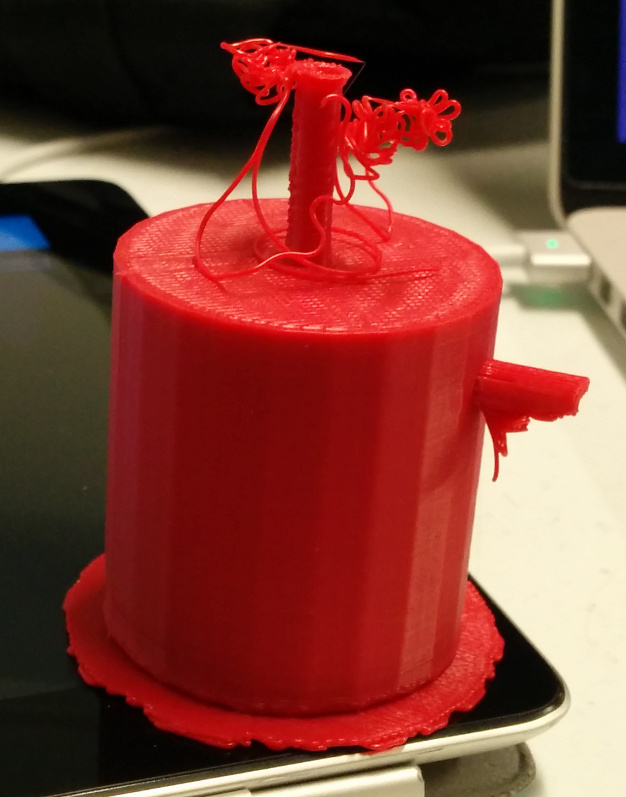
I did not watch the whole print but I did see both valves, the spout
and the finger grip at the end of the pump's shaft. When I saw the
valves I knew that I had made a mistake in sizing gaps in my design.
In hindsight, the gaps should be greater than the filament width
from the printer. In the case of the Replicator 2, the width should
have been greater than 0.020". In my design, I used gaps of 0.005".
Everything was fused. The next problem was caused by the absence of
the supporting structures. There was a slight problem with the
underside of the spout, but I canceled the print when the printer
started on the finger grip. This part of the piece had no form.
Ideally I should now know that I shouldn't undertake complex
projects without doing some tests on key components. When I try this
project again, I will test a couple of components of the design such
as creating a moving piston or testing valves without encasing them
in plastic so I can evaluate them. Based on what I saw during the
print, I should start my valve evaluation with a new design.
3D Scanning
For the 3D scanning project, I used 123D Catch in different
environments to capture a 3D images. The first object I tried to
scan was a wooden biplane toy. I put it on the floor of my kitchen
and tried a couple of scans.
Neither scan was satisfactory. At first I thought that it was
because the color of the plane was too close to the color of the
floor. So for the next capture I used a contrasting surface. In both
cases I used about 25 pictures to load into 123D Catch. The second
capture was even worse than the first. The background was stitched
into the top wing of the biplane. In the next class there was a
discussion about the captures and that a single light source can
actually confuse things and that it is much better to capture images
in diffuse light.
For my next attempt, I used the photography table at AS220 and
captured close to 60 images to convert into the final 3D image. The
photography table has four lights surrounding the platform so
there were no cast shadows. The 3D image was much better, with only
a little webbing between the box and the bottle.
I went back to the biplane for the latest capture. It was a cloudy
day and I didn't use any indoor lighting. I also had the biplane
sitting on a lazy susan, so I moved the camera between 3 different
vertical positions and then would rotate the lazy susan to rotate
the plane. This results from this capture were better.