This week's summary
This week's exercise was to:
- Design and 3D print something that could not reasonably be built
subtractively
- Scan something (print it for extra credit, and make a scanner
for lots of extra credit).
Design and Tool Notes
Work has been going on in parallel on the
hummingbird feeder design.
Progress has been made on the use of Solidworks.
While the design is not completed, I decided to print a scaled
down version of the latest.
The Solidworks designs (2 parts, top and bottom) were saved as STL
files.
Makerware software was downloaded to my PC (this is the software
that interfaces with the Makerbot printers).
The STL files were opened in Makerware (using the "Add" button to
include the second part).
Parts were rotated, scaled (down 5:1 approx) and moved to the
platform.
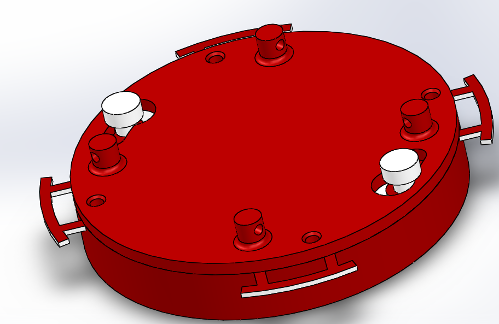
Solidworks Assembly Drawing showing feeder base and
cover
Process Notes
The STL file was saved to the machine's SD Memory
card as a THING file.
The Makerbot 2 machine
was used.
The material was ABS and a
raft was selected (to support the part).
Standard Resolution was used (versus low/faster or high/slower).
The Extruder and Platform heated to 230C and 110C respectively and
the process ran smoothly.
Results: Scale model
The 2 parts printed nicely and actually fit together even at
the small scale used.
All of the features were present and correct, even the small holes
on the top cover boss.
The key design for assembling top and bottom looks like it will
work well.
The process was a good example of rapid prototyping, and some
changes were made to the design based on this result.
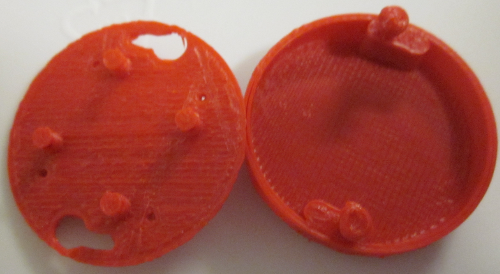
Makerbot print output at 1:5 scale (before
addition of perches)
Results: Full Size Model Attempt #1
With access to a machine on campus for the weekend,
and my updated design, we sent the base for printing full scale on
Friday evening. This is what we discovered on Monday morning. We
believe the support material clogged and the part material had no
place to bind, so spun out of control.
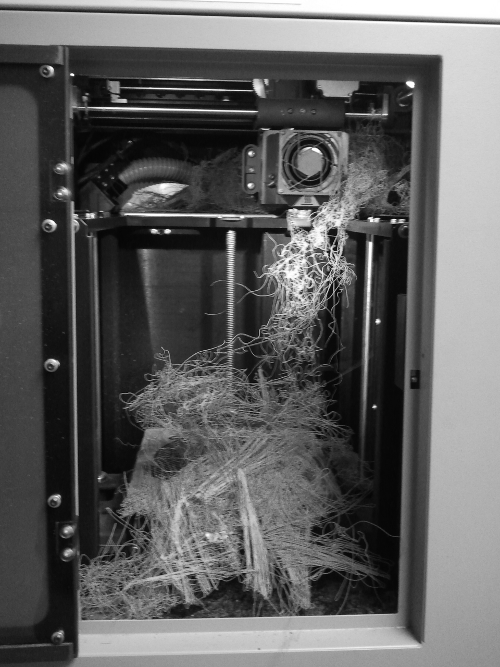
Results of failed print of full size
base (B&W photo to reduce file size)
Results: Full Size Model Attempt #2
We sent the job again and it ran perfectly second
time. Note: thank you to my colleague Lee Duerden for SolidWorks
and 3D printing support. The top cover is printing as this goes to
press.
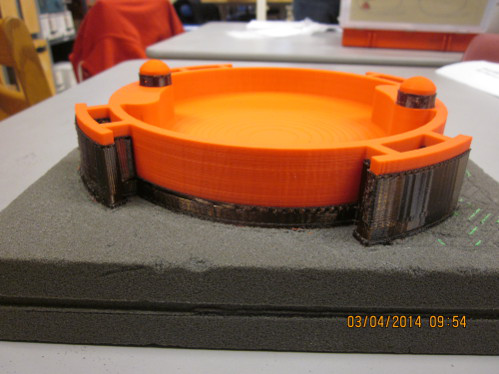
Feeder based printed full size (with support
material shown)
3D Scanning
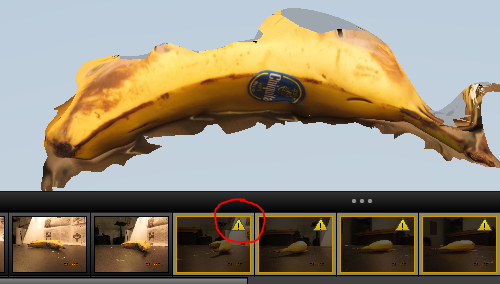
The first attempt at 3D printing was a good
learning experience but the outcome was poor. I took approx. 35
photos of a piece of fruit and uploaded to 123D Catch. Half of
the photos were flagged as requiring stitching (see photo)
probably due to lighting, but it was extremely difficult to
match the points between photos (123D Catch requests that you
match 4 points across 3 pictures).
I exported the file to Meshmixer. This process
would not work within the application, so I switched to the
website on the Cloud (using my previously generated account
info). A further problem was that this would not work in
Explorer so I switched to Firefox. The file was exported as a
STL file to my hard drive.
I finally got the mesh imported into Meshmixer
for editing and played around with some of the editing
functionality. However, the quality of the incoming image was
poor so the result was poor.
Other Ideas and Reference
Since I will need to test my project before actual
hummingbirds show up in Massachusetts, I downloaded a 3D image of
a hummingbird and printed it on a 2X machine using ABS.
Challenges
None at this time. The 3D Scanning process was difficult and
the practical value of the process with it's current capability is
not apparent to me.