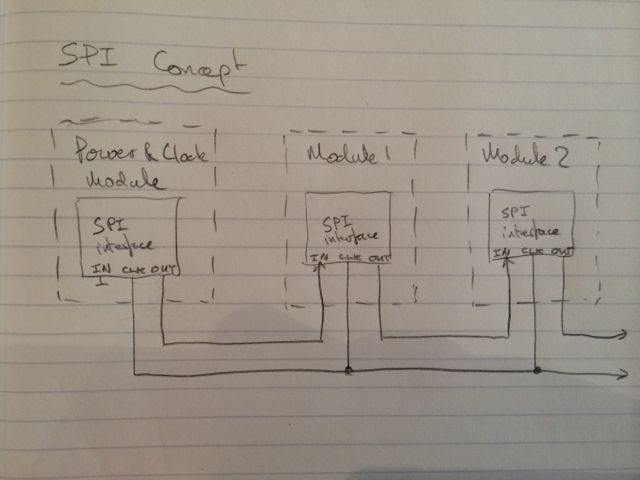
Fab
          Lab LogoFletch's Fab Academy 2014 Blog


19.  Final Project Writeup


Project presentation slide


19.01 Progress So Far

All in all, having made a last minute decision with two weeks to go to change my project concept, this project has been quite successful.  The synth is capable of playing pleasant sounds from a MIDI keyboard (albeit not in tune yet) and has a lot of scope for further development.  So far I've built:
During the project development I kept track of what I was actually working on in OpenProject to compare with the project plan that I created at the start.  As can be seen the planned and actual project files are quite different!

My modulesExploded

Left Image Above - The final demo setup.
Right Image Above - Exploded view of a module.

19.02 Further Development

I've really enjoyed doing this as a project and I intend to carry on developing the synth further.  I'd like to re-package all of the electronics into small acrylic cubes, improve the intermodule connector solution and develop the missing modules.  I'd probably develop the following modules in roughly this order next:

19.03 Plan to Disseminate

Whilst copyright for this work remains with me it's a'll released under an open source license.  However once the design is re-packaged into cubes I think there would be a small market for simple kits of cubes as educational toys.  I'm considering whether to self fund making the first 100 cubes and setting up an ebay shop to sell kits of 5 or 6 cubes at a time.

19.04 Design Choices That Differed From Initial Plan

I had problems finding suitable surface mount SIL connectors that were instock with UK suppliers.  I did consider making my own connectors from vinyl cut copper traces on ply, however this would have been too much work and testing to get a reliable connector in the time available to complete the project.  For this reason I decided to use ribon cables to connect all of the modules and place each module on a plywood base.  Up to the point of this decision all modules would have looked identical as they all shared common components for the case etc.  The addition of the plywood base has allowed me to add per module labels for controls etc. making for a better user experience.

19.05 Making the Case

19.05.1 The Case

The intention was to make a 2mm thick plastic case for the modules.  This case is cast in Smooth Cast 310 in a 2 part mould.  I then intended to over mould this plastic layer with a thin layer of silicon in a different colour to give the case a nice tactile feel.  Raised areas on the underlying plastic would show through the silicon layer, allowing me to create text and logo's on the surface of the case.

My case design was effected by the milling bits that we had available.  I wanted a small diameter bit so that I could get maximum detail on any text on the surface of the case, but I also needed a tool with as large a reach as possible so that I could make the case as deep as possible for the electronics.  The maximum depth was also limited by the size of the wax blocks available (90x150x40mm).  With these considerations in mind I choose 0.125 inch flat end downcut mill with a reach of 30mm (although only 25mm of this actually has a cutting edge).

I designed me case based around these tool parameters.  For my initial design I tried to learn to use a 'Design Spark' from RS.  This CAD package had been recommended to me by another user in the lab and at first sight looked very good and user friendly.  However as I got further with my design I began to get very frustrated by the bugs in the CSG algorithms in the software and quickly abandoned Design Spark so that I could learn to use Rhino, another package that was also new to me.  On my Mac Rhino is currently free, although it doesn't support any plugins, but it's so good that I'd certainly consider paying for it when it becomes chargable.  The final designs for the mould were all done in Rhino.  Design files (Rhino) for parts a, b, and c are linked here.

Milling wax 1Milling wax 2

Images Above - Machining The Wax
In the first image above note the diamond pattern left on the surface of the wax.  This is due to the z-axis on the shopbot coming to rest in a different position for the same z co-ordinate value when traveling in an upward or downward direction.
In the second image note the 'fur' on the right hand edge of the cut out, near the surface of the wax block.  This is due to area of the shank of the tool touching the surface of the wax as I reach the absolute maximum depth that the tool can cut to.

In future I would create a trench all of the way around the edge of the mould to 'locate' the two parts rather than using the tiny locating pins in my design above.


Silicon parts A and BWax after accel cure

Left Image Above - Silicon negatives of mould parts A and B
Right Image Above - Accelerated curing of the silicon at around 70deg C allows me to de-mould after only an hour, but the thermal stress causes the wax to fracture, rendering the wax part 'use once'.

Puddle castPuddle result

Left Image Above - As an initial test cast I filled the mould with a puddle of plastic and then pressed part b into place until the plastic squished out of the join.
Right Image Above - The result of this test shows that the plastic didn't completely fill the mould.  When initially assembling the mould it had been over compressed and then as it had relaxed air had been sucked back in.  Also not that I had failed to correctly keep track of the orientation of the pegs that make the holes in the case and I'd assembled the mould parts in the wrong orientation, causing a permanent distortion in one of the silicon pegs that could be seen in all further castings from this mould.

I drilled some injection holes into part A of the silicon mould, using a puddle to initially fill the mould I then injected more plastic with a syringe once the mould was closed.  I kept injecting until no more air bubbles came out of the injection holes.  I then held the mould held under compression with weights during the curing process.

Second castingSecond casting result

Left Image Above - The second casting test.
Right Image Above - Result of the second casting test.

At this point I realised that I hadn't left any fillets in the internal corners of my cast cases.  I had intended to crew into these fillets as one option for securing the cases to the base of the module.  So I modified the mould with a craft knife and then tried a coloured casting using a coupe of drops of the Sooth On tints to colour the plastic.

Adding fillets to mouldColoured casting with fillets

Left Image Above - Mould modified to leave fillets in internal corners of the casting.
Right Image Above - A test cast in red showing the internal fillets and also small stubs of plastic where the injection points had been added.  The plastic is 2mm thick.

Three cases

Image Above - Three sample cases moulded to the 1st plastic layer stage.  Also the three parts of the silicon mould.

The next stage was to over mould a second layer of silicon onto the first layer of plastic.  My advice was that the silicon doesn't bond to anything, not even other silicon and so I was expecting to be able to cast a layer of silicon in a silicon mould.  However this didn't work.

Silicon overmouldingSilicon fail

Left Image Above - Plastic and silicon layers in situe after moulding.
Right Image Above - Silicon layer is firmly bonded to the silicon mould. 

As can be seen from the above images, the silicon layer has firmly bonded to the silicon mould.  The silicon over spil has also bonded to both parts of the silicon mould.
I'm unsure why this is, possible reasons include:
Ultimately when I have time I'd like to investigate this issue more, however with the time I had available and the fact that I now needed to re-machine all of my moulds including making the wax positives, I decided to mould the second layer as a different color of Smooth Cast 310 plastic.

Initial 2 layer plastic case

Image Above - Initial attempt at an over mould with a 2nd layer of plastic.

The initial attempt with a second layer of plastic was quite successful, however the raised text doesn't really show through as there is a very thin second layer covering it.  In order to get around this I added some small thin objects (coins) under the area of the mould with the text during curing.  This provided just enough pressure to keep the two internal surfaces of the mould in contact and allow the text to be seen correctly.

Second 2 layer case

Image Above - Second attempt at a 2 layer over mould.  Coins used to apply pressure to underneath of mould around text area during curing can be seen.

This was the best result yet and finished off all of the cases for my final project in this manner.  The only other issues with the mouldings are:

19.05.2 The Knobs and Hole Blanks

I wanted a variety of shapes of knob for the controls and also some 'blanks' to cover up the unused holes in the case, so I decided to 3D print these on the Ultimaker.
I made some very quick designs in Rhino for both sets of parts.  In the first attempt at the hole blanks the retaining 'lip' that I added to the prongs on the bottom of the part was too thick.  This caused the prongs to 'deflect' too much and snap when the part was inserted into the hole.  I re-designed the part with a smaller 'lip' but forgot to add a chamfer to the top edge.  This second design was much better, however because of the small size of the part and the fact that bending the pin acts to pull apart the printed layers the parts are still prone to failure.  In future I'd either print these parts on the Dimension printer or cast the parts instead.  Final hole blank Rhino files here.

Hole blank 1st attemptHole blank second attempt
Left Image Above - 1st attempt at hole blank with thick lip.
Right mage Above- 2nd attempt with a thinner lip.

The knobs were a very simple design.  I made an internal hole exactly the size of the pot shaft (based on the data sheet), printed one and tested this for fit on the pot.  I was expecting to have to add some extra clearance, but to my surprise it was a perfect snug fit.  Rhino file for knobs here.

Konbs in Rhino3D printed parts

Left Image Above - Rhino design for knobs.
Right Image Above - The final printed parts.

19.05.3 The Plywood Base

As I had to abandon my original idea of SIL connectors on the sides of the modules I decided to add a plywood base carrying the DIL headers from the standard Fab Lab inventory to connect the modules together.  The base needed to be at least 3 layers of 3mm ply thick in order to allow for the height of the internal connectors.  Sorry I had to use glue to laminate the layers of the base!

Play base layersIncomplete retention of base

Left Image Above - Layers of 3mm ply base.
Right Image Above - Showing incomplete retention of case in base layers.

I added a Maya Angelou quote to the underside of the base as she died the a week ro so before designing these parts.
    "History, despite its wrenching pain, cannot be unlived, but if faced with courage, need not be lived again."

This base worked well, however I may add an extra layer of ply as it doesn't currently quite retain the cast plastic case part well enough.
As these were simple parts I did the 2D design in Inkscape. Design files, for base, for mid-layer, top layer osc module and top layer envelope module.

19.05.4 Connecting the Internal PCB to the Outside World

The initial concept had been to use copper traces cut on the vinyl cutter and stuck to the ply base to connect the internal PCB to the connectors around the outside of the base.  It proved difficult and wasteful of copper sheet to get the thin traces to cut correctly.  I found that the best technique was to gently stick the complete cut sheet down onto the ply and then 'weed' out the waste areas before applying more pressure to stick it down completely.
Once I had attached them to the plywood base and soldered the connectors on I decided that the connector reliability was too reliant on the adhesion of the copper trace to the ply base.  It felt like the any force applied to the connector was likely to peel the copper traces from the base.  At this point I abandoned the idea and re-did the part with a milled PCB.

Copper tracesMilled PCB

Left Image Above - Vinyl cut copper traces on base plate.
Right Image Above - Replacement PCB version.

Eagle sch and brd files for the connector PCB.

19.05.5 The Light Guide

As an extra touch I wanted to make a light guide with a Fab Lab logo on the top so that the indicator light on the PCB could be seen from outside the case.  Again a simple part that I designed in Inkscape.  Files here.  The part is simply stacked layers of acrylic, with the bottom layer cut to fit around the components on the PCB.  I experimented with spraying the inside of the guide with silver paint, but it makes marginal difference to the perceived light output.

Light guideSilver?

Left Image Above - Light guide parts and assembled onto the PCB.  This was later glued in place with hot glue.
Right Image Above - Experimenting with silver internal surface.

19.06 Making The Electronics

I wanted to use a generic PCB for as many of the modules as possible, with just software changes defining the modules function.  The Eagle sch and brd files for the generic module are here.  The sch and brd files for the clock / power module are here.

Module topModule bottom

Left Image Above - Generic module PCB top side with original LC filter.
Right Image Above - Generic module PCB bottom side.

Clock / Power pbProgramming

Left Image Above - Clock / Power / Test Input module.
Right Image Above - Programming via inter-module connector.

19.06.1 The Digital to Analog Convertor

Every module has an audio line out based on an DAC so that the user can listen to the audio at any point to see how it changes along the audio pathway.  The DAC design was a choice between an R-2R ladder and a PWM solution.  With the built in timers the PWM solution was easy to implement, had a much lower component count and gave high accuracy.  The only real issue is that at the max clock frequency available a 16bit PWM would only be able to achieve a sample conversion rate of around 300Hz.  So this was the first limiting point in my design and I decided to go for an 8bit DAC.  The maximum frequency that the 8bit PWM based DAC could run at is 78.125KHz.  So I decided to run my DAC at this rate and use a factor of this (39.0625KHz) as my audio sample rate.

Audio out conceptDAC test

Left Image Above - Audio output concept.
Right Image Above - Testing the PWM based DAC.

I ran some simple tests using an Arduino generating a simple triangular wave to make sure that the DAC concept worked and to help me choose a filter design.  I initially designed an LC low pass filter for the DAC but had issues getting a good cut off frequency with the available components in the inventory, so I swapped to a very poor single pole RC filter with a cut off at about 1.5KHz.  This filter is very simple and although it only cuts off at 6dB per octave above this point it actually provided a remarkably good quality output.  The main issue is that I've set the cut off frequency very low to make sure that none of the DAC noise gets through, unfortunately this will also kill any high frequency genuine audio tones.  It's OK for the purposes of this test, but as a design improvement I would re-visit the filter to make the cut off frequency nearer 20KHz but with a much steeper drop off at high frequencies.
The schematics still show the LC filter implementation, but the components have been replaced with an RC filter in the actual modules.  Component values 100nF and 1K.

19.06.2 Inter Module Bus

Interconnection between the modules is via a standarised bus.  The input connector is slightly different from the output one as it has all of the additional signals required to program the ATTiny via the ISP interface.
The main method of communication between the modules is SPI.  With all modules sharing a clock and one ATTiny's SPI out feeding the next's SPI in.  In this way frames of data are daisy chained through a sequence of modules.

SPI coms

Image Above - SPI inter connectivity between modules.

Bus connector pinout.
Pin Number
Input Connector Function
Output Connector Function
1
GND
GND
2
MISO
NC
3
SYNC
SYNC
4
NC
NC
5
MOSI
MISO
6
SCK
SCK
7
RST
NC
8
Unregulated power
Unregulated power

Power is distributed un-regulated, each module has it's own regulator.  This is to avoid voltage droop across a long chain of modules.
Sync, the SYNC signal is a digital signal generated by the clock module and fed to all modules along with the SCK signal.  It's used to signal the start of a new frame of data on the SPI bus, allowing modules to detect the start of a frame and forcing all modules to stay in sync.

19.06.3 The Generic Module

The generic module takes a frame of data in via SPI, applies some DSP function to it and then sends it to the next module.
Each generic module currently has:
Example waveforms generated by the a generic module programmed with an oscillator function.  Note the slight glitches in the output have since been fixed, this was a software bug in the DAC code.

SineSawtooth

19.06.4 Clock / Power / Test Input Module

This module was a test to allow me to test he synth.  It will ultimately be replaced by a Clock / Power module in a case with battery compartment and separate input modules.  It currently has:

19.07 Making The Code

There's a lot to discuss with the code.  However it's under continual development and is probably best understood from the comments in the source files.  However I will spend some time here on a few details.
Source code for the clock module is here.
Source code for the oscillator module is here.
Source code for the envelope module is here.

19.07.1 SPI Data Frame Format

The data is sent over the SPI bus in 20 byte frames.  Each SPI byte is sent in a fairly quick burst, but there are then pauses between bytes.  This was done as the most reliable way to generate a fast SPI clock was to bit bang the SPI clock line and the pauses between byte were required to allow the clock module to perform other processing.
The Clock module sets the sync pin low to signal the start of a new frame of SPI data.  This signal is also used to re-syncronise the timer generating the audio sample timing within each module to avoid any jitter between module audio clocks.

Byte #
Description                   
0
Sync signal goes low - no data or clock is actually sent during this byte
1
Control / Gate data byte 0
2
Control / Gate data byte 1
3
Control / Gate data byte 2
4
Audio sample 0
...

19
Audio sample 15

Note that in the 20 byte frame only 19 bytes are actually sent.  Each audio sample is 8 bits.
The contents of the control and gate data is changing on a regular basis as the product evolves, but currently it contains:

19.07.2 Control Voltage Format

This isn't quite how it's currently implemented in the test code, however the control voltage data format is intended to be similar to a 'Volts per Hertz' scheme as follows:

19.07.3 Generic Module Resource Usage

On the generic module the following resources are currently used:

19.07.4 Clock Module Resource Usage

On the clock module the following resources are currently used:
The software UART in the clock module is used for communications with the PC and is based on the code in app note AVR304.

19.07.5 Sine Wave Lookup Table

The triangular, sawtooth and square waves are easy to generate functionally.  However the sine wave needs a lookup table.  I generated this 256 entry lookup table with the following really simple Python script.

# Sine Wave generator
import math
print "const uint8_t PROGMEM sineWave[256] = {"
for i in range(0, 256):
  print math.floor(math.sin(math.radians((i*360)/256)) * 128)+127.9, ","
print "};"

19.07.6 Connecting to a MIDI Keyboard

Our instructor Joel lent me a LPK25 USB MIDI keyboard.  This connected to my laptop via USB and I then modified a simple Processing MIDI example to convert these MIDI commands into Control Voltage data for my synth.  Unfortunately I don't have any pictures of this as I had to hand the keyboard back before remembering to take any.  I intend to get a replacement MIDI keyboard, when I do I'll update this page.
Processing script is here.

19.08 Bill of Materials

All Materials were from the Fab Lab inventory apart from the following from Farnell:

Farnell#    Description
1191742    ALPS 100K rotary pot, through hole
1638670    3.5mm SMD audio jack socket
1256661    20 way SMD vertical SIL connector (these were cut down to 2x 8way connectors)

19.09 Testing

We used the synth in the lab to make an array of sounds.
When I get a replacement MIDI keyboard I intend to make a short video showing the synth in action.