Week 8: Embedded Programming
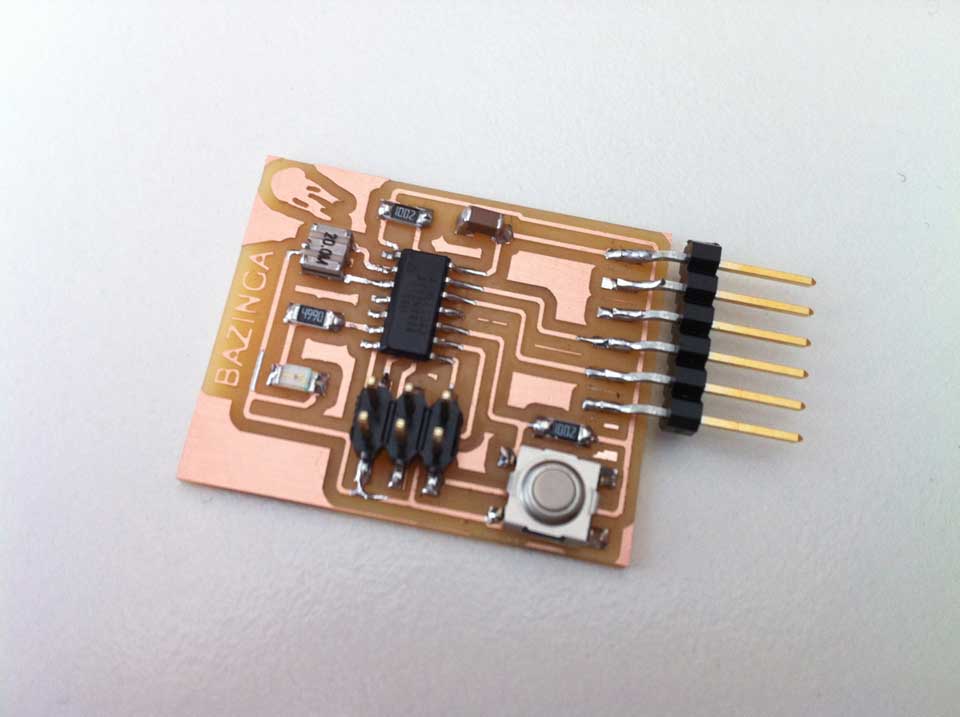
On this week's assignment, we were challenged to continue the work done on week six, the Hello-World board, but this time we had to program it to do something.
Since the board has nothing else besides a LED and a BUTTON, the only thing yo can really do is blink the LED in any way you want. So, what could be an interesting idea to work with? A LED blinking in Morse code!
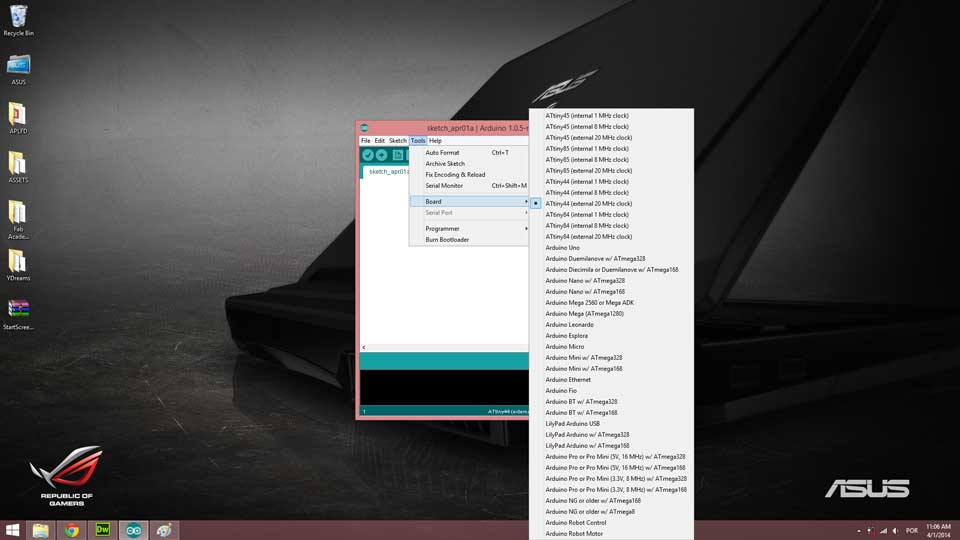
Installing ATtiny support in Arduino
First of all, download the board files so that the Arduino IDE can talk to the ATtiny44A. Locate your Arduino sketchbook folder and create a new folder there called "hardware". Unzip the ATtiny board files and copy the extracted folder to the hardware folder you've just created.
Now open your Arduinbo IDE and you should see the ATtiny entries in the Tools > Board menu.
Power and Connect the Boards
Provide power to the ATtiny and connect it to your programmer (FabISP). Connect the programmer to eh ISP header on the LED + Button board and you'll also need to power the LED + BUtton board with an FTDI cable.
Configure the ATtiny to run at 20 MHz
By deafault the ATtiny runs at 1 MHz. In order for it to run at 20 MHz you need to select the "ATtiny44 (externak 20 MHz clock)" from the Boards menu.
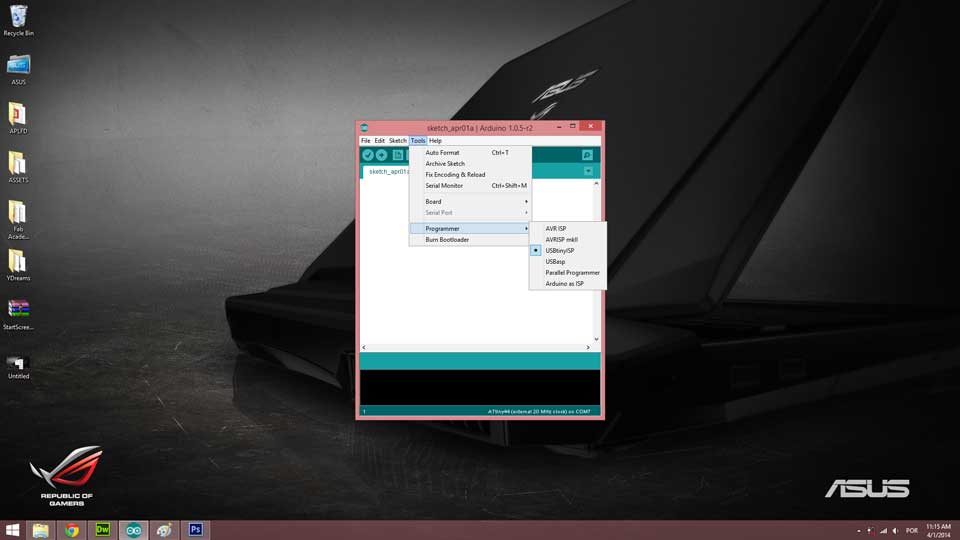
Select your programmer
Select then appropriate item from the Tools > Board menu > USBtinyISP.
Burn the Bootloader
Now it's the time to burn the bootloader in order to configure the fuse bits of the microcontroller so it runs at 8 MHz. This doesn't actually burn a bootloader onto the board; you'll still need to upload new programs using an external programmer. Note that the fuse bits keep their value until you change them, so you'll only need to do this step once for each microcontroller.
Program the ATtiny
Make sure your board is plugged properly into the computer and that the FabISP is connected to the 6 pin header of your "LED + Button" board. Open your Arduino IDE go to File > Example > 01.Basics > Blink.
Upload this sketch to your board and watch your LED come to life. Don't forget to check what pins in your microcontroller correspond to on the Arduino. Check this page for future reference. If everything turns out ok and you can now see your LED blinking, it's time to start writting your own code.
Now it's time to start getting creative on the program you want to write in your board. I thought that the best aplliance for this board, since it only has a LED and a Button was to make it say something. So what is the best way to make the board "talk" or "say something"? Trough Morse code.
The Morse Code
Morse code is a method of transmitting text information as a series of on-off tones, lights, or clicks that can be directly understood by a skilled listener or observer without special equipment. In this particular case, I'm going to code the words Hello World trough the LED light where the process will be turned on by the click of the button.
After some research I found how the letters were represented in morse code and the following represents "Hello World":
H . . . .
E .
L . - . .
L . - . .
O - - -
W . - -
O - - -
R . - .
L . - . .
D - . .
Morse code is represented by dots and dashes, where each letter (number, character, etc.) has is own representation. This may seem a little bit confusing, but first you need to know what the dots and dashes represent, and most important of all, how much time each one has. It is common knowledge that morse code is transmitted with time intervals in order to process a message. So, how can we know the duration of each dot and dash?
There are some excellent websites that explains everything you need to know about morse code and how to write it. Consult the following websites for reference:
There are some concepts you have to bare in mind. The basic element of Morse code is the dot and all other elements can be defined in terms of multiples of the dot length. So how can you determine the dot length?
First of all I'm going to leave you with the following information about ratios for the other code elements:
Now to determine the dot length in a terms of time, we first need to know the number of elements in reach word. For the sake of this example I'm going to use the word "Hello" and if you right it down and make the counting of each element, you'll get 52 elements. Don't forget to include the pause between elements, characters and words even if the word is solo like this example. And now what do we do with this number? There's another concept you need to know before proceeding to the calculation of the dot length. That is WPM and CPM.
WPM (words per minute) is the way you reference to the speed morse code is being sent and CPM (characters per minute) is the multiple correspondent to the number of characters in each word. So if you have a word like "HELLO", that is being sent at 10WPM, it means that (5x10) 50 characters are being sent per minute. But the word "HELLO", as we saw before, has 52 elements in it, so this means that if the word is being sent at 10WPM, 520 elements will be sent in a minute.
One minute = 60 seconds = 60000 milliseconds
Now let's do the math together, if a minute has 60000 milliseonds and we know that the word "HELLO" shoots 520 elements in a minute, let's divide 60000 by 520. You'll get the value of 115.4. This is the rounded value for the dot length. Now that you have the dot length you can start translating that time unit into your word and determine how long will it take to have the message sent. Now it's time to determine the duration of the phrase "HELLO WORLD"
Here is a video of what the "HELLO WORLD" blink Morse code looks like:
Project Files
Here you can download the Arduino sketch to upload to your board and watch it blink to you. Hope this documentation could be interesting and fun.
Thank you! See you soon.