<<<

abstract

Getting Started with the tiny

in assembler

compilation

clock stories

desynchronisation

patience and length of time...

in C

variable delay

with arduino

fade adjustable LED

abstract

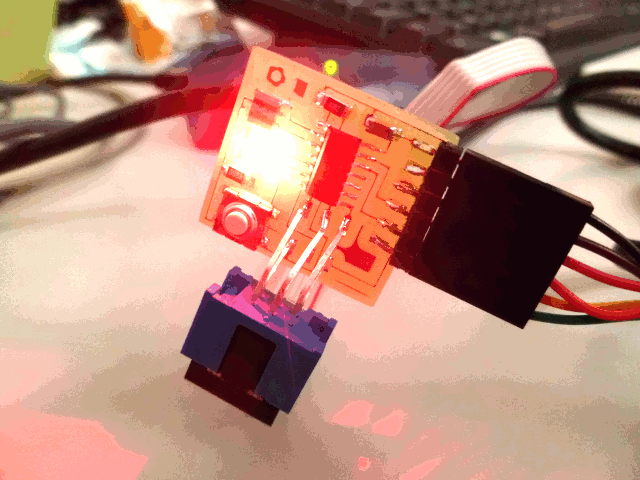
TP of the Week fabacademy is
to become familiar with the programming of microcontrollers and processors.
I'll start by programming the circuit that I realized few weeks ago: the helloWorld board.


Getting Started with the tiny

First I check my board by flashing it with the example, following the protocol of the tutorial.

  1.  
  2. make -f hello.ftdi.44.echo.c.make
  3. avr-objcopy -O ihex hello.ftdi.44.echo.out hello.ftdi.44.echo.c.hex;\
  4. avr-size --mcu=attiny44 --format=avr hello.ftdi.44.echo.out
  5. AVR Memory Usage
  6. ----------------
  7. Device: attiny44
  8.  
  9. Program: 776 bytes (18.9% Full)
  10. (.text + .data + .bootloader)
  11.  
  12. Data: 64 bytes (25.0% Full)
  13. (.data + .bss + .noinit)
  14.  
  15.  
  16. cedric@cedric-Inspiron-5520 ~/fabacademy/electronicDesign/programming $ make -f hello.ftdi.44.echo.c.make program-avrisp2-fuses
  17. avr-objcopy -O ihex hello.ftdi.44.echo.out hello.ftdi.44.echo.c.hex;\
  18. avr-size --mcu=attiny44 --format=avr hello.ftdi.44.echo.out
  19. AVR Memory Usage
  20. ----------------
  21. Device: attiny44
  22.  
  23. Program: 776 bytes (18.9% Full)
  24. (.text + .data + .bootloader)
  25.  
  26. Data: 64 bytes (25.0% Full)
  27. (.data + .bss + .noinit)
  28.  
  29.  
  30. avrdude -p t44 -P usb -c avrisp2 -U lfuse:w:0x5E:m
  31.  
  32. avrdude: AVR device initialized and ready to accept instructions
  33.  
  34. Reading | ################################################## | 100% 0.00s
  35.  
  36. avrdude: Device signature = 0x1e9207
  37. avrdude: reading input file "0x5E"
  38. avrdude: writing lfuse (1 bytes):
  39.  
  40. Writing | ################################################## | 100% 0.01s
  41.  
  42. avrdude: 1 bytes of lfuse written
  43. avrdude: verifying lfuse memory against 0x5E:
  44. avrdude: load data lfuse data from input file 0x5E:
  45. avrdude: input file 0x5E contains 1 bytes
  46. avrdude: reading on-chip lfuse data:
  47.  
  48. Reading | ################################################## | 100% 0.00s
  49.  
  50. avrdude: verifying ...
  51. avrdude: 1 bytes of lfuse verified
  52.  
  53. avrdude: safemode: Fuses OK
  54.  
  55. avrdude done. Thank you.
  56.  
  57. $ make -f hello.ftdi.44.echo.c.make program-avrisp2
  58. avr-objcopy -O ihex hello.ftdi.44.echo.out hello.ftdi.44.echo.c.hex;\
  59. avr-size --mcu=attiny44 --format=avr hello.ftdi.44.echo.out
  60. AVR Memory Usage
  61. ----------------
  62. Device: attiny44
  63.  
  64. Program: 776 bytes (18.9% Full)
  65. (.text + .data + .bootloader)
  66.  
  67. Data: 64 bytes (25.0% Full)
  68. (.data + .bss + .noinit)
  69.  
  70.  
  71. avrdude -p t44 -P usb -c avrisp2 -U flash:w:hello.ftdi.44.echo.c.hex
  72.  
  73. avrdude: AVR device initialized and ready to accept instructions
  74.  
  75. Reading | ################################################## | 100% 0.00s
  76.  
  77. avrdude: Device signature = 0x1e9207
  78. avrdude: NOTE: FLASH memory has been specified, an erase cycle will be performed
  79. To disable this feature, specify the -D option.
  80. avrdude: erasing chip
  81. avrdude: reading input file "hello.ftdi.44.echo.c.hex"
  82. avrdude: input file hello.ftdi.44.echo.c.hex auto detected as Intel Hex
  83. avrdude: writing flash (776 bytes):
  84.  
  85. Writing | ################################################## | 100% 0.27s
  86.  
  87. avrdude: 776 bytes of flash written
  88. avrdude: verifying flash memory against hello.ftdi.44.echo.c.hex:
  89. avrdude: load data flash data from input file hello.ftdi.44.echo.c.hex:
  90. avrdude: input file hello.ftdi.44.echo.c.hex auto detected as Intel Hex
  91. avrdude: input file hello.ftdi.44.echo.c.hex contains 776 bytes
  92. avrdude: reading on-chip flash data:
  93.  
  94. Reading | ################################################## | 100% 0.23s
  95.  
  96. avrdude: verifying ...
  97. avrdude: 776 bytes of flash verified
  98.  
  99. avrdude: safemode: Fuses OK
  100.  
  101. avrdude done. Thank you.
  102.  
  103.  
  104.  
  105.  

Avrdude say "thank you" : it's a good sign, but unfortunaly, the serial connection don't responds.
exploring different codes I found an Neil's Comment "lfuse set to 0x7E for 20 MHz xtal"
but in the makefile that I used, the fuse is Set to 0x5E
I try to understand the datasheet to solve this problem ...

In the datasheet, it is question of the calibration of the oscillator :
"... OSCCAL = 0x7F Gives a higher frequency than OSCCAL = 0x80 ..."

I have not been able to decode the exact code to understand what is this setting
but I see it comes to select the external clock and multiple clock.

In any case, the circuit works I can start trying to program

simply edit the Makefile by replacing:

  1.  
  2. program-avrisp2-fuses: $(PROJECT).hex
  3. avrdude -p t44 -P usb -c avrisp2 -U lfuse:w:0x5E:m
  4.  
  5.  

by :

  1.  
  2. program-avrisp2-fuses: $(PROJECT).hex
  3. avrdude -p t44 -P usb -c avrisp2 -U lfuse:w:0x7F:m
  4.  
  5.  


in assembler

I chose easy: instead of writing in hexadecimal, I will use assembler ...
Based on the example of Neil, I'll try to do my LED flashing.
some ressources : french article
AVR Assembler User Guide

compilation

we need download the compiler gavrasm
Once unzipped the folder (or installed) you can compile a program with the command:

  1. ./gavrasm <fichier_source_asm>

for example in my case :

  1. ./gavrasm hello.ftdi.44.blink.asm

I can compile my code, but the LED does not blink ...

clock stories

I try a delay loop as this :

  1.  
  2. delai:
  3. ;ldi temp, 255; max
  4. ;clr temp
  5. delay_loop:-----------------------------------------------
  6. dec temp |
  7. clr temp1 |
  8. delay_loop2:-------------------------------- |
  9. dec temp1 | |
  10. clr temp2 | |2x( 255 X 3 X 255 X 255)
  11. delay_loop3:------------------ |3X255X255 |
  12. dec temp2 |1X255 | |
  13. brne delay_loop3------------ | |
  14. brne delay_loop2-------------------------- |
  15. brne delay_loop---------------------------------------
  16. ret
  17.  
  18.  


according my calculus : the loop takes 3 X 2 X 255^2 = 99488250 cycles
because the processor pulses at 20Mhz, the duration of the delay could be ~ 4,97 sec.

It is not : the LED don't blink visualy, so I think I do mistakes in my calculs...

but when I change the clock divider to 256 (according the datasheet)

  1.  
  2. ldi temp, (1 << CLKPCE)
  3. ldi temp1, (1 << CLKPS3) | (0 << CLKPS2) | (0 << CLKPS1) | (0 << CLKPS0);/256
  4. out CLKPR, temp
  5. out CLKPR, temp1
  6.  

flashing is apparent and about the expected duration. So I made calculation errors?

desynchronisation

the LED now flashing, but I've lost my tiny !
If I try to upload another program I get :

  1.  
  2. make -f hello.ftdi.44.blink.asm.make program-avrisp2
  3. avrdude -p t44 -P usb -c avrisp2 -U flash:w:hello.ftdi.44.blink.hex
  4.  
  5. avrdude: stk500v2_command(): command failed
  6. avrdude: stk500v2_program_enable(): bad AVRISPmkII connection status: Unknown status 0x00
  7. avrdude: initialization failed, rc=-1
  8. Double check connections and try again, or use -F to override
  9. this check.
  10.  
  11.  
  12. avrdude done. Thank you.
  13.  
  14. make: *** [program-avrisp2] Erreur 1
  15.  

On the advice of Neil, I try to use the "-i" avrdude, which specifies the time in microseconds between each bit change.
But this change nothing...
I finally found a solution here : use the-B option to delete the program in 1024 (this is the option Bitclock period)
phew!

I will NEVER change the clock divider more !

patience and length of time...

I gave the clock to its original timing.
But heck! as it is difficult to wait the clock which rotates dizzying pace of 20 million cycles per second!
I finally found a more or less elegant solution, using two coupled records (in the form of words) that instead of cap 255, reaching 65535: it's been more cycles.

  1. delai:
  2. mov r16,temp
  3. outer_loop:; duration ~
  4.  
  5.  
  6. ldi r26, 0; set r26 to zero
  7. ldi r27, 0; set r27 to zero
  8. delay_loop:;~262143*65535+3= 17179541508 cycles
  9. adiw r26, 1; add 1 to r26 and r27
  10. ldi r28, 0; set r28 to zero
  11. ldi r29, 0; set r29 to zero
  12. delay_loop1:;~4*65535+3= 262143 cycles
  13. adiw r28, 1; add 1 to r28 and r29; 2 cycles
  14. brne delay_loop1; if no overflow loop; 1 or 2 cycles
  15. brne delay_loop; if no overflow loop
  16.  
  17. dec r16; dcrement R16
  18. brne outer_loop; if no overflow loop
  19. ret

Experimentally, I found this loop runs around in a centiseconde.
Ie if you set the registry "temp" 100 the last time for a second:

  1. ldi temp,100;delay 1 sec
  2. rcall delai; delay

and it works!!
Blender.svg.export.jpg
here my program : hello.ftdi.44.blink.asm.zip

in C

To make a little easier, I'll try to program the button in C.

pins:
PA7: button (to set pullup)
PB2: LED

some useful resources:
to understand the inputs and outputs http://avrbasiccode.wikispaces.com/

variable delay

My program will adjust the flash rate my led with the button.
To do this, I need to make a variable delay.
When you press the button, a counter which serve for the period of flashing LED is incremented:

  1. ...
  2. while (1) {
  3. if (PINA & button_pin_in){//if button not pushed
  4. PORTB |= led_pin_out; // Turn LED on
  5. long_delay_ms(blink_delay);
  6. PORTB &= ~led_pin_out; // Turn LED off
  7. long_delay_ms(blink_delay);
  8. }else{//if button pushed
  9. blink_delay=10;
  10. while(!(PINA & button_pin_in)){
  11. blink_delay+=10;
  12. _delay_ms(10);
  13. }
  14. }
  15. }
  16. ...

The basic function "_delay_ms" is certainly more convenient to use than in assembler, but it takes only constants, not variables.
to manage a variable time I was inspired by this page
creating a long_delay function:

  1.  
  2. void long_delay_ms(uint16_t ms) {
  3. for(ms /= 10; ms>0; ms--) _delay_ms(10);
  4. }
  5.  

File: Hello.blink.button.44.zip
My program works pretty well, but it could works better, I should attach an interrupt to the button, because when the LED is blinking in its phase, the button is inactive.
but I lack time to implement it this week.
To be continued ...

with arduino

As recreation, I try highlowtech hardware library to program directly from the tiny Arduino interface.

fade adjustable LED

The purpose of the program is to adjust the luminance of the LED by pressing more or less time the button:

  1. /*
  2.   set the value of the led by pushing the button more or less longtime
  3.  This example code is in the public domain.
  4.  
  5.  led : 8
  6.  button : 7
  7.  */
  8.  
  9. #define led 8
  10. #define bton 7
  11.  
  12. int value;
  13.  
  14.  
  15. void setup() {
  16. value=0;
  17. pinMode(led, OUTPUT);
  18. pinMode(bton, INPUT_PULLUP);
  19.  
  20. }
  21.  
  22. void loop() {
  23. if (digitalRead(bton)==LOW){
  24. if (value!=0){
  25. value=0;
  26. }
  27. else{
  28. while(digitalRead(bton)==LOW){
  29. if (value<255) {
  30. value++;
  31. analogWrite(led,value);
  32. delay(40);
  33. }
  34.  
  35. }
  36. }
  37.  
  38.  
  39. }
  40. analogWrite(led,value);
  41. delay(40);
  42.  
  43.  
  44. }
  45.  

I found that the delay does not fully correspond with what is encoded as if the clock was multiplied: my period lasts about 200ms instead of 40ms in the code.