3D Modeling - Specific to Blender
Let me put a fact - I am neither a professional 3D modeler (or whatever is the right word to describe this vertical) nor a daily
user of Blender. This is more of a "set of notes" on blender and 3D modeling. Hence, I may not be representing the best way,
even better way to do things.
That fact gets me to lot of leaverage, on how to put my experience here. So, let me take up one of my assignments as an example.
The task here is to 3D model a mold using belnder.
| Ref2: Whether a mold or a 'thing'... it is an object finally. |
In that reference, 3D modeling of a mold can be seen as designing an object in 3D space, using Blender (in the current context). As indicated in the list besided, the description stands for Blender 2.69 specifically , but it seems it will remain more or less similar for other versions under Blender 2.6.
Step 1 - Launch Blender
Opening blender shows up a splsh screen. It remains flashing till the time the user clicks onto it or in the area outside it.Note* This is not just a splash screen. The splash screen contains a picture of some latest project, being worked out using Blender's that version. To me it seems, Blender Foundation tries to explain, in that one screen, what complexities can be addressed using Blender. One has to note the expressions and background detailing in that one screen.... Observing this screen gives somekind of feeling about Blender. This collection of Splash Screens provides glimpses (prima-faciely) of journey of Blender.
There exists a choice for the user to iselect the Preset. This is about the Blender Environment - how it should behave like. I keep it on "default", as the other options are unknown to me (eventually they will be used...but not now.)
Step 2 - Initiate
Clicking behind the splash screen takes us to the design space - a grid with a cube, to start with. The default Cube always appears for a new project. One may want to start with that. In this note, the Cube is not being used. So, deleting the same would make sense.  |
Delete an object press 'x' or 'delete' key and then 'ok' with left mouse button (LBM). |
Image credits:
http://www.pointclouds.org/documentation/tutorials/_images/del_cube.png
Step 3 - Add a suitable object
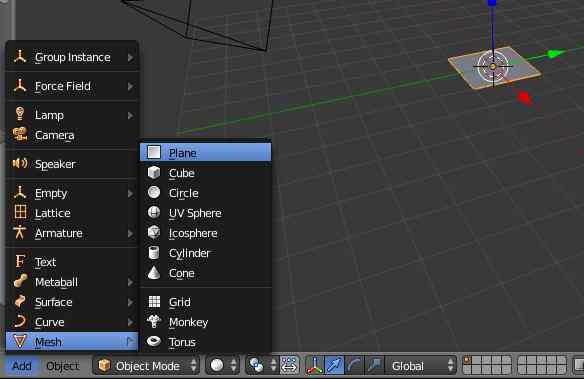
Adding an object comes with many options. In this note, a MESH object is being added to the empty Blender space.At this point, it becomes a User's understanding and perspective about the object being 3D Modelled. For a mold to be designed (whether using software or on paper), following parameters play a crucial role -
1) Type of Mold - Positive Mold or a Negatice Mold
2) Available molding materials - Wax, POP, Sand etc.
3) And obviously size of the mold.
Out of these, the 3rd parameter can be parked for a while. Let me focus on 1st and 2nd for now.
What type of Mold
This note is going to consider a Positive Mold . That means the 3D Model will look like the final object itself, to be cast using the would-be mold. However they look similar and not the same. Before exploring the difference between a Positive and Negative mold, let me attempt create a 3D Model for Positive mold. In this example let us start by adding a plane to the blender space.Here is an exploration on Modes of Blender. There are 2 modes - Object Mode and Edit Mode. A few actions can be done in Object Mode and others in Edit Mode. Ofcourse there is an overlap of actions, that can be done in both the modes.
A sense of editing ...If the plane that we just added is selected (looks shiny yellow/pink), Press 's' to see bidirectional arrow and just hover the mouse/mouse-pad. This will change the size of plane, proportionately. We, just editted the object!
| Scale an Object 1) Select the Object by pressing Right Mouse Button (RMB) onto it. 2) Press 's' and hover the mouse. 3) Click LMB to freez the new scaled size. Note* This is applicable in Object as well as Edit Mode. Note* One can move from Object to Edit mode and vice-versa by pressing "Tab" key. |
Move on to Blender Basics - Part 1 Part 3 Part 4 Part 5

