Fab Academy 2013 · Michael Hviid Nielsen
Waag Society's Fablab in Amsterdam
· Lecture 08: Embedded Programming
Lecture 08: Mar 13, 2013
Assignment: Program the board you made in as many languages and programming environments as poosible.
Lecture Notes:
What I did:
"Funny enough" - Windows 8 had since class 06 decided that all my effords for installing an unsigned driver should be anihilated. So I had to do all the steps again (as described under class 06 Electronic Design) in order to reinstall the unsigned drivers for the FabISP.
After that, installing the Arduino IDE and modifying the "Blink" example was trivial. There is some translation of pin-numbers though:
On the ATTiny and my Helo LED Button board, the LED is on pin 6 (on the chip) which is the PA7. According to the Datasheet of the processor this pin is one of the "Port A" pins; which are 8-bit bi-directional I/O with internal pull-up resistors. This pin also has alternate functions as:
- ADC7: ADC Input Channel 7
- OC0B:: Timer/Counter0 Compare Match B Output
- ICP1: Timer/Counter1 Input Capture Pin
- PCINT7: Pin Change Interrupt 0, Source 7
So the blink ended up like this in the Arduino IDE:
		/*
		HeartRate ATTINY 44A
		Turns on an LED on for ten milliseconds (ms)
		then off for 10 ms
		then on for 10 ms
		then off for 100 ms, repeatedly.

		This example code is in the public domain.
		*/

		// Pin 7 has an LED connected on Fab Helo World Button LED board.
		// give it a name:
		int led = 7;

		// the setup routine runs once when you press reset:
		void setup() {
		// initialize the digital pin as an output.
		pinMode(led, OUTPUT);
		}

		// the loop routine runs over and over again forever:
		void loop() {
		digitalWrite(led, HIGH);   // turn the LED on (HIGH is the voltage level)
		delay(10);               // wait for a second
		digitalWrite(led, LOW);    // turn the LED off by making the voltage LOW
		delay(10);               // wait for a second
		digitalWrite(led, HIGH);   // turn the LED on (HIGH is the voltage level)
		delay(10);               // wait for a second
		digitalWrite(led, LOW);    // turn the LED off by making the voltage LOW
		delay(100);               // wait for a second
		}
This slightly resembles a heartbeat so lets elaborate on that. I'll let the LED blink like a heartrate. When the button is pressed first time - the heartrate goes down and eventually into "cardiac arrest". When the button is pushed the second time - the heartbeat starts again.
On the ATTiny and my Helo LED Button board, the button is on pin 5 (on the chip) which is the PB2. According to the Datasheet of the processor this pin is one of the "Port B" pins; which are 4-bit bi-directional I/O with internal pull-up resistors. This pin also has alternate functions as:- INT0: External Interrupt 0 Input
- OC0A: Timer/Counter0 Compare Match A output
- CKOUT: System Clock Output
- PCINT10:Pin Change Interrupt 1, Source 10
For starters the LED should blink as a Heartrate unless the button is pressed. I couldn't get this to work. This was because I had initially left the pin with the button attatched floating - i.e. in an unknown state. Or as Bas expressed it; You have basically made an antenna. So a line was added to put the pin with the button high (activating the onchip pull-up resistor) before the main loop:
		/*
		Blink ATTINY 44A
		Turns on an LED on for one second, then off for one second, repeatedly.
		Mashup of default Arduino Blink example and:
		http://academy.cba.mit.edu/content/tutorials/

		09_Embedded_Programming/Programming_ATtiny_with_Arduino_IDE.html
		This example code is in the public domain.
		*/

		//Define constants:

		// ATTiny Pin 5 (Arduino pin 8): has a button connected.
		// give it a name:
		int button = 8;

		// ATTiny pin 6 (Arduino Pin 7): has a LED connected.
		// give it a name:
		int led = 7;

		// initialize variables:
		int buttonState = 0;         // variable for reading the pushbutton status

		// the setup routine runs once when you press reset:
			void setup() {
		// initialize the digital pin with the LED as an output.
			pinMode(led, OUTPUT);
		// initialize the digital pin with the button as an input.
			pinMode(button, INPUT);

		// set default button state (via pull-up resistor in chip) as HIGH
		// otherwise its left floating - left in an unknown state

			digitalWrite(button, HIGH);

		}

		// the loop routine runs over and over until button is pressed:
		void loop() {

		// read the state of the pin the pushbutton is connected to:
		buttonState = digitalRead(button);

		// is the push button pressed?
		// if pressed - the button state is LOW
		// the pull up resistor the button / pin 8 makes the button state HIGH by default.
			if (buttonState == LOW) {
		// turn LED off (LED is off by default)
			digitalWrite(led, LOW);
		}
		//otherwise.....
		// button is pressed
			else {
			digitalWrite(led, HIGH);   // turn the LED on (HIGH is the voltage level)
			delay(10);               // wait for a second
			digitalWrite(led, LOW);    // turn the LED off by making the voltage LOW
			delay(10);               // wait for a second
			digitalWrite(led, HIGH);   // turn the LED on (HIGH is the voltage level)
			delay(10);               // wait for a second
			digitalWrite(led, LOW);    // turn the LED off by making the voltage LOW
			delay(100);               // wait for a second
				}
		}
The next step is outside the arduino Environment using C code in notepad and compiling with
I downloaded Neil's files for making the serial-ecco, to my Cygwin homedir (I'm on Windows platform), and did a: (note: sudo is not available/necessary on windows so that part of the commandline is omitted)
		$ make -f hello.ftdi.44.echo.c.make program-usbtiny
		avr-gcc -mmcu=attiny44 -Wall -Os -DF_CPU=20000000 -I./

		-o hello.ftdi.44.echo.out hello.ftdi.44.echo.c
		avr-objcopy -O ihex hello.ftdi.44.echo.out hello.ftdi.44.echo.c.hex;\
		avr-size --mcu=attiny44 --format=avr hello.ftdi.44.echo.out
		AVR Memory Usage
		----------------
		Device: attiny44

		Program:     764 bytes (18.7% Full)
		(.text + .data + .bootloader)

		Data:         33 bytes (12.9% Full)
		(.data + .bss + .noinit)


		avrdude -p t44 -P usb -c usbtiny -U flash:w:hello.ftdi.44.echo.c.hex

		avrdude: AVR device initialized and ready to accept instructions

		Reading | ################################################## | 100% 0.00s

		avrdude: Device signature = 0x1e9207
		avrdude: NOTE: FLASH memory has been specified, an erase cycle will be performed
         To disable this feature, specify the -D option.
		avrdude: erasing chip
		avrdude: reading input file "hello.ftdi.44.echo.c.hex"
		avrdude: input file hello.ftdi.44.echo.c.hex auto detected as Intel Hex
		avrdude: writing flash (764 bytes):

		Writing | ################################################## | 100% 0.61s

		avrdude: 764 bytes of flash written
		avrdude: verifying flash memory against hello.ftdi.44.echo.c.hex:
		avrdude: load data flash data from input file hello.ftdi.44.echo.c.hex:
		avrdude: input file hello.ftdi.44.echo.c.hex auto detected as Intel Hex
		avrdude: input file hello.ftdi.44.echo.c.hex contains 764 bytes
		avrdude: reading on-chip flash data:

		Reading | ################################################## | 100% 0.44s

		avrdude: verifying ...
		avrdude: 764 bytes of flash verified

		avrdude done.  Thank you.
Running the term.py - I get errors related to missing libraries:
import sys,time,serial
from Tkinter import *
from select import *
I got the "select.lib" in my python directory but I cannot find a "Tkinter.lib" - only a "Tkinter.py" in the "lib-tk"-folder.
I tried to program the board but it wouldn't work. I then tried to reset the fuses eventhough this should already have been done in the Arduino Environment with the ""Burn Bootloader" command - as explained in Anna's tutorial. Something must not have worked however. Because programming the board first succeeded after rebooting Windows into allowing unsigned drivers (which apparently is only session-allowed between reboots?) and then setting the fuses with Avrdude.
Setting the fuses:
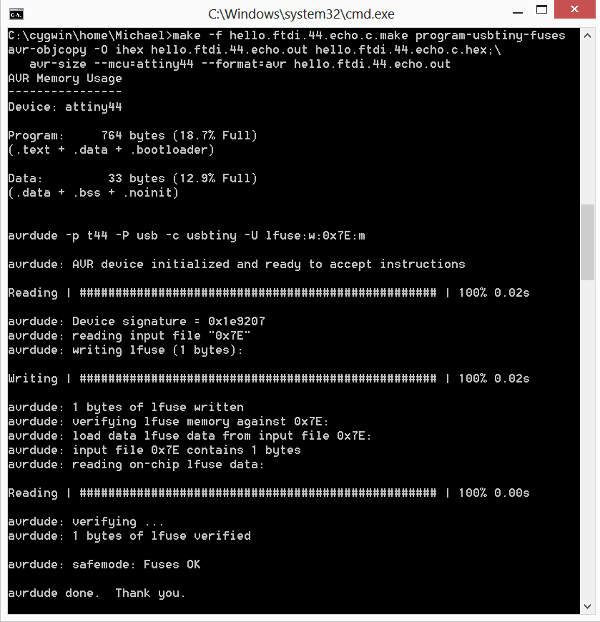
Programming the Echo-board:

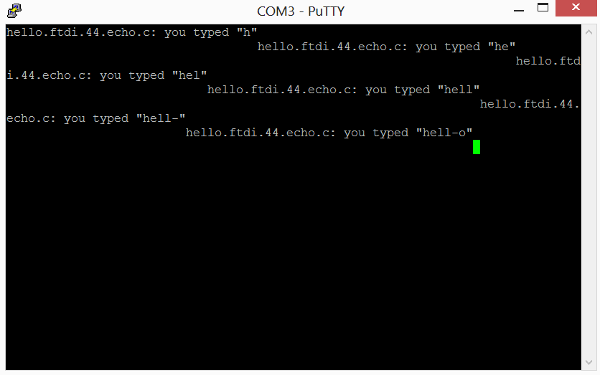
And finally the Echo (typo on purpose):
Things which went wrong:
So trying to set the fuses didn't work with either avrdude, term.py or from Cygwin terminal. Changing cables and plugin-direction also didn't work. So I tried once again to reboot Windows 8 in order to enable unsigned driver installation. Doing this (without actually reinstalling anything - just rebooting as previously described) everything works. So an unsigned driver installation is only valid until next reboot. Not really acceptable but at least it ended with the un-garbled output shown above.
Things to fix:
I will see if I can avoid the line-length shift by using another terminal program.
I really want to find out a way to make the installation of unsigned drivers in Windows 8 permanent - and not only last until the next reboot or update.