Fab Academy 2013 · Michael Hviid Nielsen
Waag Society's Fablab in Amsterdam
· Lecture 02: Computer Aided Design, Manufacturing and Modeling
Lecture 02: Jan 30, 2013
Assignments: 2D/3D Model/Render/Animate your Final Project
Lecture Notes:
An overview of different software options in 2D/3D graphics programs as well as programs for Simulation and Audio&Video (from Open Source to very expensive commercial)
Its not a question of picking one tool and just juse that. Its a question of getting comfortable with an array or a personal portfolio of tools which excells at different things.
2D Bitmap tools:
This simplest of tools: Take a picture or a scan and generate a toolpath, or use 2D raster/bitmap tools like Gimp, Photoshop, MyPaint etc. The resolution of the laser cutter is 1:10^4 (stepsize versus work size) ie. a 10k x 10k picture fulfills this resolution requirement.
2D Vektor tools:
LibreOffice:Draw, Inkscape (can do booleans and cloning wich migrates changes), Scribus (Open Source has drawing capabilities) LibreCAD, FreeCAD and Qcad: are Autodesk Autocad-like.
3D Design Tool Types:
Good CAD has: Constructive Solid Geometry (CGS), are hierachical, parametric and procedural. This means that modelled things are defined in relationships with parameters of other objects in the model. So making changes in one instance of an object not only leads to the instances of it self being changed but also that things in relation to that object gets modified automatically (eg. change the diameter of one bolt leads to all the same bolts used get changed as well and also the bolt holes, the distance from the edge etc).
The common tools today uses Boundary representation of surfaces - called b-rep. Never types uses f-rep for Function Representation, sort of a least-surface type of their function.
The future of design-tools uses optimization declarative constraint design (you draw the computer optimizes the model inside given constraints). The Fab Modules can be seen as an example og this type of designing. They are in active development at a very early stage. The Fab Modules output for each of the Fab Lab machines.
Examples of 3D Design Tools from cheap to expensive:
SketchUp, Autodesk 123D Design, ThinkerCAD, Blender. FreeCAD, OpenSCAD, Rhino+Grashopper, SolidWorks, Catia, ProE etc.
Audio and Video Tools:
Audacity, kdenlive (NLA video editor), VLC player, FFung
Simulation Tools:
Book: The Nature of Mathematical Modeling (N. Gershenfeld)
Elmer, Open Source ("a little non-trivial to use")
Asignment: Play with the mentioned tools
Asignment: Illustrate the Final Project using tools mentioned
here.
WHAT I DID
I tried a wide variety of the mentioned programs for design; Inkscape, Illustrator, Photoshop, Gimp, 3DS Max, Maya are already know to me from my work as a 3D artist. So I tested out MyPaint, FreeCAD and ImageMagick. Mypaint is very easy to use natural painting program. With a digitizing tablet it is basically just open and begin painting. Everything works as you would expect from the stuff in your atelier (which of course is packed down into the basement becouse you have too little time to work with natural media). It is thus fine for creating initial sketches of design but rather limited for stuff which demands measuments and scale. It could be interesting to draw some freehand shapes and cut them on the lasercutter. Inkscape has a rather nice blend of natual painting with brushes which respond to drawing pressure but are actually vectors which can be edited afterwards. This would make it possible to do expressive work - then editing the vectors adding pressfit cutouts. As Inkscape is "an Illustrator clone and then some" - Gimp is "Photoshop + more". What makes these programs great it not so much their slightly disordered user interface but the fact that they are open source which makes people extend their functionality beyond what a normal commercial software developer could (due to the fact that they most often cater for the majority of their users not for the few with specific needs)
ImageMagick is a collection of scriptable commandline tools
capable of all kinds of tedious image transforms and
conversions able to batch process a multitude of files (like
downscaling Fab Academy class page pictures to sensible
dimensions for web). You can even specify maximum width or
height for a folder of images and scaling them accordingly so
that no single image exceeds the set maximum. This tool can
save a lot of time compared to the bacth processing I normally
use in Photoshop. If you also install Ghostscript (which is
open source Postscript library) you can even output to
pdf-files from the command line.
I tried to install Fabmodules on Windows;
Because I had been down with a flu all weekend I decided to
take a shortcut and use the course notes of Bas Withagen from
last years Fab Academy (2012):
Downloaded the Fabmodules and installed Python 2.6, wxPython 2.8 and PyOpenGL 3.0.1. (from sourceforge)
Installed python 2.6 then added the Python26 folder to the system path in windows (Environment Variable: Path)
Rebooted - then installed wxPython then PyOpenGL - then rebooted First I had errors referring to CXX broken, guessing this was the c++ compiler or its dependencies I updated (ran Cygwin setup) the Cygwin installation adding gcc c++ development tools and its dependencies.
Tried to "make fab" again and now the CXX worked but resulted in other errors:
CMake Error at /usr/share/cmake-2.8.9/Modules/FindBoost.cmake:1191 (message): Unable to find the requested Boost libraries. Unable to find the Boost header files. Please set BOOST_ROOT to the root directory containing Boost or BOOST_INCLUDEDIR to the directory containing Boost's headers.
So I ran Cygwin setup again trying to solve the missing libraries which solved most of the boost warnings. I still get a bucket full of warnings though (like 10 screens). Mostly unused variables but also some "expected this but got that"-s. But also errors in the final linking of things. Many of the warnings seem to be related to png, so I do a final chech for those libraries and dependencies with yet another go of Cygwin Setup but it seems that I have all those png libraries already installed. So unfortunately I have come to a dead end with the Fab Modules on windows. Next week I hope to get my RMA'ed labtop sent down here to Amsterdam. Then I can have another go at it with Ubuntu under Windows.
WORK ON FINAL PROJECT
Further investigated options for making a clover detector. It basically all comes down to difficulties with using optical remote sensing techniques (wavelength-based) due to the spectral similarities of clover and grass. The only viable route I can imagine is ether brute-force pattern-recognition detecting the shapes of the clover-leaves or a more low-tech version using a combination of a depth-map and an angle of incidense shader (which basically is thus a normal map). The first approach is not realistic due to the programming and computing power necessesary. The second approch could be tested with a cheap point cloud camera/3D scanner as the Microsoft Kinex which uses structured light in the IR domain to do its generation of a 3D point cloud. The pointcloud date would then have to be converted to mesh data but luckily a number of programs are available for this task. The sensor is rather far-sighted for this purpose but that could be compensated by attaching matched and aligned correction lenses to each of the two cameras in the Kinex sensor. The "normal map" og clover on grass would most likely be much easier to digest for simple pattern recognition software libraries (osuch as OpenCV). All of this does hovever lead to the conclusion that it is not realistic to develop in the timeframe of Fab Academy. So I have chosen to focus on the simpler analog DMX LED controller for the time being. I might add futher thoughts on the clover detector during the time of Fab Academy when I bump in to new ideas for making it feasable.
Opening up the initial development of the "myAquaDMX" controller, I made a conceptual sketch in SketchUp:
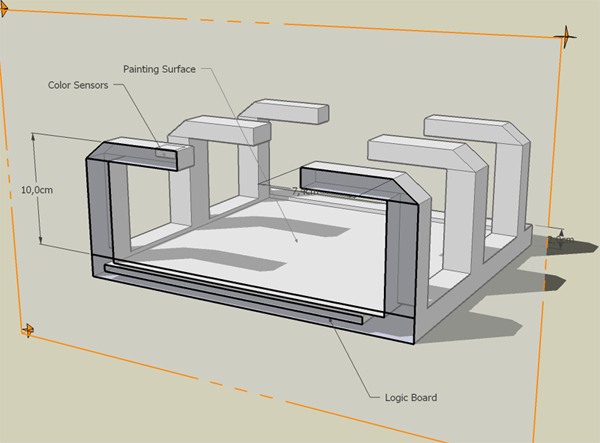
So this sketch does not show a suggestion for a final design of the device, neither are the measurements given sensible. But rather the image depicts what functions are necessary; a plate on which to draw colors, a number of color sensors digitizing areas of the drawing board - each mapped to one or more light fixtures through DMX adressing. Depending on the chosen sensors either the drawing board should be lit from below, or each sensor should also supply even illumination of their own view. The should also be made space for mikrocontrollers, wiring, out-signals and power. I actually started out with leaning Rhino (which I will continue to do) but I soon ran into problems with the free version - it is copy-paste disabled. This makes it really difficult to draw even simple shapes build with curves, where you need at least two curves to describe a surface. I thus found myself limited to modelling with solid shapes and extruded curves only. Thus "software dictates design" which is not very clever. So for now I have settled on the functional sketch from SketchUp of the device as shown above.
Color sensors
It could be fun to use some form of DIY sensor but upon investigating the available options most of them rely either on a "color-blind" light intensity sensor (illuminating the subject in turn with colored leds and detecting the resulting intensity thus being able to calculate the RGB values) or on a light wavelength to frequency sensor which is rather simple but needs gain adjustments for varying colors (ie. capable of being calibrated to detect previously defines colors). For this project it seems I need some more accurrate measurement of the color. I have found an interesting sensor: The Avago ADJD-S311-CR999. Its rather cheap (6$) and consitst of a cmos r+b+g+intensity sensor. There is a big drawback. It is BGA (Ball Grid Array: Each contact a tiny ball on the underside of the chip) but the sensor has an array of 3x3 contacts and it measures 2.2 mm height and width. It might prove difficult to make a breakout board for this sensor (they have been available in stores online but are not anymore - no one has any expected delivery times). I'll have to ask my instructor weather this is feasable or not with surface mounting techniques and the Modela 3D router in the Lab.