This week assignment is to mill the board, stuff it with components and program it, as we will be using these programmers through the semester to program the other boards we create. The FabISO is an in-system programmer for AVR microcontrollers, designed for production within a FabLab. That is, it allows you to program the microcontrollers on other boards we make, using nothing but a USB cable and 6-pin IDC to 6-pin IDC cable.
First thing s to mill the PCB with The modela, wich is a nice little milling machine that cranks out most of the circuits we will need for FabAcademy. To be able to mill on it, we need to have FR1 which is a paper based copper plate. We cannot mill the fiberglass copper plates on the modela as it will break your bit and the dust it will create is irritant.
First make sure you have a sacrificial board underneath the board that you are milling. When you drill out the PCB you are making, you might go further than the actual thickness of the board. Attach the sacrificial board and the board you are milling out to the modela with double sided tape. Make sure the tape is not overlapping in any way as to not make the base for your board uneven.

First, you need to use png_path to convert the png to a generic path file. This is the command that generates the contours which will form the toolpath. The example below uses 0.4 mm as the tool diameter; this corresponds to a 1/64" endmill.
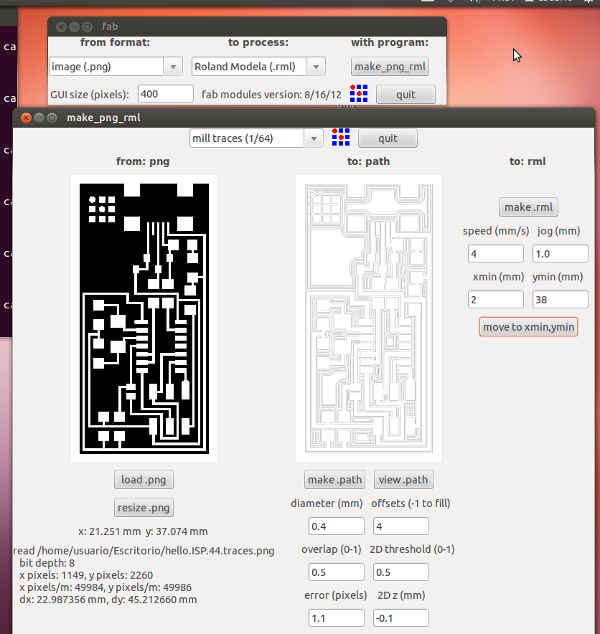
Next, you need to generate the machine-specific rml file that will be sent to the Modela. The speed should generally be 4 mm/s for milling out traces with a 1/64" endmill and the depth should be -0.1 mm.
To mill out the traces of a circuit board you will generally want to use a 1/64th endmill
Turn the Modela off and then on again to make it forget its previous z-zero setting. You'll probably need to press the view button to take it out of view mode.
Now it is time to set the x,y origin of the endmill. For that, use the Xmin, Ymin tool, sending it the x and y you used as the origin when generating your rml file above.
ZEROING_ You'll need to move the endmill over your board so you can lower it to the copper, Then lower the bit as close as you can get to your copper plate but without touching it by keeping the down button pressed. Once you have the bit as close to the copper, loosen the set screws again and push the bit all the way onto the copper. Hold the endmill against the board and tighten the screws again.

To send your job to the modela, use the rml_send tool:
Sending the job to cut out the board is the same as sending a job for the traces, only you have to use the 1/32 bit, which has a different speed, diameter, and depth. For example, you might use the following to generate your rml file:
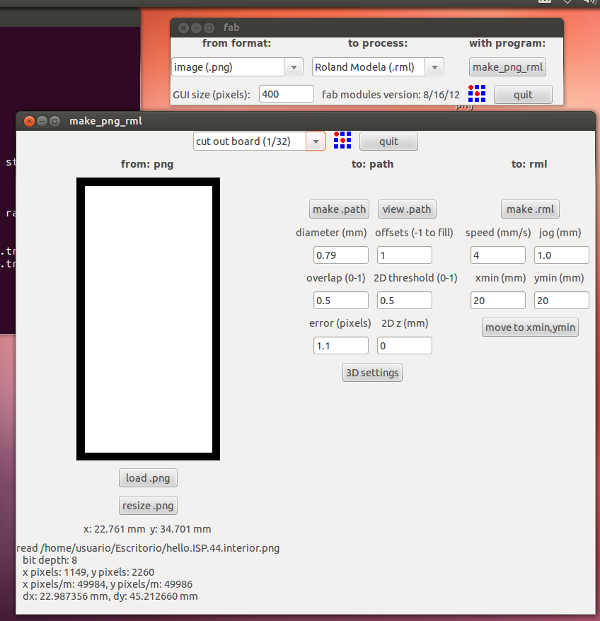
You'll need to re-zero the Modela for the 1/32" bit. Follow the procedure above, remembering to turn the Modela off and on again to forget the previous zero setting.
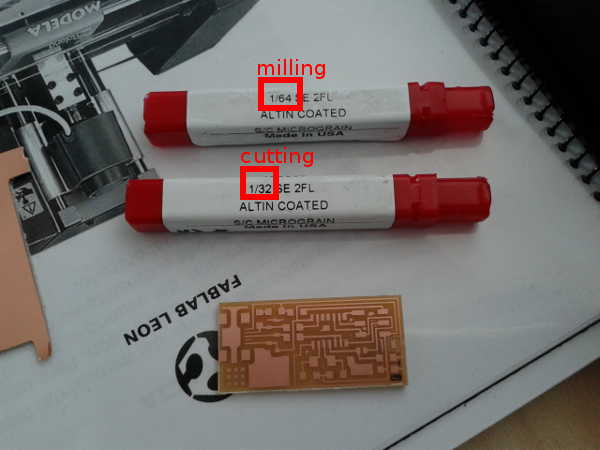
Soldering the Board is the next step. You must use the hello.ISP.44 png to collect the components, resistances diodes...

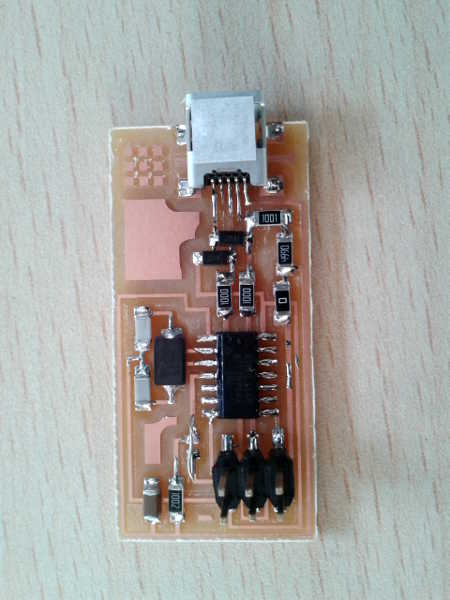
Start with the shorter components. If you haven't soldered before, it's probably good to practice with the smaller components (e.g. resistors and capacitors) before trying the microcontroller. The USB connector is probably the hardest, because the traces are so narrow, I used the magnifying glass to solder each of the pins as shown in the picture below:

And the final result! with smooth and shiny solderings!!!!
Before using the FabISP, you need to program the ATtiny44 on it. To do this, you'll need another (programmed) FabISP, some other in-system programmer (like an AVRISP mkII) or serial cable and dasa (level convertor) board. Make sure SJ1 (the solder jumper near the microcontroller) is closed. Connect the 6 pin cable of the other programmer to your FabISP, being sure to orient it correctly (pin 1 to pin 1). You'll also need to provide power to your FabISP. You can do this by connecting it to your computer with a USB cable, or, if you're using another FabISP, by closing the SJ2 jumper on both boards.
To program the FabISP we used a mac wich had already nstalled the Necessary Software for AVR Programming: Avrdude (for programming), and GCC (to compile C code)
Listed bellow is the terminal output of the installation procedure:
Last login: Fri Feb 15 11:35:39 on ttys000
MacBook-Pro-de-TMA-2:~ tma$ make clean
make: *** No rule to make target `clean'.  Stop.
MacBook-Pro-de-TMA-2:~ tma$ cd desktop
MacBook-Pro-de-TMA-2:desktop tma$ cd fabisp
-bash: cd: fabisp: No such file or directory
MacBook-Pro-de-TMA-2:desktop tma$ cd fab_isp
MacBook-Pro-de-TMA-2:fab_isp tma$ cd firmware
MacBook-Pro-de-TMA-2:firmware tma$ make clean
rm -f main.hex main.lst main.obj main.cof main.list main.map main.eep.hex main.elf *.o usbdrv/*.o main.s usbdrv/oddebug.s usbdrv/usbdrv.s
MacBook-Pro-de-TMA-2:firmware tma$ make hex
avr-gcc -Wall -Os -DF_CPU=20000000	 -Iusbdrv -I. -DDEBUG_LEVEL=0 -mmcu=attiny44 -c usbdrv/usbdrv.c -o usbdrv/usbdrv.o
avr-gcc -Wall -Os -DF_CPU=20000000	 -Iusbdrv -I. -DDEBUG_LEVEL=0 -mmcu=attiny44 -x assembler-with-cpp -c usbdrv/usbdrvasm.S -o usbdrv/usbdrvasm.o
avr-gcc -Wall -Os -DF_CPU=20000000	 -Iusbdrv -I. -DDEBUG_LEVEL=0 -mmcu=attiny44 -c usbdrv/oddebug.c -o usbdrv/oddebug.o
avr-gcc -Wall -Os -DF_CPU=20000000	 -Iusbdrv -I. -DDEBUG_LEVEL=0 -mmcu=attiny44 -c main.c -o main.o
avr-gcc -Wall -Os -DF_CPU=20000000	 -Iusbdrv -I. -DDEBUG_LEVEL=0 -mmcu=attiny44 -o main.elf usbdrv/usbdrv.o usbdrv/usbdrvasm.o usbdrv/oddebug.o main.o
rm -f main.hex main.eep.hex
avr-objcopy -j .text -j .data -O ihex main.elf main.hex
avr-size main.hex
   text	   data	    bss	    dec	    hex	filename
      0	   2020	      0	   2020	    7e4	main.hex
MacBook-Pro-de-TMA-2:firmware tma$ sudo make fuse
Password:
avrdude -c usbtiny -p attiny44  -U hfuse:w:0xDF:m -U lfuse:w:0xFF:m

avrdude: AVR device initialized and ready to accept instructions

Reading | ################################################## | 100% 0.00s

avrdude: Device signature = 0x1e9207
avrdude: reading input file "0xDF"
avrdude: writing hfuse (1 bytes):

Writing | ################################################## | 100% 0.00s

avrdude: 1 bytes of hfuse written
avrdude: verifying hfuse memory against 0xDF:
avrdude: load data hfuse data from input file 0xDF:
avrdude: input file 0xDF contains 1 bytes
avrdude: reading on-chip hfuse data:

Reading | ################################################## | 100% 0.00s

avrdude: verifying ...
avrdude: 1 bytes of hfuse verified
avrdude: reading input file "0xFF"
avrdude: writing lfuse (1 bytes):

Writing | ################################################## | 100% 0.00s

avrdude: 1 bytes of lfuse written
avrdude: verifying lfuse memory against 0xFF:
avrdude: load data lfuse data from input file 0xFF:
avrdude: input file 0xFF contains 1 bytes
avrdude: reading on-chip lfuse data:

Reading | ################################################## | 100% 0.00s

avrdude: verifying ...
avrdude: 1 bytes of lfuse verified

avrdude: safemode: Fuses OK

avrdude done.  Thank you.

MacBook-Pro-de-TMA-2:firmware tma$ sudo make program
avrdude -c usbtiny -p attiny44  -U flash:w:main.hex:i

avrdude: AVR device initialized and ready to accept instructions

Reading | ################################################## | 100% 0.00s

avrdude: Device signature = 0x1e9207
avrdude: NOTE: FLASH memory has been specified, an erase cycle will be performed
         To disable this feature, specify the -D option.
avrdude: erasing chip
avrdude: reading input file "main.hex"
avrdude: writing flash (2020 bytes):

Writing | ################################################## | 100% 2.38s


avrdude: 2020 bytes of flash written
avrdude: verifying flash memory against main.hex:
avrdude: load data flash data from input file main.hex:
avrdude: input file main.hex contains 2020 bytes
avrdude: reading on-chip flash data:

Reading | ################################################## | 100% 1.89s


avrdude: verifying ...
avrdude: 2020 bytes of flash verified

avrdude: safemode: Fuses OK

avrdude done.  Thank you.

avrdude -c usbtiny -p attiny44  -U hfuse:w:0xDF:m -U lfuse:w:0xFF:m

avrdude: AVR device initialized and ready to accept instructions

Reading | ################################################## | 100% 0.00s

avrdude: Device signature = 0x1e9207
avrdude: reading input file "0xDF"
avrdude: writing hfuse (1 bytes):

Writing | ################################################## | 100% 0.00s

avrdude: 1 bytes of hfuse written
avrdude: verifying hfuse memory against 0xDF:
avrdude: load data hfuse data from input file 0xDF:
avrdude: input file 0xDF contains 1 bytes
avrdude: reading on-chip hfuse data:

Reading | ################################################## | 100% 0.00s

avrdude: verifying ...
avrdude: 1 bytes of hfuse verified
avrdude: reading input file "0xFF"
avrdude: writing lfuse (1 bytes):

Writing | ################################################## | 100% 0.00s

avrdude: 1 bytes of lfuse written
avrdude: verifying lfuse memory against 0xFF:
avrdude: load data lfuse data from input file 0xFF:
avrdude: input file 0xFF contains 1 bytes
avrdude: reading on-chip lfuse data:

Reading | ################################################## | 100% 0.00s

avrdude: verifying ...
avrdude: 1 bytes of lfuse verified

avrdude: safemode: Fuses OK

avrdude done.  Thank you.

MacBook-Pro-de-TMA-2:firmware tma$
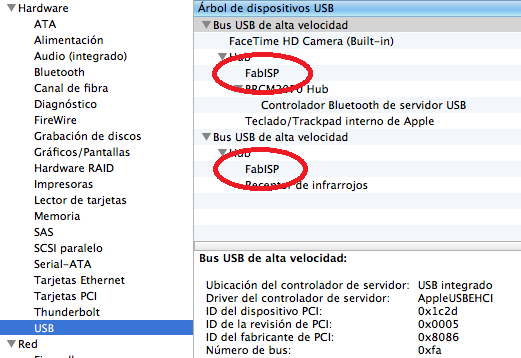
After the installation succeded we can see how the fabISp is recognized:
