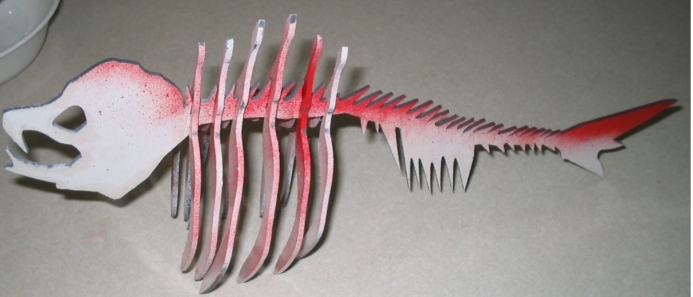
This weeks assignment was to create a press fit construction, cut it on the laser cutter and assemble it. Coming up with an idea for this project took me a while. I wanted to make something creative, not just a simple box. I finally came up with the idea of making a fish skeleton. The skeleton consists of seven parts. The first Piece is The skull,backbone and tail. The remaining pieces are ribs,2 each in three different sizes. I created the design in Inkscape. My first design attempt was a miserable failure. I simply could not draw the skull/backbone piece and have it look like a fish. It looked more like a deranged lizard or something. After scrapping design one, I found an image of a fish skeleton clip art on line. Fish clip art I imported the clip art into Inkscape and set it as layer 1. I then created layer 2 and traced the basic shape using the bezier curve tool. This allowed me to pick points on the clip art and draw straight lines and curves to quickly develop my fish. After getting the basic shape down, I turned of layer 1 and tweaked my design to adjust the size and add the notches for my joints. To make the notches I drew the first one and then cloned it to make the rest of them. I thought this would make adjusting the notch size easier when I went to cut with the laser. Although it did reduce the number of steps to adjust all of my notches it also lead to some other problems. When I tried to adjust the spacing and layout of my parts the clone drove me crazy. I needed to rotate my parts at different angles to fit them all on the sheet. When I rotated the part with the original notch all of my clones would rotate too. I would then have to go back and rotate the clones back to their original positions. Adjusting the notches had some other minor issues too. After I re-sized, them I had to individually edit all of the lines that intersected with them. Not a difficult task but a bit time consuming. Finished Design Once I had my design set I created a test cut file. Test Fit It was basically 2 1" squares with my notches on them. By running this test cut on the laser I was able to quickly adjust my notch size to get the friction fit I wanted. After 3 or 4 tests I was satisfied with the fit and ready to cut. I went back to my design and adjusted the dimensions of the notches. When I brought the design into Corell Draw and set the line width to a hairline I noticed another big mistake. The laser cuts lines drawn as .001" or a "hairline". My original fish was drawn with a stroke width of .010". When I brought the design (with all of my notches nicely adjusted) into Corell Draw and changed them to a "hairline" it compressed all of my dimensions. This threw all of my notches out of whack and sent me back to inkscape for another round of editing. Luckily I noticed the problem before I cut my design. After making final adjustments to my fish it was time to cut. I put a 12" x 24" piece of 1/8" masonite into the laser cutter loaded my design and printed it. Everything seemed to go well, the notches were all there, charring was minimal etc. Everything seemed to go well, that is, until I removed my stock from the laser cutter. Some of my parts didn't cut all the way through. The penetration of the laser was a bit variable. Lots of people in the lab had been having the same problem so it wasn't a total surprise. The bed of the laser cutter is a bit wonky and we are waiting for a replacement. I think the differences in the height of the bed are throwing off the focus of the laser beam and wreaking havoc. Although my parts didn't pop right out, I was able to free most of them with a little effort. The edges were a bit ragged but the fit of the joints was pretty good. I tried a second run with adjusted settings( lower speed , more power and higher frequency). The penetration was better,still not perfect, but the edges were more charred. The parts came out of the stock a little easier but the joints were sloppier. Once the bed of the laser cutter gets straightened out I will take another shot at it. To finish off my fish I added a quick coat of white spray paint and a dusting of red for contrast. I think it looks pretty damn good. Now I want to make about ten more so I can have a whole school of fish bones.