Additional Images and Videos of this project are on my tumblr blog:
part1 part2 part3 part4 video of flexing joint Our assignment this week was to produce a "Press-Fit" construction project using the laser cutter to pierce out parts which fit together without glue or fasteners, using tabs or dovetail-style joints.
A while back, I made a series of sculptures using the same processes I use for Zoa Chimerum Jewelry. They went into shadowboxes which I bought at Ikea and modified. Unfortunately they were water-damaged during an outdoor art fair when a sudden storm came through. I did my best to repair them, and they look OK, but I've been wanting to replace the boxes outright so this assignment seemed like as good an excuse as any to make my own display cases.
One of the sites in my RSS feed posted a link to Dutch design house Snijlab, which has discovered a way to make flexible plywood curves using a laser cutter. They've been using the technique to make snazzy notebook holders
I decided that I would like to incorporate these curved corners into my shadow box design.
Fortunately for me, the Oomlaut Lab has already adapted these bendy corners to make an Arduino housing: here, and they were kind enough to post their templates online.
I downloaded their template and removed most of the extraneous stuff like the bolt holes and what have you (remember the assignment calls for friction fit only).
I also had to modify the widths and heights of the various tabs to reflect the thickness of the material I was working with. (My plywood is .2" thick). This is important otherwise you won't get a good fit when you assemble the parts. I did all of this using Adobe Illustrator and it was finicky and annoying. I had to manually click and drag a lot of individual points and I wasn't able to find an easy way to make the kinds of changes I wanted in any kind of "batched" way. Probably other programs are better suited to this and I'd like to learn how to use some of these programs for projects like this in the future.
After the cut pattern was configured the way I wanted it to be, I sent it to the laser cutter and burned all the lines through the wood.
These were my settings: speed: 8 Power: 100% Frequency: 1325 hz
Unfortunately, we still have not replaced the bed in our laser cutter, and as such there is a focusing issue. The laser beam did not cut all the way through to the other side in a lot of places. For the back and front panels, this isn't such a big deal because you can sometimes still force the pieces out of panel and then trim off any excess with a sharp knife. For the perforated curves, though, this is a HUGE problem, because if the cuts don't penetrate all the way through, the hinge won't bend, it will snap.
Which is exactly what happened with all but one of my corners.
Frustrating, but I wasn't expecting to get it right the first time. With some tweaks to the settings, hopefully I would be able to get the cuts to go all the way through.
Other people needed to use the cutter, so I while I waited for it to free up again, I modified my file a bit. I changed the front and back panels to match edge to edge with the outer walls, and I also changed the assembly method to something more like meshing tabs rather than little rectangular projections which go through holes on the panels (This was necessary in order to allow me to have the walls meet up with the front and back panels).
Once my turn at the cutter came around again, I ran the file:
speed: 8 Power: 100% Frequency: 1425 hz
This time, I had a plan to compensate for the uneven bed. I figured that since the material is higher on one side and lower on another, that I would just run the cutting operation twice, but in between the first and second operations, I would refocus the laser onto the far right side of the material.
Normally before you run the laser cutter, you calibrate it by focusing the beam on the upper-left hand corner of the material. If the beam is too high or too low, it won't cut all the way through, and it will also cut a much wider line that it ought to. I figured I could run the job once, then refocus the beam on the far right side of the material, then run it a second time. sure, the cuts would be a bit wider than I'd like, but at least this way they ought to cut all the way through.
To save time, the only area I cut twice was the perforated strip which makes up the walls of the box.
Didn't work. The extra pass with the laser burned too much of the wood and rendered the whole thing so brittle that it snapped as it bent. Three out of four corners were actually OK initially, but after repeated bending back and forth, only one joint (the one closest to the upper-left corner of the material) held up. Additionally, the tabs did not fit together. This was partially due to the extra charring of the wood, and partially due to the fact that I had to shrink the file down at the last minute to get it to fit on the piece of wood I was using. This shrinkage didn't account for the thickness of the wood and threw the ratios of the tabs off. (I knew this would happen but decided to go ahead anyway because it would take a long time to fix and I mostly just wanted to test the joints anyway).
Back to the drawing board. Which in this case is still Adobe Illustrator. After another hour of tweaking I fixed the tabs so they will hopefully fit together better, and I shrunk the file size down a bit so everything would fit on one 23"x11.5" panel (not to be confused with the 24"x12" capacity of the cutter, nor the labeled specifications of material you buy, which will be sold as 24"x12", but will not come in those dimensions.) I then fixed the proportions of the tabs to accurately reflect the thickness of the material. I also adjusted the curvature of the corners on the front and back panels to more accurately reflect the way the joints bend.
SO I did a 3rd attempt. For this attempt, I duct-taped the corners of the board down, because the panel I was working with this time seemed to have a slight warp to it.
My settings: speed: 8% power: 100% Frequency: 1450Hz
Didn't cut through. Anywhere. The whole thing was only a partial cut. Which is odd because during the previous attempt, even after the first pass of the laser, *most* of the components were all the way cut out (there were just a few areas hanging on). Not this time, though. I'm chalking it up to inconsistency in the composition of the material. Otherwise I have no idea.
Once this cut is done, I will have to go home. I am out of wood and my train back to Boston leaves soon. I have one more idea to strengthen the joints that I'm cutting, but I doubt there will be time to try it out before the project is due on Wednesday.
Right now, all of the cutting is being done such that the vertical lines which perforate the joints and make them flexible are also running in the same direction as the grain of the wood. This is necessary because all my wood panels have the grain running crosswise rather than lengthwise, and they only fit into the cutting bed one way. If I'm willing to waste an entire panel, though, I could run the wall-strip diagonally across the entire thing, which would probably give it enough structure to withstand the bending even after the excessive charring which is necessary to make the laser cut all the way through.
Or I could just wait until we get a new, *level* bed for the laser cutter. Yeah I'm a poor craftsman. Watch me blame my tools!
But the fact of the matter is that the major benefit of a laser cutter, besides its speed, is that it is supposed to be a precision instrument which can cut materials into very specific shapes with a high degree of accuracy. Right now, it doesn't do that, and it severely limits the types of things you can do with it. Now I don't know if a new bed will fix all of this. I've been told that the lens is not being maintained as it should be and as such there may be an additional focusing issue to contend with. This is a public shop, after all, and like all public workspaces, maintenance of equipment is severely neglected at best and more often than not it doesn't happen at all, so at a certain point it's just going to turn into an exercise in adapting to a sub-optimal set of tools. Still, I hold out hope that things will get at least marginally better soon.
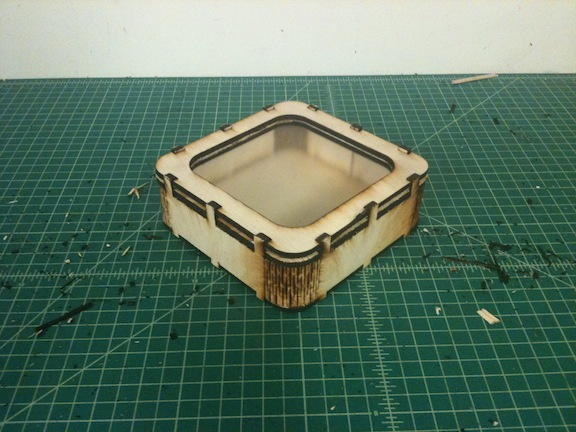
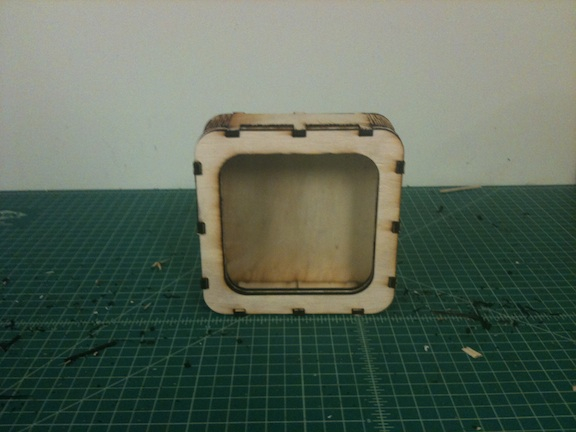
After a full day of work at my secret nondescript office job where I manipulate files in an actual filing cabinet while listening to audiobooks, I decided I would ride the rush-hour train from Boston back to Providence for one last crack at the press-fit assembly project. Upon arriving at AS220, however, I was dismayed to discover that the laser-cutter was already occupied, and would remain so until 9pm. The final train back to Boston leaves at 10pm, so I was faced with the prospect of sleeping in the lab, which I wasn't even sure I'd be allowed to do since I had not been given my key yet and would have no way to lock up after everyone left. The person operating the laser cutter indicated that she might finish earlier than 9pm, though, so I went out for a coffee and pondered my options. Upon arriving back at the lab, I decided I would at least stay until 9, just in case the cutter freed up at an earlier time. As an experiment/last-ditch act of desperation–and as a way to keep myself occupied whilst waiting for a turn with the laser–I pulled out Press-Fit Construction Attempt #3 (which didn't cut all the way through), and decided I would just cut the damned thing out by hand. I laid the half-cut pattern on top of a cutting mat, and using an Xacto knife and a ruler, I went over all the lines of the design multiple times until the blade passed through to the other side of the wood. I had to be extra careful on the "joints" so as to not split the wood with the pressure of the blade. After about an hour of handwork, The components could be popped out of the wood panel. With trepidation I gingerly gave the joints a tentative bend. They seemed stabile enough to bend the full 90 degrees, so I went ahead and attempted to assemble all the parts. Miraculously, they fit together pretty well, and I was able to get the whole box together without breaking everything. Even the glass panel fit handsomely in its frame.
I'm calling this project "done".
There are a *lot* of things I'd like to modify about this box. I'd like to figure out a way to cut everything cleanly on one pass. I'd like to modify the back a little bit so that I can integrate a wall-hanger into it. I'd like to add an extra layer to the front so that the glass is held in a more stabile way. I'd like to paint the whole box, or better yet try assembling it out of acrylic. I think it would look neat in white acrylic. It would also be nice to modify the spacing and placement of the tabs to perhaps create a nice visual pattern at the front of the box. The tabs could fit together better as well and need some tweaking to better accommodate the thickness of the material. Also, if this is going to be a real display case, there needs to be a good way to open and close it. Probably a final version would have to have all the pieces glued together, so there'd need to be some kind of access panel or something. Then again, maybe not. How cool would it be to have a display case that snaps together and can be fully disassembled, packed flat, and then reassembled again?
I'd like to do a bunch more boxes using this design as a jumping-off point. The boxes don't need to be square. They could be hexagonal, or even round. This current box is as-yet unsuitable for displaying my sculptures, especially since some of them occupy a more rectangular space.
Here is an image of the three attempts I made at this box:

And the finished box: