Design, milling and Soldering
I designed another board so easy, to avoid any problems and could concentrate on programming, which was the goal of this week.

This board contains a button and a LED.

The assignment for this week is to read a microcontroller datasheet and to program your Hello board from week 6 to do something, in as many different programming languages as possible.
Finally i just programmed my board with Arduino, so in next week i will tried with another programming lenguages
So there was somthing wrong in my board because when i tried to change the fuses it didn't work.
I designed another board so easy, to avoid any problems and could concentrate on programming, which was the goal of this week. This board contains a button and a LED.Design, milling and Soldering

Software and drivers
You'll need the Arduino software, version 1.0. You can download Arduino 1.0 from the Arduino site. Installation instructions are available for Windows and for Mac OS X
You can download Atiny files from this github repository.
Create a new sub-folder called "hardware" in the sketchbook folder.
Copy the attiny folder from inside the .zip to the hardware folder.
Restart the Arduino development environment.

I downloaded the latest version of libusb-win32 (1.2.1.0) and used the included inf-wizard tool to create new drivers for the USBTinyISP.
I used the Windows device manager to upgrade the broken drivers on my Windows 7 64-bit machine. There is still a warning that "Windows can't verify the publisher of this driver software" and there are more errors about digital signatures and the new drivers didn't install correctly.
I can't use USBtinyISP to programmer my board and i have to use AVRISP mkII!!!
I downloaded the latest version of AVRISP mkII-win32 (1.2.1.0).
Note that if you want to use the AVRISP mkII with AVR Studio, these are not the drivers you are looking for. You want the ones Atmel provides (if you installed the libusb drivers by mistake, re-run the AVR Studio installer to revert back).
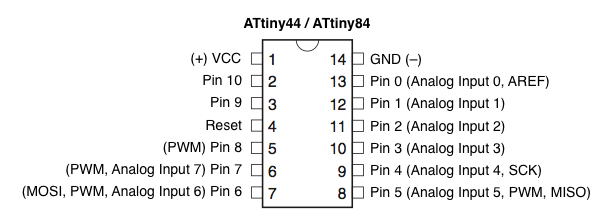
Note that the pinouts on the microcontroller are not the same numbers in the Arduino code. The microcontroller pin number is listed on the microcontroller body below. The corresponding Arduino pin is listed on the outside - to the right or left.

Select the appropriate item from the Tools > Programmer menu > USBtinyISP (if you are using and usbtiny isp)
Select the appropriate item from the Tools > Programmer menu > USBtinyISP (if you are using and AVRISP mkII like me)
Run the "Burn Bootloader" command from the Tools menu. This configures the fuse bits of the microcontroller so it runs at 8 MHz.
The fuse bits keep their value until you explicitly change them, so you'll only need to do this step once for each microcontroller.
By default, the ATtiny's run at 1 MHz (the setting used by the unmodified "ATtiny44)
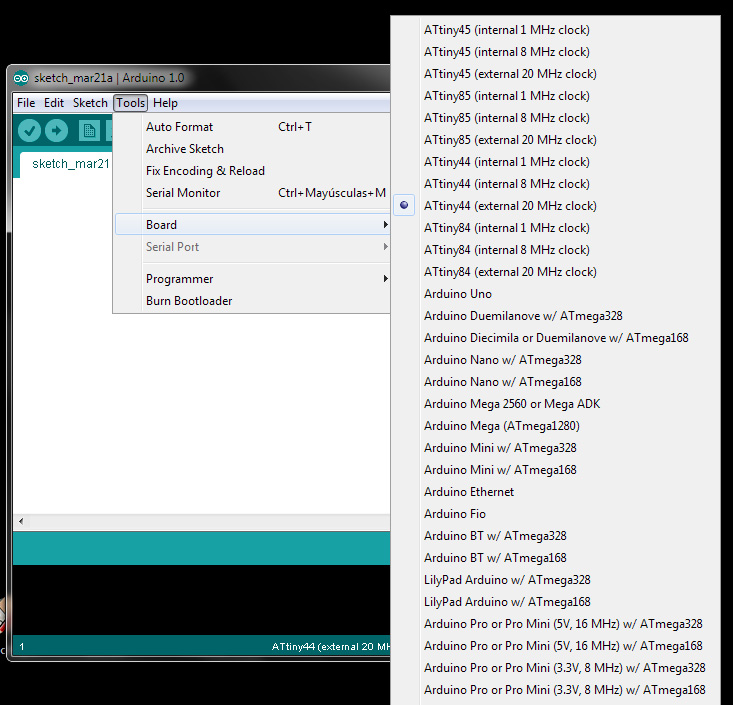
Select the "ATtiny44 (external 20 MHz clock)" from the Boards menu.

