Week 11: Networking and Communications
Group Documentation
You can find my group’s documentation here. When doing the bluetooth connection, I learned that a device can only be connected to one other device at a time. I also learned that it can be a pain to connect a Raspberry Pi Pico to a laptop. It’s helpful to name your board in your program so that you know which microcontroller you’re connecting to, especially if you have multiple of the same board around.
Using an IR Sensor and Remote
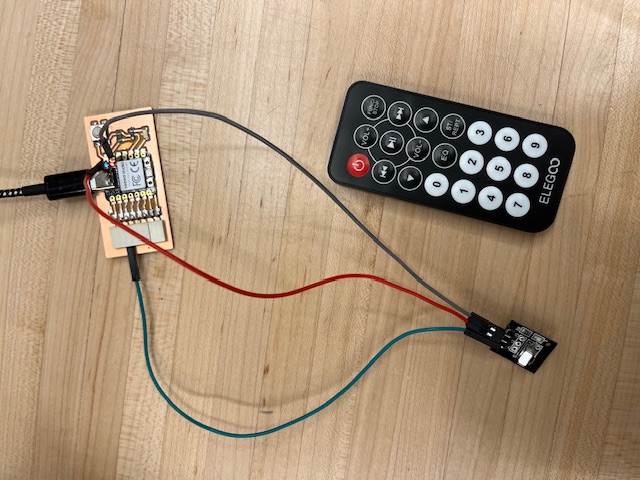
The Circuit
Testing Codes
Using Remote to Control an LED
I used this code from Wokwi as a starting point for my code this week. I put the outputs on the serial monitor for ease of testing. I then changed the translateIR function to return a string that returns the button that was pressed. This way, I could use the remote inputs to control other devices. After the first test, I found out the number codes in the example code did not line up with the IR sensor I was using. No matter what button was pressed, it prints the number associated with that button. So, I went through and wrote down each button’s corresponding number. Then I had it output the correct button based on the number codes I had just recorded. The above video is after I changed the number codes to match the remote. To use the input for something, I had the up and down buttons on the remote correspond to turning the LED on my test board on and off.
The Code
        #include < IRremote.h >

          #define PIN_RECEIVER D2   // Signal Pin of IR receiver
          const int ledPin = D8; //LED on board

          IRrecv receiver(PIN_RECEIVER);

          void setup()
          {
            Serial.begin(9600);

            receiver.enableIRIn(); // Start the receiver

            Serial.println("IR Test: Press a Button");

            pinMode(ledPin, OUTPUT);
          }

          void loop()
          {
            String test;
            // Checks received an IR signal
            if (receiver.decode()) {
              test = translateIR();
              receiver.resume();  // Receive the next value
            }
            if(test == "UP"){
              digitalWrite(ledPin, HIGH);
            }
            else if(test == "DOWN"){
              digitalWrite(ledPin, LOW);
            }

            delay(200);
          }

          void lcdPrint(char* text)
          {
            Serial.print(text);
            Serial.print(", code: ");
            Serial.println(receiver.decodedIRData.command);
          }

          String translateIR()
          {
            // Takes command based on IR code received
              switch (receiver.decodedIRData.command){
              case 69:
                lcdPrint("POWER");
                return "POWER";
                break;
              case 70:
                lcdPrint("VOL +");
                return "VOL +";
                break;
              case 71:
                lcdPrint("FUNC/STOP");
                return "FUNC/STOP";
                break;
              case 68:
                lcdPrint("PREVIOUS");
                return "PREVIOUS";
                break;
              case 64:
                lcdPrint("PLAY/PAUSE");
                return "PLAY?/PAUSE";
                break;
              case 67:
                lcdPrint("NEXT");
                return "NEXT";
                break;
              case 7:
                lcdPrint("DOWN");
                return "DOWN";
                break;
              case 21:
                lcdPrint("VOL -");
                return "VOL -";
                break;
              case 9:
                lcdPrint("UP");
                return "UP";
                break;
              case 25:
                lcdPrint("EQ");
                return "EQ";
                break;
              case 13:
                lcdPrint("ST/REPT");
                return "ST/REPT";
                break;
              case 22:
                lcdPrint("num: 0");
                return "0";
                break;
              case 12:
                lcdPrint("num: 1");
                return "1";
                break;
              case 24:
                lcdPrint("num: 2");
                return "2";
                break;
              case 94:
                lcdPrint("num: 3");
                return "3";
                break;
              case 8:
                lcdPrint("num: 4");
                return "4";
                break;
              case 28:
                lcdPrint("num: 5");
                return "5";
                break;
              case 90:
                lcdPrint("num: 6");
                return "6";
                break;
              case 66:
                lcdPrint("num: 7");
                return "7";
                break;
              case 82:
                lcdPrint("num: 8");
                return "8";
                break;
              case 74:
                lcdPrint("num: 9");
                return "9";
                break;
              default:
                Serial.print(receiver.decodedIRData.command);
                Serial.println(" other button");
                return "";
              }
          }