# 1. PRINCIPLES, PRACTICES, AND PROJECT MANAGEMENT
Assessment
- Plan and sketch a potential final project
- Build a personal site describing you and your final project.
- Upload it to the class archive.
- Work through a git tutorial.
Learning
- Communicate an initial project proposal
- Explore and use website development tool(s)
- Identify and utilise version control protocol(s)
Make template
At the beginning of the session I felt inferior and worried after knowing so many series of tasks to be done. But after getting lectures and motivation from Prof.Neil and the Fab Academy family in the first week which was so amazing, I started to get excited to try and study harder to catch up on my ignorance ^_^
Based on Fab Academy and Fab Lab Kamakura Schedule, this week we had to read carefully Fab Academy 2022 Assigment and Assessment in this link and sign student agreement, sketch a potential final project and make plans for project management, and started to getting used to the documentation process.

Final Project Proposal
Background
To support Community empowerment, mandatory program for every faculty member in our institution; by working and living in harmony to help society with differences of customs, culture, and life are really challenging. Our stakeholders, farmer/goat milk producers, asked for help in productivity and quality improvement. It is obligated to enhance structure, conduct, and performance for community development to produce good quality food for better life.
The project that I proposed at Fab Academy is a low-cost, adaptable, and ergonomic design of milk quality checker, so that it can be easily utilized by our students (they have to improve continuously) and group of farmers (goat milk producers) who are still unfamiliar with using quality rapid-detection technology.
These activities are in line with the implementation of the Sustainable Development Goals, in particular number 9 on the strategy for building durable infrastructure, supporting inclusive and sustainable industrialization, and fostering (open) innovation.

I drew three times skethes after discussed with our stakeholders to determine the suitable design which will be implemented.

After discussed with our colleagues and representative of farmer it was good looked too messy… :D

The 2nd design was good but there were many products similar with this design, we should redesigned to improve its novelty and simple…

Our 3rd design looked better for ergonomic aspects and simple.... :D
The 3rd design and the most chosen because it is simple by stakeholder was inspired from pencil box with 2 level sliding cover lock. we can cek in this link.
The material used as the top and bottom case will use PE or PLA filament and we will print them with our 3D printer. The size, placement structure, and dimensions will be adjusted to each sensor which will be stored in the lower case box. The upper case box will be used to accommodate PCBs, sensor connection plugs, microcontrollers, batteries, and display panels.
To take the sensor stored in the lower case box, it is done with a locking link and rotates it between the case boxes which are connected to the lever on one side of the bottom.
The proposed devices were embedded and have parameters for quality such as pH, alcohol, temperature, conductivity, turbidity using sensors and IOT (Internet of Things) as process assistance to transmit the information in real-time to users (distributor, consumer, other stakeholders).
We will use Atmega 328 microcontroller with sensors combined to form a compact and flexible system that analyzes and identifies fresh milk quality then display the output on the LCD screen. Our proposed device will be callibrated and benchmarked to measure the validity of the measurement results and their performance with standardized equipments and testing in our campus.
Output
In addition to measuring the quality of fresh milk products, this series of activities will later be used to prepare training tutorials on the use of digital fabrication to support open innovation and dissemination of cheap and adaptive strengthening of appropriate technology for the community.

IOT-based milk quality analyzer block diagram using AVR microcontroller is arranged in a system that is implemented with the help of pH, turbidity, alcohol, temperature, and conductivity sensors. To create an IoT (Wi-Fi module) based system.
This tool consists of several main blocks such as power supply, ATMEGA 328 microcontroller which is used as the heart of the system, various sensors such as pH sensors, turbidity sensors, temperature sensors, odor sensors, conductivity sensors, ICs, resistors, capacitors, potentiometers.
All sensors will be connected to the C port of the microcontroller while the data pins of the LCD module are connected to the B port of the microcontroller. The pH sensor detects the ph value of the milk, the turbidity sensor measures the fat present in the milk, the temperature sensor of the milk temperature is required for storage purposes, the odor sensor senses the toxic chemicals added or adulterated in the milk, the conductivity sensor measures the conductivity level of the milk.
All sensors operate on a 5 volt DC supply. All sensors have three pins i.e. VCC, output and ground and are connected to the pins of the microcontroller and the output is displayed on the LCD screen. Therefore, it is possible to connect the system with an android phone or PC. In general, the test will be carried out with reference to the standard parameter values by which any abnormality found in the sample will determine its quality.
Outcome
We hope that during the process of this activity we can produce tracing and tracking forms to ensure the most appropriate form of dissemination and education for the community. In addition, this tool is expected to be able to prevent the emergence of dangerous diseases by detecting adulteration of milk.
Starting and Working with GIT
When it comes to complex projects, unexpected challenges and changing timelines are expected. We need tools for establishing our alignment and discovering what motivates and engages us, so we can empower ourselves to deliver stronger outcomes.
This week, our work and assignment were to start using git to build personal site for describing ourselves and showing sketch out our final project.
As directed by Prof.Neil, Fab Academy instructors, and FabLab Kamakura instructors we will start and continue working with Git storing repositories. In addition, Git becomes a container or tool for collaboration and working on my projects because it will load profiles for further development following other programmers in this application.
Preface
Git was an important tool in the development of our website for Fab Academy. Git works to set the version of my program’s source code by specifying which line and code to add or replace. In this section I will tell you about installing Git, how to login to Git, and using Git. Really thanks to our beloved instructur from Fab Lab Kamakura, Rico, Youka, Georg, and teams; they were very patient and super kind to direct us ^_^
Gitlab is next wrapped up to get a service platform. So it’s like running an awesome cloud lab. This is a group we run as a fab cloud. this section is a subgroup for managing the project. So the website is the project. Staff is a project. Each lab is a group. And then in every lab, there’s a project for that lab. And then there are projects for students in the lab.
So the Git lab took Git and wrapped it up with a platform to manage lots of different users and lots of different repositories. So we’ll use it to manage repositories, web services, and messaging. To start using Git, I used the following many steps to be able to use it on my laptop as a local host :D
Installing Python
We downloaded the python installer and choose windows version. We run and follow the installer to complete installation process. When we run the python installer, we select and add manual installation. To make sure the results, we type “python –version”.
Installing MkDocs
We installed mkdocs by pip. We type “pip install mkdocs”. After finished, to check the results we typed “pip install mkdocs-material” “pip install” “mkdocs-git-revision-date-localized-plugin”
Getting set with Git
Git Bash is a source control management system for Windows. It allows users to type Git commands that make source code management easier through versioning and commit history. Bash is a Linux-based command line (that has been ported over to Windows) while Shell is a native Windows command line.
Rico, Georg, and Fablab Kamakura teams share great explanation about Git Workflow and Version Control that we can see in the image below.

and the other important thing is always documenting everything our activity to improve and conduct our assignment. Documents show and speak louder than words in limited time, especially for supply-side time management… :D

Setting up GIT
The main step that we have to conduct:
-
Download and install the Git Bash setup from the official website: https://git-scm.com/; you can find the step in here.
-
Set the SSH key
-
Open Bash and Type
ssh-keygen -t rsa -C "myemailaddres.com"
I typed my official address for “myemailaddres.com”, then set the key (but we can see what we type after colon “:”)
Enter file in which to save the key:
To make sure the result, I typed the same key
Enter same passphrase again
We can checked the fingerprint if it is correct.
The SSH key will be stored in the .ssh folder.
The .ssh folder is located directly under our local directory (D:\prasetya_kurniawan\prasetya-kurniawan)

We can check the inside of id_rsa.pub.
cat ~/.ssh/id_rsa.pub
We can find the public key starting ssh-rsa to our email address at the end and then copy it.
ssh-rsa ~~~~

...

``` "myemailaddres.com"
After that, we go to the GitLab and check the user icon on the right top corner.

And by clicked the “Preferences” Tab, we found the “SSH Keys” on the left side

- Cloning Process (Just One First Time)
For this step we typed
git clone git@gitlab.fabcloud.org:academany/fabacademy/2022/class.git
Then we entered our email address as user.
git config --global user.email "xxxxxxxx@xxxxx.com"
Next, we entered our name as the user.
git config --global user.name "prasetya_kurniawan"
I tried to read the instructions many times and tried to make sure to do it right. This is the toughest challenge because I’ve never done it and am still worried about making a fatal mistake. Why? because through this repository I will convey all the related things that I do on Fabacademy, wish me luck :D
I started to set up git on my computer by using winget, I use Windows 11.
C:\Users\ASUS>mkdocs new my-project
INFO     -  Creating project directory: my-project
INFO     -  Writing config file: my-project\mkdocs.yml
INFO     -  Writing initial docs: my-project\docs\index.md
We can check the result by typing in Git Bash statement below:
mkdocs --version
if succeed we will get the result as shown by image below:

Gitlab and Cloning Repositories
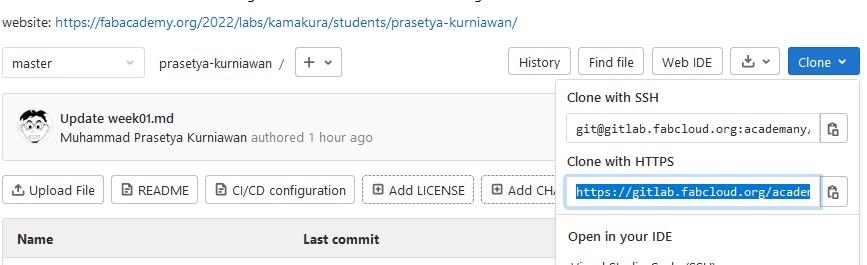
To construct our work, some step should be conducted: - Clone or download this project on my computer. For this activity, I have to find the clone url at the top of my projects “overview” page. Then Run git clone with command:
git clone [url]
This url:
https://gitlab.fabcloud.org/academany/fabacademy/2022/labs/kamakura/students/prasetya-kurniawan.git
we got it from here:
```py
C:\Users\ASUS>git clone https://gitlab.fabcloud.org/academany/fabacademy/2022/labs/kamakura/students/prasetya-kurniawan.git
Cloning into 'prasetya-kurniawan'...
remote: Enumerating objects: 591, done.
remote: Counting objects: 100% (45/45), done.
remote: Compressing objects: 100% (27/27), done.
remote: Total 591 (delta 27), reused 31 (delta 18), pack-reused 546
Receiving objects: 100% (591/591), 3.48 MiB | 967.00 KiB/s, done.
Resolving deltas: 100% (348/348), done.
C:\Users\ASUS>cd prasetya-kurniawan
C:\Users\ASUS\prasetya-kurniawan>
C:\Users\ASUS\prasetya-kurniawan>git init
Reinitialized existing Git repository in C:/Users/ASUS/prasetya-kurniawan/.git/
If succeed we will get the results As shown by image below:

For next step is Install MkDocs on my computer.
Preview our project: mkdocs serve, our site can be accessed under localhost:
http://127.0.0.1:8000/2022/labs/kamakura/students/prasetya-kurniawan/assignments/week02/
To add new pages, create the markdown file in the docs/ folder (i.e. touch docs/about.md) Push the changes to GitLab to automatically publish your changes
git commit -m "Updated site"
git push master
C:\Users\ASUS\prasetya-kurniawan>pip install mkdocs-material
Collecting mkdocs-material
Collecting mkdocs-material

C:\Users\ASUS\prasetya-kurniawan>mkdocs serve
Then to check mkdocs version, we can type
mkdocs --version
we can see the result in the image below:
Develop Integrated Development Environment (IDE)
I made and present my assignment on Web Integrated Development Environment (IDE) using Visual Studio Code and Markdown. editorI used them as streamlines the process to contribute changes to my projects, by providing an advanced editor with commit staging.
To get started with the GitLab in VS Code,I need to create a GitHub account and install the GitLab Pull Requests and Issues extension. In this topic, we’ll demonstrate how you can use some of your favorite parts of GitLab without leaving VS Code.
To operate the source control and learn more about VS Code’s basic Git support, I can start with the Version Control topic.
Here the references that I used to learn and to work with Visual Studio Code:
-
https://docs.microsoft.com/en-us/learn/modules/introduction-to-github-visual-studio-code/
Markdown is a plain-text, lightweight markup language and originally created to make writing XHTML/HTML easier by converting plain-text files into structurally valid HTML or XHTML, and it can be used for almost any type of writing: manuscripts, tutorials, notes, web content and more.
Although relatively straightforward, Markdown can be a bit intimidating when I first start out. But once I get the hang of it, I’ll quickly realise how much time was spent formatting my code instead of typing my content.
When viewing a file, or the repository file list -
-
Choose a Markdown editor.
When I am working with Markdown for the web, it’s important to understand the basic syntax and limitations I may face. Before I begin, I need some type of editor and an interpreter for my site. Alternately, I can convert the Markdown before publishing.
-
Set up headings
To recreate these in Markdown, use a series of hashtag symbols (#) – corresponding to the heading number – followed by the heading text. For example, to create an Heading 1 tag, use one hashtag #; for an Heading 2 tag, use two hashtags ##; and so on and so forth.
Markdown Input
```py
Heading 1
Heading 2
Heading 3
Heading 4
Heading 5
Heading 6
```
-
Mark up paragraphs
Paragraphs are represented and separated by one or more blank lines. Like HTML, whitespace is ignored. So if you add 20 blank lines, I am still only going to have one paragraph.
- Style the line breaks
To create line breaks, I can use a single line break, with two spaces at the end of the previous line.
- Mark emphasis
When working with Markdown, I accomplish this using one or two asterisks (*). You can also use underscores (_), but I stick with asterisks, because there are other flavours of Markdown that use underscores for other things.
- Create horizontal rules
To create a Horizontal Rule, I can use a series of three or more hyphens (—), asterisks (***) or equal signs (===). I can choose which one I prefer, but just make sure I include an empty line above and below.
- Add images and links
In Markdown, images start with an exclamation point (!), followed by square brackets ([]) for the ‘alt text’, and parentheses (()) for the path to the image. You can also include an optional title inside double quotes (“”).
With links, it’s almost the same, except there is no exclamation point.
- Add inline code and code blocks
There are two types of lists in HTML: ordered (
- ) and unordered (
- Check the status by type “git status”
- Add some files or documents by type “git add .”
- Commit after add some documents or to confirm some changes
- Then push to upload from our local to cloud repository
- If we want to check the result (locally) we can check from http://127.0.0.1:8000/2022/labs/kamakura/students/prasetya-kurniawan after type “mkdocs serve” in our GitBash
-
http://pub.fabcloud.io/tutorials/week01_principles_practices_project_management/git_simple.html
-
http://pub.fabcloud.io/tutorials/week01_principles_practices_project_management/git_cheat_sheet.html
-
http://pub.fabcloud.io/tutorials/week01_principles_practices_project_management/mkdocs.html
-
http://pub.fabcloud.io/tutorials/week01_principles_practices_project_management/image_scaling.html
-
I was great pleasure to document and make for my activities/work/assignment.
-
I have to manage the task with large number of images was the most time-consuming and come up with named them for images.
-
Due to no experience and less basic knowledge in web design, I have to overcome many problems and learn from my mistakes.
- ). With Markdown, use numbers for ordered lists, and asterisks (*) or hyphens (-) for unordered lists.
When I am working with code in Markdown, these elements are delimited using either a single backtick on each side (`); or by using a fenced-style, which includes three backticks above and below the code block (```).
Herewith some references that I used to create my website to submit my weekly assignment and final project:
Using Version Control to support Git
Version Control help us for keeping a historical record of all changes made to files and documents, so that we can revert back to an earlier version if necessary. To explore and deep understanding version control, it would be great to visit this link.
We used Visual Studio Code (VS Code), which supports Markdown files out of the box, to write Markdown text, save the file with the .md extension and then we can toggle the visualization of the editor between the code and the preview of the Markdown file; obviously, we can also open an existing Markdown file and start working with it.
To switch between views, press Ctrl+Shift+V in the editor. We can view the preview side-by-side (Ctrl+K V) with the file we are editing and see changes reflected in real-time as we edit.
Here is an example preview of my simple file.

After got evaluation for our beloved instructor, I gave documented steps for adding files and pushed to class Gitlab (in our GitBash) in these pictures below:


Trouble shooting
I have made many mistakes and error when start work with Git in the editing on git remote without setting up local-host and I put the file repository on the system directory (C:).
To overcome unwanted things in the future, what I did next was to move the repository folder from the system (C:) to drive D: . Next I see the status by typing git status as in the image below.

To check the information regarding the changes which I have made is shown in the git status as in the image below.

Furthermore, the error when doing the push also occurred because I had made changes to the remote repository or cloud before by not synchronizing with the changes made to the local repository on my laptop, it was very embarrassing for beginners, but I’m still excited to fix it.

I tried to find conflicts and look for problems that I need to solve as soon as possible because time is very limited. Apart from reading more information from the FabLab Kamakura instructors, who were extremely considerate and very helpful, my colleagues Mr. Jans and Mr. Setyawan were also loyal to accompany me when I was stuck in fixing it. thank you all of you, guys… you are the best :D

I also often make mistakes in typing commands or not adding commands in mkdocs. Besides being amazed and spending a lot of time I can’t understand quickly because I’m just starting :D .... so that many fatal things happen. I only realized this after studying it more deeply.

When it finished, we can closed git bash :)
